Spring入门第一课
今天先不讲Spring是什么。我们直接通过代码来看Spring框架的一下基本用法。以此来看Spring到底是什么。
我们使用Eclipse来作为IDE,因为Eclipse是免费的。
首先,我们创建一个Maven的项目。
在Eclipse中点击File,New,Maven Project
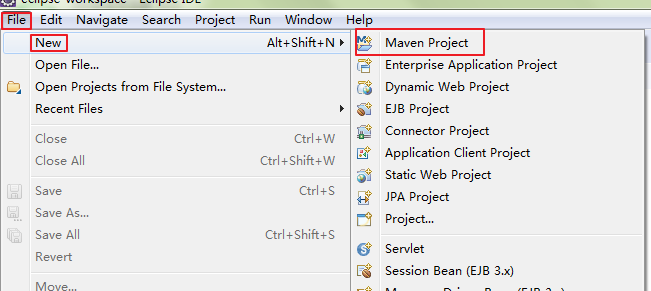
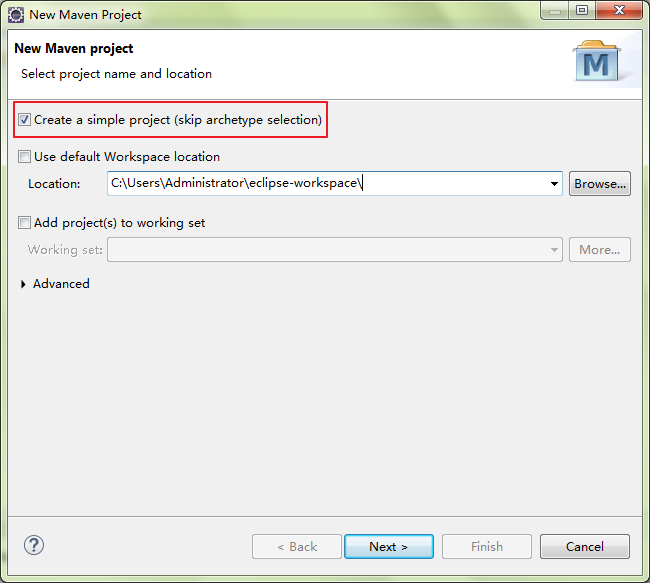
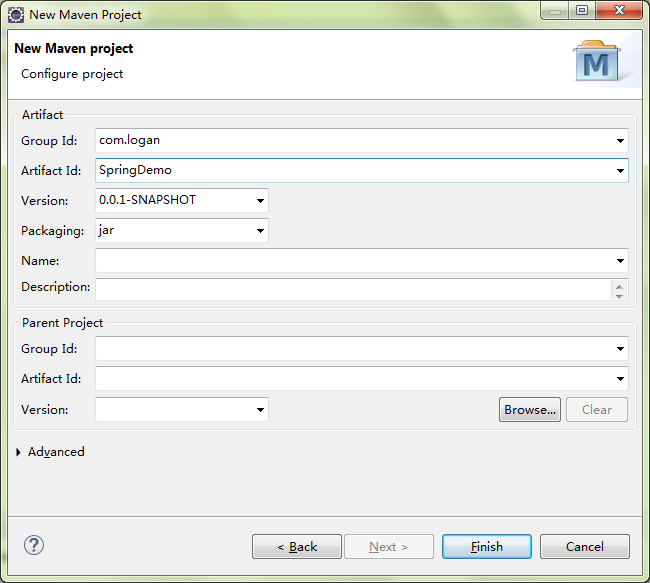
我们得到一个Maven的项目。
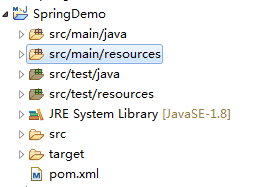
接下来,我们配置Spring的Jar包,maven的好处就是可以方便的管理jar包。
在https://mvnrepository.com/artifact/org.springframework/spring-context/4.3.12.RELEASE这个链接,我们可以看到spring context的jar包的maven配置方式
所以我们的pom.xml改成如下:
<project xmlns="http://maven.apache.org/POM/4.0.0"

    xmlns:xsi="http://www.w3.org/2001/XMLSchema-instance"

    xsi:schemaLocation="http://maven.apache.org/POM/4.0.0 http://maven.apache.org/xsd/maven-4.0.0.xsd">

    <modelVersion>4.0.0</modelVersion>

    <groupId>com.logan</groupId>

    <artifactId>SpringDemo</artifactId>

    <version>0.0.1-SNAPSHOT</version>

    <dependencies>

        <!-- https://mvnrepository.com/artifact/org.springframework/spring-context -->

        <dependency>

            <groupId>org.springframework</groupId>

            <artifactId>spring-context</artifactId>

            <version>4.3.12.RELEASE</version>

        </dependency>

    </dependencies>

</project>
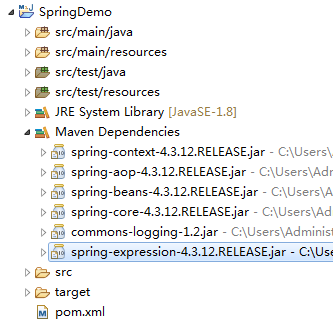
保存之后,maven就可以自动的帮我们下载jar包并添加到项目中:
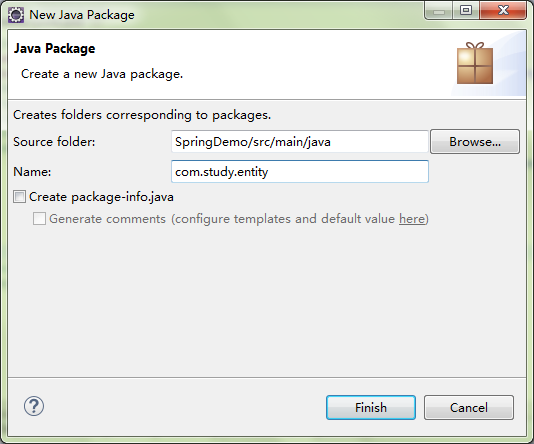
接下来,我们创建一个package

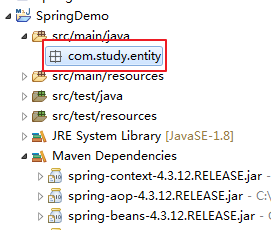
我们得到如下:
我们在package内创建一个实体类Persion

Persion.java的代码:
package com.study.entity;

public class Persion {

    private String name;

    private Integer age;

    public String getName() {

        return name;

    }

    public void setName(String name) {

        this.name = name;

    }

    public Integer getAge() {

        return age;

    }

    public void setAge(Integer age) {

        this.age = age;

    }

    public Persion(String name, Integer age) {

        super();

        this.name = name;

        this.age = age;

    }

    public Persion() {

        super();

        // TODO Auto-generated constructor stub

    }

    @Override

    public String toString() {

        return "Persion [name=" + name + ", age=" + age + "]";

    }

}
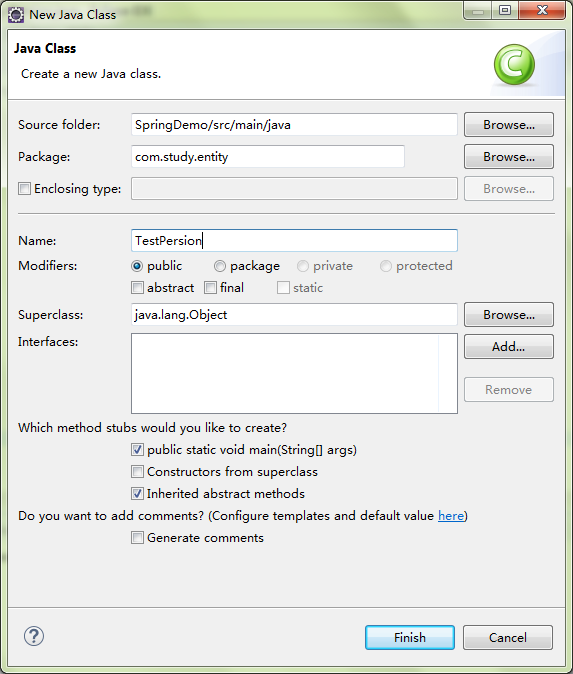
我们再创建一个TestPersion类
正常情况下如果我们想定义一个Persion对象并且使用,就可以按照如下代码进行:
package com.study.entity;

public class TestPersion {

    public static void main(String[] args) {

        // TODO Auto-generated method stub

        Persion p1 = new Persion();

        p1.setName("xiaoming");

        System.out.println(p1.getName());

    }

}
输出的结果也正是我们想要的结果:

下面我们看能不能不去声明一个Persion对象,我们就能使用呢?
当然是可以的,Spring就是干这个事的。
我们在src/main/resources上创建一个xml文件

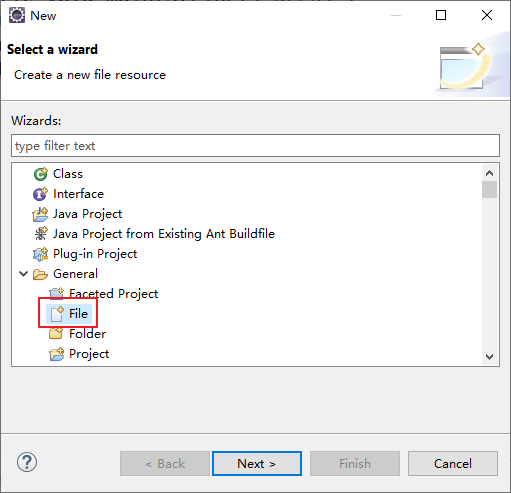
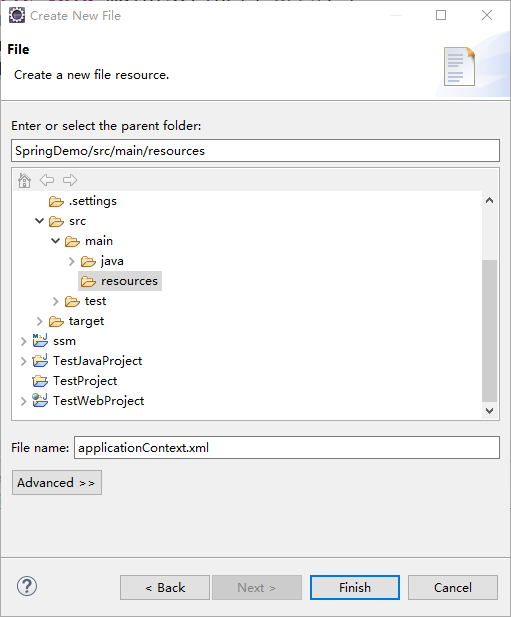
然后我们在applicationContext.xml中插入如下代码:
<?xml version="1.0" encoding="UTF-8"?>

<beans xmlns="http://www.springframework.org/schema/beans"

    xmlns:xsi="http://www.w3.org/2001/XMLSchema-instance"

    xsi:schemaLocation="http://www.springframework.org/schema/beans http://www.springframework.org/schema/beans/spring-beans.xsd">

    <bean id="persionService" class="com.study.entity.Persion">

    <property name="name" value="xiaozhang"></property>

    </bean>

</beans>
从上面的配置文件中可以看到,我们定义了一个bean,id是persionService,对应的类是com.study.entity.Persion
然后给name属性赋值xiaozhang。
我们在TestPersion中修改代码如下:
package com.study.entity;

import org.springframework.context.ApplicationContext;

import org.springframework.context.support.ClassPathXmlApplicationContext;

public class TestPersion {

    public static void main(String[] args) {

        // TODO Auto-generated method stub

//        Persion p1 = new Persion();

//        p1.setName("xiaoming");

//        System.out.println(p1.getName());

        ApplicationContext ext = new ClassPathXmlApplicationContext("applicationContext.xml");

        Persion p2 = (Persion) ext.getBean("persionService");

        System.out.println(p2.getName());

    }

}
得到结果如下:

三月 05, 2020 7:34:15 下午 org.springframework.context.support.ClassPathXmlApplicationContext prepareRefresh

信息: Refreshing org.springframework.context.support.ClassPathXmlApplicationContext@4d405ef7: startup date [Thu Mar 05 19:34:15 CST 2020]; root of context hierarchy

三月 05, 2020 7:34:15 下午 org.springframework.beans.factory.xml.XmlBeanDefinitionReader loadBeanDefinitions

信息: Loading XML bean definitions from class path resource [applicationContext.xml]

xiaozhang
Java代码中我们没有声明Persion对象,只是从配置文件里面去获取bean,然后强制转换成Persion类,然后输出的这个对象的name,可以看到我们得到了期望的xiaozhang。
不知道大家有没有感觉到神奇,反正我第一次接触Spring的时候就觉得很神奇,因为它和常规的Java开发不同,不需要声明对象就可以使用,只要你想用哪个对象,拿来就用。
这就颠覆了以往的Java开发。
其实这个就是通过Java的反射机制实现的,如果想对反射做一个了解,可以看我的这个博客
以上是20200305更新。
Spring网址:http://projects.spring.io/spring-framework/
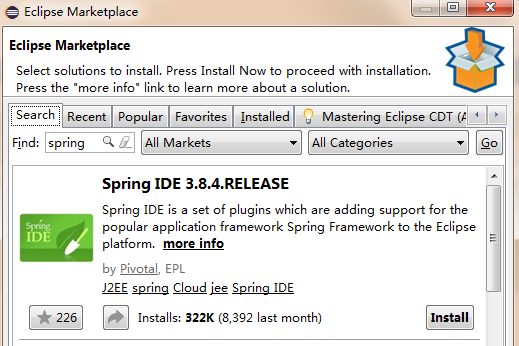
Eclipse 安装开发IDE
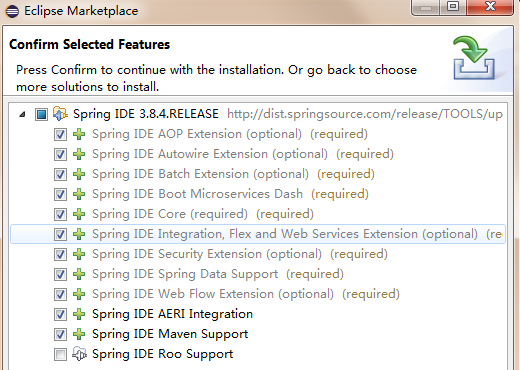
在Eclipse Marketplace搜索spring,然后直接安装。


下载spring的Jar包
http://repo.spring.io/simple/libs-release-local/org/springframework/spring/
下载4.3.8的zip包
先直接看代码。
目录结构
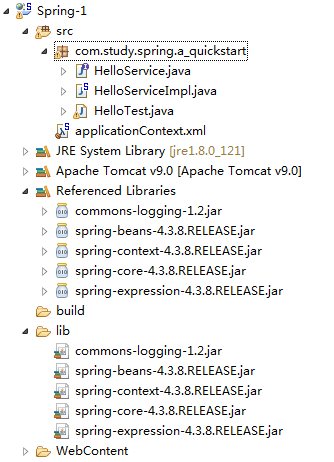
代码
applicationContext.xml
<?xml version="1.0" encoding="UTF-8"?>

<beans xmlns="http://www.springframework.org/schema/beans"

    xmlns:xsi="http://www.w3.org/2001/XMLSchema-instance"

    xsi:schemaLocation="http://www.springframework.org/schema/beans http://www.springframework.org/schema/beans/spring-beans.xsd">

    <bean id="helloService" class="com.study.spring.a_quickstart.HelloServiceImpl">

    </bean>

</beans>
package com.study.spring.a_quickstart;

public interface HelloService {

    public void sayHello();

}
package com.study.spring.a_quickstart;

public class HelloServiceImpl implements HelloService {

    @Override

    public void sayHello() {

        // TODO Auto-generated method stub

        System.out.println("hello spring!");

    }

}
package com.study.spring.a_quickstart;

import org.springframework.context.ApplicationContext;

import org.springframework.context.support.ClassPathXmlApplicationContext;

public class HelloTest {

    public static void main(String[] args) {

        // TODO Auto-generated method stub

        HelloServiceImpl service = new HelloServiceImpl();

        service.sayHello();

        ApplicationContext ext = new ClassPathXmlApplicationContext("applicationContext.xml");

        HelloService helloService = (HelloService) ext.getBean("helloService");

        helloService.sayHello();

    }

}
下面是输出结果:
hello spring!

五月 17, 2017 10:13:04 下午 org.springframework.context.support.ClassPathXmlApplicationContext prepareRefresh

信息: Refreshing org.springframework.context.support.ClassPathXmlApplicationContext@3eb07fd3: startup date [Wed May 17 22:13:04 CST 2017]; root of context hierarchy

五月 17, 2017 10:13:04 下午 org.springframework.beans.factory.xml.XmlBeanDefinitionReader loadBeanDefinitions

信息: Loading XML bean definitions from class path resource [applicationContext.xml]

hello spring!
Spring入门第一课的更多相关文章
- Spring入门第一课:Spring基础与配置Bean
1.入门 Spring是简化java开发的一个框架,其中IoC和AOP是Spring的两个重要核心.由于Spring是非侵入性的,通过Ioc容器来管理bean的生命周期,还整合了许多其他的优秀框架,所 ...
- Asp.Net Web API 2(入门)第一课
Asp.Net Web API 2(入门)第一课 前言 Http不仅仅服务于Web Pages.它也是一个创建展示服务和数据的API的强大平台.Http是简单的.灵活的.无处不在的.你能想象到几乎 ...
- emacs 入门第一课:Emacs里的基本概念
Table of Contents 无聊的开场白 buffer(缓冲区) window(窗口)与frame Emacs的mode Emacs Lisp 函数function.命令command.键绑定 ...
- Android入门第一课之Java基础
通知:由于本周六场地申请没通过,所以本周的培训临时取消. 今天给大家带来的是Android入门的第一课,由于教室申请的不确定性,因此,每次培训的内容都会在博客先提前释放出来.首先Android的APP ...
- Docker入门 第一课 --.Net Core 使用Docker全程记录
微服务架构无疑是当前最火热的开发架构,而Docker作为微服务架构的首选工具,是我们必须要了解掌握的. 我通过一天的时间,网上查文档,了解基础概念,安装Docker,试验Docker命令,通过Dock ...
- Kotlin入门第一课:从对比Java开始
1. 介绍 今年初,甲骨文再次对谷歌所谓的安卓侵权使用Java提起诉讼,要求后者赔偿高达90亿美元.随后便传出谷歌因此计划将主力语言切换到苹果主导的Swift,不过这事后来没了跟进. 但谷歌在这两天的 ...
- Spring入门第一例
通过多天对基础语法的学习,早就向往一睹SPRING的芳容.今天按照ITEYE 唐的 教程,第一次运行Spring成功,步骤及注意事项如下: 一.基础环境 Jdk1.8, Eclipse4.71 .Sp ...
- 傻瓜式Spring教学第一课
首先,把Spring需要的五个包导入项目: commons-logging-1.2.jar spring-beans-4.3.4.RELEASE.jar spring-context-4.3.4.RE ...
- Spring入门第二课
看代码 package logan.spring.study; public class HelloWorld { private String name; public void setName2( ...
随机推荐
- Codeforces Round #250 (Div. 2) D. The Child and Zoo 并查集
D. The Child and Zoo time limit per test 2 seconds memory limit per test 256 megabytes input standar ...
- jQuery向上遍历DOM树之parents(),parent(),closest()之间的区别
http://www.poluoluo.com/jzxy/201312/253059.html 在这个sprint中,因为要写前端UI,所以用到了jQuery,但是jQuery在向上遍历DOM树的AP ...
- 利用bootsrap控件 实现文件上传功能
源代码实例:https://github.com/kartik-v/bootstrap-fileinput 一.jsp页面 <%@ page language="java" ...
- eslipse 修改tomcat server location 解决HTTP Status 404 – Not Found
Eclipse中tomcat service设置选择window ----show view---services可以看到服务的面板双击tomcat进入配置界面Service Locations(Sp ...
- User-Agent 及其构造
url = ... user_agent = ... headers = {'User-Agent' : user_agent} req = requests.request(url=url, hea ...
- 【leetcode刷题笔记】Remove Nth Node From End of List
Given a linked list, remove the nth node from the end of list and return its head. For example, Give ...
- Code Chef - Chef and Graph Queries
传送门 题目大意 给定一个$n$个点$m$条边的无向图$(n,m\leq 200000)$. 有$q$每次询问$(q\leq 200000)$,每次给定一个区间$L,R$,求仅保留编号$\in[L,R ...
- CF510E. Fox And Dinner
CF510E. Fox And Dinner https://codeforces.com/contest/510 分析: 由于\(a_i>2\), 相邻两个数一定一奇一偶,按奇偶建立二分图. ...
- LuoguP4383 [八省联考2018]林克卡特树lct
LuoguP4383 [八省联考2018]林克卡特树lct https://www.luogu.org/problemnew/show/P4383 分析: 题意等价于选择\(K\)条点不相交的链,使得 ...
- ACM学习历程—广东工业大学2016校赛决赛-网络赛C wintermelon的魔界寻路之旅(最短路 && 递推)
题目链接:http://gdutcode.sinaapp.com/problem.php?cid=1031&pid=2 题目由于要找对称的路径,那么狠明显可以把右下角的每一块加到左上角对应的每 ...
