如何利用MHA+ProxySQL实现读写分离和负载均衡
摘要:本文分享一下“MHA+中间件ProxySQL”如何来实现读写分离+负载均衡的相关知识。
本文分享自华为云社区《MySQL高可用架构MHA+ProxySQL实现读写分离和负载均衡》,作者:小麦苗DB宝。
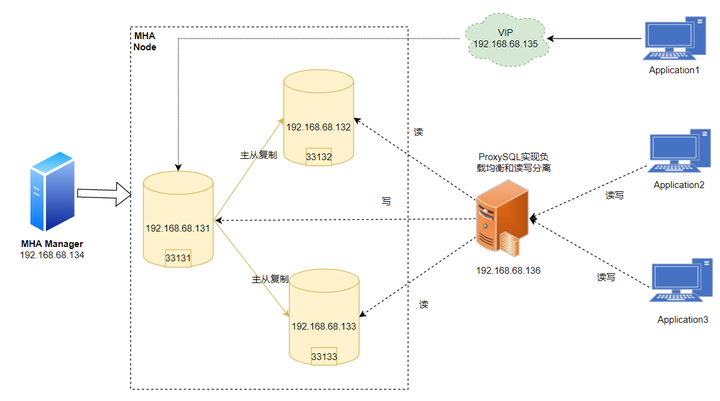
一、MHA+ProxySQL架构
我们都知道,MHA(Master High Availability Manager and tools for MySQL)目前在MySQL高可用方面是一个相对成熟的解决方案,是一套作为MySQL高可用性环境下故障切换和主从提升的高可用软件。它的架构是要求一个MySQL复制集群必须最少有3台数据库服务器,一主二从,即一台充当Master,一台充当备用Master,另一台充当从库。但是,如果不连接任何外部的数据库中间件,那么就会导致所有的业务压力流向主库,从而造成主库压力过大,而2个从库除了本身的IO和SQL线程外,无任何业务压力,会严重造成资源的浪费。因此,我们可以把MHA和ProxySQL结合使用来实现读写分离和负载均衡。所有的业务通过中间件ProxySQL后,会被分配到不同的MySQL机器上。从而,前端的写操作会流向主库,而读操作会被负载均衡的转发到2个从库上。
MHA+ProxySQL架构如下图所示:
 https://cdn.jsdelivr.net/gh/lhrbest/pic/img/20210416111756.png
二、快速搭建MHA环境
2.1 下载MHA镜像
- 小麦苗的Docker Hub的地址:https://hub.docker.com/u/lhrbest
-- 下载镜像
docker pull registry.cn-hangzhou.aliyuncs.com/lhrbest/mha-lhr-master1-ip131

docker pull registry.cn-hangzhou.aliyuncs.com/lhrbest/mha-lhr-slave1-ip132

docker pull registry.cn-hangzhou.aliyuncs.com/lhrbest/mha-lhr-slave2-ip133

docker pull registry.cn-hangzhou.aliyuncs.com/lhrbest/mha-lhr-monitor-ip134
-- 重命名镜像
docker tag     registry.cn-hangzhou.aliyuncs.com/lhrbest/mha-lhr-master1-ip131  lhrbest/mha-lhr-master1-ip131

docker tag    registry.cn-hangzhou.aliyuncs.com/lhrbest/mha-lhr-slave1-ip132   lhrbest/mha-lhr-slave1-ip132

docker tag    registry.cn-hangzhou.aliyuncs.com/lhrbest/mha-lhr-slave2-ip133   lhrbest/mha-lhr-slave2-ip133

docker tag    registry.cn-hangzhou.aliyuncs.com/lhrbest/mha-lhr-monitor-ip134  lhrbest/mha-lhr-monitor-ip134
一共4个镜像,3个MHA Node,一个MHA Manager,压缩包大概3G,下载完成后:
[root@lhrdocker ~]# docker images | grep mha

registry.cn-hangzhou.aliyuncs.com/lhrbest/mha-lhr-monitor-ip134          latest              7d29597dc997        14 hours ago        1.53GB

registry.cn-hangzhou.aliyuncs.com/lhrbest/mha-lhr-slave2-ip133           latest              d3717794e93a        40 hours ago        4.56GB

registry.cn-hangzhou.aliyuncs.com/lhrbest/mha-lhr-slave1-ip132           latest              f62ee813e487        40 hours ago        4.56GB

registry.cn-hangzhou.aliyuncs.com/lhrbest/mha-lhr-master1-ip131          latest              ae7be48d83dc        40 hours ago        4.56GB
2.2 编辑yml文件,创建MHA相关容器
编辑yml文件,使用docker-compose来创建MHA相关容器,注意docker-compose.yml文件的格式,对空格、缩进、对齐都有严格要求:
# 创建存放yml文件的路径

mkdir -p /root/mha

# 编辑文件/root/mha/docker-compose.yml

cat > /root/mha/docker-compose.yml <<"EOF"

version: '3.8'

services:

  MHA-LHR-Master1-ip131:

    container_name: "MHA-LHR-Master1-ip131"

    restart: "always"

    hostname: MHA-LHR-Master1-ip131

    privileged: true

    image: lhrbest/mha-lhr-master1-ip131

    ports:

      - "33131:3306"

      - "2201:22"

    networks:

      mhalhr:

        ipv4_address: 192.168.68.131

  MHA-LHR-Slave1-ip132:

    container_name: "MHA-LHR-Slave1-ip132"

    restart: "always"

    hostname: MHA-LHR-Slave1-ip132

    privileged: true

    image: lhrbest/mha-lhr-slave1-ip132

    ports:

      - "33132:3306"

      - "2202:22"

    networks:

      mhalhr:

        ipv4_address: 192.168.68.132

  MHA-LHR-Slave2-ip133:

    container_name: "MHA-LHR-Slave2-ip133"

    restart: "always"

    hostname: MHA-LHR-Slave2-ip133

    privileged: true

    image: lhrbest/mha-lhr-slave2-ip133

    ports:

      - "33133:3306"

      - "2203:22"

    networks:

      mhalhr:

        ipv4_address: 192.168.68.133

  MHA-LHR-Monitor-ip134:

    container_name: "MHA-LHR-Monitor-ip134"

    restart: "always"

    hostname: MHA-LHR-Monitor-ip134

    privileged: true

    image: lhrbest/mha-lhr-monitor-ip134

    ports:

      - "33134:3306"

      - "2204:22"

    networks:

      mhalhr:

        ipv4_address: 192.168.68.134

networks:

  mhalhr:

    name: mhalhr

    ipam:

      config:

         - subnet: "192.168.68.0/16"

EOF
2.3 安装docker-compose软件(若已安装,可忽略)
安装 Docker Compose官方文档:https://docs.docker.com/compose/
编辑docker-compose.yml文件官方文档:https://docs.docker.com/compose/compose-file/
[root@lhrdocker ~]# curl --insecure -L https://github.com/docker/compose/releases/download/1.28.4/docker-compose-Linux-x86_64 -o /usr/local/bin/docker-compose

  % Total    % Received % Xferd  Average Speed   Time    Time     Time  Current

                                 Dload  Upload   Total   Spent    Left  Speed

100   638  100   638    0     0    530      0  0:00:01  0:00:01 --:--:--   531

100 11.6M  100 11.6M    0     0  1994k      0  0:00:06  0:00:06 --:--:-- 2943k

[root@lhrdocker ~]# chmod +x /usr/local/bin/docker-compose

[root@lhrdocker ~]# docker-compose -v

docker-compose version 1.28.4, build cabd5cfb
2.4 创建MHA容器
# 启动mha环境的容器,一定要进入文件夹/root/mha/后再操作

-- docker rm -f MHA-LHR-Master1-ip131 MHA-LHR-Slave1-ip132 MHA-LHR-Slave2-ip133 MHA-LHR-Monitor-ip134

[root@lhrdocker ~]# cd /root/mha/

[root@lhrdocker mha]#

[root@lhrdocker mha]# docker-compose up -d

Creating network "mhalhr" with the default driver

Creating MHA-LHR-Monitor-ip134 ... done

Creating MHA-LHR-Slave2-ip133  ... done

Creating MHA-LHR-Master1-ip131 ... done

Creating MHA-LHR-Slave1-ip132  ... done

[root@docker35 ~]# docker ps | grep "mha\|COMMAND"

CONTAINER ID        IMAGE                           COMMAND                  CREATED             STATUS              PORTS                                                                                           NAMES

2978361198b7        lhrbest/mha-lhr-master1-ip131   "/usr/sbin/init"         2 minutes ago       Up 2 minutes        16500-16599/tcp, 0.0.0.0:2201->22/tcp, 0.0.0.0:33131->3306/tcp                                  MHA-LHR-Master1-ip131

a64e2e86589c        lhrbest/mha-lhr-slave1-ip132    "/usr/sbin/init"         2 minutes ago       Up 2 minutes        16500-16599/tcp, 0.0.0.0:2202->22/tcp, 0.0.0.0:33132->3306/tcp                                  MHA-LHR-Slave1-ip132

d7d6ce34800b        lhrbest/mha-lhr-monitor-ip134   "/usr/sbin/init"         2 minutes ago       Up 2 minutes        0.0.0.0:2204->22/tcp, 0.0.0.0:33134->3306/tcp                                                   MHA-LHR-Monitor-ip134

dacd22edb2f8        lhrbest/mha-lhr-slave2-ip133    "/usr/sbin/init"         2 minutes ago       Up 2 minutes        16500-16599/tcp, 0.0.0.0:2203->22/tcp, 0.0.0.0:33133->3306/tcp                                  MHA-LHR-Slave2-ip133
2.5 主库131添加VIP
# 进入主库131

docker exec -it MHA-LHR-Master1-ip131 bash

# 添加VIP135

/sbin/ifconfig eth0:1 192.168.68.135/24

ifconfig

# 如果删除的话

ip addr del 192.168.68.135/24 dev eth1
添加完成后:
[root@MHA-LHR-Master1-ip131 /]# ifconfig

eth0: flags=4163<UP,BROADCAST,RUNNING,MULTICAST>  mtu 1500

        inet 192.168.68.131  netmask 255.255.0.0  broadcast 192.168.255.255

        ether 02:42:c0:a8:44:83  txqueuelen 0  (Ethernet)

        RX packets 220  bytes 15883 (15.5 KiB)

        RX errors 0  dropped 0  overruns 0  frame 0

        TX packets 189  bytes 17524 (17.1 KiB)

        TX errors 0  dropped 0 overruns 0  carrier 0  collisions 0

eth0:1: flags=4163<UP,BROADCAST,RUNNING,MULTICAST>  mtu 1500

        inet 192.168.68.135  netmask 255.255.255.0  broadcast 192.168.68.255

        ether 02:42:c0:a8:44:83  txqueuelen 0

lo: flags=73<UP,LOOPBACK,RUNNING>  mtu 65536

        inet 127.0.0.1  netmask 255.0.0.0

        loop  txqueuelen 1000  (Local Loopback)

        RX packets 5  bytes 400 (400.0 B)

        RX errors 0  dropped 0  overruns 0  frame 0

        TX packets 5  bytes 400 (400.0 B)

        TX errors 0  dropped 0 overruns 0  carrier 0  collisions 0

# 管理节点已经可以ping通VIP了

[root@MHA-LHR-Monitor-ip134 /]# ping 192.168.68.135

PING 192.168.68.135 (192.168.68.135) 56(84) bytes of data.

64 bytes from 192.168.68.135: icmp_seq=1 ttl=64 time=0.172 ms

64 bytes from 192.168.68.135: icmp_seq=2 ttl=64 time=0.076 ms

^C

--- 192.168.68.135 ping statistics ---

2 packets transmitted, 2 received, 0% packet loss, time 1000ms

rtt min/avg/max/mdev = 0.076/0.124/0.172/0.048 ms
到这一步就可以验证主从复制是否正确,若正确,则可以直接测试MHA了。
mysql -uroot -plhr -h192.168.68.131 -P3306

show slave hosts;

mysql> show slave hosts;

+-----------+----------------+------+-----------+--------------------------------------+

| Server_id | Host           | Port | Master_id | Slave_UUID                           |

+-----------+----------------+------+-----------+--------------------------------------+

| 573306133 | 192.168.68.133 | 3306 | 573306131 | d391ce7e-aec3-11ea-94cd-0242c0a84485 |

| 573306132 | 192.168.68.132 | 3306 | 573306131 | d24a77d1-aec3-11ea-9399-0242c0a84484 |

+-----------+----------------+------+-----------+--------------------------------------+

2 rows in set (0.00 sec)
 https://cdn.jsdelivr.net/gh/lhrbest/pic/img/20210416111806.png
三、配置ProxySQL环境
3.1 申请ProxySQL主机并安装ProxySQL
docker rm -f MHA-LHR-ProxySQL-ip136

docker run -d --name MHA-LHR-ProxySQL-ip136 -h MHA-LHR-ProxySQL-ip136 \

  -v /sys/fs/cgroup:/sys/fs/cgroup \

  --network mhalhr --ip 192.168.68.136 \

  -p 26032:6032 -p 26033:6033 -p 26080:6080 \

  --privileged=true lhrbest/lhrcentos76:8.0 \

  /usr/sbin/init

docker network connect bridge MHA-LHR-ProxySQL-ip136

docker restart MHA-LHR-ProxySQL-ip136

docker cp proxysql2-2.0.15-1.1.el7.x86_64.rpm MHA-LHR-ProxySQL-ip136:/

docker exec -it MHA-LHR-ProxySQL-ip136 bash

rpm -ivh proxysql2-2.0.15-1.1.el7.x86_64.rpm

systemctl start proxysql

systemctl status proxysql
3.2 添加远程登录用户
-- 添加远程登录用户

mysql -uadmin -padmin -h127.0.0.1 -P6032

select @@admin-admin_credentials;

set admin-admin_credentials='admin:admin;root:lhr';

select @@admin-admin_credentials;

load admin variables to runtime;

save admin variables to disk;

-- 远程登录

mysql -uroot -plhr -h192.168.66.35 -P26032
执行过程:
-- ProxySQL本地登录

[root@MHA-LHR-ProxySQL-ip136 /]# mysql -uadmin -padmin -h127.0.0.1 -P6032

mysql: [Warning] Using a password on the command line interface can be insecure.

Welcome to the MySQL monitor.  Commands end with ; or \g.

Your MySQL connection id is 162

Server version: 5.5.30 (ProxySQL Admin Module)

Copyright (c) 2000, 2020, Oracle and/or its affiliates. All rights reserved.

Oracle is a registered trademark of Oracle Corporation and/or its

affiliates. Other names may be trademarks of their respective

owners.

Type 'help;' or '\h' for help. Type '\c' to clear the current input statement.

mysql> select @@admin-admin_credentials;

+---------------------------+

| @@admin-admin_credentials |

+---------------------------+

| admin:admin;lhr:lhr       |

+---------------------------+

1 row in set (0.05 sec)

mysql> set admin-admin_credentials='admin:admin;root:lhr';

Query OK, 1 row affected (0.00 sec)

mysql> select @@admin-admin_credentials;

+---------------------------+

| @@admin-admin_credentials |

+---------------------------+

| admin:admin;root:lhr      |

+---------------------------+

1 row in set (0.00 sec)

mysql> load admin variables to runtime;

Query OK, 0 rows affected (0.00 sec)

mysql> save admin variables to disk;

Query OK, 35 rows affected (0.13 sec)

mysql>

-- 远程登录

C:\Users\lhrxxt>mysql -uroot -plhr -h192.168.66.35 -P26032

mysql: [Warning] Using a password on the command line interface can be insecure.

ERROR 1045 (28000): ProxySQL Error: Access denied for user 'root'@'172.17.0.1' (using password: YES)

C:\Users\lhrxxt>mysql -uroot -plhr -h192.168.66.35 -P26032

mysql: [Warning] Using a password on the command line interface can be insecure.

Welcome to the MySQL monitor.  Commands end with ; or \g.

Your MySQL connection id is 163

Server version: 5.5.30 (ProxySQL Admin Module)

Copyright (c) 2000, 2020, Oracle and/or its affiliates. All rights reserved.

Oracle is a registered trademark of Oracle Corporation and/or its

affiliates. Other names may be trademarks of their respective

owners.

Type 'help;' or '\h' for help. Type '\c' to clear the current input statement.

MySQL [(none)]> show databases;

+-----+---------------+-------------------------------------+

| seq | name          | file                                |

+-----+---------------+-------------------------------------+

| 0   | main          |                                     |

| 2   | disk          | /var/lib/proxysql/proxysql.db       |

| 3   | stats         |                                     |

| 4   | monitor       |                                     |

| 5   | stats_history | /var/lib/proxysql/proxysql_stats.db |

+-----+---------------+-------------------------------------+

5 rows in set (0.05 sec)
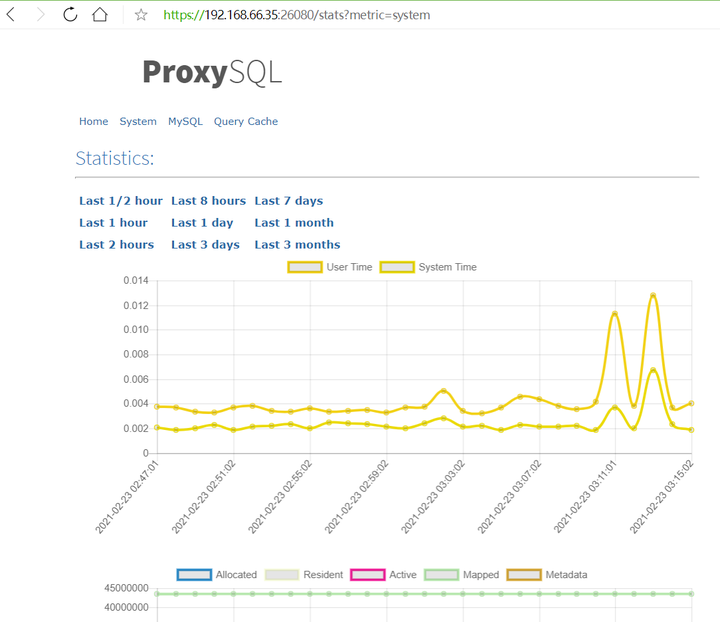
3.3 开启ProxySQL的web监控功能
-- 开启web监控功能

SET admin-web_enabled='true';

LOAD ADMIN VARIABLES TO RUNTIME;

SAVE ADMIN VARIABLES TO DISK;

select * from global_variables where variable_name LIKE 'admin-web_enabled';

select @@admin-web_enabled;

lsof -i:6080

-- 浏览器访问

https://192.168.66.35:26080

用户名和密码:stats:stats
 https://cdn.jsdelivr.net/gh/lhrbest/pic/img/20210416111815.png
3.4 配置被监控的数据库
3.4.1 向ProxySQL插入被监控数据库
-- 1、向ProxySQL插入被监控数据库

select * from mysql_servers;

insert into main.mysql_servers(hostgroup_id,hostname,port) values(10,'192.168.68.131',3306);

insert into main.mysql_servers(hostgroup_id,hostname,port) values(10,'192.168.68.132',3306);

insert into main.mysql_servers(hostgroup_id,hostname,port) values(10,'192.168.68.133',3306);

load mysql servers to runtime;

save mysql servers to disk;

select * from mysql_servers;

MySQL [(none)]> select * from mysql_servers;

+--------------+----------------+------+-----------+--------+--------+-------------+-----------------+---------------------+---------+----------------+---------+

| hostgroup_id | hostname       | port | gtid_port | status | weight | compression | max_connections | max_replication_lag | use_ssl | max_latency_ms | comment |

+--------------+----------------+------+-----------+--------+--------+-------------+-----------------+---------------------+---------+----------------+---------+

| 10           | 192.168.68.131 | 3306 | 0         | ONLINE | 1      | 0           | 1000            | 0                   | 0       | 0              |         |

| 10           | 192.168.68.132 | 3306 | 0         | ONLINE | 1      | 0           | 1000            | 0                   | 0       | 0              |         |

| 10           | 192.168.68.133 | 3306 | 0         | ONLINE | 1      | 0           | 1000            | 0                   | 0       | 0              |         |

+--------------+----------------+------+-----------+--------+--------+-------------+-----------------+---------------------+---------+----------------+---------+

3 rows in set (0.07 sec)
3.4.2 在所有被监控MySQL服务器上创建监控帐户
-- 2、在所有被监控MySQL服务器上创建帐户,注意:新版本中,这里的密码必须为monitor,可参考配置文件/etc/proxysql.cnf

mysql -uroot -plhr -h192.168.66.35 -P33131

create user 'monitor'@'%' IDENTIFIED BY 'monitor';

GRANT all privileges ON *.* TO 'monitor'@'%' with grant option;

select user,host from mysql.user;

mysql> select user,host from mysql.user;

+---------------+--------------+

| user          | host         |

+---------------+--------------+

| mha           | %            |

| monitor       | %            |

| repl          | %            |

| root          | %            |

| mysql.session | localhost    |

| mysql.sys     | localhost    |

| root          | localhost    |

+---------------+--------------+

7 rows in set (0.00 sec)
3.4.3 在所有被监控MySQL服务器上创建对外访问账户
-- 3、 在所有被监控MySQL服务器上创建对外访问账户:

create user 'wr'@'%' IDENTIFIED BY 'lhr';

GRANT all privileges ON *.* TO 'wr'@'%' with grant option;

-- 配置到ProxySQL中

insert into mysql_users(username,password,default_hostgroup) values('wr','lhr',10);

update mysql_users set transaction_persistent=1 where username='wr';

load mysql users to runtime;

save mysql users to disk;

select * from mysql_users;

MySQL [(none)]> select * from mysql_users;

+----------+----------+--------+---------+-------------------+----------------+---------------+------------------------+--------------+---------+----------+-----------------+---------+

| username | password | active | use_ssl | default_hostgroup | default_schema | schema_locked | transaction_persistent | fast_forward | backend | frontend | max_connections | comment |

+----------+----------+--------+---------+-------------------+----------------+---------------+------------------------+--------------+---------+----------+-----------------+---------+

| wr       | lhr      | 1      | 0       | 10                | NULL           | 0             | 1                      | 0            | 1       | 1        | 10000           |         |

+----------+----------+--------+---------+-------------------+----------------+---------------+------------------------+--------------+---------+----------+-----------------+---------+

1 row in set (0.05 sec)
3.4.4 配置监控
-- 4、在ProxySQL端执行下列SQL语句:

set mysql-monitor_username='monitor';

set mysql-monitor_password='monitor';

load mysql servers to runtime;

save mysql servers to disk;

select * from global_variables where variable_name in('mysql-monitor_username','mysql-monitor_password');

+------------------------+----------------+

| variable_name          | variable_value |

+------------------------+----------------+

| mysql-monitor_password | monitor        |

| mysql-monitor_username | monitor        |

+------------------------+----------------+

2 rows in set (0.05 sec)

-- 检查连接到MySQL的日志

select * from monitor.mysql_server_ping_log order by time_start_us desc limit 6;

select * from monitor.mysql_server_connect_log order by time_start_us desc limit 6;

MySQL [(none)]> select * from monitor.mysql_server_ping_log order by time_start_us desc limit 6;

+----------------+------+------------------+----------------------+------------+

| hostname       | port | time_start_us    | ping_success_time_us | ping_error |

+----------------+------+------------------+----------------------+------------+

| 192.168.68.132 | 3306 | 1614050308827202 | 252                  | NULL       |

| 192.168.68.133 | 3306 | 1614050308716530 | 370                  | NULL       |

| 192.168.68.131 | 3306 | 1614050308605853 | 542                  | NULL       |

| 192.168.68.131 | 3306 | 1614050298778908 | 334                  | NULL       |

| 192.168.68.133 | 3306 | 1614050298690947 | 297                  | NULL       |

| 192.168.68.132 | 3306 | 1614050298605725 | 344                  | NULL       |

+----------------+------+------------------+----------------------+------------+

6 rows in set (0.06 sec)

MySQL [(none)]> select * from monitor.mysql_server_connect_log order by time_start_us desc limit 6;

+----------------+------+------------------+-------------------------+---------------+

| hostname       | port | time_start_us    | connect_success_time_us | connect_error |

+----------------+------+------------------+-------------------------+---------------+

| 192.168.68.131 | 3306 | 1614050285481316 | 1173                    | NULL          |

| 192.168.68.133 | 3306 | 1614050284894846 | 1008                    | NULL          |

| 192.168.68.132 | 3306 | 1614050284309124 | 970                     | NULL          |

| 192.168.68.131 | 3306 | 1614050225194575 | 1108                    | NULL          |

| 192.168.68.133 | 3306 | 1614050224751771 | 987                     | NULL          |

| 192.168.68.132 | 3306 | 1614050224309026 | 1294                    | NULL          |

+----------------+------+------------------+-------------------------+---------------+

6 rows in set (0.05 sec)
四、故障切换
在Manager节点检查SSH、复制及MHA的状态。
docker exec -it MHA-LHR-Monitor-ip134 bash

masterha_check_ssh --conf=/etc/mha/mha.cnf

masterha_check_repl --conf=/etc/mha/mha.cnf

masterha_check_status --conf=/etc/mha/mha.cnf

-- 启动MHA监控进程

nohup masterha_manager --conf=/etc/mha/mha.cnf  --ignore_last_failover < /dev/null > /usr/local/mha/manager_start.log 2>&1 &

--关闭MHA监控进程

masterha_stop --conf=/etc/mha/mha.cnf

[root@MHA-LHR-Monitor-ip134 /]# masterha_check_status --conf=/etc/mha/mha.cnf

mha (pid:3738) is running(0:PING_OK), master:192.168.68.131
接下来,宕掉主库,继续观察ProxySQL的情况:
 -- 宕掉主库

 docker stop MHA-LHR-Master1-ip131
MHA自动执行了故障转移,主库切换为132,并发送告警邮件:
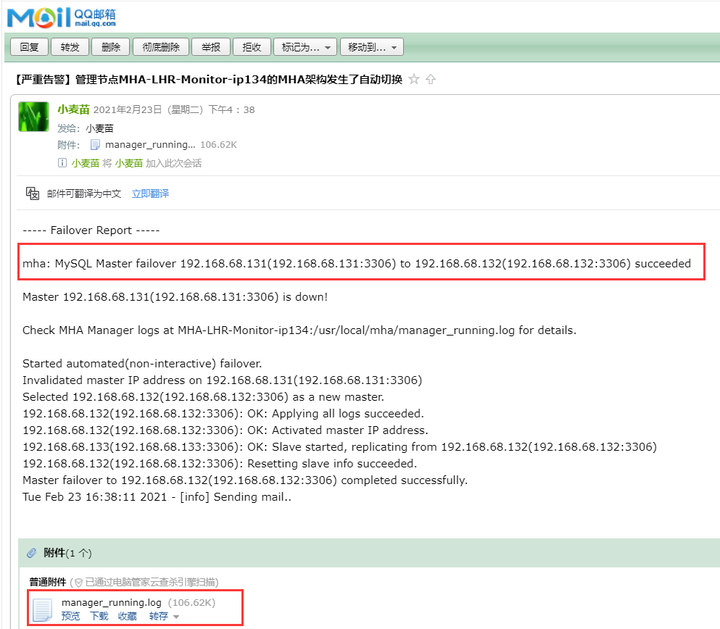 https://cdn.jsdelivr.net/gh/lhrbest/pic/img/20210416111828.png
此时,来查看ProxySQL的情况:
MySQL [(none)]> select * from mysql_servers;

+--------------+----------------+------+-----------+--------+--------+-------------+-----------------+---------------------+---------+----------------+---------+

| hostgroup_id | hostname       | port | gtid_port | status | weight | compression | max_connections | max_replication_lag | use_ssl | max_latency_ms | comment |

+--------------+----------------+------+-----------+--------+--------+-------------+-----------------+---------------------+---------+----------------+---------+

| 10           | 192.168.68.132 | 3306 | 0         | ONLINE | 1      | 0           | 1000            | 0                   | 0       | 0              |         |

| 20           | 192.168.68.131 | 3306 | 0         | ONLINE | 1      | 0           | 1000            | 0                   | 0       | 0              |         |

| 20           | 192.168.68.133 | 3306 | 0         | ONLINE | 1      | 0           | 1000            | 0                   | 0       | 0              |         |

| 20           | 192.168.68.132 | 3306 | 0         | ONLINE | 1      | 0           | 1000            | 0                   | 0       | 0              |         |

+--------------+----------------+------+-----------+--------+--------+-------------+-----------------+---------------------+---------+----------------+---------+

4 rows in set (0.05 sec)

MySQL [(none)]> select * from runtime_mysql_servers;

+--------------+----------------+------+-----------+---------+--------+-------------+-----------------+---------------------+---------+----------------+---------+

| hostgroup_id | hostname       | port | gtid_port | status  | weight | compression | max_connections | max_replication_lag | use_ssl | max_latency_ms | comment |

+--------------+----------------+------+-----------+---------+--------+-------------+-----------------+---------------------+---------+----------------+---------+

| 10           | 192.168.68.132 | 3306 | 0         | ONLINE  | 1      | 0           | 1000            | 0                   | 0       | 0              |         |

| 20           | 192.168.68.131 | 3306 | 0         | SHUNNED | 1      | 0           | 1000            | 0                   | 0       | 0              |         |

| 20           | 192.168.68.133 | 3306 | 0         | ONLINE  | 1      | 0           | 1000            | 0                   | 0       | 0              |         |

| 20           | 192.168.68.132 | 3306 | 0         | ONLINE  | 1      | 0           | 1000            | 0                   | 0       | 0              |         |

+--------------+----------------+------+-----------+---------+--------+-------------+-----------------+---------------------+---------+----------------+---------+

4 rows in set (1.26 sec)
可以发现131已经变成SHUNNED状态,ProxySQL会避开这个主机。
此时再做压测等操作,所有负载会被分配到132和133上,此处不再测试。
接下来启动131,并以从库的身份加入原主从环境:
-- 启动131

docker start MHA-LHR-Master1-ip131

-- 在134的日志文件中找到恢复的语句

grep "All other slaves should start replication from here" /usr/local/mha/manager_running.log

-- 在131上执行恢复

mysql -uroot -plhr -h192.168.68.131 -P3306

CHANGE MASTER TO MASTER_HOST='192.168.68.132',

MASTER_PORT=3306,

MASTER_AUTO_POSITION=1,

MASTER_USER='repl',

MASTER_PASSWORD='lhr';

start slave;

show slave status \G

-- 设置只读

set global read_only=1;
查询ProxySQL:
MySQL [(none)]> select * from mysql_servers;

+--------------+----------------+------+-----------+--------+--------+-------------+-----------------+---------------------+---------+----------------+---------+

| hostgroup_id | hostname       | port | gtid_port | status | weight | compression | max_connections | max_replication_lag | use_ssl | max_latency_ms | comment |

+--------------+----------------+------+-----------+--------+--------+-------------+-----------------+---------------------+---------+----------------+---------+

| 10           | 192.168.68.132 | 3306 | 0         | ONLINE | 1      | 0           | 1000            | 0                   | 0       | 0              |         |

| 20           | 192.168.68.131 | 3306 | 0         | ONLINE | 1      | 0           | 1000            | 0                   | 0       | 0              |         |

| 20           | 192.168.68.133 | 3306 | 0         | ONLINE | 1      | 0           | 1000            | 0                   | 0       | 0              |         |

| 20           | 192.168.68.132 | 3306 | 0         | ONLINE | 1      | 0           | 1000            | 0                   | 0       | 0              |         |

+--------------+----------------+------+-----------+--------+--------+-------------+-----------------+---------------------+---------+----------------+---------+

4 rows in set (0.06 sec)
可以看到131为只读。若想让132只写,则可以删除相关记录:
MySQL [(none)]> delete from mysql_servers where hostgroup_id=20 and  hostname='192.168.68.132';

Query OK, 1 row affected (0.06 sec)

MySQL [(none)]> load mysql servers to runtime;

Query OK, 0 rows affected (0.68 sec)

MySQL [(none)]> save mysql servers to disk;

Query OK, 0 rows affected (0.10 sec)

MySQL [(none)]> select * from mysql_servers;

+--------------+----------------+------+-----------+--------+--------+-------------+-----------------+---------------------+---------+----------------+---------+

| hostgroup_id | hostname       | port | gtid_port | status | weight | compression | max_connections | max_replication_lag | use_ssl | max_latency_ms | comment |

+--------------+----------------+------+-----------+--------+--------+-------------+-----------------+---------------------+---------+----------------+---------+

| 10           | 192.168.68.132 | 3306 | 0         | ONLINE | 1      | 0           | 1000            | 0                   | 0       | 0              |         |

| 20           | 192.168.68.131 | 3306 | 0         | ONLINE | 1      | 0           | 1000            | 0                   | 0       | 0              |         |

| 20           | 192.168.68.133 | 3306 | 0         | ONLINE | 1      | 0           | 1000            | 0                   | 0       | 0              |         |

+--------------+----------------+------+-----------+--------+--------+-------------+-----------------+---------------------+---------+----------------+---------+

3 rows in set (0.05 sec)

MySQL [(none)]> select * from runtime_mysql_servers;

+--------------+----------------+------+-----------+--------+--------+-------------+-----------------+---------------------+---------+----------------+---------+

| hostgroup_id | hostname       | port | gtid_port | status | weight | compression | max_connections | max_replication_lag | use_ssl | max_latency_ms | comment |

+--------------+----------------+------+-----------+--------+--------+-------------+-----------------+---------------------+---------+----------------+---------+

| 10           | 192.168.68.132 | 3306 | 0         | ONLINE | 1      | 0           | 1000            | 0                   | 0       | 0              |         |

| 20           | 192.168.68.133 | 3306 | 0         | ONLINE | 1      | 0           | 1000            | 0                   | 0       | 0              |         |

| 20           | 192.168.68.131 | 3306 | 0         | ONLINE | 1      | 0           | 1000            | 0                   | 0       | 0              |         |

+--------------+----------------+------+-----------+--------+--------+-------------+-----------------+---------------------+---------+----------------+---------+

3 rows in set (0.94 sec)
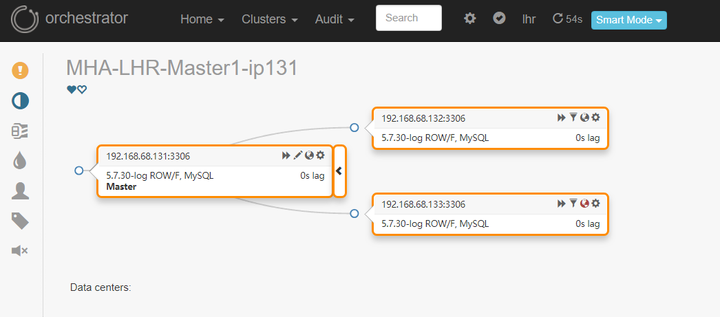
可以看到132为主库,131和133为从库。Orchestrator界面:
 https://cdn.jsdelivr.net/gh/lhrbest/pic/img/20210416111835.png
如何利用MHA+ProxySQL实现读写分离和负载均衡的更多相关文章
- 【DB宝42】MySQL高可用架构MHA+ProxySQL实现读写分离和负载均衡
目录 一.MHA+ProxySQL架构 二.快速搭建MHA环境 2.1 下载MHA镜像 2.2 编辑yml文件,创建MHA相关容器 2.3 安装docker-compose软件(若已安装,可忽略) 2 ...
- MaxScale:实现MySQL读写分离与负载均衡的中间件利器
1. MaxScale 是干什么的? 配置好了 MySQL 的主从复制结构后,我们希望实现读写分离,把读操作分散到从服务器中,并且对多个从服务器能实现负载均衡. 读写分离和负载均衡 是MySQL集群的 ...
- phalcon:数据库分库,读写分离,负载均衡 系统方法执行顺序
phalcon:数据库分库,读写分离,负载均衡 系统方法执行顺序 用命名空间区分不同的数据库实例,对应代码结构上是不同的目录区分,在同一目录下基类负责初始化连接.连接来自初始化时注入的多个db服务 隐 ...
- Atlas mysql的读写分离和负载均衡<转>
mysql的读写分离和负载均衡 http://my.oschina.net/superbigfu/blog/178134
- python实现mysql的读写分离及负载均衡
Oracle数据库有其公司开发的配套rac来实现负载均衡,目前已知的最大节点数能到128个,但是其带来的维护成本无疑是很高的,并且rac的稳定性也并不是特别理想,尤其是节点很多的时候. 但是,相对my ...
- Mysql-Proxy实现mysql读写分离、负载均衡 (转)
在mysql中实现读写分离.负载均衡,用Mysql-Proxy是很容易的事,不过大型处理对于性能方面还有待提高,主要配置步骤如下: 1.1. mysql-proxy安装 MySQL Proxy就是这么 ...
- 如何轻松实现MySQL数据库的读写分离和负载均衡?
配置好了 Mysql 的主从复制结构后,我们希望实现读写分离,把读操作分散到从服务器中,并且对多个从服务器能实现负载均衡.读写分离和负载均衡是 Mysql 集群的基础需求,MaxScale 就可以帮着 ...
- mycat(读写分离、负载均衡、主从切换)
博主本人平和谦逊,热爱学习,读者阅读过程中发现错误的地方,请帮忙指出,感激不尽 1.环境准备 1.1新增两台虚拟机 mycat01:192.168.247.81 mycat02:192.168.247 ...
- MHA+ProxySQL实现读写分离高可用
最近在研究ProxySQL,觉得还挺不错的,所以就简单的折腾了一下,ProxySQL目前也是Percona在推荐的一个读写分离的中间件.关于详细的介绍可以参考官方文档.https://github.c ...
随机推荐
- Java入土---Java运行机制及IDEA的安装使用
Java运行机制及IDEA的安装使用 java程序运行机制 计算机高级语言分为编译型语言跟解释型语言,而java同时具有两者的特点. 可能对于新手来说,什么是编译,什么是解释; 简单来说,编译就是将代 ...
- 关于mysql8.0 caching_sha2_password和sha256_password认证方式
今天开发上线新系统反馈数据库连接有问题.自己分别在命令行下及navicat进行连接发现,发现root用户密码在命令行下可以正常连接,但是新建立的子用户连接不上.于是就换成管理员密码.立即就连接上了.看 ...
- CF498B题解
咋黑色啊,这不是看到数据范围就去想 \(O(nT)\) 的做法吗? 然后仔细想想最靠谱的就是 DP. 设 \(dp[n][T]\) 表示听完第 \(n\) 首歌,总共听了 \(T\) 秒. 很明显有 ...
- Sobel算子 Scharr算子 Laplacian算子
图像梯度处理 Sobel算子 水平方向: 对于线条A和线条B,右侧像素值与左侧像素值的差值不为零,因此是边界 上下像素值差值为0,左右素值的差值不为零,分布为正负, 离的近的为2,离的远的为1 P5= ...
- python 命令行参数学习(二)
照着例子看看打打,码了就会.写了个命令行参数调用进行运算的脚本. 参考文章链接:http://www.jianshu.com/p/a50aead61319 #-*-coding:utf-8-*- __ ...
- 浅析Java反射--Java
前言 上篇文章我们提到了可以使用反射机制破解单例模式.这篇文章我们就来谈一谈什么是反射,反射有什么用,怎么用,怎么实现反射. 概述 Java的反射(reflection)机制:是指在程序的运行状态中, ...
- pg数据库排序和limit同时使用遇到的奇怪问题
这两天由于一位实习生同事回学校答辩,因此我来跟进他之前开发的功能进行测试,测试反馈上来这么一个问题: 也就是说下面这两条sql查询出来的数据前10条的数据不一样. select * from tabl ...
- 简述 Mybatis 的插件运行原理,以及如何编写一个插件?
Mybatis 仅可以编写针对 ParameterHandler.ResultSetHandler. StatementHandler.Executor 这 4 种接口的插件,Mybatis 使用 J ...
- MySQL 中 InnoDB 支持的四种事务隔离级别名称,以及逐 级之间的区别?
SQL 标准定义的四个隔离级别为: 1.read uncommited :读到未提交数据 2.read committed:脏读,不可重复读 3.repeatable read:可重读 4.seria ...
- 表单属性method的值get和post的区别?什么时候用get?什么时候用post?
get和post的区别 一.安全性 因为get会将用户名和密码放在URL中,进而出现在浏览器的历史记录中,显然这种情况应该用post. 二.编码 get只能向服务器发送ASCII字符,而post则可以 ...