GUI基础知识点
简介
GUI的核心技术:AWT(是Swing 的前身) Swing
- 不流行的原因
- 界面不美观
- 运行需要jre环境(可能一个项目的大小比jre还要大)
- 为什么我们需要学习
- 了解MVC架构和监听
AWT
介绍
全名:abstract windows tools
awt包含了很多类和接口
里面有各种各样的元素 eg:窗口、按钮、文本框
用到java.awt.*
组件和容器(核心类)
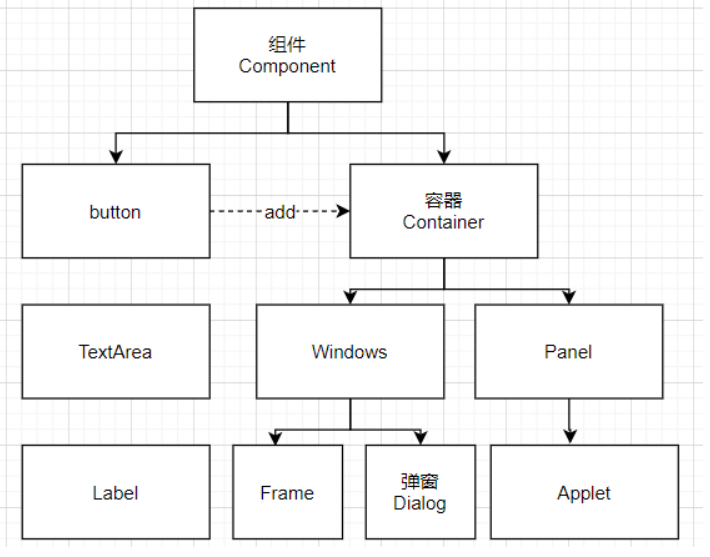
Frame
窗口是我们日常使用软件最常看到的
import java.awt.*;

Frame frame=new Frame("JAVA WINDOWS");

//需要设置可见性 w h

frame.setVisible(true);

//设置窗口大小

frame.setSize(400,900);

Color color = new Color(128,128,128);

frame.setBackground(color);

//弹出的初始位置

frame.setLocation(new Point(200,300));

//设置大小固定,窗口不能拉伸

frame.setResizable(false);
Panel
可以看成一个空间,但是不能单独存在,必须添加到某个容器中
public static void main(String[] args) {

    Frame frame = new Frame();

    Panel panel = new Panel();

    //设置布局

    frame.setLayout(null);

    //坐标

    frame.setBounds(300,300,500,500);

    frame.setBackground(Color.yellow);

    //panel设置坐标,相对于frame

    panel.setBounds(50,50,400,400);

    panel.setBackground(Color.blue);

    frame.add(panel);

    frame.setVisible(true);

    //监听事件,解决点击窗口关闭

    //WindowAdapter 适配器模式,只需写需要的override

    //WindowListener 实现所有的监听,很多个override

    //匿名内部类

    frame.addWindowListener(new WindowAdapter() {

        @Override

        public void windowClosing(WindowEvent e) {

            //先隐藏再关闭

            setVisible(false);

            //结束程序

            System.exit(0);

        }

    });

}
备注:如果是JFrame,关闭窗口可以不用写一个监听事件,一行代码直接搞定
布局管理器
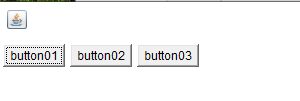
流式布局
public static void main(String[] args) {

    Frame frame = new Frame();

    //组件 按钮

    Button button01 = new Button("button01");

    Button button02 = new Button("button02");

    Button button03 = new Button("button03");

    frame.setBounds(300,300,500,500);

    frame.setVisible(true);

    //设置为流式布局

    frame.setLayout(new FlowLayout(FlowLayout.LEFT));

    frame.add(button01);

    frame.add(button02);

    frame.add(button03);

}
东西南北中
public static void main(String[] args) {

    Frame frame = new Frame();

    Button button1 = new Button("East");

    Button button2 = new Button("West");

    Button button3 = new Button("South");

    Button button4 = new Button("North");

    Button button5 = new Button("Center");

    frame.add(button1,BorderLayout.EAST);

    frame.add(button2,BorderLayout.WEST);

    frame.add(button3,BorderLayout.SOUTH);

    frame.add(button4,BorderLayout.NORTH);

    frame.add(button5,BorderLayout.CENTER);

    frame.setVisible(true);

    frame.setBounds(500,500,500,500);

}

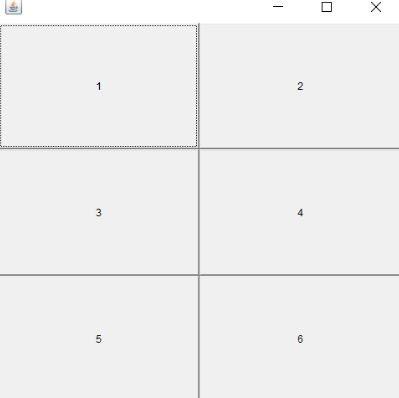
表格布局 Grid
public static void main(String[] args) {

    Frame frame = new Frame();

    Button button1 = new Button("1");

    Button button2 = new Button("2");

    Button button3 = new Button("3");

    Button button4 = new Button("4");

    Button button5 = new Button("5");

    Button button6 = new Button("6");

    frame.setVisible(true);

    frame.setBounds(500,500,500,500);

    frame.setLayout(new GridLayout(3,2));

    frame.add(button1);

    frame.add(button2);

    frame.add(button3);

    frame.add(button4);

    frame.add(button5);

    frame.add(button6);

}
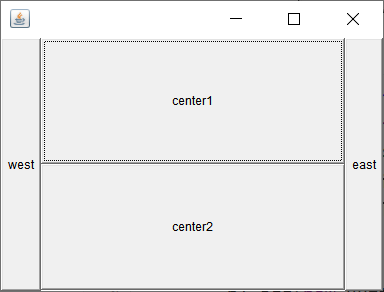
综合练习
public static void main(String[] args) {

        Frame frame = new Frame();

        frame.setSize(400,300);

        frame.setLocation(300,400);

        frame.setVisible(true);

        Panel p1 = new Panel(new BorderLayout());

        Panel p2 = new Panel(new GridLayout(2,1));

        p1.add(new Button("east"),BorderLayout.EAST);

        p1.add(new Button("west"),BorderLayout.WEST);

        p2.add(new Button("center1"));

        p2.add(new Button("center2"));

        p1.add(p2,BorderLayout.CENTER);

        frame.add(p1);

    }
事件监听
简单的例子
public class TestFrame {

    public static void main(String[] args) {

        Frame frame = new Frame();

        Button button = new Button();

        //因为addActionListener需要一个ActionListener,所以我们需要构建一个ActionListener

        MyActionListener myActionListener = new MyActionListener();

        button.addActionListener(myActionListener);

        frame.add(button,BorderLayout.CENTER);

        frame.setVisible(true);

        frame.pack();//窗口自适应

    }

}

class MyActionListener implements ActionListener{

    @Override

    public void actionPerformed(ActionEvent e) {

        System.out.println("点击了一下,在控制台输出");

    }

}
输入框监听
public class TestFrame {

    public static void main(String[] args) {

        new MyFrame();

    }

}

class MyFrame extends Frame{

    public MyFrame(){

        TextField textField = new TextField();

        add(textField);

        //监听文本输入框的文字

        MyActionListener myActionListener = new MyActionListener();

        textField.addActionListener(myActionListener);

        //设置替换编码  密码处理

        textField.setEchoChar('*');

        setVisible(true);

        pack();

    }

}

class MyActionListener implements ActionListener{

    @Override

    public void actionPerformed(ActionEvent e) {

        //获得一些资源,返回一个对象

        TextField field = (TextField)e.getSource();

        //获得输入框中的文本

        System.out.println(field.getText());

        field.setText("");

    }

}
简易计算器
方法一:组合写法
import java.awt.*;

import java.awt.event.*;

//简易计算

public class TestFrame {

    public static void main(String[] args) {

        new Calculator().loadFrame();

    }

}

//计算类

class Calculator extends Frame{

    TextField num1,num2,num3;

    public void loadFrame(){

        //3个文本框

        num1 = new TextField(10);//10表示输入最大字符数,框的大小也会改变

        num2  = new TextField(10);

        num3 = new TextField(12);

        num1.setText("");

        num2.setText("");

        num3.setText("");

        //1个按钮

        Button button = new Button("=");

        button.addActionListener(new MyActionListener(this));

        //1个标签

        Label label = new Label("+");

        //流式布局

        setLayout(new FlowLayout());

        add(num1);

        add(label);

        add(num2);

        add(button);

        add(num3);

        pack();

        setVisible(true);

    }

}

//监听类

class MyActionListener implements ActionListener{

    //获得计算器对象,在一个类中组合另外一个类

    Calculator calculator = null;

    public MyActionListener(Calculator calculator){

        this.calculator=calculator;

    }

    @Override

    public void actionPerformed(ActionEvent e) {

        //清空

        if("".equals(calculator.num3.getText())!=true){

            calculator.num1.setText("");

            calculator.num2.setText("");

            calculator.num3.setText("");

        }else{

            //获得加数和被加数

            int a=Integer.parseInt(calculator.num1.getText());

            int b=Integer.parseInt(calculator.num2.getText());

            //将+结果放入第三个框

            calculator.num3.setText(""+(a+b));

        }

    }

}
方法二:内部类写法(推荐)
内部类最大的好处就是畅通无阻访问外部类
//简易计算

public class TestFrame {

    public static void main(String[] args) {

        new Calculator().loadFrame();

    }

}

//计算类

class Calculator extends Frame{

    TextField num1,num2,num3;

    public void loadFrame(){

        //3个文本框

        num1 = new TextField(10);//10表示输入最大字符数,框的大小也会改变

        num2  = new TextField(10);

        num3 = new TextField(12);

        num1.setText("");

        num2.setText("");

        num3.setText("");

        //1个按钮

        Button button = new Button("=");

        button.addActionListener(new MyActionListener());

        //1个标签

        Label label = new Label("+");

        //流式布局

        setLayout(new FlowLayout());

        add(num1);

        add(label);

        add(num2);

        add(button);

        add(num3);

        pack();

        setVisible(true);

    }

    //监听类

    private class MyActionListener implements ActionListener{

        @Override

        public void actionPerformed(ActionEvent e) {

            //清空

            if("".equals(num3.getText())!=true){

                num1.setText("");

                num2.setText("");

                num3.setText("");

            }else{

                //获得加数和被加数

                int a=Integer.parseInt(num1.getText());

                int b=Integer.parseInt(num2.getText());

                //将+结果放入第三个框

                num3.setText(""+(a+b));

            }

        }

    }

}
画笔
public class TestFrame {

    public static void main(String[] args) {

        new MyFrame().loadFrame();

    }

}

class MyFrame extends Frame{

    public void loadFrame(){

        setBounds(200,200,600,500);

        setVisible(true);

    }

    //画笔

    @Override

    public void paint(Graphics g) {

        //设置画笔颜色

        g.setColor(Color.blue);

        g.fillOval(100,100,100,100);

        //养成习惯,画笔用完,还原最初的颜色

        g.setColor(Color.black);

    }

}
鼠标监听
class MyFrame extends Frame{

    //画画需要画笔

    //需要监听鼠标当前的位置

    //需要集合存储这个点

    ArrayList<Point> points;

    public MyFrame(String title) {

        super(title);

        setBounds(200,200,400,300);

        points = new ArrayList<Point>();

        this.addMouseListener(new MyMouseListener());

        setVisible(true);

    }

    public class MyMouseListener extends MouseAdapter {

        @Override

        public void mousePressed(MouseEvent e) {

            MyFrame myFrame =(MyFrame)e.getSource();

            points.add(new Point(e.getX(),e.getY()));

            //每次点击鼠标都重新画一遍

            myFrame.repaint();

        }

    }

    @Override

    public void paint(Graphics g) {

        Iterator iterator = points.iterator();

        //注意是画一个数组

        while(iterator.hasNext()){

            Point point = (Point) iterator.next();

            g.setColor(Color.blue);

            //画一个小点

            g.fillOval(point.x,point.y,10,10);

        }

    }

}
键盘监听
public class TestFrame {

    public static void main(String[] args) {

        new MyFrame();

    }

}

class MyFrame extends Frame{

    public MyFrame() {

        setBounds(100,200,300,300);

        setVisible(true);

        this.addKeyListener(new KeyAdapter() {

            //键盘按下

            @Override

            public void keyPressed(KeyEvent e) {

                int keyCode = e.getKeyCode();

                if(keyCode==KeyEvent.VK_UP){

                    System.out.println("你按下了上键");

                }

            }

        });

    }

}
Swing
窗口 JFrame
public class TestJFrame {

    public void init(){

        //顶级窗口

        JFrame frame = new JFrame("JFrame窗口");

        frame.setVisible(true);

        frame.setBounds(100,100,200,200);

        /*注意必须要在容器中加入颜色,单纯下面这样写,无法生效

        frame.setBackground(Color.yellow);*/

        //获得一个容器

        Container container = frame.getContentPane();

        container.setBackground(Color.yellow);

        //设置文字Jlabel

        JLabel label = new JLabel("欢迎你");

        //文本标签居中

        label.setHorizontalAlignment(SwingConstants.CENTER);

        frame.add(label);

        //关闭事件 相当于awt的窗口监听 代码少多了吧

        frame.setDefaultCloseOperation(WindowConstants.EXIT_ON_CLOSE);

    }

    public static void main(String[] args) {

        new TestJFrame().init();

    }

}
弹窗 JDialog
public class TestJFrame extends JFrame{

    public TestJFrame() {

        this.setVisible(true);

        this.setSize(700,500);

        //JFrame 放东西 容器

        Container container = this.getContentPane();

        //绝对布局

        container.setLayout(null);

        JButton button  = new JButton("点击弹出对话框");//创建把

        button.setBounds(30,30,200,50);

        container.add(button);

        //点击按钮弹出弹窗

        button.addActionListener(new ActionListener() {

            @Override

            public void actionPerformed(ActionEvent e) {

                //弹窗

                new MyJDialog();

            }

        });

        this.setDefaultCloseOperation(WindowConstants.EXIT_ON_CLOSE);

    }

    public static void main(String[] args) {

        new TestJFrame();

    }

}

class MyJDialog extends JDialog{

    public MyJDialog(){

        this.setVisible(true);

        this.setBounds(100,100,500,500);

        Container container = this.getContentPane();

        container.add(new JLabel("我是一个弹窗"));

    }

}
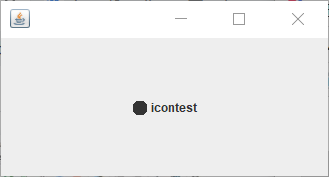
图标
import javax.swing.*;

import java.awt.*;

public class IconDemo extends JFrame implements Icon{

    private int width;

    private int height;

    public static void main(String[] args) {

        new IconDemo().init();

    }

    public void  init(){

        IconDemo iconDemo = new IconDemo(15,15);

        //图标可以放在按钮上或者标签上

        JLabel label = new JLabel("icontest",iconDemo,SwingConstants.CENTER);

        Container container = getContentPane();

        container.add(label);

        this.setVisible(true);

        this.setDefaultCloseOperation(WindowConstants.EXIT_ON_CLOSE);

    }

    public IconDemo(){ }

    public IconDemo(int width,int height){

        this.width=width;

        this.height=height;

    }

    @Override

    public void paintIcon(Component c, Graphics g, int x, int y) {

        g.fillOval(x,y,width,height);

    }

    @Override

    public int getIconWidth() {

        return this.width;

    }

    @Override

    public int getIconHeight() {

        return this.height;

    }

}
图片
import javax.swing.*;

import java.awt.*;

import java.net.URL;

public class ImageDemo extends JFrame{

    private int width;

    private int height;

    public static void main(String[] args) {

        new ImageDemo();

    }

    public ImageDemo(){

        JLabel label = new JLabel("Imageicon");

		//这个url需要注意 容易写错找不到

        URL url= ImageDemo.class.getResource("icon.png");

        ImageIcon imageIcon = new ImageIcon(url);

        label.setIcon(imageIcon);

        label.setHorizontalAlignment(SwingConstants.CENTER);

        Container container = getContentPane();

        container.add(label);

        setVisible(true);

        setDefaultCloseOperation(WindowConstants.EXIT_ON_CLOSE);

        setBounds(0,0,200,200);

    }

}
面板
public class TestJFrame extends JFrame{

    public TestJFrame(){

        //获得容器

        Container container = this.getContentPane();

        //后面的参数是间距

        container.setLayout(new GridLayout(2,1,10,10));

        JPanel panel1 = new JPanel(new GridLayout(1,3));

        panel1.add(new Button("1"));

        panel1.add(new Button("1"));

        panel1.add(new Button("1"));

        container.add(panel1);

        this.setVisible(true);

        this.setSize(500,500);

        this.setDefaultCloseOperation(WindowConstants.EXIT_ON_CLOSE);

    }

    public static void main(String[] args) {

        new TestJFrame();

    }

}
下拉框
public TestJFrame(){

        //获得容器

        Container container = this.getContentPane();

        JComboBox jComboBox = new JComboBox();

        jComboBox.addItem("下拉选项一");

        jComboBox.addItem("下拉选项二");

        jComboBox.addItem("下拉选项三");

        container.add(jComboBox);

//        System.out.println(jComboBox.getSelectedIndex());

//        System.out.println(jComboBox.getSelectedItem());

        this.setVisible(true);

        this.setSize(500,500);

        this.setDefaultCloseOperation(WindowConstants.EXIT_ON_CLOSE);

    }

    public static void main(String[] args) {

        new TestJFrame();

    }
文本域/JscrollPan滚动条
public class TestJFrame extends JFrame{

    public TestJFrame(){

        //获得容器

        Container container = this.getContentPane();

        //文本域

        JTextArea jTextArea = new JTextArea(20,50);

        jTextArea.setText("大家好,你们的DJ同学又来喽");

        JScrollPane jScrollPan = new JScrollPane(jTextArea);

        container.add(jScrollPan);

        this.setVisible(true);

        this.setSize(500,500);

        this.setDefaultCloseOperation(WindowConstants.EXIT_ON_CLOSE);

    }

    public static void main(String[] args) {

        new TestJFrame();

    }

}
文本框
JTextField
密码框
JPasswordField
GUI基础知识点的更多相关文章
- fastclick 源码注解及一些基础知识点
在移动端,网页上的点击穿透问题导致了非常糟糕的用户体验.那么该如何解决这个问题呢? 问题产生的原因 移动端浏览器的点击事件存在300ms的延迟执行,这个延迟是由于移动端需要通过在这个时间段用户是否两次 ...
- .NET基础知识点
.NET基础知识点 l .Net平台 .Net FrameWork框架 l .Net FrameWork框架提供了一个稳定的运行环境,:来保障我们.Net平台正常的运转 l 两种交 ...
- JavaScript 开发者经常忽略或误用的七个基础知识点(转)
JavaScript 本身可以算是一门简单的语言,但我们也不断用智慧和灵活的模式来改进它.昨天我们将这些模式应用到了 JavaScript 框架中,今天这些框架又驱动了我们的 Web 应用程序.很多新 ...
- JavaScript 开发者经常忽略或误用的七个基础知识点
JavaScript 本身可以算是一门简单的语言,但我们也不断用智慧和灵活的模式来改进它.昨天我们将这些模式应用到了 JavaScript 框架中,今天这些框架又驱动了我们的 Web 应用程序.很多新 ...
- Unity3D入门之GUI基础以及常用GUI控件使用(2)
1.GUI基础 (1)GUI部分是每帧擦除重绘的,只应该在OnGUI中绘制GUI,按钮:GUILayout.Button(“Hello”); 只读标签:GUILayout.Label() (2)修改控 ...
- JavaScript开发者常忽略或误用的七个基础知识点
JavaScript 本身可以算是一门简单的语言,但我们也不断用智慧和灵活的模式来改进它.昨天我们将这些模式应用到了 JavaScript 框架中,今天这些框架又驱动了我们的 Web 应用程序.很多新 ...
- JavaScript语言基础知识点图示(转)
一位牛人归纳的JavaScript 语言基础知识点图示. 1.JavaScript 数据类型 2.JavaScript 变量 3.Javascript 运算符 4.JavaScript 数组 5.Ja ...
- JavaScript 语言基础知识点总结
网上找到的一份JavaScript 语言基础知识点总结,还不错,挺全面的. (来自:http://t.cn/zjbXMmi @刘巍峰 分享 )
- c语言学习之基础知识点介绍(三):scanf函数
本节继续介绍c语言的基础知识点. scanf函数:用来接收用户输入的数据. 语法:scanf("格式化控制符",地址列表); 取地址要用到取地址符:&(shift+7) 例 ...
随机推荐
- 前端学习 node 快速入门 系列 —— 模块(module)
其他章节请看: 前端学习 node 快速入门 系列 模块(module) 模块的导入 核心模块 在 初步认识 node 这篇文章中,我们在读文件的例子中用到了 require('fs'),在写最简单的 ...
- JS逆向-抠代码的第二天【手把手学会抠代码】
今天的学习项目:沃支付:https://epay.10010.com/auth/login 清空浏览器缓存后,打开网页,输入手机号,密码222222,按照网站要求填入验证码(sorry,我没有账号密码 ...
- python学习之基础内容
python基础内容① 什么是python? -一种计算机语言,计算机语言分为 -高级语言:python.java.Ruby.C#.C++...... -基础语言:C语言.汇编 -计算机可以直接执行基 ...
- 攻防世界 maze NJUPT CTF 2017
迷宫题 1 __int64 __fastcall main(__int64 a1, char **a2, char **a3) 2 { 3 signed __int64 mid_i; // rbx 4 ...
- Go 语言入门教程,共32讲,6小时(已完结)
Go语言入门教程,共32讲,6小时(完结) 在B站:https://www.bilibili.com/video/BV1fD4y1m7TD/
- 80%的人都不会的,15个Linux实用技巧
熟悉 Linux 系统的同学都知道,它高效主要体现在命令行.通过命令行,可以将很多简单的命令,通过自由的组合,得到非常强大的功能. 命令行也就意味着可以自动化,自动化会使你的工作更高效,释放很多手工操 ...
- 基于ZXing.Net生成一维二维码
新阁教育-喜科堂付工原创 最近很多小伙伴对一维码.二维码比较感兴趣,今天主要给大家分享一个C#生成条形码和二维码的案例. C#作为一个高级语言,特点就是快! 我们使用的是开源库ZXing,ZXing是 ...
- Python数据分析入门(十七):绘制条形图
条形图的绘制方式跟折线图非常的类似,只不过是换成了plt.bar方法.plt.bar方法有以下常用参数: x:一个数组或者列表,代表需要绘制的条形图的x轴的坐标点. height:一个数组或者列表,代 ...
- OO第一单元作业——魔幻求导
简介 本单元作业分为三次 第一次作业:需要完成的任务为简单多项式导函数的求解. 第二次作业:需要完成的任务为包含简单幂函数和简单正余弦函数的导函数的求解. 第三次作业:需要完成的任务为包含简单幂函数和 ...
- 在一些64位的glibc的payload调用system函数失败问题
在一些64位的glibc的payload调用system函数失败问题 当我在做题的时候就发现一个奇怪的事情,我在ubuntu16.04运行成功的exp在ubuntu 18.04却报出了timeout: ...