openswan源码ubantu下编译、安装、基本环境搭建
openswan的编译过程
文章目录
1. 下载源码:
对于openswan源码,我们是从官网上下载的。这里提供两个不同的网站:
专门下载openswan源码的网站
openswan官网页面
2. 在虚拟机上解压后编译:
我解压后的源码目录为:root@ubantu:/usr/src/openswan-2.6.51.5#
2.1 查看INSTALL文件
root@ubantu:/usr/src/openswan-2.6.51.5# cat INSTALL

Please read the documentation in doc/ & docs/

Building userland:

	make programs install

Building KLIPS kernel module on 2.4 (assuming your kernel source is /usr/src/linux-2.4)

	make KERNELSRC=/usr/src/linux-2.4 module minstall

Building KLIPS kernel module on 2.6

	make KERNELSRC=/lib/modules/`uname -r`/build module minstall

root@ubantu:/usr/src/openswan-2.6.51.5#
从这个文件可以看出直接运行make programs install命令即可。直接输入该命令进行编译:
root@ubantu:/usr/src/openswan-2.6.51.5# make programs install

OBJDIR: OBJ.linux.x86_64

(cd /usr/src/openswan-2.6.51.5/OBJ.linux.x86_64 && OBJDIRTOP=/usr/src/openswan-2.6.51.5/OBJ.linux.x86_64 OBJDIR=/usr/src/openswan-2.6.51.5/OBJ.linux.x86_64 make programs )

make[1]: Entering directory '/usr/src/openswan-2.6.51.5/OBJ.linux.x86_64'

make[2]: Entering directory '/usr/src/openswan-2.6.51.5/OBJ.linux.x86_64/lib'

make[3]: Entering directory '/usr/src/openswan-2.6.51.5/OBJ.linux.x86_64/lib/libopenswan'

CC id.c

In file included from /usr/src/openswan-2.6.51.5/include/certs.h:24:0,

                 from /usr/src/openswan-2.6.51.5/lib/libopenswan/id.c:42:

/usr/src/openswan-2.6.51.5/include/secrets.h:20:10: fatal error: gmp.h: No such file or directory

 #include <gmp.h>    /* GNU MP library */

          ^~~~~~~

compilation terminated.

/usr/src/openswan-2.6.51.5/lib/libopenswan/Makefile:175: recipe for target 'id.o' failed

make[3]: *** [id.o] Error 1

make[3]: Leaving directory '/usr/src/openswan-2.6.51.5/OBJ.linux.x86_64/lib/libopenswan'

/usr/src/openswan-2.6.51.5/lib/Makefile:37: recipe for target 'programs' failed

make[2]: *** [programs] Error 1

make[2]: Leaving directory '/usr/src/openswan-2.6.51.5/OBJ.linux.x86_64/lib'

Makefile:10: recipe for target 'programs' failed

make[1]: *** [programs] Error 1

make[1]: Leaving directory '/usr/src/openswan-2.6.51.5/OBJ.linux.x86_64'

Makefile:185: recipe for target 'programs' failed

make: *** [programs] Error 2

root@ubantu:/usr/src/openswan-2.6.51.5#
提示有错误:/usr/src/openswan-2.6.51.5/include/secrets.h:20:10: fatal error: gmp.h: No such file or directory。
2.2 查看文件buildlin.sh文件
由于提示上述错误,且INSTALL文件中也没有相关说明,因此我看了下其他的文件,发现在buildlin.sh中有相关的依赖。从这个名字上就能看出这个是Linux下的自动编译脚本,因此我就尝试运行了下:
root@ubantu:/usr/src/openswan-2.6.51.5# ./buildlin.sh

You need to install libgmp-dev.

    apt-get install libgmp-dev

or  yum install gmp-dev

You need to install bison.

    apt-get install bison

or  yum install bison

You need to install flex.

    apt-get install flex

or  yum install flex

root@ubantu:/usr/src/openswan-2.6.51.5#
提示的结果是:缺少相应的库,而第一个和我们上述的错误是相关的。因此一次安装提示的几个库:
apt-get install libgmp-dev

apt-get install bison

apt-get install flex
安装成功后,重新执行make programs install(这实际上是两个命令make programs和make install,可以分开单独执行),结果成功编译安装:
root@ubantu:/usr/src/openswan-2.6.51.5# make programs install

OBJDIR: OBJ.linux.x86_64

(cd /usr/src/openswan-2.6.51.5/OBJ.linux.x86_64 && OBJDIRTOP=/usr/src/openswan-2.6.51.5/OBJ.linux.x86_64 OBJDIR=/usr/src/openswan-2.6.51.5/OBJ.linux.x86_64 make programs )

make[1]: Entering directory '/usr/src/openswan-2.6.51.5/OBJ.linux.x86_64'

make[2]: Entering directory '/usr/src/openswan-2.6.51.5/OBJ.linux.x86_64/lib'

make[3]: Entering directory '/usr/src/openswan-2.6.51.5/OBJ.linux.x86_64/lib/libopenswan'

CC id.c

CC initaddr.c

CC initsaid.c

CC initsubnet.c

CC iprange.c

CC keyblobtoid.c

CC kernel_alg.c

CC lex.c

CC mpzfuncs.c

CC optionsfrom.c

CC oswconf.c

... ...

make[3]: Leaving directory '/usr/src/openswan-2.6.51.5/OBJ.linux.x86_64/programs/tncfg'

make[3]: Entering directory '/usr/src/openswan-2.6.51.5/OBJ.linux.x86_64/programs/klipsdebug'

make[3]: Leaving directory '/usr/src/openswan-2.6.51.5/OBJ.linux.x86_64/programs/klipsdebug'

make[3]: Entering directory '/usr/src/openswan-2.6.51.5/OBJ.linux.x86_64/programs/pf_key'

make[3]: Leaving directory '/usr/src/openswan-2.6.51.5/OBJ.linux.x86_64/programs/pf_key'

make[3]: Entering directory '/usr/src/openswan-2.6.51.5/OBJ.linux.x86_64/programs/_updown.mast'

make[3]: Leaving directory '/usr/src/openswan-2.6.51.5/OBJ.linux.x86_64/programs/_updown.mast'

make[3]: Entering directory '/usr/src/openswan-2.6.51.5/OBJ.linux.x86_64/programs/_startnetkey'

make[3]: Leaving directory '/usr/src/openswan-2.6.51.5/OBJ.linux.x86_64/programs/_startnetkey'

make[3]: Entering directory '/usr/src/openswan-2.6.51.5/OBJ.linux.x86_64/programs/_updown.netkey'

make[3]: Leaving directory '/usr/src/openswan-2.6.51.5/OBJ.linux.x86_64/programs/_updown.netkey'

make[2]: Leaving directory '/usr/src/openswan-2.6.51.5/OBJ.linux.x86_64/programs'

make[1]: Leaving directory '/usr/src/openswan-2.6.51.5/OBJ.linux.x86_64'

mkdir -p /usr/local/libexec/ipsec

if [ -n '' ]; then echo ' ' >/usr/local/lib/ipsec/vendor.txt; fi

root@ubantu:/usr/src/openswan-2.6.51.5#
3. 查看是否安装成功:
3.1 查看版本信息:
root@ubantu:/usr/src/openswan-2.6.51.5/docs# ipsec --version

Linux Openswan U2.6.51.5/K(no kernel code presently loaded)

See `ipsec --copyright' for copyright information.

root@ubantu:/usr/src/openswan-2.6.51.5/docs#
可以看出我安装的是Linux Openswan U2.6.51.5/K版本
3.2 执行ipsec verify命令:
注意:下面可能只是我的虚拟环境配置导致的问题,不是没有给人会遇到(如果是纯净的环境可能会遇到)
执行ipsec verify命令后提示有错误:命令找不到
root@ubantu:/etc/ipsec.d/examples# ipsec verify

/usr/local/sbin/ipsec: 148: exec: /usr/local/libexec/ipsec/verify: not found

root@ubantu:/etc/ipsec.d/examples#
然后我进入到此目录,查看verify命令是否存在:
root@ubantu:/usr/local/libexec/ipsec# ls *verify*

verify  verify.old

root@ubantu:/usr/local/libexec/ipsec#
结果是存在此文件(命令),然后我查看了下是否有执行权限:
root@ubantu:/usr/local/libexec/ipsec# ll

total 24112

drwxr-xr-x 2 root root    4096 4月  30 09:03 ./

drwxr-xr-x 3 root root    4096 4月  30 08:10 ../

-rwxr-xr-x 1 root root 1473304 4月  30 09:03 addconn*

-rwxr-xr-x 1 root root 1473304 4月  30 09:02 addconn.old*

-rwxr-xr-x 1 root root    5122 4月  30 09:03 auto*

-rwxr-xr-x 1 root root    5122 4月  30 09:02 auto.old*

-rwxr-xr-x 1 root root   11297 4月  30 09:03 barf*

-rwxr-xr-x 1 root root   11297 4月  30 09:02 barf.old*

-rwxr-xr-x 1 root root  498600 4月  30 09:03 eroute*

-rwxr-xr-x 1 root root  498600 4月  30 09:02 eroute.old*

-rwxr-xr-x 1 root root  442432 4月  30 09:03 ikeping*

-rwxr-xr-x 1 root root  442432 4月  30 09:02 ikeping.old*

-rwxr-xr-x 1 root root    1028 4月  30 09:03 initnss*

-rwxr-xr-x 1 root root    1028 4月  30 09:02 initnss.old*

-rwxr-xr-x 1 root root  430320 4月  30 09:03 klipsdebug*

-rwxr-xr-x 1 root root  430320 4月  30 09:02 klipsdebug.old*

-rwxr-xr-x 1 root root    2783 4月  30 09:03 look*

-rwxr-xr-x 1 root root    2783 4月  30 09:02 look.old*

-rwxr-xr-x 1 root root    2480 4月  30 09:03 newhostkey*

-rwxr-xr-x 1 root root    2480 4月  30 09:02 newhostkey.old*

-rwxr-xr-x 1 root root  400136 4月  30 09:03 pf_key*

-rwxr-xr-x 1 root root  400136 4月  30 09:02 pf_key.old*

-rwxr-xr-x 1 root root 5405512 4月  30 09:03 pluto*

-rwxr-xr-x 1 root root 5405512 4月  30 09:02 pluto.old*

-rwxr-xr-x 1 root root   12349 4月  30 09:03 policy*

-rwxr-xr-x 1 root root   12349 4月  30 09:02 policy.old*

-rwxr-xr-x 1 root root   35784 4月  30 09:03 ranbits*

-rwxr-xr-x 1 root root   35784 4月  30 09:02 ranbits.old*

-rwxr-xr-x 1 root root  106800 4月  30 09:03 rsasigkey*

-rwxr-xr-x 1 root root  106800 4月  30 09:02 rsasigkey.old*

-rwxr-xr-x 1 root root     704 4月  30 09:03 secrets*

-rwxr-xr-x 1 root root     704 4月  30 09:02 secrets.old*

lrwxrwxrwx 1 root root      17 4月  30 09:03 setup -> /etc/init.d/ipsec*

-rwxr-xr-x 1 root root    1126 4月  30 09:03 showdefaults*

-rwxr-xr-x 1 root root    1126 4月  30 09:02 showdefaults.old*

-rwxr-xr-x 1 root root 1296672 4月  30 09:03 showhostkey*

-rwxr-xr-x 1 root root 1296672 4月  30 09:02 showhostkey.old*

-rwxr-xr-x 1 root root  670080 4月  30 09:03 spi*

-rwxr-xr-x 1 root root  464944 4月  30 09:03 spigrp*

-rwxr-xr-x 1 root root  464944 4月  30 09:02 spigrp.old*

-rwxr-xr-x 1 root root  670080 4月  30 09:02 spi.old*

-rwxr-xr-x 1 root root    1064 4月  30 09:03 status*

-rwxr-xr-x 1 root root    1064 4月  30 09:02 status.old*

-rwxr-xr-x 1 root root  426232 4月  30 09:03 tncfg*

-rwxr-xr-x 1 root root  426232 4月  30 09:02 tncfg.old*

-rwxr-xr-x 1 root root   16879 4月  30 09:03 verify*

-rwxr-xr-x 1 root root   16879 4月  30 09:02 verify.old*

-rwxr-xr-x 1 root root  579136 4月  30 09:03 whack*

-rwxr-xr-x 1 root root  579136 4月  30 09:02 whack.old*

root@ubantu:/usr/local/libexec/ipsec#
第48行显示是有执行权限的,那么是怎么回事呢?
我又查看了下verify这个文件的类型:
root@ubantu:/usr/local/libexec/ipsec# file verify

verify: Python script, ASCII text executable

root@ubantu:/usr/local/libexec/ipsec#
结果显示:verify是一个python脚本
然后我又看了先我的虚拟机是否有安装python工具:通过输入python命令或者直接输入刚才要执行的命令python verify都可以看到以下提示信息:
root@ubantu:/usr/local/libexec/ipsec# python

Command 'python' not found, but can be installed with:

apt install python3

apt install python

apt install python-minimal

You also have python3 installed, you can run 'python3' instead.
结果自然是没有安装python环境,于是乎我按提示安装最小的python环境apt install python-minimal
root@ubantu:/usr/local/libexec/ipsec# apt install python-minimal

Reading package lists... Done

Building dependency tree

Reading state information... Done

The following packages were automatically installed and are no longer required:

  linux-headers-4.18.0-15 linux-headers-4.18.0-15-generic linux-image-4.18.0-15-generic linux-modules-4.18.0-15-generic

  linux-modules-extra-4.18.0-15-generic

Use 'sudo apt autoremove' to remove them.

The following additional packages will be installed:

  libpython-stdlib python python2.7 python2.7-minimal

Suggested packages:

  python-doc python-tk python2.7-doc binfmt-support

The following NEW packages will be installed:

  libpython-stdlib python python-minimal python2.7 python2.7-minimal

0 upgraded, 5 newly installed, 0 to remove and 265 not upgraded.

Need to get 1,717 kB of archives.

After this operation, 4,990 kB of additional disk space will be used.

Do you want to continue? [Y/n] y

Get:1 http://cn.archive.ubuntu.com/ubuntu bionic-updates/main amd64 python2.7-minimal amd64 2.7.17-1~18.04ubuntu1 [1,294 kB]

Get:2 http://cn.archive.ubuntu.com/ubuntu bionic/main amd64 python-minimal amd64 2.7.15~rc1-1 [28.1 kB]

Get:3 http://cn.archive.ubuntu.com/ubuntu bionic-updates/main amd64 python2.7 amd64 2.7.17-1~18.04ubuntu1 [248 kB]

Get:4 http://cn.archive.ubuntu.com/ubuntu bionic/main amd64 libpython-stdlib amd64 2.7.15~rc1-1 [7,620 B]

Get:5 http://cn.archive.ubuntu.com/ubuntu bionic/main amd64 python amd64 2.7.15~rc1-1 [140 kB]

Fetched 1,717 kB in 6s (278 kB/s)

Selecting previously unselected package python2.7-minimal.

(Reading database ... 208792 files and directories currently installed.)

Preparing to unpack .../python2.7-minimal_2.7.17-1~18.04ubuntu1_amd64.deb ...

Unpacking python2.7-minimal (2.7.17-1~18.04ubuntu1) ...

Selecting previously unselected package python-minimal.

Preparing to unpack .../python-minimal_2.7.15~rc1-1_amd64.deb ...

Unpacking python-minimal (2.7.15~rc1-1) ...

Selecting previously unselected package python2.7.

Preparing to unpack .../python2.7_2.7.17-1~18.04ubuntu1_amd64.deb ...

Unpacking python2.7 (2.7.17-1~18.04ubuntu1) ...

Selecting previously unselected package libpython-stdlib:amd64.

Preparing to unpack .../libpython-stdlib_2.7.15~rc1-1_amd64.deb ...

Unpacking libpython-stdlib:amd64 (2.7.15~rc1-1) ...

Setting up python2.7-minimal (2.7.17-1~18.04ubuntu1) ...

Linking and byte-compiling packages for runtime python2.7...

Setting up python-minimal (2.7.15~rc1-1) ...

Selecting previously unselected package python.

(Reading database ... 208849 files and directories currently installed.)

Preparing to unpack .../python_2.7.15~rc1-1_amd64.deb ...

Unpacking python (2.7.15~rc1-1) ...

Processing triggers for mime-support (3.60ubuntu1) ...

Processing triggers for desktop-file-utils (0.23-1ubuntu3.18.04.2) ...

Setting up python2.7 (2.7.17-1~18.04ubuntu1) ...

Setting up libpython-stdlib:amd64 (2.7.15~rc1-1) ...

Processing triggers for man-db (2.8.3-2ubuntu0.1) ...

Processing triggers for gnome-menus (3.13.3-11ubuntu1.1) ...

Setting up python (2.7.15~rc1-1) ...

root@ubantu:/usr/local/libexec/ipsec#
成功安装上python后,重新执行ipsec verify,结果如下:
root@ubantu:/usr/local/libexec/ipsec# ipsec verify

/usr/local/libexec/ipsec/verify

Checking if IPsec got installed and started correctly:

Version check and ipsec on-path                   	[OK]

Openswan U2.6.51.5/K5.3.0-46-generic (netkey)

See `ipsec --copyright' for copyright information.

Checking for IPsec support in kernel              	[OK]

 NETKEY: Testing XFRM related proc values

         ICMP default/send_redirects              	[NOT DISABLED]

  Disable /proc/sys/net/ipv4/conf/*/send_redirects or NETKEY will cause act on or cause sending of bogus ICMP redirects!

         ICMP default/accept_redirects            	[NOT DISABLED]

  Disable /proc/sys/net/ipv4/conf/*/accept_redirects or NETKEY will cause act on or cause sending of bogus ICMP redirects!

         XFRM larval drop                         	[OK]

Hardware random device check                      	[N/A]

Checking rp_filter                                	[ENABLED]

 /proc/sys/net/ipv4/conf/all/rp_filter            	[ENABLED]

 /proc/sys/net/ipv4/conf/default/rp_filter        	[ENABLED]

Checking that pluto is running                    	[OK]

 Pluto listening for IKE on udp 500               	[OK]

 Pluto listening for IKE on tcp 500               	[NOT IMPLEMENTED]

 Pluto listening for IKE/NAT-T on udp 4500        	[OK]

 Pluto listening for IKE/NAT-T on tcp 4500        	[NOT IMPLEMENTED]

 Pluto listening for IKE on tcp 10000 (cisco)     	[NOT IMPLEMENTED]

Checking NAT and MASQUERADEing                    	[TEST INCOMPLETE]

Checking 'ip' command                             	[OK]

Checking 'iptables' command                       	[OK]

ipsec verify: encountered errors

root@ubantu:/usr/local/libexec/ipsec#
算是解决了ipsec verify无法显示的问题。
3.3 启动IPSec服务:
通过命令/etc/init.d/ipsec start命令来启动IPSec服务(为啥我的服务打印了这么多信息我还不清楚,原来大的环境记得没这么多内容,但是应该不是出错的原因):
root@ubantu:/usr/local/libexec/ipsec# /etc/init.d/ipsec start

export IPSECconfreadstatus=''

export IPSECklipsdebug=''

export IPSECplutodebug=''

export IPSECplutostderrlogtime='no'

export IPSECplutorestartoncrash='yes'

export IPSECdumpdir='/var/run/pluto/'

export IPSECplutowait='no'

export IPSECoe='no'

export IPSECfragicmp='yes'

export IPSEChidetos='yes'

export IPSECuniqueids='yes'

export IPSECnocrsend='no'

export IPSECstrictcrlpolicy='no'

export IPSECforce_busy='no'

export IPSECvirtual_private='%v4:10.0.0.0/8,%v4:192.168.0.0/16,%v4:172.16.0.0/12,%v4:25.0.0.0/8,%v6:fd00::/8,%v6:fe80::/10'

export IPSECnat_traversal='yes'

export IPSECdisable_port_floating='no'

export IPSECforce_keepalive='no'

export IPSECprotostack='auto'

export IPSECnhelpers='-1'

export IPSECsecctx_attr_value='32001'

# obsolete option 'IPSECforwardcontrol' ignored

# obsolete option 'IPSECrp_filter' ignored

# obsolete option 'IPSECplutofork' ignored

<27>Apr 30 10:09:19 ipsec_setup: /usr/local/lib/ipsec/_realsetup start

<27>Apr 30 10:09:19 ipsec_setup: Starting Openswan IPsec 2.6.51.5...

<27>Apr 30 10:09:19 ipsec_setup: /usr/local/lib/ipsec/_startklips --info /var/run/pluto/ipsec.info --debug  --omtu  --fragicmp  --hidetos  --log daemon.error %defaultroute

<27>Apr 30 10:09:19 ipsec_setup: No KLIPS support found while requested, desperately falling back to netkey

<27>Apr 30 10:09:20 ipsec_setup: NETKEY support found. Use protostack=netkey in /etc/ipsec.conf to avoid attempts to use KLIPS. Attempting to continue with NETKEY

<27>Apr 30 10:09:20 ipsec_setup: /usr/local/lib/ipsec/_startnetkey

<27>Apr 30 10:09:20 ipsec_setup: MANUALSTART_confreadstatus=

<27>Apr 30 10:09:20 ipsec_setup: MANUALSTART_confreadnames=""

<27>Apr 30 10:09:20 ipsec_setup: /usr/local/lib/ipsec/_plutorun --debug  --uniqueids yes --force_busy  --nocrsend  --strictcrlpolicy  --nat_traversal  --keep_alive  --protostack auto --force_keepalive  --disable_port_floating no --virtual_private  --listen  --crlcheckinterval 0 --ocspuri  --nhelpers  --secctx_attr_value  --dump  --opts  --stderrlog  --wait no --plutostderrlogtime no --pre  --post  --log daemon.error --pid /var/run/pluto/pluto.pid

root@ubantu:/usr/local/libexec/ipsec#
然后重新通过ipsec verify查看启动情况:
root@ubantu:/usr/local/libexec/ipsec# ipsec verify

/usr/local/libexec/ipsec/verify

Checking if IPsec got installed and started correctly:

Version check and ipsec on-path                   	[OK]

Openswan U2.6.51.5/K5.3.0-46-generic (netkey)

See `ipsec --copyright' for copyright information.

Checking for IPsec support in kernel              	[OK]

 NETKEY: Testing XFRM related proc values

         ICMP default/send_redirects              	[NOT DISABLED]

  Disable /proc/sys/net/ipv4/conf/*/send_redirects or NETKEY will cause act on or cause sending of bogus ICMP redirects!

         ICMP default/accept_redirects            	[NOT DISABLED]

  Disable /proc/sys/net/ipv4/conf/*/accept_redirects or NETKEY will cause act on or cause sending of bogus ICMP redirects!

         XFRM larval drop                         	[OK]

Hardware random device check                      	[N/A]

Checking rp_filter                                	[ENABLED]

 /proc/sys/net/ipv4/conf/all/rp_filter            	[ENABLED]

 /proc/sys/net/ipv4/conf/default/rp_filter        	[ENABLED]

Checking that pluto is running                    	[OK]

 Pluto listening for IKE on udp 500               	[OK]

 Pluto listening for IKE on tcp 500               	[NOT IMPLEMENTED]

 Pluto listening for IKE/NAT-T on udp 4500        	[DISABLED]

 Pluto listening for IKE/NAT-T on tcp 4500        	[NOT IMPLEMENTED]

 Pluto listening for IKE on tcp 10000 (cisco)     	[NOT IMPLEMENTED]

Checking NAT and MASQUERADEing                    	[TEST INCOMPLETE]

Checking 'ip' command                             	[OK]

Checking 'iptables' command                       	[OK]

ipsec verify: encountered errors

root@ubantu:/usr/local/libexec/ipsec#
该启动的基本成功启动。
3.4 修改配置文件:
3.4 修改配置文件:
由于使用ipsec verify命令查询模块信息时会提示Disable /proc/sys/net/ipv4/conf/*/send_redirects or NETKEY will cause act on or cause sending of bogus ICMP redirects!类似的信息,因此需要修改配置禁用ICMP的重定向功能。我根据网上的资料,整理了一个shell脚本。直接运行脚本即可:
#########################################################################

# File Name: openswan_redirects.sh

# Author: Toney Sun

# mail: vip_13031075266@163.com

# Created Time: 2020年05月01日 星期五 10时33分15秒

#########################################################################

#!/bin/bash

for each in /proc/sys/net/ipv4/conf/*

do

	echo ${each##*/}

    #echo 0 > $each/send_redirects

    #echo 0 > $each/accept_redirects

    echo "net.ipv4.conf.${each##*/}.send_redirects=0" >> /etc/sysctl.conf

    echo "net.ipv4.conf.${each##*/}.accept_redirects=0" >> /etc/sysctl.conf

done

sysctl -p
3.5 重新启动ipsec功能:
再次输入命令重启ipsec功能:/etc/init.d/ipsec restart
root@ubantu:/etc/ipsec.d#

root@ubantu:/etc/ipsec.d# /etc/init.d/ipsec restart

<27>May  1 14:43:01 ipsec_setup: Stopping Openswan IPsec...

<27>May  1 14:43:02 ipsec_setup: Starting Openswan IPsec U2.6.51.5/K5.3.0-51-generic...

root@ubantu:/etc/ipsec.d#
注意:我在3.3时,启动ipsec服务,打印了很多内容,这里确实是有问题的,可能是配置文件有错误导致的。我花费了一个上午的时间也没有找到是什么原因。后来更换了一个配置文件(自己写的ipsec隧道连接信息)就好了:(。我想说的是正常的启动只有上述两行打印信息。。。
3.6 添加自己的隧道环境配置
这里我添加上自己的配置信息,这是个最基本的隧道协商配置,可以协商成功:
/etc/ipsec.conf
这个文件是openswan安装后的一个配置文件,可以在这个文件里添加隧道配置信息,但是我不推荐,因为我想尽可能的保留它的原有信息。只添加了最后一行,引入自己的配置文件(ipsec_vpn.conf)
# /etc/ipsec.conf - Openswan IPsec configuration file

# This file:  /usr/local/share/doc/openswan/ipsec.conf-sample

#

# Manual:     ipsec.conf.5

version	2.0	# conforms to second version of ipsec.conf specification

# basic configuration

config setup

	# Do not set debug options to debug configuration issues!

	# plutodebug / klipsdebug = "all", "none" or a combination from below:

	# "raw crypt parsing emitting control klips pfkey natt x509 dpd private"

	# eg:

	# plutodebug="control parsing"

	# Again: only enable plutodebug or klipsdebug when asked by a developer

	#

	# enable to get logs per-peer

	# plutoopts="--perpeerlog"

	#

	# Enable core dumps (might require system changes, like ulimit -C)

	# This is required for abrtd to work properly

	# Note: incorrect SElinux policies might prevent pluto writing the core

	dumpdir=/var/run/pluto/

	#

	# NAT-TRAVERSAL support, see README.NAT-Traversal

	nat_traversal=yes

	# exclude networks used on server side by adding %v4:!a.b.c.0/24

	# It seems that T-Mobile in the US and Rogers/Fido in Canada are

	# using 25/8 as "private" address space on their 3G network.

	# This range has not been announced via BGP (at least upto 2010-12-21)

	virtual_private=%v4:10.0.0.0/8,%v4:192.168.0.0/16,%v4:172.16.0.0/12,%v4:25.0.0.0/8,%v6:fd00::/8,%v6:fe80::/10

	# OE is now off by default. Uncomment and change to on, to enable.

	oe=off

	# which IPsec stack to use. auto will try netkey, then klips then mast

	#protostack=auto

	protostack=netkey

	# Use this to log to a file, or disable logging on embedded systems (like openwrt)

	plutostderrlog=/var/log/pluto.log

# Add connections here

# sample VPN connection

# for more examples, see /etc/ipsec.d/examples/

#conn sample

#		# Left security gateway, subnet behind it, nexthop toward right.

#		left=10.0.0.1

#		leftsubnet=172.16.0.0/24

#		leftnexthop=10.22.33.44

#		# Right security gateway, subnet behind it, nexthop toward left.

#		right=10.12.12.1

#		rightsubnet=192.168.0.0/24

#		rightnexthop=10.101.102.103

#		# To authorize this connection, but not actually start it,

#		# at startup, uncomment this.

#		#auto=add

include /etc/ipsec.d/ipsec_vpn.conf
/etc/ipsec.d/ipsec_vpn.conf
这个文件完全是自己的(当然是参考给的demo)隧道配置信息:
conn test

        auto=start

        pfs=no                  # PFS(Perfect Forward Secrecy)

        compress=no             # IP Compression

        type=tunnel

        keyingtries=0

        disablearrivalcheck=no

        ## phase 1 ##

        ike=aes128-sha1;modp1024  # 第一阶段参数

        ikelifetime=86400s        # 第一阶段的生存时间

        keyexchange=ike

        ## phase 2 ##

        phase2alg=aes128-sha1     # 第二阶段参数

        salifetime=3600s          # 第二阶段参数

        phase2=esp

        left=192.168.1.3

        leftid=@left

        leftsubnet=10.28.1.0/24

        leftsourceip=192.168.1.3

        leftnexthop=%defaultroute

        right=192.168.1.13

        rightid=@right

        rightsubnet=10.28.2.0/24

        rightsourceip=192.168.1.13

        rightnexthop=%defaultroute

	# rsakey AQPGLAfkE

	leftrsasigkey=0sAQPGLAfkEfGISg4FfXZqRe47LMX5sGyG+0ec1b5FWDriEpy4tiOvjusVzx2eyP3PTM+J9uKW93GxRugxpqa82O/aegGpnUpWGHBnEBBIvjpiMawrv3RhtCYeXodMKKqI6jhdEYzU69AYHkbPI3jOtk8TVYhaoSEkDRoBkbUzasAXOCrxL6a61G8C8XwOaW0qz+yEaoYwh/Nhc0fz1li/vQWofwXuR7ZQ5FlfDUY+JCgqbIhpmUfA9mRtawqIupYxQO3j55lhX4yUT9mBcRl9dlUNZnNEXL3hvoIABm/O+xMTwM695JBF0lVM5MJ/zizy7TsbHFJlNEPuGMI/An4FseHK0pQwe4BUZ08A8izIiI9ZT4Lp

	# rsakey AQOzIeXfR

	rightrsasigkey=0sAQOzIeXfRPL5ODGw97Y6wwotc9LExdihgdfxprYLKukKSpe3oH9G6smILqqkU+8INImuHwpL7mDPqKxDWb/YiYxRgRciXAMkuhq8c/IjcVIbK9EXSmWyPkC1Rn5+cD+2FDUd85FtQWMlEObwLJDC0UxqN5ZoFr7sR0Kur9LqZFS1FlD72E/x3RckY1R/LiR27R83Zv2EXEi1lhYf/ZstKPsGuzlEAzSnyV6jRz9Urz/SFrnyL8vGapiq5p6q+PkBEqsw97Wp8taj8tzK+lH1oxMB4+ArUKhGNk/w+tKPgKrLI8AR2nh2892P6cN0dta83t67k8Mf0ZrOCpxWLcZUnjLkFBvs9fJca3ONXH2RA+jMjn1l
隧道两端可以使用同一个配置文件(已经区分开了左右的配置)。
隧道协商过程抓包如下:
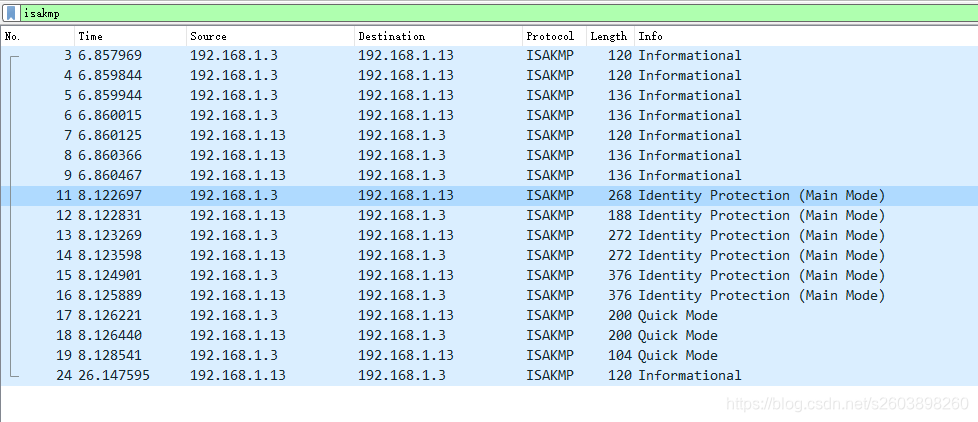
使用命令行查看状态信息如下:
root@ubantu:/home# ipsec auto status

ipsec auto: warning: obsolete command syntax used

000 using kernel interface: netkey

000 interface ens33/ens33 2409:8a00:18eb:2b00:69e6:ab5c:116a:da03 (AF_INET6)

000 interface ens33/ens33 2409:8a00:18eb:2b00:cdca:7d9:32ac:4d08 (AF_INET6)

000 interface lo/lo ::1 (AF_INET6)

000 interface lo/lo 127.0.0.1 (AF_INET)

000 interface lo/lo 127.0.0.1 (AF_INET)

000 interface ens33/ens33 192.168.1.3 (AF_INET)

000 interface ens33/ens33 192.168.1.3 (AF_INET)

000 using secrets file: /etc/ipsec.secrets

000 %myid = (none)

000 debug none

000

000 virtual_private (%priv):

000 - allowed 6 subnets: 10.0.0.0/8, 192.168.0.0/16, 172.16.0.0/12, 25.0.0.0/8, fd00::/8, fe80::/10

000 - disallowed 0 subnets:

000 WARNING: Disallowed subnets in virtual_private= is empty. If you have

000          private address space in internal use, it should be excluded!

000

000 algorithm ESP encrypt: id=2, name=ESP_DES, ivlen=8, keysizemin=64, keysizemax=64

000 algorithm ESP encrypt: id=3, name=ESP_3DES, ivlen=8, keysizemin=192, keysizemax=192

000 algorithm ESP encrypt: id=6, name=ESP_CAST, ivlen=8, keysizemin=40, keysizemax=128

000 algorithm ESP encrypt: id=7, name=ESP_BLOWFISH, ivlen=8, keysizemin=40, keysizemax=448

000 algorithm ESP encrypt: id=11, name=ESP_NULL, ivlen=0, keysizemin=0, keysizemax=0

000 algorithm ESP encrypt: id=12, name=ESP_AES, ivlen=8, keysizemin=128, keysizemax=256

000 algorithm ESP encrypt: id=13, name=ESP_AES_CTR, ivlen=8, keysizemin=160, keysizemax=288

000 algorithm ESP encrypt: id=14, name=ESP_AES_CCM_A, ivlen=8, keysizemin=128, keysizemax=256

000 algorithm ESP encrypt: id=15, name=ESP_AES_CCM_B, ivlen=8, keysizemin=128, keysizemax=256

000 algorithm ESP encrypt: id=16, name=ESP_AES_CCM_C, ivlen=8, keysizemin=128, keysizemax=256

000 algorithm ESP encrypt: id=18, name=ESP_AES_GCM_A, ivlen=8, keysizemin=160, keysizemax=288

000 algorithm ESP encrypt: id=19, name=ESP_AES_GCM_B, ivlen=12, keysizemin=160, keysizemax=288

000 algorithm ESP encrypt: id=20, name=ESP_AES_GCM_C, ivlen=16, keysizemin=160, keysizemax=288

000 algorithm ESP encrypt: id=22, name=ESP_CAMELLIA, ivlen=8, keysizemin=128, keysizemax=256

000 algorithm ESP encrypt: id=252, name=ESP_SERPENT, ivlen=8, keysizemin=128, keysizemax=256

000 algorithm ESP encrypt: id=253, name=ESP_TWOFISH, ivlen=8, keysizemin=128, keysizemax=256

000 algorithm ESP auth attr: id=1, name=AUTH_ALGORITHM_HMAC_MD5, keysizemin=128, keysizemax=128

000 algorithm ESP auth attr: id=2, name=AUTH_ALGORITHM_HMAC_SHA1, keysizemin=160, keysizemax=160

000 algorithm ESP auth attr: id=5, name=AUTH_ALGORITHM_HMAC_SHA2_256, keysizemin=256, keysizemax=256

000 algorithm ESP auth attr: id=6, name=AUTH_ALGORITHM_HMAC_SHA2_384, keysizemin=384, keysizemax=384

000 algorithm ESP auth attr: id=7, name=AUTH_ALGORITHM_HMAC_SHA2_512, keysizemin=512, keysizemax=512

000 algorithm ESP auth attr: id=8, name=AUTH_ALGORITHM_HMAC_RIPEMD, keysizemin=160, keysizemax=160

000 algorithm ESP auth attr: id=9, name=AUTH_ALGORITHM_AES_CBC, keysizemin=128, keysizemax=128

000 algorithm ESP auth attr: id=251, name=AUTH_ALGORITHM_NULL_KAME, keysizemin=0, keysizemax=0

000

000 algorithm IKE encrypt: id=0, name=(null), blocksize=16, keydeflen=131

000 algorithm IKE encrypt: id=5, name=OAKLEY_3DES_CBC, blocksize=8, keydeflen=192

000 algorithm IKE encrypt: id=7, name=OAKLEY_AES_CBC, blocksize=16, keydeflen=128

000 algorithm IKE hash: id=1, name=OAKLEY_MD5, hashsize=16

000 algorithm IKE hash: id=2, name=OAKLEY_SHA1, hashsize=20

000 algorithm IKE hash: id=4, name=OAKLEY_SHA2_256, hashsize=32

000 algorithm IKE hash: id=6, name=OAKLEY_SHA2_512, hashsize=64

000 algorithm IKE dh group: id=2, name=OAKLEY_GROUP_MODP1024, bits=1024

000 algorithm IKE dh group: id=5, name=OAKLEY_GROUP_MODP1536, bits=1536

000 algorithm IKE dh group: id=14, name=OAKLEY_GROUP_MODP2048, bits=2048

000 algorithm IKE dh group: id=15, name=OAKLEY_GROUP_MODP3072, bits=3072

000 algorithm IKE dh group: id=16, name=OAKLEY_GROUP_MODP4096, bits=4096

000 algorithm IKE dh group: id=17, name=OAKLEY_GROUP_MODP6144, bits=6144

000 algorithm IKE dh group: id=18, name=OAKLEY_GROUP_MODP8192, bits=8192

000 algorithm IKE dh group: id=22, name=OAKLEY_GROUP_DH22, bits=1024

000 algorithm IKE dh group: id=23, name=OAKLEY_GROUP_DH23, bits=2048

000 algorithm IKE dh group: id=24, name=OAKLEY_GROUP_DH24, bits=2048

000

000 stats db_ops: {curr_cnt, total_cnt, maxsz} :context={0,2,64} trans={0,2,3072} attrs={0,2,2048}

000

000 "test": 10.28.1.0/24===192.168.1.3[@left]---192.168.1.1...192.168.1.1---192.168.1.13[@right]===10.28.2.0/24; erouted; eroute owner: #4

000 "test":     myip=192.168.1.3; hisip=192.168.1.13;

000 "test":   keys: 1:8F4C 47D1 466A 6F7C C469 B04C 9525 1F9B E69A E022 2:none...

000 "test":        ....1:AD25 3E8F B131 F1DB 5926 B2C9 CCF1 2D3E A9D7 858D 2:none

000 "test":   ike_life: 86400s; ipsec_life: 3600s; rekey_margin: 540s; rekey_fuzz: 100%; keyingtries: 0

000 "test":   policy: RSASIG+ENCRYPT+TUNNEL+UP+IKEv2ALLOW+SAREFTRACK; prio: 24,24; interface: ens33; kind=CK_PERMANENT

000 "test":   newest ISAKMP SA: #1; newest IPsec SA: #4; eroute owner: #4;

000 "test":   IKE algorithms wanted: AES_CBC(7)_128-SHA1(2)_000-MODP1024(2); flags=-strict

000 "test":   IKE algorithms found:  AES_CBC(7)_128-SHA1(2)_160-MODP1024(2)

000 "test":   IKE algorithm newest: AES_CBC_128-SHA1-MODP1024

000 "test":   ESP algorithms wanted: AES(12)_128-SHA1(2)_000; flags=-strict

000 "test":   ESP algorithms loaded: AES(12)_128-SHA1(2)_160

000 "test":   ESP algorithm newest: AES_128-HMAC_SHA1; pfsgroup=<N/A>

000

000 #3: "test":500 IKEv1.0 STATE_QUICK_R2 (IPsec SA established); EVENT_SA_REPLACE in 3207s; isakmp#2; idle; import:not set

000 #3: "test" esp.4476710a@192.168.1.13 esp.aaa03819@192.168.1.3 tun.0@192.168.1.13 tun.0@192.168.1.3 ref=0 refhim=4294901761

000 #2: "test":500 IKEv1.0 STATE_MAIN_R3 (sent MR3, ISAKMP SA established); EVENT_SA_REPLACE in 86007s; lastdpd=-1s(seq in:0 out:0); idle; import:not set

000 #4: "test":500 IKEv1.0 STATE_QUICK_I2 (sent QI2, IPsec SA established); EVENT_SA_REPLACE in 2940s; newest IPSEC; eroute owner; isakmp#1; idle; import:admin initiate

000 #4: "test" esp.5863f7d3@192.168.1.13 esp.f2d719f9@192.168.1.3 tun.0@192.168.1.13 tun.0@192.168.1.3 ref=0 refhim=4294901761

000 #1: "test":500 IKEv1.0 STATE_MAIN_I4 (ISAKMP SA established); EVENT_SA_REPLACE in 85579s; newest ISAKMP; lastdpd=-1s(seq in:0 out:0); idle; import:admin initiate

000

root@ubantu:/home#
从80行开始便是隧道协商信息。
日志信息如下:
root@ubantu:/var/log# cat pluto.log

Plutorun started on Fri May 1 15:06:45 CST 2020

adjusting ipsec.d to /etc/ipsec.d

Labelled IPsec not enabled; value 32001 ignored.

Starting Pluto (Openswan Version 2.6.51.5; Vendor ID OSW~|tYiWYsW) pid:25601

LEAK_DETECTIVE support [disabled]

OCF support for IKE [disabled]

SAref support [disabled]: Protocol not available

SAbind support [disabled]: Protocol not available

NSS support [disabled]

HAVE_STATSD notification support not compiled in

Setting NAT-Traversal port-4500 floating to on

   port floating activation criteria nat_t=1/port_float=1

   NAT-Traversal support  [enabled]

using /dev/urandom as source of random entropy

ike_alg_register_enc(): Activating OAKLEY_AES_CBC: Ok (ret=0)

ike_alg_register_hash(): Activating OAKLEY_SHA2_512: Ok (ret=0)

ike_alg_register_hash(): Activating OAKLEY_SHA2_256: Ok (ret=0)

starting up 1 cryptographic helpers

started helper pid=25603 (fd:7)

Using Linux XFRM/NETKEY IPsec interface code on 5.3.0-51-generic

ike_alg_register_enc(): Activating aes_ccm_8: Ok (ret=0)

ike_alg_add(): ERROR: algo_type '0', algo_id '0', Algorithm type already exists

ike_alg_register_enc(): Activating aes_ccm_12: FAILED (ret=-17)

ike_alg_add(): ERROR: algo_type '0', algo_id '0', Algorithm type already exists

ike_alg_register_enc(): Activating aes_ccm_16: FAILED (ret=-17)

ike_alg_add(): ERROR: algo_type '0', algo_id '0', Algorithm type already exists

ike_alg_register_enc(): Activating aes_gcm_8: FAILED (ret=-17)

ike_alg_add(): ERROR: algo_type '0', algo_id '0', Algorithm type already exists

ike_alg_register_enc(): Activating aes_gcm_12: FAILED (ret=-17)

ike_alg_add(): ERROR: algo_type '0', algo_id '0', Algorithm type already exists

ike_alg_register_enc(): Activating aes_gcm_16: FAILED (ret=-17)

using /dev/urandom as source of random entropy

loaded key: 8F4C 47D1 466A 6F7C C469 B04C 9525 1F9B E69A E022

loaded key: AD25 3E8F B131 F1DB 5926 B2C9 CCF1 2D3E A9D7 858D

use keyid: 1:8F4C 47D1 466A 6F7C C469 B04C 9525 1F9B E69A E022 / 2:<>

use keyid: 1:AD25 3E8F B131 F1DB 5926 B2C9 CCF1 2D3E A9D7 858D / 2:<>

adding connection: "test"

listening for IKE messages

adding interface ens33/ens33 192.168.1.3:500 (AF_INET)

adding interface ens33/ens33 192.168.1.3:4500

adding interface lo/lo 127.0.0.1:500 (AF_INET)

adding interface lo/lo 127.0.0.1:4500

adding interface lo/lo ::1:500 (AF_INET6)

adding interface ens33/ens33 2409:8a00:18eb:2b00:cdca:7d9:32ac:4d08:500 (AF_INET6)

adding interface ens33/ens33 2409:8a00:18eb:2b00:69e6:ab5c:116a:da03:500 (AF_INET6)

loading secrets from "/etc/ipsec.secrets"

loaded private key for keyid: PPK_RSA:AQPGLAfkE/8F4C 47D1 466A 6F7C C469 B04C 9525 1F9B E69A E022

| creating SPD to 192.168.1.3->spi=00000104@0.0.0.0 proto=61

| creating SPD to 192.168.1.3->spi=00000104@0.0.0.0 proto=61

"test" #1: initiating Main Mode

"test" #1: ERROR: asynchronous network error report on ens33 (sport=500) for message to 192.168.1.13 port 500, complainant 192.168.1.13: Connection refused [errno 111, origin ICMP type 3 code 3 (not authenticated)]

"test" #1: ERROR: asynchronous network error report on ens33 (sport=500) for message to 192.168.1.13 port 500, complainant 192.168.1.13: Connection refused [errno 111, origin ICMP type 3 code 3 (not authenticated)]

"test" #1: ERROR: asynchronous network error report on ens33 (sport=500) for message to 192.168.1.13 port 500, complainant 192.168.1.13: Connection refused [errno 111, origin ICMP type 3 code 3 (not authenticated)]

"test" #1: ERROR: asynchronous network error report on ens33 (sport=500) for message to 192.168.1.13 port 500, complainant 192.168.1.13: Connection refused [errno 111, origin ICMP type 3 code 3 (not authenticated)]

"test" #1: ERROR: asynchronous network error report on ens33 (sport=500) for message to 192.168.1.13 port 500, complainant 192.168.1.13: Connection refused [errno 111, origin ICMP type 3 code 3 (not authenticated)]

pending Quick Mode with 192.168.1.13 "test" took too long -- replacing phase 1

"test" #1: ERROR: asynchronous network error report on ens33 (sport=500) for message to 192.168.1.13 port 500, complainant 192.168.1.13: Connection refused [errno 111, origin ICMP type 3 code 3 (not authenticated)]

packet from 192.168.1.13:500: received Vendor ID payload [Openswan (this version) 2.6.51.5 ]

packet from 192.168.1.13:500: received Vendor ID payload [Dead Peer Detection]

packet from 192.168.1.13:500: received Vendor ID payload [RFC 3947] method set to=115

packet from 192.168.1.13:500: received Vendor ID payload [draft-ietf-ipsec-nat-t-ike-03] meth=108, but already using method 115

packet from 192.168.1.13:500: received Vendor ID payload [draft-ietf-ipsec-nat-t-ike-02_n] meth=106, but already using method 115

packet from 192.168.1.13:500: received Vendor ID payload [draft-ietf-ipsec-nat-t-ike-02] meth=107, but already using method 115

packet from 192.168.1.13:500: received Vendor ID payload [draft-ietf-ipsec-nat-t-ike-00]

"test" #2: responding to Main Mode

"test" #2: transition from state STATE_MAIN_R0 to state STATE_MAIN_R1

"test" #2: STATE_MAIN_R1: sent MR1, expecting MI2

"test" #2: NAT-Traversal: Result using draft-ietf-ipsec-nat-t-ike (MacOS X): no NAT detected

"test" #2: transition from state STATE_MAIN_R1 to state STATE_MAIN_R2

"test" #2: STATE_MAIN_R2: sent MR2, expecting MI3

| WARNING: /usr/src/openswan-2.6.51.5/programs/pluto/crypt_start_dh.c:160: encryptor 'aes' expects keylen 16/128, SA #2 INITIATOR keylen is 20

| WARNING: /usr/src/openswan-2.6.51.5/programs/pluto/crypt_start_dh.c:160: encryptor 'aes' expects keylen 16/128, SA #2 RESPONDER keylen is 0

| WARNING: /usr/src/openswan-2.6.51.5/programs/pluto/ikev1_main.c:1206: encryptor 'aes' expects keylen 16/128, SA #2 INITIATOR keylen is 20

| WARNING: /usr/src/openswan-2.6.51.5/programs/pluto/ikev1_main.c:1206: encryptor 'aes' expects keylen 16/128, SA #2 RESPONDER keylen is 0

"test" #2: Main mode peer ID is ID_FQDN: '@right'

"test" #2: transition from state STATE_MAIN_R2 to state STATE_MAIN_R3

"test" #2: STATE_MAIN_R3: sent MR3, ISAKMP SA established {auth=OAKLEY_RSA_SIG oursig= theirsig=AQOzIeXfR cipher=aes_128 prf=oakley_sha group=modp1024}

"test" #2: the peer proposed: 10.28.1.0/24:0/0 -> 10.28.2.0/24:0/0

"test" #3: responding to Quick Mode proposal {msgid:d7a7bc25}

"test" #3:     us: 10.28.1.0/24===192.168.1.3[@left]---192.168.1.1

"test" #3:   them: 192.168.1.1---192.168.1.13[@right]===10.28.2.0/24

| creating SPD to 192.168.1.13->spi=00010000@192.168.1.3 proto=4

"test" #3: transition from state STATE_QUICK_R0 to state STATE_QUICK_R1

"test" #3: STATE_QUICK_R1: sent QR1, inbound IPsec SA installed, expecting QI2

| creating SPD to 192.168.1.3->spi=00000000@192.168.1.13 proto=4

"test" #3: transition from state STATE_QUICK_R1 to state STATE_QUICK_R2

"test" #3: STATE_QUICK_R2: IPsec SA established tunnel mode {ESP=>0x4476710a <0xaaa03819 xfrm=AES_128-HMAC_SHA1 NATOA=none NATD=none DPD=none}

"test" #1: received Vendor ID payload [Openswan (this version) 2.6.51.5 ]

"test" #1: received Vendor ID payload [Dead Peer Detection]

"test" #1: received Vendor ID payload [RFC 3947] method set to=115

"test" #1: enabling possible NAT-traversal with method RFC 3947 (NAT-Traversal)

"test" #1: transition from state STATE_MAIN_I1 to state STATE_MAIN_I2

"test" #1: STATE_MAIN_I2: sent MI2, expecting MR2

| WARNING: /usr/src/openswan-2.6.51.5/programs/pluto/crypt_start_dh.c:160: encryptor 'aes' expects keylen 16/128, SA #1 INITIATOR keylen is 20

| WARNING: /usr/src/openswan-2.6.51.5/programs/pluto/crypt_start_dh.c:160: encryptor 'aes' expects keylen 16/128, SA #1 RESPONDER keylen is 0

"test" #1: NAT-Traversal: Result using draft-ietf-ipsec-nat-t-ike (MacOS X): no NAT detected

"test" #1: transition from state STATE_MAIN_I2 to state STATE_MAIN_I3

"test" #1: STATE_MAIN_I3: sent MI3, expecting MR3

"test" #1: received Vendor ID payload [CAN-IKEv2]

"test" #1: Main mode peer ID is ID_FQDN: '@right'

"test" #1: transition from state STATE_MAIN_I3 to state STATE_MAIN_I4

"test" #1: STATE_MAIN_I4: ISAKMP SA established {auth=OAKLEY_RSA_SIG oursig= theirsig=AQOzIeXfR cipher=aes_128 prf=oakley_sha group=modp1024}

"test" #4: initiating Quick Mode RSASIG+ENCRYPT+TUNNEL+UP+IKEv2ALLOW+SAREFTRACK {using isakmp#1 msgid:e65ec697 proposal=AES(12)_128-SHA1(2)_160 pfsgroup=no-pfs}

| creating SPD to 192.168.1.3->spi=00000000@192.168.1.13 proto=4

"test" #4: transition from state STATE_QUICK_I1 to state STATE_QUICK_I2

"test" #4: STATE_QUICK_I2: sent QI2, IPsec SA established tunnel mode {ESP=>0x5863f7d3 <0xf2d719f9 xfrm=AES_128-HMAC_SHA1 NATOA=none NATD=none DPD=none}

root@ubantu:/var/log#
至此,openswan才是真的编译、安装、环境搭建完毕。
openswan源码ubantu下编译、安装、基本环境搭建的更多相关文章
- CentOS6.5下编译安装LAMP环境
LAMP(Linux-Apache-MySQL-PHP)网站架构是目前国际流行的Web框架.该框架能够满足大流量.大并发量的网站需求:当然.也可以直接使用高性能的服务器.高性能的负载均衡硬件以及CDN ...
- centos中软件源码简单的编译安装./configure,make ,make install
参考 Linux下源码编译安装详解 源码编译安装分三个步骤 1. 编译参数配置 2. 编译 3. 安装 1. 源码编译安装环境检查以及编译参数配置 编译器在开始工作之前,需要知道当前的系统环境,比如标 ...
- 下载Dubbo源码后的编译安装启动
1:安装jdk,maven 配制环境变量: 2:安装zookeeper 配制zookeeper环境变量 3:把dubbo源码编译成war包 启动cmd黑窗口 ,进入 源码文件 ...
- linux学习笔记-lrmi源码包的编译安装方法
我的邮箱地址:zytrenren@163.com欢迎大家交流学习纠错! 官方的lrmi包没有人更新了,如果碰到需要这个编译安装这个包,可以参考我的解决思路,如下: https://pkgs.org/这 ...
- centos6.7下编译安装lamp环境
编译C源代码: 前提:提供开发工具及开发环境 通过“包组”提供开发组件,CentOS 6: "Development Tools", "Server Platform D ...
- CentOS 6.4 linux下编译安装 LNMP环境
1.nginx编译安装 2.PHP编译安装 3.mysql编译安装 4.NGINX配置模板 5.CentOS 6.4 php-fpm 添加service 添加平滑启动/重启
- eos源码分析和应用(一)调试环境搭建
转载自 http://www.limerence2017.com/2018/09/02/eos1/#more eos基于区块链技术实现的开源引擎,开发人员可以基于该引擎开发DAPP(分布式应用).下面 ...
- 2019-9-16:渗透测试,基础学习,Linux下软件安装,环境搭建,笔记
Centos linux下软件安装yum 通过分析rpm包头数据后,自动解决依赖关系,直接云端下载软件,根据不同版本系统获取不同软件信息,按顺序下载rpm包,安装软件yum search 软件名:搜索 ...
- 曹工说Redis源码(1)-- redis debug环境搭建,使用clion,达到和调试java一样的效果
概要 最近写了spring系列,这个系列还在进行中,然后有些同学开始叫我大神,然后以为我各方面都比较厉害,当然了,我是有自知之明的,大佬大神什么的,当作一个称呼就好,如果真的以为自己就是大神,那可能就 ...
随机推荐
- 背单词(AC自动机+线段树+dp+dfs序)
G. 背单词 内存限制:256 MiB 时间限制:1000 ms 标准输入输出 题目类型:传统 评测方式:文本比较 题目描述 给定一张包含N个单词的表,每个单词有个价值W.要求从中选出一个子序列使 ...
- kali linux重启网卡失败:Job for networking.service failed because the control process exited with error code. See "systemctl status networking.service" and "journalctl -xe" for details. 问题排查
linux菜鸡的时候,总是为了配置网络而烦恼,重启网卡的原因有很多,我这次是因为配置了固定IP[使用第三方工具连接]所以需要重启网卡,出现 Job for networking.service fai ...
- CentOS帮助类语法
目录 一.man获取帮助信息 二.help获得shell内置命令的帮助信息 三.history查看所有命令历史 补充:Linux常用快捷键 一.man获取帮助信息 基本语法:man [命令或配置文件] ...
- Notes about WindowPadX
WindowPadX乃一Autohotkey脚本,具有强大的单/多显示器窗口排布能力且易于配置.有了它,那些Pro版收费的.需要安装的DisplayFusion, MultiMon TaskBar, ...
- Shell-14-常用命令和工具
常用命令 有人说 Shell 脚本是命令堆积的一个文件, 按顺序去执行 还有人说想学好 Shell 脚本,要把 Linux 上各种常见的命令或工具掌握了,这些说法都没错 Shell 语言本身在语法结构 ...
- cmseasy&内网渗透 Writeup
某CTF内网渗透 题目:www.whalwl.site:8021 目录 cmseasy 内网横向渗透 cmseasy 简单看一下网站架构 Apache/2.4.7 (Ubuntu) PHP/5.5.9 ...
- 常见web中间件漏洞(二)Apache漏洞
Apache(总联想到武直那个)是最常见,使用人数最多的一款web服务器软件.跨平台,多扩展,开源,用过的人都说好 Apache的漏洞主要集中在解析漏洞这一块 1.未知扩展名解析漏洞 Apache的一 ...
- Centos7-编译安装zlib
1.解压并进入zlib目录tar xf zlib-1.2.11.tar.gz cd zlib-1.2.11 2.查看编辑参数[root@manage zlib-1.2.11]#./configure ...
- NOIP 模拟 $21\; \rm Game$
题解 考试的时候遇到了这个题,没多想,直接打了优先队列,但没想到分差竟然不是绝对值,自闭了. 正解: 值域很小,所以我们开个桶,维护当前最大值. 如果新加入的值大于最大值,那么它肯定直接被下一个人选走 ...
- spring-cloud-sleuth+zipkin追踪服务
1, 父Maven pom 文件 <parent> <groupId>org.springframework.boot</groupId> <artifact ...