Walkthrough: Create and use your own Dynamic Link Library (C++)
This step-by-step walkthrough shows how to use the Visual Studio IDE to create your own dynamic link library (DLL) written in Microsoft C++ (MSVC). Then it shows how to use the DLL from another C++ app. DLLs (also known as shared libraries in UNIX-based operating systems) are one of the most useful kinds of Windows components. You can use them as a way to share code and resources, and to shrink the size of your apps. DLLs can even make it easier to service and extend your apps.
In this walkthrough, you'll create a DLL that implements some math functions. Then you'll create a console app that uses the functions from the DLL. You'll also get an introduction to some of the programming techniques and conventions used in Windows DLLs.
This walkthrough covers these tasks:
Create a DLL project in Visual Studio.
Add exported functions and variables to the DLL.
Create a console app project in Visual Studio.
Use the functions and variables imported from the DLL in the console app.
Run the completed app.
Like a statically linked library, a DLL exports variables, functions, and resources by name. A client app imports the names to use those variables, functions, and resources. Unlike a statically linked library, Windows connects the imports in your app to the exports in a DLL at load time or at run time, instead of connecting them at link time. Windows requires extra information that isn't part of the standard C++ compilation model to make these connections. The MSVC compiler implements some Microsoft-specific extensions to C++ to provide this extra information. We explain these extensions as we go.
This walkthrough creates two Visual Studio solutions; one that builds the DLL, and one that builds the client app. The DLL uses the C calling convention. It can be called from apps written in other programming languages, as long as the platform, calling conventions, and linking conventions match. The client app uses implicit linking, where Windows links the app to the DLL at load-time. This linking lets the app call the DLL-supplied functions just like the functions in a statically linked library.
This walkthrough doesn't cover some common situations. The code doesn't show the use of C++ DLLs by other programming languages. It doesn't show how to create a resource-only DLL, or how to use explicit linking to load DLLs at run-time rather than at load-time. Rest assured, you can use MSVC and Visual Studio to do all these things.
For links to more information about DLLs, see Create C/C++ DLLs in Visual Studio. For more information about implicit linking and explicit linking, see Determine which linking method to use. For information about creating C++ DLLs for use with programming languages that use C-language linkage conventions, see Exporting C++ functions for use in C-language executables. For information about how to create DLLs for use with .NET languages, see Calling DLL Functions from Visual Basic Applications.
Prerequisites
- A computer that runs Microsoft Windows 7 or later versions. We recommend Windows 10 for the best development experience.
A copy of Visual Studio. For information on how to download and install Visual Studio, see Install Visual Studio. When you run the installer, make sure that the Desktop development with C++ workload is checked. Don't worry if you didn't install this workload when you installed Visual Studio. You can run the installer again and install it now.

An understanding of the basics of using the Visual Studio IDE. If you've used Windows desktop apps before, you can probably keep up. For an introduction, see Visual Studio IDE feature tour.
An understanding of enough of the fundamentals of the C++ language to follow along. Don't worry, we don't do anything too complicated.
Create the DLL project
In this set of tasks, you create a project for your DLL, add code, and build it. To begin, start the Visual Studio IDE, and sign in if you need to. The instructions vary slightly depending on which version of Visual Studio you're using. Make sure you have the correct version selected in the control in the upper left of this page.
To create a DLL project in Visual Studio 2019
On the menu bar, choose File > New > Project to open the Create a New Project dialog box.
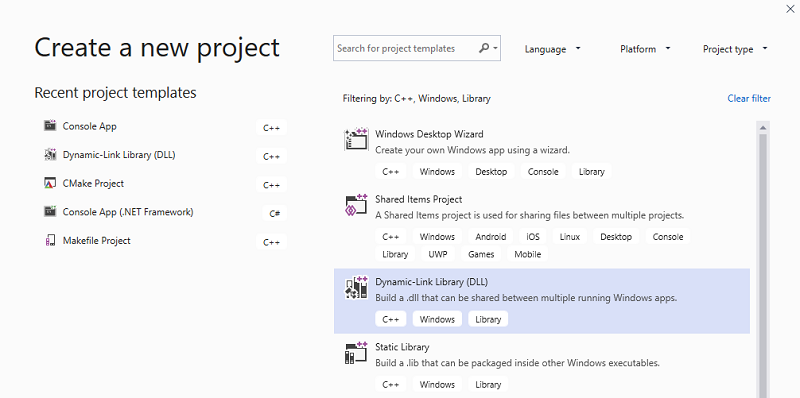
At the top of the dialog, set Language to C++, set Platform to Windows, and set Project type to Library.
From the filtered list of project types, select Dynamic-link Library (DLL), and then choose Next.
In the Configure your new project page, enter MathLibrary in the Project name box to specify a name for the project. Leave the default Location and Solution name values. Set Solution to Create new solution. Uncheck Place solution and project in the same directory if it's checked.
Choose the Create button to create the project.
When the solution is created, you can see the generated project and source files in the Solution Explorer window in Visual Studio.

Right now, this DLL doesn't do very much. Next, you'll create a header file to declare the functions your DLL exports, and then add the function definitions to the DLL to make it more useful.
To add a header file to the DLL
To create a header file for your functions, on the menu bar, choose Project > Add New Item.
In the Add New Item dialog box, in the left pane, select Visual C++. In the center pane, select Header File (.h). Specify MathLibrary.h as the name for the header file.

Choose the Add button to generate a blank header file, which is displayed in a new editor window.

Replace the contents of the header file with this code:
C++Copy// MathLibrary.h - Contains declarations of math functions
#pragma once #ifdef MATHLIBRARY_EXPORTS
#define MATHLIBRARY_API __declspec(dllexport)
#else
#define MATHLIBRARY_API __declspec(dllimport)
#endif // The Fibonacci recurrence relation describes a sequence F
// where F(n) is { n = 0, a
// { n = 1, b
// { n > 1, F(n-2) + F(n-1)
// for some initial integral values a and b.
// If the sequence is initialized F(0) = 1, F(1) = 1,
// then this relation produces the well-known Fibonacci
// sequence: 1, 1, 2, 3, 5, 8, 13, 21, 34, ... // Initialize a Fibonacci relation sequence
// such that F(0) = a, F(1) = b.
// This function must be called before any other function.
extern "C" MATHLIBRARY_API void fibonacci_init(
const unsigned long long a, const unsigned long long b); // Produce the next value in the sequence.
// Returns true on success and updates current value and index;
// false on overflow, leaves current value and index unchanged.
extern "C" MATHLIBRARY_API bool fibonacci_next(); // Get the current value in the sequence.
extern "C" MATHLIBRARY_API unsigned long long fibonacci_current(); // Get the position of the current value in the sequence.
extern "C" MATHLIBRARY_API unsigned fibonacci_index();
This header file declares some functions to produce a generalized Fibonacci sequence, given two initial values. A call to fibonacci_init(1, 1) generates the familiar Fibonacci number sequence.
Notice the preprocessor statements at the top of the file. The new project template for a DLL project adds PROJECTNAME_EXPORTS to the defined preprocessor macros. In this example, Visual Studio defines MATHLIBRARY_EXPORTS when your MathLibrary DLL project is built.
When the MATHLIBRARY_EXPORTS macro is defined, the MATHLIBRARY_API macro sets the __declspec(dllexport) modifier on the function declarations. This modifier tells the compiler and linker to export a function or variable from the DLL for use by other applications. When MATHLIBRARY_EXPORTS is undefined, for example, when the header file is included by a client application, MATHLIBRARY_API applies the __declspec(dllimport) modifier to the declarations. This modifier optimizes the import of the function or variable in an application. For more information, see dllexport, dllimport.
To add an implementation to the DLL
In Solution Explorer, right-click on the Source Files node and choose Add > New Item. Create a new .cpp file called MathLibrary.cpp, in the same way that you added a new header file in the previous step.
In the editor window, select the tab for MathLibrary.cpp if it's already open. If not, in Solution Explorer, double-click MathLibrary.cpp in the Source Files folder of the MathLibrary project to open it.
In the editor, replace the contents of the MathLibrary.cpp file with the following code:
C++Copy// MathLibrary.cpp : Defines the exported functions for the DLL.
#include "pch.h" // use stdafx.h in Visual Studio 2017 and earlier
#include <utility>
#include <limits.h>
#include "MathLibrary.h" // DLL internal state variables:
static unsigned long long previous_; // Previous value, if any
static unsigned long long current_; // Current sequence value
static unsigned index_; // Current seq. position // Initialize a Fibonacci relation sequence
// such that F(0) = a, F(1) = b.
// This function must be called before any other function.
void fibonacci_init(
const unsigned long long a,
const unsigned long long b)
{
index_ = 0;
current_ = a;
previous_ = b; // see special case when initialized
} // Produce the next value in the sequence.
// Returns true on success, false on overflow.
bool fibonacci_next()
{
// check to see if we'd overflow result or position
if ((ULLONG_MAX - previous_ < current_) ||
(UINT_MAX == index_))
{
return false;
} // Special case when index == 0, just return b value
if (index_ > 0)
{
// otherwise, calculate next sequence value
previous_ += current_;
}
std::swap(current_, previous_);
++index_;
return true;
} // Get the current value in the sequence.
unsigned long long fibonacci_current()
{
return current_;
} // Get the current index position in the sequence.
unsigned fibonacci_index()
{
return index_;
}
To verify that everything works so far, compile the dynamic link library. To compile, choose Build > Build Solution on the menu bar. The DLL and related compiler output are placed in a folder called Debug directly below the solution folder. If you create a Release build, the output is placed in a folder called Release. The output should look something like this:
1>------ Build started: Project: MathLibrary, Configuration: Debug Win32 ------

1>pch.cpp

1>dllmain.cpp

1>MathLibrary.cpp

1>Generating Code...

1>   Creating library C:\Users\username\Source\Repos\MathLibrary\Debug\MathLibrary.lib and object C:\Users\username\Source\Repos\MathLibrary\Debug\MathLibrary.exp

1>MathLibrary.vcxproj -> C:\Users\username\Source\Repos\MathLibrary\Debug\MathLibrary.dll

========== Build: 1 succeeded, 0 failed, 0 up-to-date, 0 skipped ==========
Congratulations, you've created a DLL using Visual Studio! Next, you'll create a client app that uses the functions exported by the DLL.
Create a client app that uses the DLL
When you create a DLL, think about how client apps may use it. To call the functions or access the data exported by a DLL, client source code must have the declarations available at compile time. At link time, the linker requires information to resolve the function calls or data accesses. A DLL supplies this information in an import library, a file that contains information about how to find the functions and data, instead of the actual code. And at run time, the DLL must be available to the client, in a location that the operating system can find.
Whether it's your own or from a third-party, your client app project needs several pieces of information to use a DLL. It needs to find the headers that declare the DLL exports, the import libraries for the linker, and the DLL itself. One solution is to copy all of these files into your client project. For third-party DLLs that are unlikely to change while your client is in development, this method may be the best way to use them. However, when you also build the DLL, it's better to avoid duplication. If you make a local copy of DLL files that are under development, you may accidentally change a header file in one copy but not the other, or use an out-of-date library.
To avoid out-of-sync code, we recommend you set the include path in your client project to include the DLL header files directly from your DLL project. Also, set the library path in your client project to include the DLL import libraries from the DLL project. And finally, copy the built DLL from the DLL project into your client build output directory. This step allows your client app to use the same DLL code you build.
To create a client app in Visual Studio
On the menu bar, choose File > New > Project to open the Create a new project dialog box.
At the top of the dialog, set Language to C++, set Platform to Windows, and set Project type to Console.
From the filtered list of project types, choose Console App then choose Next.
In the Configure your new project page, enter MathClient in the Project name box to specify a name for the project. Leave the default Location and Solution name values. Set Solution to Create new solution. Uncheck Place solution and project in the same directory if it's checked.
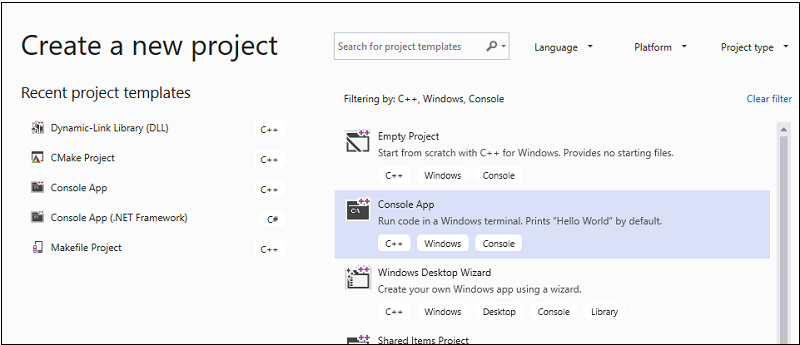
Choose the Create button to create the client project.
A minimal console application project is created for you. The name for the main source file is the same as the project name that you entered earlier. In this example, it's named MathClient.cpp. You can build it, but it doesn't use your DLL yet.
Next, to call the MathLibrary functions in your source code, your project must include the MathLibrary.h file. You could copy this header file into your client app project, then add it to the project as an existing item. This method can be a good choice for third-party libraries. However, if you're working on the code for your DLL and your client at the same time, the header files could get out of sync. To avoid this issue, set the Additional Include Directories path in your project to include the path to the original header.
To add the DLL header to your include path
Right-click on the MathClient node in Solution Explorer to open the Property Pages dialog.
In the Configuration drop-down box, select All Configurations if it's not already selected.
In the left pane, select Configuration Properties > C/C++ > General.
In the property pane, select the drop-down control next to the Additional Include Directories edit box, and then choose Edit.
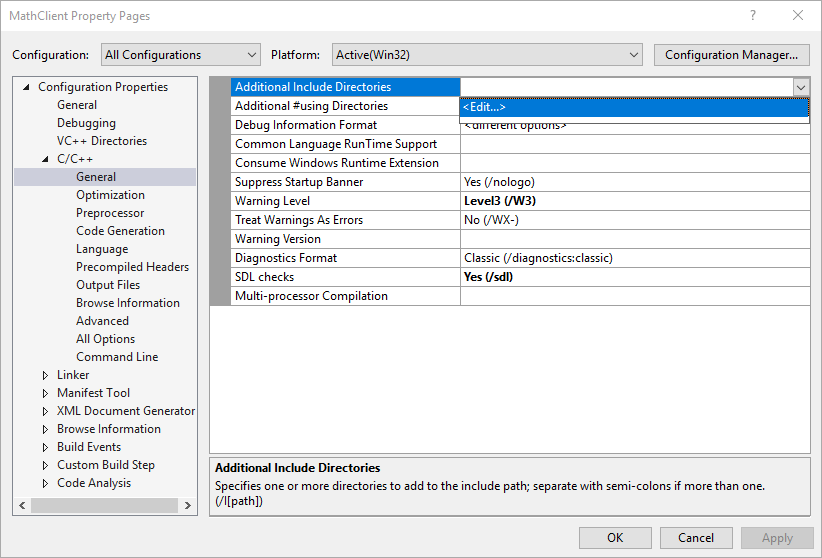
Double-click in the top pane of the Additional Include Directories dialog box to enable an edit control. Or, choose the folder icon to create a new entry.
In the edit control, specify the path to the location of the MathLibrary.h header file. You can choose the ellipsis (...) control to browse to the correct folder.
You can also enter a relative path from your client source files to the folder that contains the DLL header files. If you followed the directions to put your client project in a separate solution from the DLL, the relative path should look like this:
..\..\MathLibrary\MathLibraryIf your DLL and client projects are in the same solution, the relative path might look like this:
..\MathLibraryWhen the DLL and client projects are in other folders, adjust the relative path to match. Or, use the ellipsis control to browse for the folder.

After you've entered the path to the header file in the Additional Include Directories dialog box, choose the OK button. In the Property Pages dialog box, choose the OK button to save your changes.
You can now include the MathLibrary.h file and use the functions it declares in your client application. Replace the contents of MathClient.cpp by using this code:
// MathClient.cpp : Client app for MathLibrary DLL.

// #include "pch.h" Uncomment for Visual Studio 2017 and earlier

#include <iostream>

#include "MathLibrary.h"

int main()

{

    // Initialize a Fibonacci relation sequence.

    fibonacci_init(1, 1);

    // Write out the sequence values until overflow.

    do {

        std::cout << fibonacci_index() << ": "

            << fibonacci_current() << std::endl;

    } while (fibonacci_next());

    // Report count of values written before overflow.

    std::cout << fibonacci_index() + 1 <<

        " Fibonacci sequence values fit in an " <<

        "unsigned 64-bit integer." << std::endl;

}
This code can be compiled, but not linked. If you build the client app now, the error list shows several LNK2019 errors. That's because your project is missing some information: You haven't specified that your project has a dependency on the MathLibrary.lib library yet. And, you haven't told the linker how to find the MathLibrary.lib file.
To fix this issue, you could copy the library file directly into your client app project. The linker would find and use it automatically. However, if both the library and the client app are under development, that might lead to changes in one copy that aren't shown in the other. To avoid this issue, you can set the Additional Dependencies property to tell the build system that your project depends on MathLibrary.lib. And, you can set an Additional Library Directories path in your project to include the path to the original library when you link.
To add the DLL import library to your project
Right-click on the MathClient node in Solution Explorer and choose Properties to open the Property Pages dialog.
In the Configuration drop-down box, select All Configurations if it's not already selected. It ensures that any property changes apply to both Debug and Release builds.
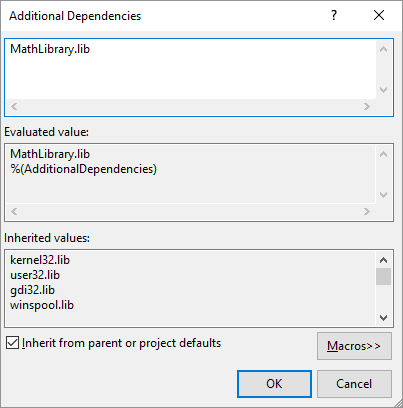
In the left pane, select Configuration Properties > Linker > Input. In the property pane, select the drop-down control next to the Additional Dependencies edit box, and then choose Edit.
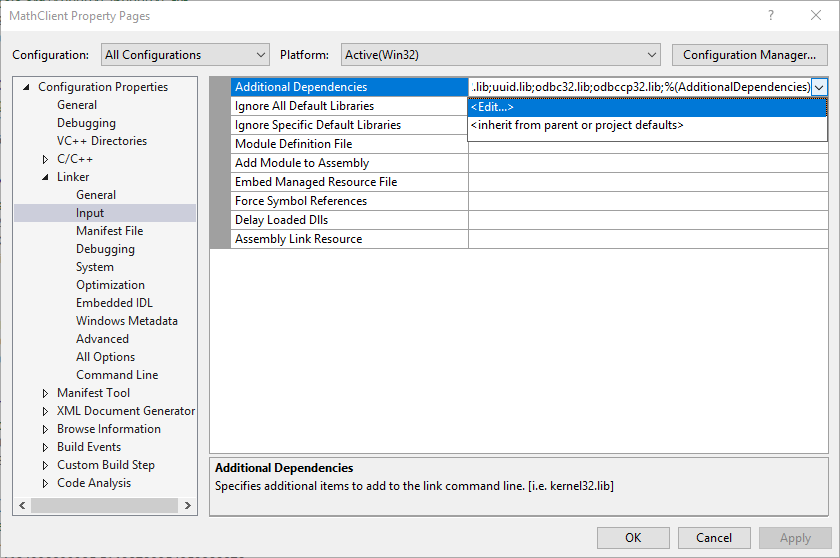
In the Additional Dependencies dialog, add MathLibrary.lib to the list in the top edit control.
Choose OK to go back to the Property Pages dialog box.
In the left pane, select Configuration Properties > Linker > General. In the property pane, select the drop-down control next to the Additional Library Directories edit box, and then choose Edit.

Double-click in the top pane of the Additional Library Directories dialog box to enable an edit control. In the edit control, specify the path to the location of the MathLibrary.lib file. By default, it's in a folder called Debug directly under the DLL solution folder. If you create a release build, the file is placed in a folder called Release. You can use the
$(IntDir)macro so that the linker can find your DLL, no matter which kind of build you create. If you followed the directions to put your client project in a separate solution from the DLL project, the relative path should look like this:..\..\MathLibrary\$(IntDir)If your DLL and client projects are in other locations, adjust the relative path to match.
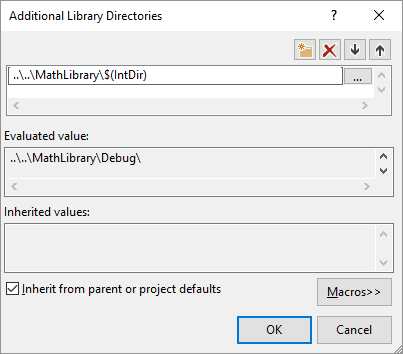
Once you've entered the path to the library file in the Additional Library Directories dialog box, choose the OK button to go back to the Property Pages dialog box. Choose OK to save the property changes.
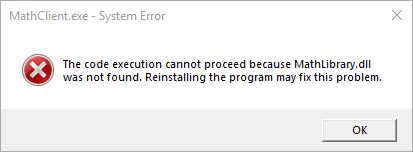
Your client app can now compile and link successfully, but it still doesn't have everything it needs to run. When the operating system loads your app, it looks for the MathLibrary DLL. If it can't find the DLL in certain system directories, the environment path, or the local app directory, the load fails. Depending on the operating system, you'll see an error message like this:
One way to avoid this issue is to copy the DLL to the directory that contains your client executable as part of the build process. You can add a Post-Build Event to your project, to add a command that copies the DLL to your build output directory. The command specified here copies the DLL only if it's missing or has changed. It uses macros to copy to and from the Debug or Release locations, based on your build configuration.
To copy the DLL in a post-build event
Right-click on the MathClient node in Solution Explorer and choose Properties to open the Property Pages dialog.
In the Configuration drop-down box, select All Configurations if it isn't already selected.
In the left pane, select Configuration Properties > Build Events > Post-Build Event.
In the property pane, select the edit control in the Command Line field. If you followed the directions to put your client project in a separate solution from the DLL project, then enter this command:
xcopy /y /d "..\..\MathLibrary\$(IntDir)MathLibrary.dll" "$(OutDir)"If your DLL and client projects are in other directories, change the relative path to the DLL to match.
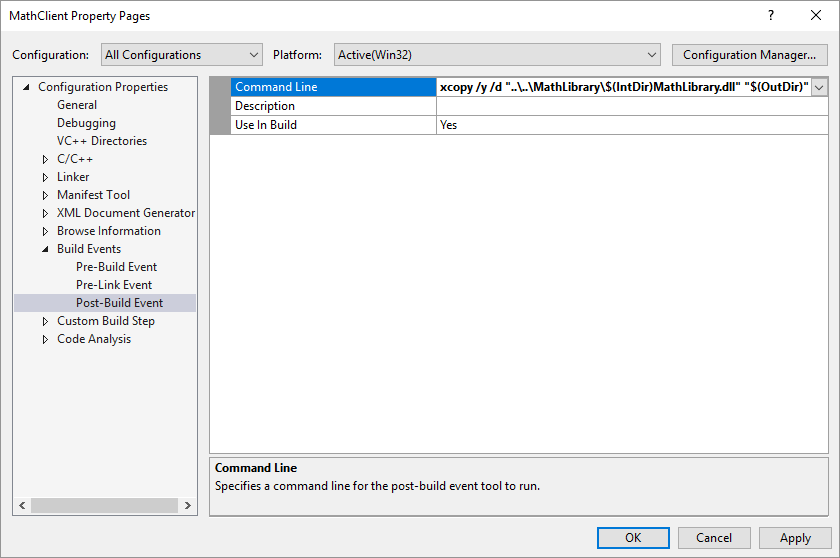
Choose the OK button to save your changes to the project properties.
Now your client app has everything it needs to build and run. Build the application by choosing Build > Build Solution on the menu bar. The Output window in Visual Studio should have something like the following example depending on your version of Visual Studio:
1>------ Build started: Project: MathClient, Configuration: Debug Win32 ------

1>MathClient.cpp

1>MathClient.vcxproj -> C:\Users\username\Source\Repos\MathClient\Debug\MathClient.exe

1>1 File(s) copied

========== Build: 1 succeeded, 0 failed, 0 up-to-date, 0 skipped ==========
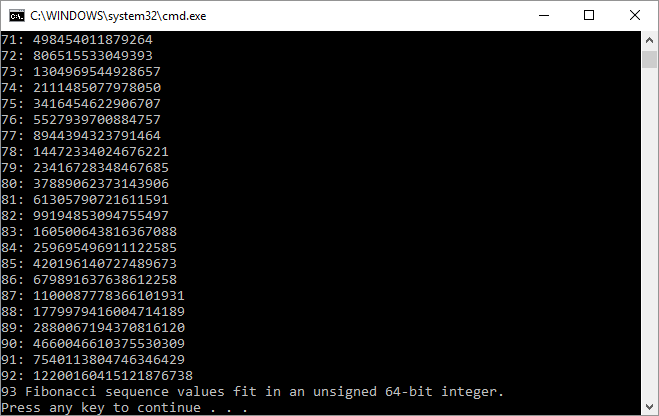
Congratulations, you've created an application that calls functions in your DLL. Now run your application to see what it does. On the menu bar, choose Debug > Start Without Debugging. Visual Studio opens a command window for the program to run in. The last part of the output should look like:
Press any key to dismiss the command window.
Now that you've created a DLL and a client application, you can experiment. Try setting breakpoints in the code of the client app, and run the app in the debugger. See what happens when you step into a library call. Add other functions to the library, or write another client app that uses your DLL.
When you deploy your app, you must also deploy the DLLs it uses. The simplest way to make the DLLs that you build, or that you include from third parties, available is to put them in the same directory as your app. It's known as app-local deployment. For more information about deployment, see Deployment in Visual C++.
See also
Calling DLL Functions from Visual Basic Applications
Walkthrough: Create and use your own Dynamic Link Library (C++)的更多相关文章
- Walkthrough: Creating and Using a Dynamic Link Library (C++)
Original Link: http://msdn.microsoft.com/zh-cn/library/ms235636.aspx Following content is only used ...
- How to Use the Dynamic Link Library in C++ Linux (C++调用Delphi写的.so文件)
The Dynamic Link Library (DLL) is stored separately from the target application and shared among dif ...
- DYNAMIC LINK LIBRARY - DLL
https://www.tenouk.com/ModuleBB.html MODULE BB DYNAMIC LINK LIBRARY - DLL Part 1: STORY What do we h ...
- Custom Action : dynamic link library
工具:VS2010, Installshield 2008 实现功能: 创建一个C++ win32 DLL的工程,MSI 工程需要调用这个DLL,并将Basic MSI工程中的两个参数,传递给DLL, ...
- How to Create DLL(Dynamic link library)
该文章属于在YouTube视频上看到的,链接如下: https://www.youtube.com/watch?v=EmDJsl7C9-k&t=3s 1.创建一个工程并建立一个控制台程序 2. ...
- [DLL] Dynamic link library (dll) 的编写和使用教程
前一阵子,项目里需要导出一个DLL,但是导出之后输出一直不怎么对,改了半天才算改对...读了一些DLL教程,感觉之后要把现在的代码导出,应该还要花不少功夫...下面教程参照我读的3个教程写成,所以内容 ...
- 动态链接库(Dynamic Link Library)
DLL INTRODUCTION A DLL is a library that contains code and data that can be used by more than one pr ...
- 动态链接库(Dynamic Link Library)学习笔记(附PE文件分析)
转载:http://www.cnblogs.com/yxin1322/archive/2008/03/08/donamiclinklibrary.html 作者:EricYou 转载请注明出处 注 ...
- Linux Dynamic Shared Library && LD Linker
目录 . 动态链接的意义 . 地址无关代码: PIC . 延迟版定(PLT Procedure Linkage Table) . 动态链接相关结构 . 动态链接的步骤和实现 . Linux动态链接器实 ...
随机推荐
- Flask(12)- 操作 Session
前言 Session 详解:https://www.cnblogs.com/poloyy/p/12513247.html 这一节来瞧一瞧如何用 Flask 操作 Session 功能 list 提供操 ...
- 题解 SP3591 PATHEADS - Patting Heads
类似桶排 先看有多少头奶牛抽出这个数 再看这个数的奶牛能拍多少人的头(别忘了-1,自己不能拍自己) 最后根据输入输出 110ms #include<bits/stdc++.h> using ...
- 团队开发day10
项目整合成功,测试功能基本达到,目标完成!
- Nacos源码分析-Distro协议概览
温馨提示: 本文内容基于个人学习Nacos 2.0.1版本代码总结而来,因个人理解差异,不保证完全正确.如有理解错误之处欢迎各位拍砖指正,相互学习:转载请注明出处. 什么是Distro协议 今天来分析 ...
- 纯C语言(C89)实现动态数组
起因 工作很少接触纯C项目,业余写着玩玩,不断雕琢 目标 纯C实现动态数组,提供方便易用泛型接口,避免依赖 实现 完全封装,隐藏结构体细节,不支持栈创建 拷贝存储,轻微性能代价换来易用性 vector ...
- springmvc学习指南 之---第25篇 Spring Bean有三种配置方式
writed by不要张艳涛, 从tomcat转到了springmvc 现在开始有点不知道该看什么书了,看完了springmvc 学习指南之后 又查了一些书,好多都是内容相近,在找书的过程之中,发现s ...
- 我眼中的java线程池实现原理
最近在看java线程池实现方面的源码,在此做个小结,因为网上关于线程池源码分析的博客挺多的,我也不打算重复造轮子啦,仅仅用纯语言描述的方式做做总结啦! 个人认为要想理解清楚java线程池实现原理,明白 ...
- js 时间戳转为日期
1 function time(){ //页面时间戳转换成时间 2 $(".time").each(function(){ 3 var time = $(this).text(); ...
- QT经验(一)——按钮长按事件分析
引言 最近在做qt项目,需要对button按钮添加一个长按事件(比如点击按钮,开始运动.松开按钮,运动停止).查了些许资料,(差点误把QPushButton的press信号和长按事件混淆)在此记录一下 ...
- 手写Pascal解释器(二)
目录 一.part4 补充理论知识 二.part5 设计生成式 三.part6 一.part4 承接上次的内容,我们继续编写part4,这个部分我们的任务是完成输入一个仅带乘除运算符的表达式,然后返回 ...
