10天学会phpWeChat——第八天:Form类,丰富表单提交的字段类型
通过前面七讲的系列教程,我们完成了一个包含后台并自适应PC+h5移动端的文章管理模块。
在实际的生产环境中,文章投稿、商品上传等操作并不会简单局限于一个text和textarea组成的表单。在实际中,我们可能会用到web富文本编辑器(如ueditor、markdown)、图片上传、多图上传、附件上传、地图标注等更加丰富的表单类型。
今天,我们开始《10天学会phpWeChat》的第八讲:Form类,丰富表单提交的字段类型。
一、什么是Form类?
Form类是phpWeChat封装好的一个类,它的方法集成了常见的表单字段类型包括:富文本编辑器、时间日期、多图上传、附件上传、视频上传、地图标注等。
二、怎么使用Form类?
1、由于phpWeChat采用了命名空间的机制,所以每次在视图模板里需要调用Form类时,请在视图模板头部加上
<?php use phpWeChat\Form;?>
来声明下Form所处的命名空间才能使用。
2、由于Form类的具体实现需要借助jQuery类,所以所以每次在视图模板里需要调用Form类时,请在视图模板头部加上以下Js代码:
 <script language="javascript" type="text/javascript">

    var PW_PATH='{__PW_PATH__}';

 </script>

 <script src="{__PW_PATH__}statics/jquery/jquery-1.12.2.min.js" language="javascript"></script>

 <script src="{__PW_PATH__}statics/core.js" language="javascript"></script>
3、要给指定表单form加一个ID并最好加上enctype="multipart/form-data"属性。
4、指定form的提交按钮不能用submit类型,要更换为button。并增加一个onclick事件,如:
<input type="button" onClick="doSubmit('tougaoform','{U('hello','tougaosave')}')" value="投稿" />
其中,doSubmit('tougaoform','{U('hello','tougaosave')}') 的作用是指定ID为tougaoform的表单的action为{U('hello','tougaosave')},并提交表单。
三、实例
以上的大道理讲完了,接下来,我们还以hello world模块的文章投稿功能为例,来实际展示今天的话题。
文章投稿的视图文件为tougao.html,我们按照以上两点加入指定代码,如下面代码所示:
{php use phpWeChat\Form;}

<!DOCTYPE html PUBLIC "-//W3C//DTD XHTML 1.0 Transitional//EN" "http://www.w3.org/TR/xhtml1/DTD/xhtml1-transitional.dtd">

<html xmlns="http://www.w3.org/1999/xhtml">

<head>

<meta http-equiv="Content-Type" content="text/html; charset=utf-8" />

<script language="javascript" type="text/javascript">

   var PW_PATH='{__PW_PATH__}';

</script>

<script src="{__PW_PATH__}statics/jquery/jquery-1.12.2.min.js" language="javascript"></script>

<script src="{__PW_PATH__}statics/core.js" language="javascript"></script>

<title>投稿</title>

</head>

<body>

<form action="{U('hello','tougaosave')}" method="post" name="tougaoform" id="tougaoform"  enctype="multipart/form-data">

    标题:<input type="text" name="info[title]" size="36" />

    <br />

    内容:<textarea name="info[content]" cols="55" rows="5"></textarea>

    <br />

    百度编辑器:{Form::baiduEditor('info','content2','请输入您的内容')}

    <input type="button" onClick="doSubmit('tougaoform','{U('hello','tougaosave')}')" value="投稿" />

</form>

</body>

</html>
如同代码所示,我们在视图文件的第一行加入了声明命名空间的
{php use phpWeChat\Form;}
和在<head></head>之间加入了加载jQuery的Js代码:
<script language="javascript" type="text/javascript">
var PW_PATH='{__PW_PATH__}';
</script>
<script src="{__PW_PATH__}statics/jquery/jquery-1.12.2.min.js" language="javascript"></script>
<script src="{__PW_PATH__}statics/core.js" language="javascript"></script>
同时,我们在body里加入了一个Form的方法调用:
百度编辑器:{Form::baiduEditor('info','content2','请输入您的内容')}
此时,我们访问投稿页面,则出现了如下视图效果:
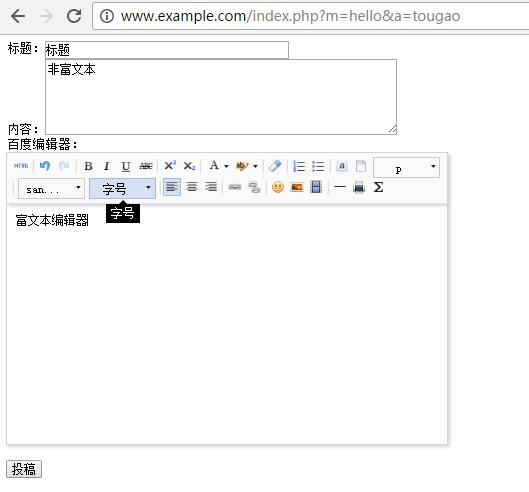
如上图所示,出现了一个富文本编辑器。而这一切,我们只用了一行代码:{Form::baiduEditor('info','content2','请输入您的内容')}就搞定了。
为了便于查看效果,我们适当修改下hello world模块的前端控制器(index.php)的tougaosave分支,让其打印出表单提交后的变量:
 <?php

     //自适应模块的PC前端控制器

     use wechat\hello\hello;

     use phpWeChat\Area;

     use phpWeChat\CaChe;

     use phpWeChat\Config;

     use phpWeChat\Member;

     use phpWeChat\Module;

     use phpWeChat\MySql;

     use phpWeChat\Order;

     use phpWeChat\Upload;

     !defined('IN_APP') && exit('Access Denied!');

     switch($action)

     {

         case 'index':

             //从数据表读取数据并赋给数组$data

             //$data=Hello::dataList();

             echo '这是自适应模块的PC端前端控制器';

             exit();

             break;

         case 'detail':

             $data=Hello::dataGet($id); //$id 可以改成$_GET['id']

             break;

         case 'tougao':

             break;

         case 'tougaosave':

             print_r($info);

             exit();

             /*

             $op=Hello::dataInsert($info);

             if($op)

             {

                 echo '文章投稿成功,ID为'.$op;

             }

             else

             {

                 echo '文章投稿失败';

             }

             exit();

             */

             break;

         //以下 case 条件仅为 示例。您可以根据业务逻辑自由修改和拓展

         //case 'index':

             //在此写 index.php?m=hello&a=index 时的逻辑

             //break;

         //case 'list':

             //在此写 index.php?m=hello&a=list 时的逻辑

             //break;

         //以此类推...

         //case '...':

             //在此写 index.php?m=hello&a=... 时的逻辑

             //break;

         default:

             break;

     }

 ?>
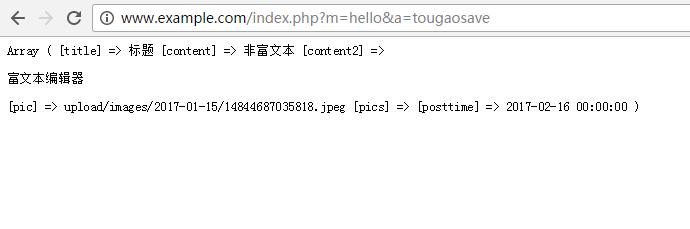
点击提交按钮,出现如下图所示的效果:
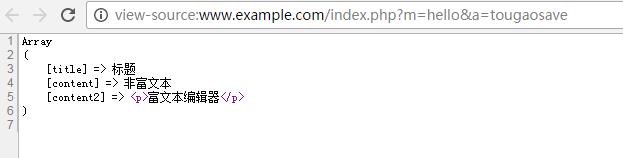
如上图所示,我们不仅在前端展示出来了富文本编辑器,而且还在提交后,在服务端接收到了富文本编辑器的值,从而我们就可以进行数据库更新操作了。
四、Form类方法的调用参数
在上面的示例中,我们通过一个富文本编辑器的调用实例来展示了Form类的作用。以下是它各个参数的说明(文档参考:http://wiki.phpwechat.com/4):
Form::方法名('表单数组名称','字段名称','默认值')。
五、更多实例参考
1、单图上传
视图模板代码(tougao.html):
 {php use phpWeChat\Form;}

 <!DOCTYPE html PUBLIC "-//W3C//DTD XHTML 1.0 Transitional//EN" "http://www.w3.org/TR/xhtml1/DTD/xhtml1-transitional.dtd">

 <html xmlns="http://www.w3.org/1999/xhtml">

 <head>

 <meta http-equiv="Content-Type" content="text/html; charset=utf-8" />

 <script language="javascript" type="text/javascript">

    var PW_PATH='{__PW_PATH__}';

 </script>

 <script src="{__PW_PATH__}statics/jquery/jquery-1.12.2.min.js" language="javascript"></script>

 <script src="{__PW_PATH__}statics/core.js" language="javascript"></script>

 <title>投稿</title>

 </head>

 <body>

 <form action="{U('hello','tougaosave')}" method="post" name="tougaoform" id="tougaoform"  enctype="multipart/form-data">

     标题:<input type="text" name="info[title]" size="36" />

     <br />

     内容:<textarea name="info[content]" cols="55" rows="5"></textarea>

     <br />

     百度编辑器:{Form::baiduEditor('info','content2','请输入您的内容')}

     <br />

     单图上传:{Form::image('info','pic','')}

     <input type="button" onClick="doSubmit('tougaoform','{U('hello','tougaosave')}')" value="投稿" />

 </form>

 </body>

 </html>
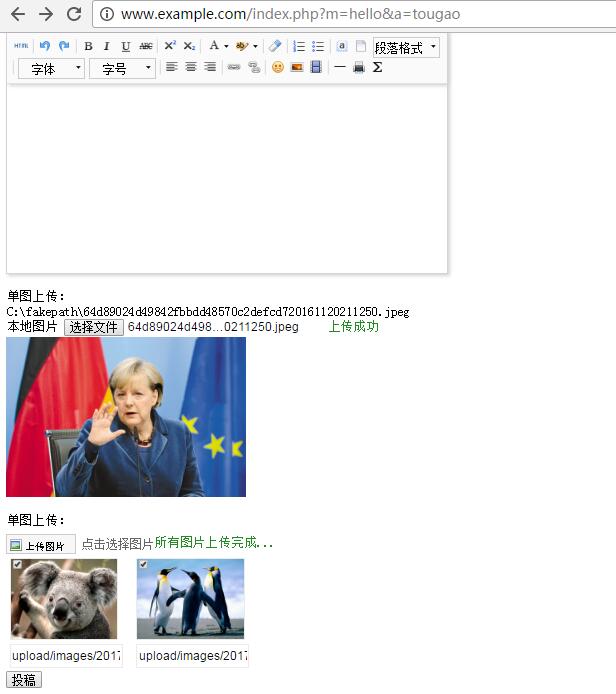
效果:

提交后接收变量:

如上图,我们接收到了单图上传的值。
2、多图上传
 {php use phpWeChat\Form;}

 <!DOCTYPE html PUBLIC "-//W3C//DTD XHTML 1.0 Transitional//EN" "http://www.w3.org/TR/xhtml1/DTD/xhtml1-transitional.dtd">

 <html xmlns="http://www.w3.org/1999/xhtml">

 <head>

 <meta http-equiv="Content-Type" content="text/html; charset=utf-8" />

 <script language="javascript" type="text/javascript">

    var PW_PATH='{__PW_PATH__}';

 </script>

 <script src="{__PW_PATH__}statics/jquery/jquery-1.12.2.min.js" language="javascript"></script>

 <script src="{__PW_PATH__}statics/core.js" language="javascript"></script>

 <title>投稿</title>

 </head>

 <body>

 <form action="{U('hello','tougaosave')}" method="post" name="tougaoform" id="tougaoform"  enctype="multipart/form-data">

     标题:<input type="text" name="info[title]" size="36" />

     <br />

     内容:<textarea name="info[content]" cols="55" rows="5"></textarea>

     <br />

     百度编辑器:{Form::baiduEditor('info','content2','请输入您的内容')}

     <br />

     单图上传:{Form::image('info','pic','')}

     <br />

     多图上传:{Form::images('info','pics','')}

     <input type="button" onClick="doSubmit('tougaoform','{U('hello','tougaosave')}')" value="投稿" />

 </form>

 </body>

 </html>
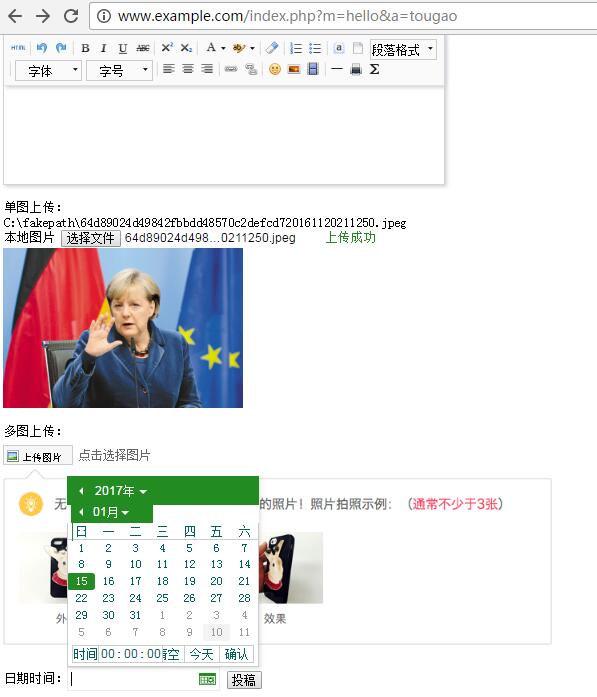
效果:
小贴士:如同http://wiki.phpwechat.com/4文档中指明的一样,由于多图上传是一个复杂的过程,提交后需要用 deformat_focus_img() 函数进行处理成可以存储的字符串。其他字段类型无需处理。
在控制器中,我们加上多图的转码:
 <?php

     //自适应模块的PC前端控制器

     use wechat\hello\hello;

     use phpWeChat\Area;

     use phpWeChat\CaChe;

     use phpWeChat\Config;

     use phpWeChat\Member;

     use phpWeChat\Module;

     use phpWeChat\MySql;

     use phpWeChat\Order;

     use phpWeChat\Upload;

     !defined('IN_APP') && exit('Access Denied!');

     switch($action)

     {

         case 'index':

             //从数据表读取数据并赋给数组$data

             //$data=Hello::dataList();

             echo '这是自适应模块的PC端前端控制器';

             exit();

             break;

         case 'detail':

             $data=Hello::dataGet($id); //$id 可以改成$_GET['id']

             break;

         case 'tougao':

             break;

         case 'tougaosave':

             $info['pics']=deformat_focus_img('pics'); //多图上传的特殊处理,其他类型不需要

             print_r($info);

             exit();

             /*

             $op=Hello::dataInsert($info);

             if($op)

             {

                 echo '文章投稿成功,ID为'.$op;

             }

             else

             {

                 echo '文章投稿失败';

             }

             exit();

             */

             break;

         //以下 case 条件仅为 示例。您可以根据业务逻辑自由修改和拓展

         //case 'index':

             //在此写 index.php?m=hello&a=index 时的逻辑

             //break;

         //case 'list':

             //在此写 index.php?m=hello&a=list 时的逻辑

             //break;

         //以此类推...

         //case '...':

             //在此写 index.php?m=hello&a=... 时的逻辑

             //break;

         default:

             break;

     }

 ?>
接收效果:

如图所示,我们接收到了多图上传的值。
3、日期控件
视图:
 {php use phpWeChat\Form;}

 <!DOCTYPE html PUBLIC "-//W3C//DTD XHTML 1.0 Transitional//EN" "http://www.w3.org/TR/xhtml1/DTD/xhtml1-transitional.dtd">

 <html xmlns="http://www.w3.org/1999/xhtml">

 <head>

 <meta http-equiv="Content-Type" content="text/html; charset=utf-8" />

 <script language="javascript" type="text/javascript">

    var PW_PATH='{__PW_PATH__}';

 </script>

 <script src="{__PW_PATH__}statics/jquery/jquery-1.12.2.min.js" language="javascript"></script>

 <script src="{__PW_PATH__}statics/core.js" language="javascript"></script>

 <title>投稿</title>

 </head>

 <body>

 <form action="{U('hello','tougaosave')}" method="post" name="tougaoform" id="tougaoform"  enctype="multipart/form-data">

     标题:<input type="text" name="info[title]" size="36" />

     <br />

     内容:<textarea name="info[content]" cols="55" rows="5"></textarea>

     <br />

     百度编辑器:{Form::baiduEditor('info','content2','请输入您的内容')}

     <br />

     单图上传:{Form::image('info','pic','')}

     <br />

     多图上传:{Form::images('info','pics','')}

     <br />

     日期时间:{Form::dateWithTime('info','posttime','')}

     <input type="button" onClick="doSubmit('tougaoform','{U('hello','tougaosave')}')" value="投稿" />

 </form>

 </body>

 </html>
接收:
更多示例,请参考http://wiki.phpwechat.com/4,里面涵盖了9 种拓展的字段类型,基本涵盖了大部分的业务场景。
《10天学会phpWeChat》系列教程传送门:
10天学会phpWeChat——第八天:Form类,丰富表单提交的字段类型的更多相关文章
- jquery.form.js 让表单提交更优雅
jquery.form.js 让表单提交更优雅.可以页面不刷新提交表单,比jQuery的ajax提交要功能强大. 1.引入 <script src="/src/jquery-1.9.1 ...
- form + iframe 获取表单提交后返回的数据
原理: submit 提交表单没有回调函数,但是可以用iframe来接收返回结果,最后进行格式转换就ok了: 原文地址: http://blog.csdn.net/simeng_1016/articl ...
- 使用Jquery.form.js ajax表单提交插件弹出下载提示框
现象: 使用jquery的from做ajax表单提交的时候,后台处理完毕返回json字符串,此时浏览器提示下载一个json文件而不是在success里面继续解析该json对象. 具体的原因: 浏览器兼 ...
- 10天学会phpWeChat——第七天:创建一个自适应PC网站+H5移动端的模块
本教程基于phpWeChat核心框架1.1.0+版本.下载地址:http://s.phpwechat.com/app_38026ed22fc1a91d92b5d2ef93540f20 通过前面六讲的系 ...
- 10天学会phpWeChat——第六天:实现新闻的后台管理
通过前面五讲的系列教程,我们完成了一个简单模块的前端发布.列表展示.详情展示.实际生产环境中,所有前台的数据都会有对应的后台操作进行统筹管理.我们称之为后台管理系统. 今天,我们开始<10天学会 ...
- 10天学会phpWeChat——第五天:实现新闻投稿功能
在前几讲里,我们逐渐实现了自己小模块的新闻列表展示.新闻详情展示功能,现在您已经初步有能力开发一个phpWeChat小模块了,本文将在已开发的hello world模块基础上,增加一个新的功能--新闻 ...
- 10天学会phpWeChat——第四天:大U函数U()的使用
在第三天,我们创建了一个"增强版"的文章模块,实现了数据从数据库到视图端展示的流程.但是我们仅仅是实现了数据列表的展示,对于文章详情等页面跳转并未涉及. 本文重点讲解phpWeCh ...
- 10天学会phpWeChat——第三天:从数据库读取数据到视图
在第二天,我们创建了我们的第一个phpWeChat功能模块,但是比较简单.实际生产环境中,我们不可能有如此简单的需求.更多的情况是数据存储在MySql数据库中,我们开发功能模块的作用就是将这些数据从M ...
- 10天学会phpWeChat——第二天:hello world!我的第一个功能模块
今天我们开始进入<10天学会phpWeChat>系列教程的第二天:创建我的第一个hello world! 功能模块. 1.登录后台,进入 系统设置--自定义模块,如图: 自定义模块参数说明 ...
随机推荐
- Dom+2016/4/20
元素.parentNode父节点 offsetParent
- unity LineRenderer
using UnityEngine; using System.Collections; public class Spider:MonoBehaviour { private LineRendere ...
- Json解析要点
解析Json时,昨天遇到了新的问题,之前都是解析的数组,不是数组的用类来做. 这是Json串; {"status":"00001","ver" ...
- jq判断元素是否显示
为了判断元素是否显示,jquery中用is()来实现, $(function(){ $(obj).bind('click',function(){ if(obj.is(:visible)){ //编写 ...
- 转 OGG add trandata 到底做了什么
有的时候我们做OGG的时候add trandata会出现异常. 这里就剖析一下add trandata到底做了什么 GGSCI (yjfora81 as ggs_admin@testdb) 2> ...
- css居中
<html><head lang="en"> <meta charset="UTF-8"> <title>< ...
- GridView的RowCreated与RowDataBound事件区别
在西门子面试时,项目负责人除了道试题关于RowCreated与RowDataBound事件区别,经过google一下,得出结果: GridView的RowCreated与RowDataBound的一个 ...
- IE6下最小19px像素
<!DOCTYPE html> <html> <head> <meta charset="utf-8"> <title> ...
- Linux操作系统入门教程
http://www.linuxidc.com/Linux/2015-07/120815p8.htm
- Android SystemProperties设置/取得系统属性的用法总结
通过调查得知,Android系统中取得/设置系统属性的用法参考以下3篇文章就足够了. 1.Android SystemProperties简介 介绍了设置属性需要的权限,已经设置权限的方法. Syst ...