React Router基础使用
React是个技术栈,单单使用React很难构建复杂的Web应用程序,很多情况下我们需要引入其他相关的技术
React Router是React的路由库,保持相关页面部件与URL间的同步
下面就来简单介绍其基础使用,更全面的可参考 指南
1. 它看起来像是这样
在页面文件中
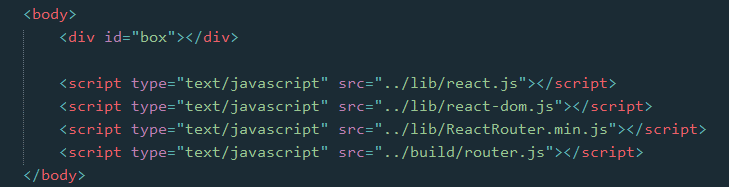
在外部脚本文件中

2. 库的引入
React Router库的引入,有两种方式
2.1 浏览器直接引入
可以引用 这里 的浏览器版本,或者下载之后引入
然后就可以直接使用 ReactRouter 这个对象了,我们可能会使用到其中的几个属性
let {Router, Route, IndexRoute, Redirect, IndexRedirect, Link, IndexLink, hashHistory, browserHistory} = ReactRouter;
2.2 npm 安装,通过构建工具编译引入
npm install --save react-router
安装好路由库之后,在脚本文件中引入相关属性
import {Router, Route, IndexRoute, Redirect, IndexRedirect, Link, IndexLink, hashHistory, browserHistory} from 'react-router';
因浏览器目前还不能支持import与export命令,且babel工具不会将require命令编译,所以我们还得需要如Webpack等构建工具编译引入
库引入之后,在ReactDOM的render方法中,就可以使用相关的组件了
3. 路由简单使用
最基本的,通过URL判断进入哪个页面(组件部件)

class First extends Component {

    constructor(props) {

        super(props);

    }

    render() {

        return <p>First</p>

    }

}

class Second extends Component {

    constructor(props) {

        super(props);

    }

    render() {

        return <p>Second</p>

    }

}

class App extends Component {

    constructor(props) {

        super(props);

    }

    render() {

        return <div></div>

    }

}
render((

    <Router history={hashHistory}>

        <Route path="/" component={App} />

        <Route path="first" component={First} />

        <Route path="second" component={Second} />

    </Router>

    ),

    document.getElementById('box')

);
首先,Router是一个容器,history属性定义了是用何种方式处理页面的URL
有三种:
- browserHistory:通过URL的变化改变路由,是推荐的一种方式,但是需要在服务器端需要做一些配置(窝目前还不知怎么配)
- hashHistory:通过#/ ,其实就像是单页面应用中常见的hashbang方式,example.com/#/path/path.. (使用简单,这里暂且就用这种方式)
- createMemoryHistory:Memory history 并不会从地址栏中操作或是读取,它能够帮助我们完成服务器端的渲染,我们得手动创建history对象
然后,在容器中使用Route组件定义各个路由,通过path指定路径(可以看到,是不区分大小写的),通过component指定该路径使用的组件
也可以直接在Router容器上直接用routes属性定义各个路由,如
let routes =

    <div>

        <Route path="/" component={App} />

        <Route path="first" component={First} />

        <Route path="second" component={Second} />

    </div>;

render(<Router routes={routes} history={hashHistory}></Router>, document.getElementById('box'));
需要注意的是{routes}中只能有一个父级,所以这里加了<div>标签
另外,路由Route也可以嵌套,在上面的例子中,嵌套起来可能更符合实际情况
需要注意的是,这里的App在父级,为了获取子级的First与Second组件,需要在App组件中添加 this.props.children 获取
class App extends Component {

    constructor(props) {

        super(props);

    }

    render() {

        return <div>{this.props.children}</div>

    }

}

render((

    <Router history={hashHistory}>

        <Route path="/" component={App}>

            <Route path="first" component={First} />

            <Route path="second" component={Second} />

        </Route>

    </Router>

    ),

    document.getElementById('box')

);
同样的,可以直接在Router中用routes属性定义路由
let routes =

        <Route path="/" component={App}>

            <Route path="first" component={First} />

            <Route path="second" component={Second} />

        </Route>;

render(<Router routes={routes} history={hashHistory}></Router>, document.getElementById('box'));
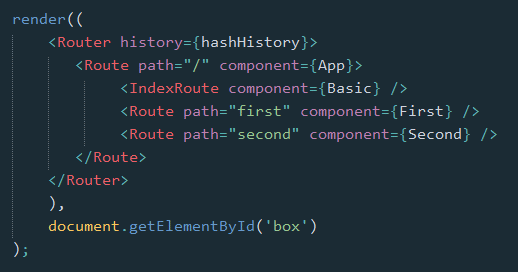
4. 路由的其他组件
除了基本的Route之外,IndexRoute、Redirect、IndexRedirect、Link、IndexLink等,顾名思义
- IndexRoute: 在主页面会用到,如上个例子中,在路径"/"下我们看到的是空白页面,可以添加默认的页面组件用于导航
- Link: 可以认为它是<a>标签在React中的实现,使用to属性定义路径,还可以通过activeClass或activeStyle定义active的样式
- IndexLink: 类似Link,推荐用来定义指向主页面的链接,当然也可以随意定义

class First extends Component {

    constructor(props) {

        super(props);

    }

    render() {

        return (

            <p>First

                <IndexLink to="/" activeStyle={{color: 'red'}}>Basic</IndexLink>

            </p>

        )

    }

}

class Second extends Component {

    constructor(props) {

        super(props);

    }

    render() {

        return <p>Second</p>

    }

}

class Basic extends Component {

    constructor(props) {

        super(props);

    }

    render() {

        return (

            <ul role="nav">

                <li><IndexLink to="/" activeStyle={{color: 'red'}}>Basic</IndexLink></li>

                <li><Link to="/first" activeStyle={{color: 'red'}}>First</Link></li>

                <li><Link to="/Second" activeClass="active">Second</Link></li>

            </ul>

        )

    }

}

class App extends Component {

    constructor(props) {

        super(props);

    }

    render() {

        return <div>

            {this.props.children}

        </div>

    }

}

render((

    <Router history={hashHistory}>

        <Route path="/" component={App}>

            <IndexRoute component={Basic} />

            <Route path="first" component={First} />

            <Route path="second" component={Second} />

        </Route>

    </Router>

    ),

    document.getElementById('box')

);
- Redirect: 从from路径重定向到to路径
- IndexRedirect: 在主页面,直接重定向到to路径

render((

    <Router history={hashHistory}>

        <Route path="/" component={App}>

            <IndexRoute component={Basic} />

            <IndexRedirect to="first" />

            <Redirect from="second" to="first" />

            <Route path="first" component={First} />

            <Route path="second" component={Second} />

        </Route>

    </Router>

    ),

    document.getElementById('box')

);
5. 路由的path规则
path定义的路由的路径,在hashHistory中,它的主页路径是#/
自定义Route路由通过与父Route的path进行合并,在与主页路径合并,得到最终的路径
- :paramName 匹配 URL 的一个部分,直到遇到下一个/、?、#
- () 表示URL的这个部分是可选的
- * 匹配任意字符(非贪婪模式),直到模式里面的下一个字符为止
- ** 匹配任意字符(贪婪模式),直到下一个/、?、#为止
<Route path="/hello/:name">         // 匹配 /hello/michael 和 /hello/ryan

<Route path="/hello(/:name)">       // 匹配 /hello, /hello/michael, 和 /hello/ryan

<Route path="/files/*.*">           // 匹配 /files/hello.jpg 和 /files/hello.html

<Route path="/**/*.jpg">            // 匹配 /files/hello.jpg 和 /files/path/to/file.jpg
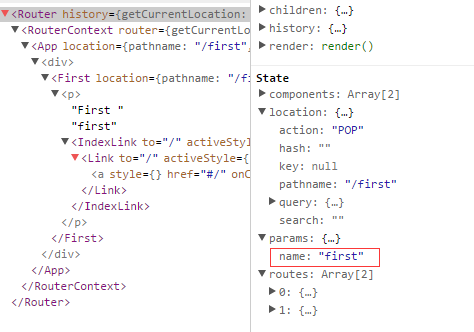
而:name可以通过 this.props.params 中取到
class First extends Component {

    constructor(props) {

        super(props);

    }

    render() {

        return (

            <p>First {this.props.params.name}

                <IndexLink to="/" activeStyle={{color: 'red'}}>Basic</IndexLink>

            </p>

        )

    }

}

.

.

<Route path="/:name" component={First} />

通过React Dev Tool也可以看到组件的相关数据
6. 路由的onEnter、onLeave钩子
在路由的跳转中,我们可能需要在进入页面或离开页面的时候做一些特殊操作,Route 通过 onEnter 与 onLeave 定义了这两个行为

      <Route path="first" component={First} onEnter={(nextState, replace) => {

                console.log(nextState);

                alert('onEnter');

                // replace('second');

            }} onLeave={() => {

                alert('onLeave');

            }}/>
如上,带两个参数,通过 replace 可以更新路径,把注释去掉后,进入"/first"时立马跳转值"/second",这在检测登录时应该比较有用
更多的使用参见 指南
React Router基础使用的更多相关文章
- React Router基础教程
React是个技术栈,单单使用React很难构建复杂的Web应用程序,很多情况下我们需要引入其他相关的技术 React Router是React的路由库,保持相关页面部件与URL间的同步 下面就来简单 ...
- React入门---基础知识-大纲-1
-----------------在慕课网学习react入门笔记-------------- ---------博主边学边记录,手把手进行学习及记录---------- --------------- ...
- React Router教程
React Router教程 React项目的可用的路由库是React-Router,当然这也是官方支持的.它也分为: react-router 核心组件 react-router-dom 应用于浏览 ...
- React Router API文档
React Router API文档 一.<BrowserRouter> 使用HTML5历史记录API(pushState,replaceState和popstate事件)的<Rou ...
- React Router 用法
React Router 用法 一.DEMO import React from "react"; import { HashRouter as Router, Route, Li ...
- react router @4 和 vue路由 详解(全)
react router @4 和 vue路由 本文大纲: 1.vue路由基础和使用 2.react-router @4用法 3.什么是包容性路由?什么是排他性路由? 4.react路由有两个重要的属 ...
- React Router学习
React Router教程 本教程引用马伦老师的的教程 React项目的可用的路由库是React-Router,当然这也是官方支持的.它也分为: react-router 核心组件 react-ro ...
- [Web 前端] React Router v4 入坑指南
cp from : https://www.jianshu.com/p/6a45e2dfc9d9 万恶的根源 距离React Router v4 正式发布也已经过去三个月了,这周把一个React的架子 ...
- React:快速上手(6)——掌握React Router
React:快速上手(6)——掌握React Router 引入Router 安装 npm install react-router-dom 基础组件 React Router中有三种类型的组件:路由 ...
随机推荐
- Git上传文件
最近开始折腾node.js,顺便学习了Git上传的相关知识,找了许多关于Git如何上传项目的相关资料,最终发现一篇比较简易完整的文章, 在此分享一下喜悦的心情!下文是使用Git上传的完整教程: 将文件 ...
- CG之基本光照模型计算公式
在一个基本模型里,一个物体表面的颜色是由放射(emissive).环境反射(ambient).漫反射(diffuse)和镜面反射(specular)等光照作用的总和.每种光照作用取决于表面材质的性质( ...
- DedeCMS新建模型字段【附件样式】修改方法
当我们在系统模型中添加了一个自定义附件类型字段的时候,例如我在后台添加一个名为"fujian"的附件类型的字段,字段的实际内容为:'/uploads/soft/2245/1-255 ...
- Linux的iptables常用配置范例(3)
编辑/etc/rc.local,加入iptables -t nat -A POSTROUTING -s 192.168.0.0/24 -o eth1 -j MASQUERADE,外网口eth1为dhc ...
- Nginx 中 nginx.conf 详解
#定义Nginx运行的用户和用户组 user www www; #nginx进程数,建议设置为等于CPU总核心数. worker_processes 8; #全局错误日志定义类型,[ debug | ...
- Shell实例----------从文件夹里面多个文件里面查找指定内容
脚本执行方式:脚本名称 目录的路径 要查找的内容 #!/bin/bash num=`ls $1 |tr ' ' '^$'|wc -l` for i in `seq 1 $num` do file_n ...
- laravel无法显示路由界面
安装完laravel项目后,开启了重写,/app/storage也设置好了权限,但是始终无法显示出页面,并出现: "Whoops, looks like something went wro ...
- LPC1788的spi使用
#ifndef __SPI_H_ #define __SPI_H_ #include "common.h" #include "delay.h" // cs p ...
- @synthesize和@dynamic
@synthesize 除非开发人员已经做了,否则由编译器自动生成getter/setter方法.当开发人员自定义存或取方法时,自定义会屏蔽自动生成该方法. @dynamic 告诉编译器,不自动生成g ...
- Listener
通过Listner获得当前的用户个数 package listener; import javax.servlet.ServletContext; import javax.servlet.Servl ...