Angular2.x
Angular版本
Angular1和Angular4分别是Angular的两个版本,也就是Angular1.x和Angular2.x(除了Angular1以外,其余都属于Angular2.x)。
1.Angular1.x ~ Angular2.x
2.Angular2.x有什么变化
1.x
安装Angular CLL
- //自从node升级7.x以后,采用@方式进行安装
- npm i -g @angular/cli
创建一个新的应用程序
- ng new angular-tour-of-heroes
启动应用程序(ng参数使用,请访问这篇文章)
- cd angular-tour-of-heroes
- ng serve --open
AppComponent组件
- app.component.ts - 用TypeScript编写的组件类代码。
- app.component.html - 用HTML编写的组件模板。
- app.component.css - 组件的私有CSS样式。
2.x
创建heroes组件
- 组件生成在src目录
- ng generate component heroes

执行命令后,会在本app下,生成heroes目录,且目录里存在
- heroes.component.html
- heroes.component.css
- heroes.component.ts
- //heroes.component.html
- <p>
- heroes works!
- </p>
- //heroes.component.css
- //heroes.component.ts
- import { Component, OnInit } from '@angular/core';
- @Component({
- selector: 'app-heroes',
- templateUrl: './heroes.component.html',
- styleUrls: ['./heroes.component.css']
- })
- export class HeroesComponent implements OnInit {
- constructor() { }
- ngOnInit() {
- }
- }
您始终Component从Angular核心库中导入符号并使用注释组件类。@Component
@Component 是指定组件的Angular元数据的装饰器函数。
CLI生成了三个元数据属性:
selector- 组件的CSS元素选择器templateUrl- 组件模板文件的位置。styleUrls- 组件的私有CSS样式的位置。
在CSS元素选择, 'app-heroes'是相匹配的标识父组件模板内此组件的HTML元素的名称。
这ngOnInit是一个生命周期钩子 Angular ngOnInit在创建组件后立即调用。这是放置初始化逻辑的地方。
总是export组件类,所以你可以import在其他地方...像在AppModule。
详情查询:
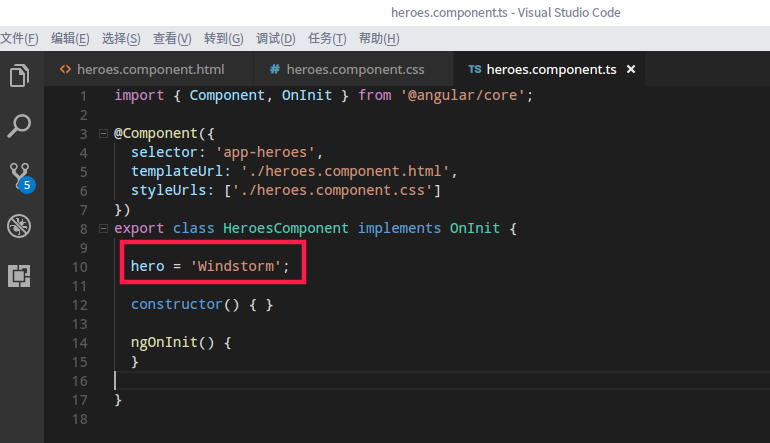
添加hero属性到HeroesComponent,然后再用html模板文件再显示出来。

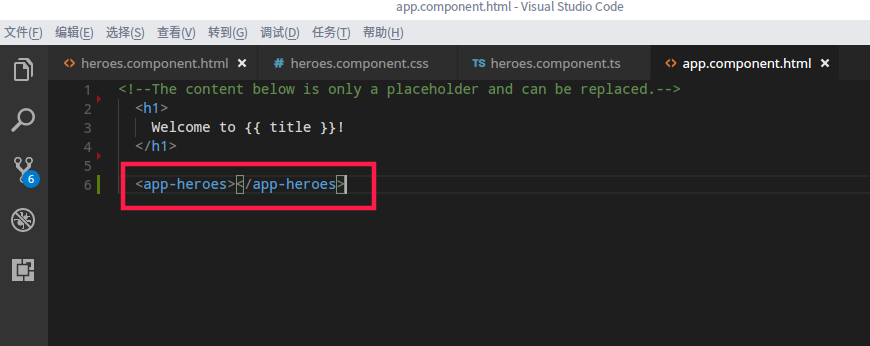
显示HeroesComponent视图,必须添加到shell(AppComponent)模板中

3.x
创建一个heroes类
Hero在文件src/app夹中的文件中创建一个类。给它id和name属性。
- export class Hero {
- id: number;
- name: string;
- }
然后返回到HeroesComponent导入hero.ts
- import { Component, OnInit } from '@angular/core';
- import { Hero } from '../hero';
- @Component({
- selector: 'app-heroes',
- templateUrl: './heroes.component.html',
- styleUrls: ['./heroes.component.css']
- })
- export class HeroesComponent implements OnInit {
- hero: Hero = {
- id: 1,
- name: 'Windstorm'
- };
- constructor() { }
- ngOnInit() {
- }
- }
页面不再正确显示,因为您已将heroes从字符串更改为对象。

怎么显示heroes对象?
- //heroes.component.html
- <h2>{{ hero.name }} Details</h2>
- <div><span>id: </span>{{hero.id}}</div>
- <div><span>name: </span>{{hero.name}}</div>

浏览器刷新,现在heroes的名字以大写字母显示。
uppercase插值绑定中的单词(在管道运算符(|)之后)激活内置函数UppercasePipe。
管道是格式化字符串,货币金额,日期和其他显示数据的好方法。你可以创建自己的。
5.x
编辑heroes
用户应该能够在<input>文本框中编辑英雄名字。
该文本框应显示英雄的name属性并更新该属性的用户类型。这意味着数据从组件类流出到屏幕,从屏幕返回到类。
要自动执行该数据流,请在<input>表单元素和hero.name属性之间设置双向数据绑定。
5.1-双向绑定
- <div>
- <label>name:
- <input [(ngModel)]="hero.name" placeholder="name">
- </label>
- </div>
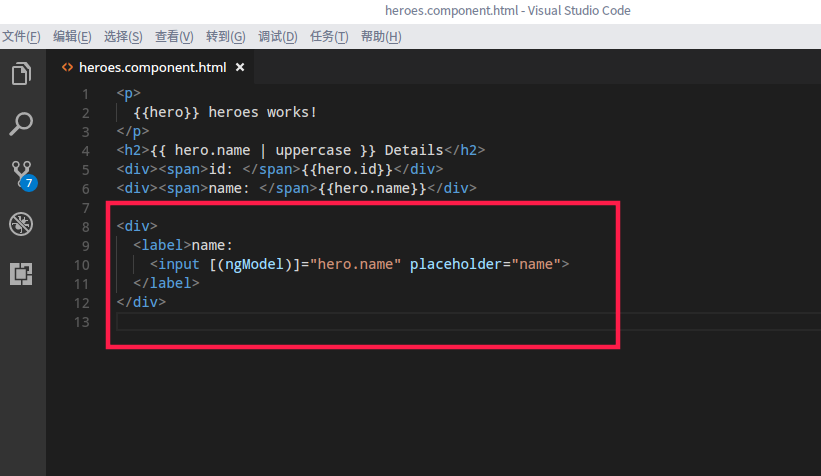
[(ngModel)]是Angular的双向数据绑定语法。
在这里它将hero.name属性绑定到HTML文本框,以便数据可以在两个方向上流动:从hero.name属性到文本框,从文本框回到hero.name。
5.2-FromsModule
请注意,添加应用程序后停止工作。[(ngModel)]
要查看错误,请打开浏览器开发工具,然后在控制台中查找类似的消息
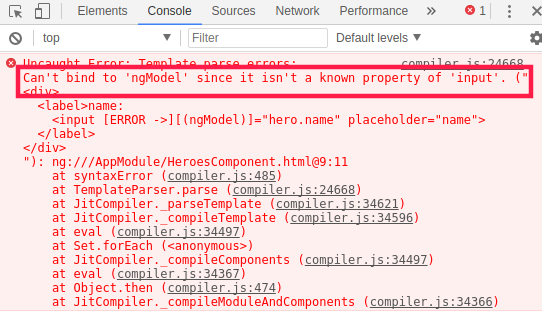
虽然ngModel是有效的Angular指令,但它默认情况下不可用。
它属于可选项FormsModule,您必须选择使用它。
AppModule
Angular需要知道应用程序的各个部分如何组合在一起以及应用程序需要哪些其他文件和库。这些信息被称为元数据
一些元数据位于您添加到组件类的装饰器中。其他关键元数据在装饰器中。@Component@NgModule
最重要的装饰器注释顶级AppModule类。@NgModule
Angular CLI AppModule在src/app/app.module.ts创建项目时生成了一个类。这是你选择进入的地方FormsModule。
导入FormsModule
打开AppModule(app.module.ts)并FormsModule从@angular/forms库中导入符号。
- import { FormsModule } from '@angular/forms'; // <-- NgModel lives here
然后添加FormsModule到元数据的数组中,其中包含应用程序需要的外部模块列表。@NgModuleimports
- imports: [
- BrowserModule,
- FormsModule
- ],
- //app.module.ts
- import { BrowserModule } from '@angular/platform-browser';
- import { FormsModule } from '@angular/forms'; // <-- NgModel lives here
- import { NgModule } from '@angular/core';
- import { AppComponent } from './app.component';
- import { HeroesComponent } from './heroes/heroes.component';
- @NgModule({
- declarations: [
- AppComponent,
- HeroesComponent
- ],
- imports: [
- BrowserModule,
- FormsModule
- ],
- providers: [],
- bootstrap: [AppComponent]
- })
- export class AppModule { }
每个组件必须在一个 NgModule中声明。
你没有声明HeroesComponent。那么为什么应用程序工作?
它的工作原因是Angular CLI HeroesComponent在AppModule它生成该组件时进行了声明。
打开src/app/app.module.ts并HeroesComponent在顶部附近找到导入。
- import { HeroesComponent } from './heroes/heroes.component';
的HeroesComponent是在中声明阵列。 @NgModule.declarations
- declarations: [
- AppComponent,
- HeroesComponent
- ],
请注意,AppModule 声明这两个应用程序组件,AppComponent和HeroesComponent。
Angular2.x的更多相关文章
- Angular2入门系列教程7-HTTP(一)-使用Angular2自带的http进行网络请求
上一篇:Angular2入门系列教程6-路由(二)-使用多层级路由并在在路由中传递复杂参数 感觉这篇不是很好写,因为涉及到网络请求,如果采用真实的网络请求,这个例子大家拿到手估计还要自己写一个web ...
- Angular2学习笔记(1)
Angular2学习笔记(1) 1. 写在前面 之前基于Electron写过一个Markdown编辑器.就其功能而言,主要功能已经实现,一些小的不影响使用的功能由于时间关系还没有完成:但就代码而言,之 ...
- Angular杂谈系列1-如何在Angular2中使用jQuery及其插件
jQuery,让我们对dom的操作更加便捷.由于其易用性和可扩展性,jQuer也迅速风靡全球,各种插件也是目不暇接. 我相信很多人并不能直接远离jQuery去做前端,因为它太好用了,我们以前做的东西大 ...
- Angular2入门系列教程6-路由(二)-使用多层级路由并在在路由中传递复杂参数
上一篇:Angular2入门系列教程5-路由(一)-使用简单的路由并在在路由中传递参数 之前介绍了简单的路由以及传参,这篇文章我们将要学习复杂一些的路由以及传递其他附加参数.一个好的路由系统可以使我们 ...
- Angular2入门系列教程5-路由(一)-使用简单的路由并在在路由中传递参数
上一篇:Angular2入门系列教程-服务 上一篇文章我们将Angular2的数据服务分离出来,学习了Angular2的依赖注入,这篇文章我们将要学习Angualr2的路由 为了编写样式方便,我们这篇 ...
- Angular2入门系列教程4-服务
上一篇文章 Angular2入门系列教程-多个组件,主从关系 在编程中,我们通常会将数据提供单独分离出来,以免在编写程序的过程中反复复制粘贴数据请求的代码 Angular2中提供了依赖注入的概念,使得 ...
- Angular2入门系列教程3-多个组件,主从关系
上一篇 Angular2项目初体验-编写自己的第一个组件 好了,前面简单介绍了Angular2的基本开发,并且写了一个非常简单的组件,这篇文章我们将要学会编写多个组件并且有主从关系 现在,假设我们要做 ...
- Angular2入门系列教程2-项目初体验-编写自己的第一个组件
上一篇 使用Angular-cli搭建Angular2开发环境 Angular2采用组件的编写模式,或者说,Angular2必须使用组件编写,没有组件,你甚至不能将Angular2项目启动起来 紧接着 ...
- Angular2入门系列教程1-使用Angular-cli搭建Angular2开发环境
一直在学Angular2,百忙之中抽点时间来写个简单的教程. 2016年是前端飞速发展的一年,前端越来越形成了(web component)组件化的编程模式:以前Jquery通吃一切的田园时代一去不复 ...
- angular2系列教程(十一)路由嵌套、路由生命周期、matrix URL notation
今天我们要讲的是ng2的路由的第二部分,包括路由嵌套.路由生命周期等知识点. 例子 例子仍然是上节课的例子:
随机推荐
- Linux 常用命令:解压缩
目录 Linux 常用命令:解压缩 说明 tar 涉及参数说明: 压缩 解压 zip压缩 涉及参数说明: uzip解压 涉及参数说明: gzip 涉及参数说明: 压缩率比较 Linux 常用命令:解压 ...
- Error:Failed to resolve: com.afollestad:material-dialogs:
http://www.chenruixuan.com/archives/1068.html 背景: 同事把Android项目直接考给了我...我在Android Studio上运行,然后提示: Err ...
- FastDFS和集中存储方式对比
指标 FastDFS NFS 集中存储设备如NetApp.NAS 线性扩容性 高 差 差 文件高并发访问性能 高 差 一般 文件访问方式 专有API POSIX 支持POSIX 硬件成 ...
- Java中的反射--Reflect
在张孝祥老师的Java讲解中,学习到了Java反射的一部分知识,觉得有必要好好学习一下哈. 一.反射的理解 经典总结:反射就是把Java类中的各种成分映射成为相应的Java类 例如:一个Java类中用 ...
- PHP基于phpqrcode类生成二维码的方法详解
前期准备: 1.phpqrcode类文件下载,下载地址:https://sourceforge.net/projects/phpqrcode/2.PHP环境必须开启支持GD2扩展库支持(一般情况下都是 ...
- 从多表连接后的select count(*)看待SQL优化
从多表连接后的select count(*)看待SQL优化 一朋友问我,以下这SQL能直接改写成select count(*) from a吗? SELECT COUNT(*) FROM a LEFT ...
- IP封包协议头/TCP协议头/TCP3次握手/TCP4次挥手/UDP协议头/ICMP协议头/HTTP协议(请求报文和响应报文)/IP地址/子网掩码(划分子网)/路由概念/MAC封包格式
IP协议头IP包头格式: 1.版本号:4个bit,用来标识IP版本号.这个4位字段的值设置为二进制的0100表示IPv4,设置为0110表示IPv6.目前使用的IP协议版本号是4. 2.首部长度:4个 ...
- git服务器端安装
一.服务器端安装 git支持四种传输协议 1.本地协议 2.ssh协议 3.git协议 4.http/s协议 [root@zabbix ~]# cat /etc/redhat-release Cent ...
- js事件默认行为
事件默认行为: 当一个事件发生的时候浏览器自己默认做的事情 怎么阻止? 当前这个行为是什么事件触发的,然后在这个事件的处理函数中使用 return false; 但是return false 阻止的是 ...
- 【BZOJ2733】永无乡(线段树,启发式合并)
题意:支持合并,求块内K小数 对于 100%的数据 n≤100000,m≤n,q≤300000 思路:对于每一个块建立一棵动态开点的线段树,暴力(启发式?)合并后二分下就行了 merge用函数的方式写 ...
