使用Patroni和HAProxy创建高可用的PostgreSQL集群
操作系统:CentOS Linux release 7.6.1810 (Core)
node1:192.168.216.130 master
node2:192.168.216.132 slave
node3:192.168.216.136 haproxy
这里仅测试,所以只部署了一主一丛,适用与测试环境,生产环境建议postgres至少1主2从,3个etcd节点,2个haproxy+keepalive组成
一、首先在两个节点上安装postgres,下面以postgres9.5.19为例
1、添加RPM

yum install https://download.postgresql.org/pub/repos/yum/9.5/redhat/rhel-7-x86_64/pgdg-centos95-9.5-3.noarch.rpm

2、安装PostgreSQL 9.5

yum install postgresql95-server postgresql95-contrib

注意:本次实验我们这里只需要操作到第2步即可,初始化可以由patroni来替我们完成

3、初始化数据库

/usr/pgsql-9.5/bin/postgresql95-setup initdb

4、设置开机自启动

systemctl enable postgresql-9.5.service

5、启动服务

systemctl start postgresql-9.5.service

6、查看版本

psql --version
二、安装etcd服务
1、这里我只在node1单节点上安装,仅实验,未做分布式部署,如果集群部署可以参考博客etcd集群部署文章
yum install etcd -y

cp /etc/etcd/etcd.conf /etc/etcd/etcd.conf.bak

cd /etc/etcd/

[root@localhost etcd]# egrep ^[A-Z] ./etcd.conf

ETCD_DATA_DIR="/var/lib/etcd/node1.etcd"

ETCD_LISTEN_PEER_URLS="http://192.168.216.130:2380"

ETCD_LISTEN_CLIENT_URLS="http://192.168.216.130:2379,http://127.0.0.1:2379"

ETCD_NAME="node1"

ETCD_INITIAL_ADVERTISE_PEER_URLS="http://192.168.216.130:2380"

ETCD_ADVERTISE_CLIENT_URLS="http://192.168.216.130:2379"

ETCD_INITIAL_CLUSTER="node1=http://192.168.216.130:2380"

ETCD_INITIAL_CLUSTER_TOKEN="etcd-cluster"

ETCD_INITIAL_CLUSTER_STATE="new"
2、保存文件,然后重启etcd服务
systemctl restart etcd
3、查看ectd服务是否正常


三、安装patroni,分别在node1和node2节点安装
1、安装patroni用到依赖包,这里通过pip安装patroni
yum install gcc

yum install python-devel.x86_64

curl https://bootstrap.pypa.io/get-pip.py -o get-pip.py

python get-pip.py

pip install psycopg2-binary

pip install --upgrade setuptools

pip install patroni[etcd,consul]
2、验证patroni是否安装成功

3、配置patroni,以下操作在node1中进行
mkdir /data/patroni/conf -p

cd /data/patroni/conf

yum install git

git clone https://github.com/zalando/patroni.git

cd /data/patroni/conf/patroni-master

cp -r postgres0.yml ../conf/
4、编辑node1上的postgres0.yml文件
scope: batman

#namespace: /service/

name: postgresql0

restapi:

  listen: 192.168.216.130:8008

  connect_address: 192.168.216.130:8008

#  certfile: /etc/ssl/certs/ssl-cert-snakeoil.pem

#  keyfile: /etc/ssl/private/ssl-cert-snakeoil.key

#  authentication:

#    username: username

#    password: password

# ctl:

#   insecure: false # Allow connections to SSL sites without certs

#   certfile: /etc/ssl/certs/ssl-cert-snakeoil.pem

#   cacert: /etc/ssl/certs/ssl-cacert-snakeoil.pem

etcd:

  host: 192.168.216.130:2379

bootstrap:

  # this section will be written into Etcd:/<namespace>/<scope>/config after initializing new cluster

  # and all other cluster members will use it as a `global configuration`

  dcs:

    ttl: 30

    loop_wait: 10

    retry_timeout: 10

    maximum_lag_on_failover: 1048576

#    master_start_timeout: 300

    synchronous_mode: false

    #standby_cluster:

      #host: 127.0.0.1

      #port: 1111

      #primary_slot_name: patroni

    postgresql:

      use_pg_rewind: true

      use_slots: true

      parameters:

         wal_level: logical

         hot_standby: "on"

         wal_keep_segments: 1000

         max_wal_senders: 10

         max_replication_slots: 10

         wal_log_hints: "on"

         archive_mode: "on"

         archive_timeout: 1800s

         archive_command: mkdir -p ../wal_archive && test ! -f ../wal_archive/%f && cp %p ../wal_archive/%f

      recovery_conf:

         restore_command: cp ../wal_archive/%f %p

  # some desired options for 'initdb'

  initdb:  # Note: It needs to be a list (some options need values, others are switches)

  - encoding: UTF8

  - data-checksums

  pg_hba:  # Add following lines to pg_hba.conf after running 'initdb'

  # For kerberos gss based connectivity (discard @.*$)

  #- host replication replicator 127.0.0.1/32 gss include_realm=0

  #- host all all 0.0.0.0/0 gss include_realm=0

  - host replication replicator 0.0.0.0/0 md5

  - host all admin 0.0.0.0/0 md5

  - host all all 0.0.0.0/0 md5

  # Additional script to be launched after initial cluster creation (will be passed the connection URL as parameter)

# post_init: /usr/local/bin/setup_cluster.sh

  # Some additional users users which needs to be created after initializing new cluster

  users:

    admin:

      password: postgres

      options:

        - createrole

        - createdb

    replicator:

      password: replicator

      options:

        - replication

postgresql:

  listen: 0.0.0.0:5432

  connect_address: 192.168.216.130:5432

  data_dir: /data/postgres

  bin_dir: /usr/pgsql-9.5/bin/

#  config_dir:

#  pgpass: /tmp/pgpass0

  authentication:

    replication:

      username: replicator

      password: replicator

    superuser:

      username: admin

      password: postgres

#    rewind:  # Has no effect on postgres 10 and lower

#      username: rewind_user

#      password: rewind_password

  # Server side kerberos spn

#  krbsrvname: postgres

  parameters:

    # Fully qualified kerberos ticket file for the running user

    # same as KRB5CCNAME used by the GSS

#   krb_server_keyfile: /var/spool/keytabs/postgres

    unix_socket_directories: '.'

#watchdog:

#  mode: automatic # Allowed values: off, automatic, required

#  device: /dev/watchdog

#  safety_margin: 5

tags:

    nofailover: false

    noloadbalance: false

    clonefrom: false

    nosync: false
5、配置patroni,以下操作在node2中进行
mkdir /data/patroni/conf -p

cd /data/patroni/conf

yum install git

git clone https://github.com/zalando/patroni.git

cd /data/patroni/conf/patroni-master

cp -r postgres1.yml ../conf/
6、编辑node2上的postgres1.yml文件
scope: batman

#namespace: /service/

name: postgresql1

restapi:

  listen: 192.168.216.132:8008

  connect_address: 192.168.216.132:8008

#  certfile: /etc/ssl/certs/ssl-cert-snakeoil.pem

#  keyfile: /etc/ssl/private/ssl-cert-snakeoil.key

#  authentication:

#    username: username

#    password: password

# ctl:

#   insecure: false # Allow connections to SSL sites without certs

#   certfile: /etc/ssl/certs/ssl-cert-snakeoil.pem

#   cacert: /etc/ssl/certs/ssl-cacert-snakeoil.pem

etcd:

  host: 192.168.216.130:2379

bootstrap:

  # this section will be written into Etcd:/<namespace>/<scope>/config after initializing new cluster

  # and all other cluster members will use it as a `global configuration`

  dcs:

    ttl: 30

    loop_wait: 10

    retry_timeout: 10

    maximum_lag_on_failover: 1048576

#    master_start_timeout: 300

    synchronous_mode: false

    #standby_cluster:

      #host: 127.0.0.1

      #port: 1111

      #primary_slot_name: patroni

    postgresql:

      use_pg_rewind: true

      use_slots: true

      parameters:

         wal_level: logical

         hot_standby: "on"

         wal_keep_segments: 1000

         max_wal_senders: 10

         max_replication_slots: 10

         wal_log_hints: "on"

         archive_mode: "on"

         archive_timeout: 1800s

         archive_command: mkdir -p ../wal_archive && test ! -f ../wal_archive/%f && cp %p ../wal_archive/%f

      recovery_conf:

         restore_command: cp ../wal_archive/%f %p

  # some desired options for 'initdb'

  initdb:  # Note: It needs to be a list (some options need values, others are switches)

  - encoding: UTF8

  - data-checksums

  pg_hba:  # Add following lines to pg_hba.conf after running 'initdb'

  # For kerberos gss based connectivity (discard @.*$)

  #- host replication replicator 127.0.0.1/32 gss include_realm=0

  #- host all all 0.0.0.0/0 gss include_realm=0

  - host replication replicator 0.0.0.0/0 md5

  - host all admin 0.0.0.0/0 md5

  - host all all 0.0.0.0/0 md5

  # Additional script to be launched after initial cluster creation (will be passed the connection URL as parameter)

# post_init: /usr/local/bin/setup_cluster.sh

  # Some additional users users which needs to be created after initializing new cluster

  users:

    admin:

      password: postgres

      options:

        - createrole

        - createdb

    replicator:

      password: replicator

      options:

        - replication

postgresql:

  listen: 0.0.0.0:5432

  connect_address: 192.168.216.132:5432

  data_dir: /data/postgres

  bin_dir: /usr/pgsql-9.5/bin/

#  config_dir:

#  pgpass: /tmp/pgpass0

  authentication:

    replication:

      username: replicator

      password: replicator

    superuser:

      username: admin

      password: postgres

#    rewind:  # Has no effect on postgres 10 and lower

#      username: rewind_user

#      password: rewind_password

  # Server side kerberos spn

#  krbsrvname: postgres

  parameters:

    # Fully qualified kerberos ticket file for the running user

    # same as KRB5CCNAME used by the GSS

#   krb_server_keyfile: /var/spool/keytabs/postgres

    unix_socket_directories: '.'

#watchdog:

#  mode: automatic # Allowed values: off, automatic, required

#  device: /dev/watchdog

#  safety_margin: 5

tags:

    nofailover: false

    noloadbalance: false

    clonefrom: false

    nosync: false
7、记下data_dir上述yml配置文件中的值。该目录需要确保postgres用户具备写入的权限。如果此目录不存在,请创建它:在node1和node2节点分别进行如下操作
mkdir /data/postgres -p

chown -Rf postgres:postgres /data/postgres

chmod 700 /data/postgres
8、在node1上切换到postgres用户,并启动patroni服务,这里patroni会帮我们自动初始化数据库并创建相应的角色
chown -Rf postgres:postgres /data/patroni/conf

su - postgres

启动patroni服务

patroni /data/patroni/conf/postgres0.yml
此时如果服务正常启动可以打印以下日志信息

由于不是后台启动的服务,所以这里我们克隆一个窗口,切换到postgres用户下,并执行psql -h 127.0.0.1 -U admin postgres连接数据库,验证patroni是否正常托管postgres服务

9、在node2上切换到postgres用户,并启动patroni服务,这里和node1的操作一致
chown -Rf postgres:postgres /data/patroni/conf

su - postgres

启动patroni服务

patroni /data/patroni/conf/postgres1.yml
如果服务启动正常,可看到如下日志打印信息

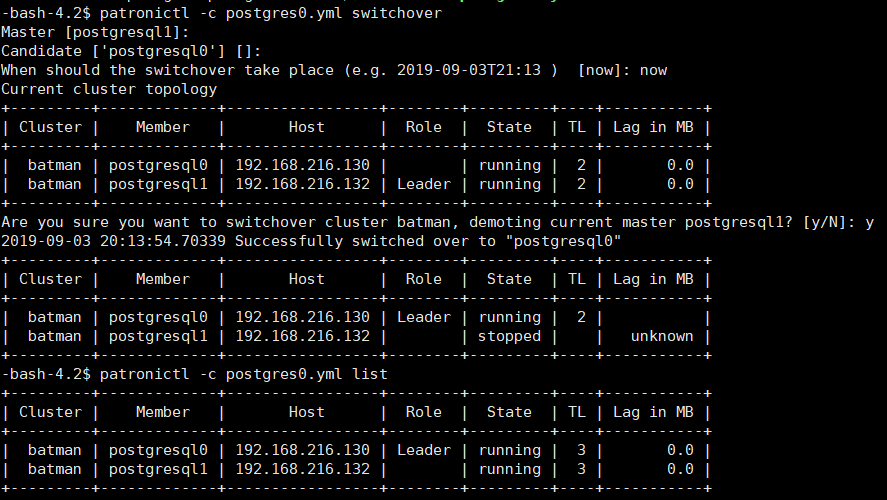
10、查询集群运行状态patronictl -c /data/patroni/conf/postgres0.yml list

11、patronictl -c /data/patroni/conf/postgres0.yml switchover 手动切换master
12、可以后台启动来保持patroni服务不中断,也可以配置成systemd服务来管理保证开机自启
node1节点:
nohup patroni /data/patroni/conf/postgres0.yml >

/data/patroni/patroni_log 2>&1 &
node2节点:
nohup patroni /data/patroni/conf/postgres1.yml >

/data/patroni/patroni_log 2>&1 &
四、在node3节点安装haproxy
yum install -y haproxy

cp -r /etc/haproxy/haproxy.cfg /etc/haproxy/haproxy.cfg_bak
编辑haproxy.cfg配置文件
# vi /etc/haproxy/haproxy.cfg

#---------------------------------------------------------------------

# 全局定义

global

    # log语法:log [max_level_1]

    # 全局的日志配置,使用log关键字,指定使用127.0.0.1上的syslog服务中的local0日志设备,

    # 记录日志等级为info的日志

#   log         127.0.0.1 local0 info

    log         127.0.0.1 local1 notice

    chroot      /var/lib/haproxy

    pidfile     /var/run/haproxy.pid

    # 定义每个haproxy进程的最大连接数 ,由于每个连接包括一个客户端和一个服务器端,

    # 所以单个进程的TCP会话最大数目将是该值的两倍。

    maxconn     4096

    # 用户,组

    user        haproxy

    group       haproxy

    # 以守护进程的方式运行

    daemon

    # turn on stats unix socket

    stats socket /var/lib/haproxy/stats

#---------------------------------------------------------------------

# 默认部分的定义

defaults

    # mode语法:mode {http|tcp|health} 。http是七层模式,tcp是四层模式,health是健康检测,返回OK

    mode tcp

    # 使用127.0.0.1上的syslog服务的local3设备记录错误信息

    log 127.0.0.1 local3 err

    #if you set mode to http,then you nust change tcplog into httplog

    option     tcplog

    # 启用该项,日志中将不会记录空连接。所谓空连接就是在上游的负载均衡器或者监控系统为了

    #探测该服务是否存活可用时,需要定期的连接或者获取某一固定的组件或页面,或者探测扫描

    #端口是否在监听或开放等动作被称为空连接;官方文档中标注,如果该服务上游没有其他的负

    #载均衡器的话,建议不要使用该参数,因为互联网上的恶意扫描或其他动作就不会被记录下来

    option     dontlognull

    # 定义连接后端服务器的失败重连次数,连接失败次数超过此值后将会将对应后端服务器标记为不可用

    retries    3

    # 当使用了cookie时,haproxy将会将其请求的后端服务器的serverID插入到cookie中,以保证

    #会话的SESSION持久性;而此时,如果后端的服务器宕掉了,但是客户端的cookie是不会刷新的

    #,如果设置此参数,将会将客户的请求强制定向到另外一个后端server上,以保证服务的正常

    option redispatch

    #等待最大时长  When a server's maxconn is reached, connections are left pending in a queue  which may be server-specific or global to the backend.

    timeout queue           1m

    # 设置成功连接到一台服务器的最长等待时间,默认单位是毫秒

    timeout connect         10s

    # 客户端非活动状态的超时时长   The inactivity timeout applies when the client is expected to acknowledge or  send data.

    timeout client          1m

    # Set the maximum inactivity time on the server side.The inactivity timeout applies when the server is expected to acknowledge or  send data.

    timeout server          1m

    timeout check           5s

    maxconn                 5120

#---------------------------------------------------------------------

# 配置haproxy web监控,查看统计信息

listen status

    bind 0.0.0.0:1080

    mode http

    log global

    stats enable

    # stats是haproxy的一个统计页面的套接字,该参数设置统计页面的刷新间隔为30s

    stats refresh 30s

    stats uri /haproxy-stats

    # 设置统计页面认证时的提示内容

    stats realm Private lands

    # 设置统计页面认证的用户和密码,如果要设置多个,另起一行写入即可

    stats auth admin:passw0rd

    # 隐藏统计页面上的haproxy版本信息

#    stats hide-version

#---------------------------------------------------------------------

listen master

	bind *:5000

        mode tcp

        option tcplog

        balance roundrobin

	option httpchk OPTIONS /master

	http-check expect status 200

	default-server inter 3s fall 3 rise 2 on-marked-down shutdown-sessions

        server node1 192.168.216.130:5432 maxconn 1000 check port 8008 inter 5000 rise 2 fall 2

        server node2 192.168.216.132:5432 maxconn 1000 check port 8008 inter 5000 rise 2 fall 2

listen replicas

	bind *:5001

        mode tcp

        option tcplog

        balance roundrobin

	option httpchk OPTIONS /replica

	http-check expect status 200

	default-server inter 3s fall 3 rise 2 on-marked-down shutdown-sessions

        server node1 192.168.216.130:5432 maxconn 1000 check port 8008 inter 5000 rise 2 fall 2

        server node2 192.168.216.132:5432 maxconn 1000 check port 8008 inter 5000 rise 2 fall 2
启动haproxy服务
systemctl start haproxy

systemctl status haproxy
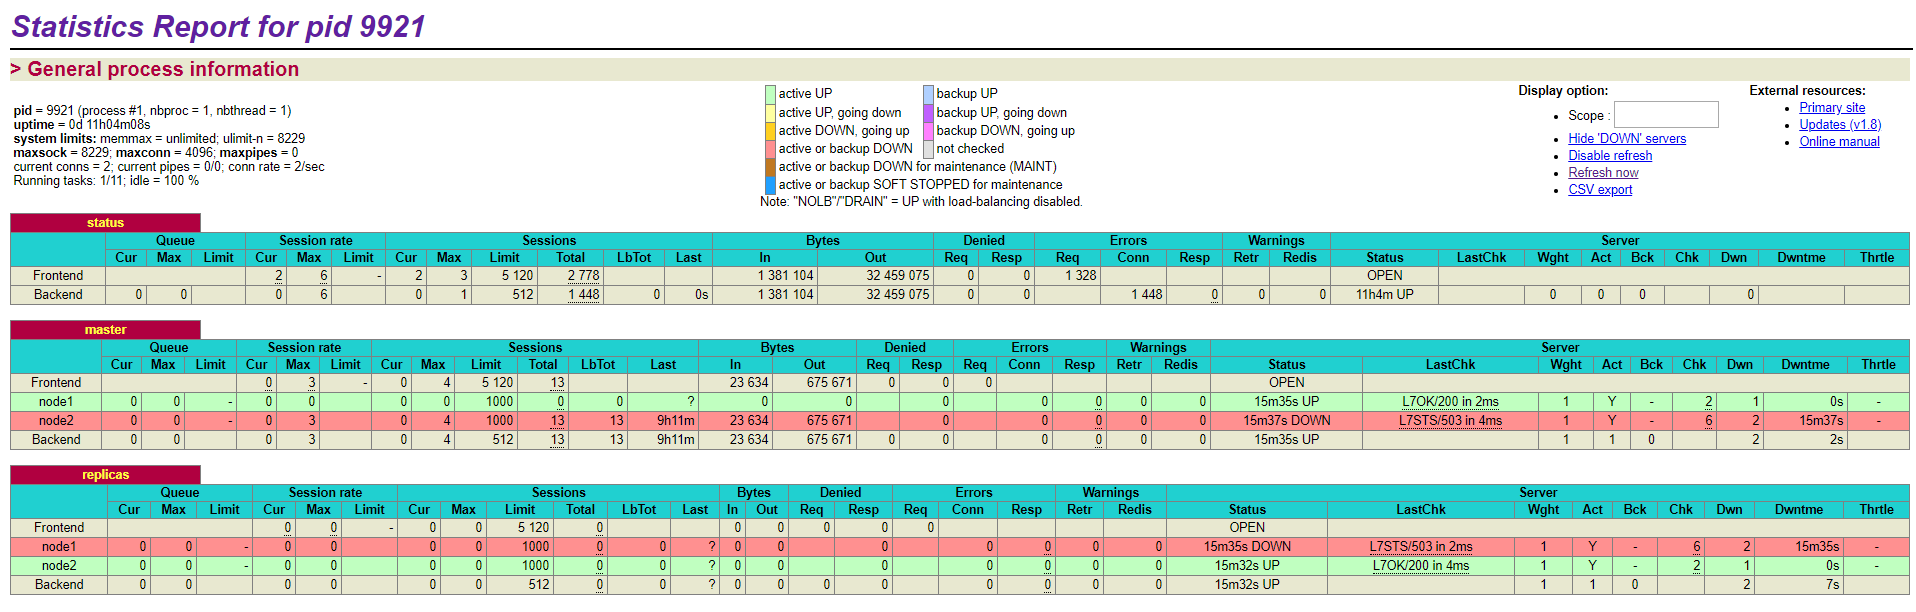
浏览器访问http://192.168.216.136:1080/haproxy-stats输入用户名admin密码passw0rd
这里我们通过5000端口和5001端口分别来提供写服务和读服务,如果需要对数据库写入数据只需要对外提供192.168.216.136:5000即可,可以模拟主库故障,即关闭其中的master节点来验证是否会进行自动主从切换
https://www.linode.com/docs/databases/postgresql/create-a-highly-available-postgresql-cluster-using-patroni-and-haproxy/#configure-etcd
https://www.opsdash.com/blog/postgres-getting-started-patroni.html
使用Patroni和HAProxy创建高可用的PostgreSQL集群的更多相关文章
- 基于MySQL+MHA+Haproxy部署高可用负载均衡集群
一.MHA 概述 MHA(Master High Availability)是可以在MySQL上使用的一套高可用方案.所编写的语言为Perl 从名字上我们可以看到.MHA的目的就是为了维护Master ...
- docker下用keepalived+Haproxy实现高可用负载均衡集群
启动keepalived后宿主机无法ping通用keepalived,报错: [root@localhost ~]# ping 172.18.0.15 PING () bytes of data. F ...
- Haproxy+Keepalived搭建Weblogic高可用负载均衡集群
配置环境说明: KVM虚拟机配置 用途 数量 IP地址 机器名 虚拟IP地址 硬件 内存3G 系统盘20G cpu 4核 Haproxy keepalived 2台 192.168.1.10 192 ...
- Dubbo入门到精通学习笔记(二十):MyCat在MySQL主从复制的基础上实现读写分离、MyCat 集群部署(HAProxy + MyCat)、MyCat 高可用负载均衡集群Keepalived
文章目录 MyCat在MySQL主从复制的基础上实现读写分离 一.环境 二.依赖课程 三.MyCat 介绍 ( MyCat 官网:http://mycat.org.cn/ ) 四.MyCat 的安装 ...
- RabbitMQ(四):使用Docker构建RabbitMQ高可用负载均衡集群
本文使用Docker搭建RabbitMQ集群,然后使用HAProxy做负载均衡,最后使用KeepAlived实现集群高可用,从而搭建起来一个完成了RabbitMQ高可用负载均衡集群.受限于自身条件,本 ...
- 1.还不会部署高可用的kubernetes集群?看我手把手教你使用二进制部署v1.23.6的K8S集群实践(上)
公众号关注「WeiyiGeek」 设为「特别关注」,每天带你玩转网络安全运维.应用开发.物联网IOT学习! 本章目录: 0x00 前言简述 0x01 环境准备 主机规划 软件版本 网络规划 0x02 ...
- K8S 使用Kubeadm搭建高可用Kubernetes(K8S)集群 - 证书有效期100年
1.概述 Kubenetes集群的控制平面节点(即Master节点)由数据库服务(Etcd)+其他组件服务(Apiserver.Controller-manager.Scheduler...)组成. ...
- 企业运维实践-还不会部署高可用的kubernetes集群?使用kubeadm方式安装高可用k8s集群v1.23.7
关注「WeiyiGeek」公众号 设为「特别关注」每天带你玩转网络安全运维.应用开发.物联网IOT学习! 希望各位看友[关注.点赞.评论.收藏.投币],助力每一个梦想. 文章目录: 0x00 前言简述 ...
- keepalived工作原理和配置说明 腾讯云VPC内通过keepalived搭建高可用主备集群
keepalived工作原理和配置说明 腾讯云VPC内通过keepalived搭建高可用主备集群 内网路由都用mac地址 一个mac地址绑定多个ip一个网卡只能一个mac地址,而且mac地址无法改,但 ...
随机推荐
- DS博客作业07--查找
1.本周学习总结(0--2分) 1.思维导图 2.谈谈你对查找运算的认识及学习体会. 2.PTA实验作业(6分) 本周要求挑3道题目写设计思路.调试过程.设计思路用伪代码描述.题目选做要求: 原则上题 ...
- 深入Vue响应式原理
深入Vue.js响应式原理 一.创建一个Vue应用 new Vue({ data() { return { name: 'yjh', }; }, router, store, render: h =& ...
- SSM学习系列
Spring+SpringMVC+MyBatis Spring+SpringMVC+MyBatis深入学习及搭建(一)——MyBatis的基础知识 Spring+SpringMVC+MyBatis深入 ...
- 纪一次线上cms调优
过去也有对JAVA性能调优的分析,有过以下case: 1. JVM outOfMemory, 主要是使用jmap dump 出来 hprof,使用MAT进行分析 2. JVM outOfMemory, ...
- 【Python爬虫案例学习】分析Ajax请求并抓取今日头条街拍图片
1.抓取索引页内容 利用requests请求目标站点,得到索引网页HTML代码,返回结果. from urllib.parse import urlencode from requests.excep ...
- Spring整合Hibernate的两种方式
在使用spring注解整合hibernate时出现"org.hibernate.MappingException: Unknown entity: com.ssh.entry.Product ...
- np.minimum()与tf.minimum()的用法
总结:二者用法一致.a=np.array([[[[10,8,3,9],[5,6,7,8]]],[[[1,2,3,4],[5,6,7,8]]],[[[1,2,3,4],[5,6,7,8]]]] )pri ...
- Python进阶(三)----函数名,作用域,名称空间,f-string,可迭代对象,迭代器
Python进阶(三)----函数名,作用域,名称空间,f-string,可迭代对象,迭代器 一丶关键字:global,nonlocal global 声明全局变量: 1. 可以在局部作用域声明一 ...
- 【开发工具】-Idea代码提示忽略大小写
设置路径:File–>Settings–>Editor–>General–>Code Completion–>Match case 取消Match case 勾选. [o ...
- angular js根据json文件动态生成路由状态
项目上有一个新需求,就是需要根据json文件动态生成路由状态,查阅了一下资料,现在总结一下发出来: 首先项目用到的是angular的UI-路由,所以必须引入angular.js和angular-ui- ...