RHEL6+GFS2+MYSQL高可用
RHCS集群安装部署
组件介绍:
luci: luci是一个基于web的,用来管理和配置RHCS集群,通过luci可以轻松的搭建一个功能强大的集群系统,节点主机可以使用ricci来和luci 管理段进行通信
ricci: 安装在集群的节点的接收来自 luci 管理请求的代理,端口=11111
rgmanager: 高可用性服务管理,主要用来监督、启动和停止集群的应用、服务和资源
cman: 全称clustermanagment,cman用于管理集群成员、消息和通知。他通过监控每个节点的运行状态来了解节点成员之间的关系,当节点出现故障时,cman及时将这种改变通知底层,进而做出相应的调整
gfs2: 集群文件系统,GFS是RHCS为集群系统提供的一个存储解决方案,它允许集群多个节点在块级别上共享存储,每个节点通过共享一个存储空间,保证了访问数据的一致性,更切实的说,GFS是RHCS提供的一个集群文件系统,多个节点同时挂载一个文件系统分区,而文件系统数据不受破坏,这是单一的文件系统不能实现的。
iscsi-target-utils: iscsi服务端
iscsi-initiator: iscsi发起端
|
主机名 |
IP |
software |
|
csnode01 |
192.168.2.10 |
luci,ricci,rgmanager,cman,mysql-server,gfs2-utils,iscsi-initiator-utils |
|
csnode02 |
192.168.2.20 |
ricci,rgmanager,cman,mysql-server,gfs2-utils,iscsi-initiator-utils |
|
csnode03 |
192.168.2.30 |
ricci,rgmanager,cman,mysql-server,gfs2-utils,iscsi-initiator-utils |
|
csnode04 |
192.168.2.40 |
scsi-target-utils |
基础服务配置:
在csnode04上:
配置yum仓库,通过httpd实现:
挂载OS镜像
启动httpd服务:
#service httpd start
#chkconfig httpd on
#cd /var/www/html
[root@csnode04 html]# mkdir rhel/6/os/x86_64/ -pv
[root@csnode04 html]# mount /dev/sr0 rhel/6/os/x86_64/
mount: block device /dev/sr0 is write-protected, mounting read-only
在csnode01,cdnode02,cdnode03上配置以下:
#vim /etc/yum.repo.d/base.repo
[rhel-source]
name=Red Hat Enterprise Linux $releasever - $basearch - Source
baseurl=http://192.168.2.40/rhel/6/os/x86_64/
enabled=1
gpgcheck=0
[HighAvailability]
name=Red Hat Enterprise Linux $releasever - $basearch - Source
baseurl=http://192.168.2.40/rhel/6/os/x86_64/HighAvailability
enabled=1
gpgcheck=0
[LoadBalancer]
name=Red Hat Enterprise Linux $releasever - $basearch - Source
baseurl=http://192.168.2.40/rhel/6/os/x86_64/LoadBalancer
enabled=1
gpgcheck=0
[ResilientStorage]
name=Red Hat Enterprise Linux $releasever - $basearch - Source
baseurl=http://192.168.2.40/rhel/6/os/x86_64/ResilientStorage
enabled=1
gpgcheck=0
[ScalableFileSystem]
name=Red Hat Enterprise Linux $releasever - $basearch - Source
baseurl=http://192.168.2.40/rhel/6/os/x86_64/ScalableFileSystem
enabled=1
gpgcheck=0
4台服务器配置hosts名称解析:
#vim /etc/hosts
127.0.0.1 localhost localhost.localdomain localhost4 localhost4.localdomain4
::1 localhost localhost.localdomain localhost6 localhost6.localdomain6
192.168.2.10 csnode01.example.com csnode01
192.168.2.20 csnode02.example.com csnode02
192.168.2.30 csnode03.example.com csnode03
192.168.2.40 csnode04.example.com csnode04
禁用防火墙:
#service iptables stop
#chkconfig iptables off
关闭网络服务:
#service NetworkManager stop
#chkconfig NetworkManager off
关闭Selinux:
#sed -i 's/^SELINUX=.*/SELINUX=disabled/g' /etc/selinux/config
安装RHCS工具:
管理服务器csnode01安装luci:
[root@csnode01 yum.repos.d]# yum install luci -y
[root@csnode01 yum.repos.d]# service luci start
[root@csnode01 yum.repos.d]# chkconfig luci on
浏览器访问 https://192.168.2.10:8084 使用root帐号密码即可登陆管理界面:
集群节点csnode01,csnode02,csnode03安装ricci rgmanager cman
[root@csnode01 yum.repos.d]#yum install ricci rgmanager cman -y
从红帽企业版 Linux 6.1 开始,您在任意节点中使用 ricci 推广更新的集群配置时要求输入密码。所以在前面两台主机安装完成ricci后需要修改ricci用户的密码,这个是后面节点设置的密码,并且要作时间同步;然后启动安装的服务
修改密码:
[root@csnode01 yum.repos.d]# echo 123456 | passwd --stdin ricci
永久启动服务:
[root@csnode01 yum.repos.d]# service ricci start;service rgmanager start ;service cman start
[root@csnode01 yum.repos.d]# chkconfig ricci on ; chkconfig rgmanager on ; chkconfig cman on
安装好RHCS,在启动cman的时候会提示如下错误:
Starting cman... xmlconfig cannot find/etc/cluster/cluster.conf [Failed]
是由于cluster.conf文件没有创建,可以安装luci图形界面配置。
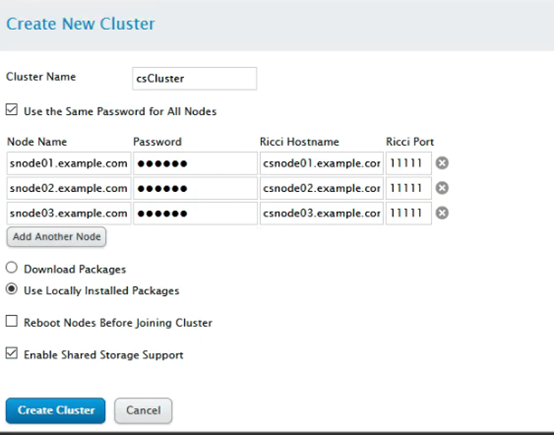
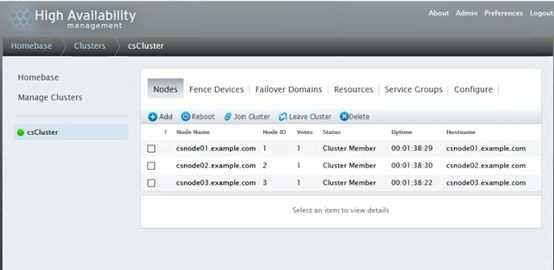
访问图形管理界面,配置RHCS:
配置Cluster:
Manag Clusters -> Create (其中password填写 123456 用户的密码,同时建议将”Reboot Nodes Before Joining Cluster“推荐勾选上)
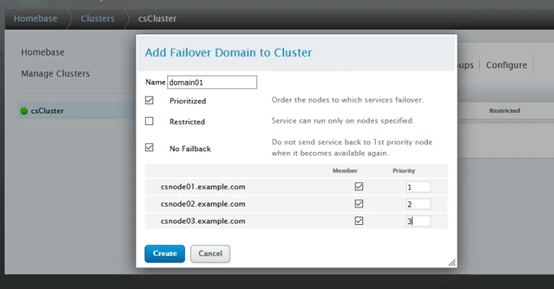
添加故障转移域:FailOverDomains -> Add ,添加转移域
说明:
Prioritized:故障转移时选择优先级高
Restricted:服务只运行在指定的节点上
No Failback:故障节点恢复后,服务不用切换回去
服务安装
给csnode04添加一块硬盘,将/dev/sdb(新添加的硬盘)共享给csnode01、csnode02和csnode03
安装服务端程序:
[root@csnode04 yum.repos.d]# yum install scsi-target-utils -y
创建分区:
[root@csnode04 yum.repos.d]# fdisk /dev/sdb
Device contains neither a valid DOS partition table, nor Sun, SGI or OSF disklabel
Building a new DOS disklabel with disk identifier 0xe747f71d.
Changes will remain in memory only, until you decide to write them.
After that, of course, the previous content won't be recoverable.
Warning: invalid flag 0x0000 of partition table 4 will be corrected by w(rite)
WARNING: DOS-compatible mode is deprecated. It's strongly recommended to
switch off the mode (command 'c') and change display units to
sectors (command 'u').
Command (m for help): n
Command action
e extended
p primary partition (1-4)
p
Partition number (1-4): 1
First cylinder (1-20480, default 1):
Using default value 1
Last cylinder, +cylinders or +size{K,M,G} (1-20480, default 20480):
Using default value 20480
Command (m for help): w
The partition table has been altered!
Calling ioctl() to re-read partition table.
Syncing disks.
让内核重读分区表:
[root@csnode04 yum.repos.d]# partx -a /dev/sdb
BLKPG: Device or resource busy
error adding partition 1
[root@csnode04 yum.repos.d]# partx -a /dev/sdb
BLKPG: Device or resource busy
error adding partition 1
在csnode04上配置服务端,添加配置文件:
[root@csnode04 yum.repos.d]# vim /etc/tgt/targets.conf
<target iqn.2019-11.com.example:server.target1>
backing-store /dev/sdb1
initiator-address 192.168.2.10
initiator-address 192.168.2.20
initiator-address 192.168.2.30
</target>
启动tgtd服务,并开机自启:
[root@csnode04 yum.repos.d]# service tgtd start
[root@csnode04 yum.repos.d]# chkconfig tgtd on
查看共享的设备信息:
[root@csnode04 yum.repos.d]# tgtadm -L iscsi -m target -o show
Target 1: iqn.2019-11.com.example:server.target1
System information:
Driver: iscsi
State: ready
I_T nexus information:
LUN information:
LUN: 0
Type: controller
SCSI ID: IET 00010000
SCSI SN: beaf10
Size: 0 MB, Block size: 1
Online: Yes
Removable media: No
Prevent removal: No
Readonly: No
Backing store type: null
Backing store path: None
Backing store flags:
LUN: 1
Type: disk
SCSI ID: IET 00010001
SCSI SN: beaf11
Size: 21475 MB, Block size: 512
Online: Yes
Removable media: No
Prevent removal: No
Readonly: No
Backing store type: rdwr
Backing store path: /dev/sdb1
Backing store flags:
Account information:
ACL information:
192.168.2.10
192.168.2.20
192.168.2.30
csnode01、csnode02和csnode03安装客户端程序:
[root@csnode01 yum.repos.d]# yum install iscsi-initiator-utils –y
启动服务,并永久启动:
[root@csnode01 yum.repos.d]# service iscsi start;service iscsid start
[root@csnode01 yum.repos.d]# chkconfig iscsi on;chkconfig iscsid on
csnode01、csnode02和csnode03发现共享设备:
[root@csnode01 yum.repos.d]# iscsiadm -m discovery -t st -p 192.168.2.40
Starting iscsid: [ OK ]
192.168.2.40:3260,1 iqn.2019-11.com.example:server.target1
csnode01、csnode02和csnode03登入存储设备:
[root@csnode01 yum.repos.d]# iscsiadm -m node -T iqn.2019-11.com.example:server.target1 -p 192.168.2.40 -l
Logging in to [iface: default, target: iqn.2019-11.com.example:server.target1, portal: 192.168.2.40,3260] (multiple)
Login to [iface: default, target: iqn.2019-11.com.example:server.target1, portal: 192.168.2.40,3260] successful.
此时使用fdisk -l可以看到/dev/sdb设备
csnode01、csnode02和csnode03安装集群文件系统程序:
[root@csnode01 yum.repos.d]# yum install gfs2-utils –y
创建分区:
[root@csnode01 ~]# fdisk /dev/sdb
Device contains neither a valid DOS partition table, nor Sun, SGI or OSF disklabel
Building a new DOS disklabel with disk identifier 0x20e43e5e.
Changes will remain in memory only, until you decide to write them.
After that, of course, the previous content won't be recoverable.
Warning: invalid flag 0x0000 of partition table 4 will be corrected by w(rite)
WARNING: DOS-compatible mode is deprecated. It's strongly recommended to
switch off the mode (command 'c') and change display units to
sectors (command 'u').
Command (m for help): n
Command action
e extended
p primary partition (1-4)
p
Partition number (1-4): 1
First cylinder (1-20479, default 1):
Using default value 1
Last cylinder, +cylinders or +size{K,M,G} (1-20479, default 20479):
Using default value 20479
Command (m for help): w
The partition table has been altered!
Calling ioctl() to re-read partition table.
Syncing disks.
任意节点格式化集群文件系统,这里选择csnode01:
[root@csnode01 ~]# mkfs.gfs2 -j 3 -p lock_dlm -t csCluster:sdb1 /dev/sdb1
This will destroy any data on /dev/sdb1.
It appears to contain: data
Are you sure you want to proceed? [y/n] y
Device: /dev/sdb1
Blocksize: 4096
Device Size 20.00 GB (5242620 blocks)
Filesystem Size: 20.00 GB (5242617 blocks)
Journals: 3
Resource Groups: 80
Locking Protocol: "lock_dlm"
Lock Table: "csCluster:sdb1"
UUID: 4b12a97a-c23c-998a-9ac3-8a579deb5391
csnode01、csnode02和csnode03安装mysql-server服务:
[root@csnode01 ~]# yum install mysql-server –y
挂载刚才的gfs2文件系统给mysql:
[root@csnode01 ~]# mount -t gfs2 /dev/sdb1 /var/lib/mysql/
测试:
csnode01创建一个目录haha:
[root@csnode01 ~]# cd /var/lib/mysql/
[root@csnode01 mysql]# mkdir haha
[root@csnode01 mysql]# ls
haha
csnode02挂载设备:
[root@csnode02 ~]# mount -t gfs2 /dev/sdb1 /var/lib/mysql/
invalid device path "/dev/sdb1"
发现有问题:应让内核重读分区表:
[root@csnode02 ~]# partx -a /dev/sdb
[root@csnode02 ~]# mount -t gfs2 /dev/sdb1 /var/lib/mysql/
[root@csnode02 ~]# cd /var/lib/mysql/
[root@csnode02 mysql]# ls
haha
在csnode02上也看到了刚才看到的haha目录
在csnode01上删除haha,在csnode02上看不到haha目录,实现同步操作。
此时gfs2配置完成,卸载csnode02上的/var/lib/mysql,在luci界面上配置gfs2资源,使其自动开启服务,并实现数据共享:
[root@csnode02 ~]# umount /var/lib/mysql/
配置资源,添加至资源组
其实就是将资源添加之后,新建资源组,谁拿到资源组谁就可以挂载共享磁盘,打开服务,获得数据库中数据。
新建资源组,按照IP,文件管理器,服务的顺序加入资源组中:
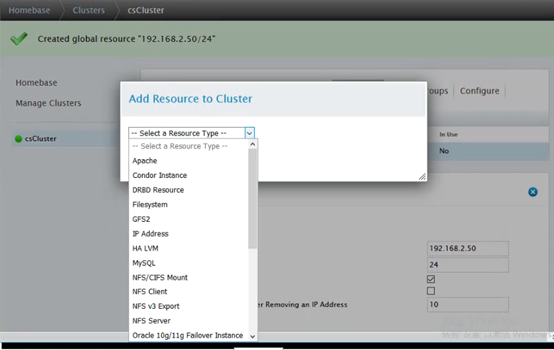
添加资源组:
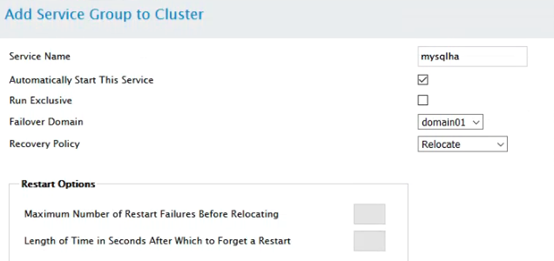
添加IP资源配置信息:

添加GFS配置信息:

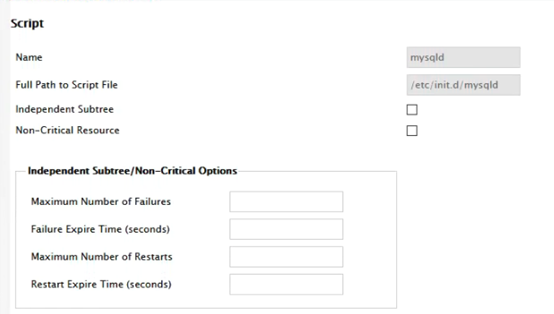
加入资源组,确认之后,重新刷新luci页面,查看效果。配置完成如下:
登入csnode01,发现/dev/sdb1自动挂载到了csnode01,mysql服务自动开启:
[root@csnode01 ~]# cd /var/lib/mysql/
[root@csnode01 mysql]# ls
ibdata1 ib_logfile0 ib_logfile1 mysql mysql.sock test
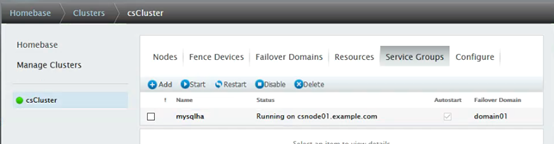
查询集群状态信息:
[root@csnode01 mysql]# clustat
Cluster Status for csCluster @ Sun Dec 1 14:47:05 2019
Member Status: Quorate
Member Name ID Status
------ ---- ---- ------
csnode01.example.com 1 Online, Local, rgmanager
csnode02.example.com 2 Online, rgmanager
csnode03.example.com 3 Online, rgmanager
Service Name Owner (Last) State
------- ---- ----- ------ -----
service:mysqlha csnode01.example.com
切换到csnode02上:
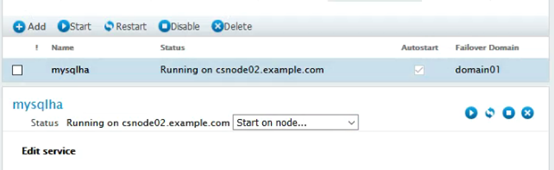
在csnode01上查看集群服务,发现服务已切换到csnode02节点:
[root@csnode01 ~]# clustat
Cluster Status for csCluster @ Sun Dec 1 14:49:49 2019
Member Status: Quorate
Member Name ID Status
------ ---- ---- ------
csnode01.example.com 1 Online, Local, rgmanager
csnode02.example.com 2 Online, rgmanager
csnode03.example.com 3 Online, rgmanager
Service Name Owner (Last) State
------- ---- ----- ------ -----
service:mysqlha csnode02.example.com starting
查看csnode02上磁盘挂载信息:
[root@csnode02 ~]# df
Filesystem 1K-blocks Used Available Use% Mounted on
/dev/mapper/system-lv_root
36950724 2882816 32190916 9% /
tmpfs 1962828 31884 1930944 2% /dev/shm
/dev/sda1 198337 32970 155127 18% /boot
/dev/sdb1 20967856 418908 20548948 2% /var/lib/mysql
测试登入mysql,执行相关命令:
[root@csnode02 ~]# mysql
Welcome to the MySQL monitor. Commands end with ; or \g.
Your MySQL connection id is 2
Server version: 5.1.66 Source distribution
Copyright (c) 2000, 2012, Oracle and/or its affiliates. All rights reserved.
Oracle is a registered trademark of Oracle Corporation and/or its
affiliates. Other names may be trademarks of their respective
owners.
Type 'help;' or '\h' for help. Type '\c' to clear the current input statement.
mysql> show databases;
+--------------------+
| Database |
+--------------------+
| information_schema |
| mysql |
| test |
+--------------------+
3 rows in set (0.00 sec)
mysql> create databases test1;
mysql> create database test1;
Query OK, 1 row affected (0.01 sec)
重启csnode02,发现服务重新启动在csnode01上:
止此,rhcs+gfs2+mysql搭建完成。
RHEL6+GFS2+MYSQL高可用的更多相关文章
- MySQL高可用之——keepalived+互为主从
目标:配置一个keepalived双机热备架构,并配置主从复制 规划: master1 zlm177 192.168.17.177 master2 zlm188 192 ...
- MySQL高可用架构之MHA
简介: MHA(Master High Availability)目前在MySQL高可用方面是一个相对成熟的解决方案,它由日本DeNA公司youshimaton(现就职于Facebook公司)开发,是 ...
- Heartbeat+DRBD+MySQL高可用方案
1.方案简介 本方案采用Heartbeat双机热备软件来保证数据库的高稳定性和连续性,数据的一致性由DRBD这个工具来保证.默认情况下只有一台mysql在工作,当主mysql服务器出现问题后,系统将自 ...
- [转]MYSQL高可用方案探究(总结)
前言 http://blog.chinaunix.net/uid-20639775-id-3337432.htmlLvs+Keepalived+Mysql单点写入主主同步高可用方案 http://bl ...
- mysql高可用架构
高可用 高可用(High Availabiltity) 应用提供持续不间断(可用)的服务的能力 系统高可用性的评价通常用可用率表示 造成不可用的原因 硬件故障(各种) 预期中的系统软硬件维护 ...
- 基于PXC的MySQL高可用环境简单部署
PXC简介 Percona XtraDB Cluster(简称PXC集群)提供了MySQL高可用的一种实现方法. 1.集群是有节点组成的,推荐配置至少3个节点,但是也可以运行在2个节点上. 2.每个节 ...
- [转载] MySQL高可用方案选型参考
原文: http://imysql.com/2015/09/14/solutions-of-mysql-ha.shtml?hmsr=toutiao.io&utm_medium=toutiao. ...
- MySQL高可用读写分离方案预研
目前公司有需求做MySQL高可用读写分离,网上搜集了不少方案,都不尽人意,下面是我结合现有组件拼凑的实现方案,亲测已满足要求,希望各位多提建议 :) 一. 网上方案整理(搜集地址不详...) 1 ...
- MySQL高可用之MHA的搭建 转
http://www.cnblogs.com/muhu/p/4045780.html http://www.cnblogs.com/gomysql/p/3675429.html http://www ...
随机推荐
- 测试之selenium简介
目录 selenium是什么? 应该具备的知识 Selenium功能特性 Selenium的局限性 Selenium与QTP比较 Selenium工具套件 Selenium集成开发环境(IDE) Se ...
- centos7 编译安装 haproxy1.8.20
当前系统信息: [root@localhost ~]# cat /etc/os-release NAME="CentOS Linux" VERSION="7 (Core) ...
- AQS源码的简单理解
概念 AQS全称 AbstractQueuedSynchronizer. AQS是一个并发包的基础组件,用来实现各种锁,各种同步组件的.它包含了state变量.加锁线程.等待队列等并发中的核心组件. ...
- Leetcode 5281. 使结果不超过阈值的最小除数
又一次参赛,除了第一道Easy题和第二道Medium外,剩下的两道在有限时间内,要么没思路,要么思路不对,超时,要么有思路调试出错,还需多加练习! (这次的第三题,在循环从1开始,直到找到满足地为止, ...
- ASP.NET Core如何在ActionFilterAttribute里做依赖注入
在ASP.NET Core里,我们可以使用构造函数注入很方便地对Controller,ViewComponent等部件做依赖注入.但是如何给过滤器ActionFilterAttribute也用上构造函 ...
- 《Linux就该这么学》培训笔记_ch15_使用Postfix与Dovecot部署邮件系统
<Linux就该这么学>培训笔记_ch15_使用Postfix与Dovecot部署邮件系统 文章最后会post上书本的笔记照片. 文章主要内容: 电子邮件系统 配置Postfix服务程序 ...
- selenium爬虫入门(selenium+Java+chrome)
selenium是一个开源的测试化框架,可以直接在浏览器中运行,就像用户直接操作浏览器一样,十分方便.它支持主流的浏览器:chrome,Firefox,IE等,同时它可以使用Java,python,J ...
- QuantLib 金融计算——收益率曲线之构建曲线(4)
[TOC] 如果未做特别说明,文中的程序都是 C++11 代码. QuantLib 金融计算--收益率曲线之构建曲线(4) 本文代码对应的 QuantLib 版本是 1.15.相关源代码可以在 Qua ...
- wordpress防止垃圾邮件方法
wordpress防止垃圾邮件方法 安装NoSpamNX插件然后设置Operating mode 为 Block (recommended) save
- Linux常用基础(三)
1.gcc编译器 (1)简介 前期的GCC是GNU C Compiler,仅仅用于C语言的编译,经过多年的发展,现在的GCC为GNU Compiler Collection,并且目前支持多种编程语言的 ...