pytorch实现style transfer
说是实现,其实并不是我自己实现的
亮出代码:https://github.com/yunjey/pytorch-tutorial/tree/master/tutorials/03-advanced/neural_style_transfer
# -*- coding: utf-8 -*-

from __future__ import division

from torch.backends import cudnn

from torch.autograd import Variable

from torchvision import models

from torchvision import transforms

from PIL import Image

import argparse

import torch

import torchvision

import torch.nn as nn

import numpy as np

use_cuda = torch.cuda.is_available()

dtype = torch.cuda.FloatTensor if use_cuda else torch.FloatTensor

# Load image file and convert it into variable

# unsqueeze for make the 4D tensor to perform conv arithmetic

def load_image(image_path, transform=None, max_size=None, shape=None):

    image = Image.open(image_path)

    if max_size is not None:

        scale = max_size / max(image.size)

        size = np.array(image.size) * scale

        image = image.resize(size.astype(int), Image.ANTIALIAS)

    if shape is not None:

        image = image.resize(shape, Image.LANCZOS)

    if transform is not None:

        image = transform(image).unsqueeze(0)

    return image.type(dtype)

# Pretrained VGGNet

class VGGNet(nn.Module):

    def __init__(self):

        """Select conv1_1 ~ conv5_1 activation maps."""

        super(VGGNet, self).__init__()

        self.select = ['', '', '', '', '']

        self.vgg = models.vgg19(pretrained=True).features

    def forward(self, x):

        """Extract 5 conv activation maps from an input image.

        Args:

            x: 4D tensor of shape (1, 3, height, width).

        Returns:

            features: a list containing 5 conv activation maps.

        """

        features = []

        for name, layer in self.vgg._modules.items():

            x = layer(x)  # 依次输出并且截取

            if name in self.select:

                features.append(x)

        return features

def main(config):

    # Image preprocessing

    # For normalization, see https://github.com/pytorch/vision#models

    transform = transforms.Compose([

        transforms.ToTensor(),

        transforms.Normalize((0.485, 0.456, 0.406),

                             (0.229, 0.224, 0.225))])

    # Load content and style images

    # make content.size() == style.size()

    content = load_image(config.content, transform, max_size=config.max_size)

    style = load_image(config.style, transform, shape=[content.size(2), content.size(3)])

    # Initialization and optimizer

    target = Variable(content.clone(), requires_grad=True)

    optimizer = torch.optim.Adam([target], lr=config.lr, betas=[0.5, 0.999])  # 优化目标:target,非网络参数

    # 优化的目标并不是网络参数,而是target,target与content要相似,并且target的grammer矩阵要和style的feature要相似

    vgg = VGGNet()

    if use_cuda:

        vgg.cuda()

    for step in range(config.total_step):

        # Extract multiple(5) conv feature vectors

        target_features = vgg(target)   # 每一次输入到网络中的是同样一张图片,反传优化的目标是输入的target

        content_features = vgg(Variable(content))

        style_features = vgg(Variable(style))

        style_loss = 0

        content_loss = 0

        for f1, f2, f3 in zip(target_features, content_features, style_features):

            # Compute content loss (target and content image)

            content_loss += torch.mean((f1 - f2)**2)  # 用内容来直接衡量loss

            # Reshape conv features

            _, c, h, w = f1.size()  # channel height width

            f1 = f1.view(c, h * w)  # reshape a vector, c是feature中的通道数目

            f3 = f3.view(c, h * w)  # reshape a vector

            # Compute gram matrix

            f1 = torch.mm(f1, f1.t())

            f3 = torch.mm(f3, f3.t())

            # Compute style loss (target and style image)

            style_loss += torch.mean((f1 - f3)**2) / (c * h * w)   # 用两个gram矩阵之间的距离来衡量loss

            # style_loss += torch.mean((f1 - f3) ** 2)   # 用两个gram矩阵之间的距离来衡量loss

            # / c * h * w 保证二者之间的尺度相同

        # Compute total loss, backprop and optimize

        loss = content_loss + config.style_weight * style_loss

        optimizer.zero_grad()

        loss.backward()

        optimizer.step()

        if (step+1) % config.log_step == 0:

            print ('Step [%d/%d], Content Loss: %.4f, Style Loss: %.4f'

                   %(step+1, config.total_step, content_loss.data[0], style_loss.data[0]))

        if (step+1) % config.sample_step == 0:

            # Save the generated image

            denorm = transforms.Normalize((-2.12, -2.04, -1.80), (4.37, 4.46, 4.44))

            img = target.clone().cpu().squeeze()

            img = denorm(img.data).clamp_(0, 1)

            torchvision.utils.save_image(img, 'output2-%d.png' %(step+1))

        '''

        if step == 0:

            for name, weight in vgg.state_dict().items():

                print(name, weight)

        if step == 21:

            for name, weight in vgg.state_dict().items():

                print(name, weight)

        '''

if __name__ == "__main__":

    parser = argparse.ArgumentParser()

    parser.add_argument('--content', type=str, default='./png/content.png')

    parser.add_argument('--style', type=str, default='./png/style.png')

    parser.add_argument('--max_size', type=int, default=400)

    parser.add_argument('--total_step', type=int, default=5000)

    parser.add_argument('--log_step', type=int, default=10)

    parser.add_argument('--sample_step', type=int, default=1000)

    parser.add_argument('--style_weight', type=float, default=100)

    parser.add_argument('--lr', type=float, default=0.003)

    config = parser.parse_args()

    print(config)

    main(config)
代码已经写的很清晰干净,大致思路是作者用gram矩阵来衡量一幅作品的style,用未经过变化的feature map来衡量content的相似度
我觉得比较牛逼的地方有3
1.作者用的是一个训练好的网络,优化的目标根本就不是网络的参数,这与传统的自己搭建网络不同,而是一个target,这个target是网络的输入,这个输入是一个variable,包含梯度信息。这个target是白噪声可以,也可以是content的copy
2.pytorch实现加载一个特定的网络的参数,并且输出特定层的结果,并且根据这些中间层的输出结果,进行梯度回传,非常方便实现
3.这种idea类似于gan,定义两个loss,让网络的输出在这两个loss之间做一个权衡,gan是真假二元对立,style transfer是style与content的互补关系
现在有几个疑问
1.为什么要用grammer矩阵?
作者oral原话是这样说的
What that means is that in each layer we take paires of feature maps we just multiply them pointwise and sum over the spatial extent and that gives us one correlation value . that give us a number that tells me how correlated are these two features in response to that particular image and if we do all the feature maps in the layer we get a whole correlation matrix and we can do that for multiple layers of the network and then have a texture model with which we model the style, and we can now visualize what information is captured by these curl feature map correlations by generating a new image that now doesn't reproduce the extra feature responses in the network but rather reproduce the correlations between feature responses
然后作者就放出了这一张图
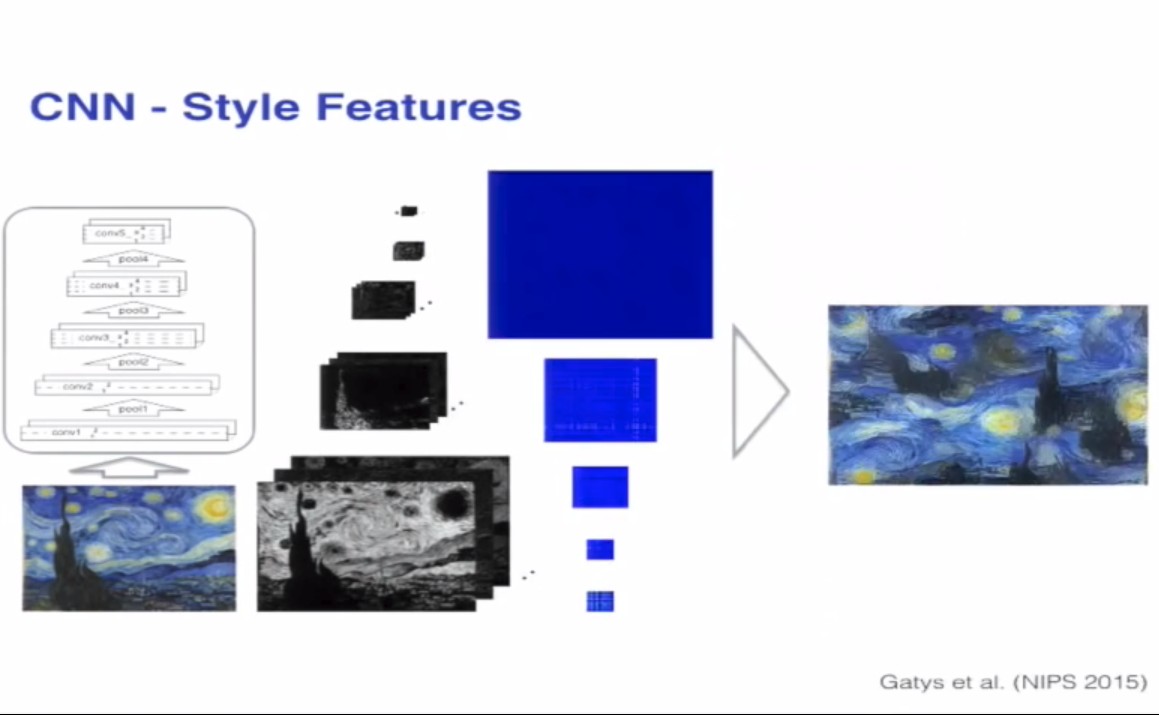
知乎上一位大神回答的比较好,我想补充一下,https://www.youtube.com/watch?v=UFffxcCQMPQ,这个是作者的oral视频,作者的思路可能更多的是实验性的结果,因为作者做了这样一个实验
用不同层的输出的gram矩阵作为衡量,输入白噪声,计算loss,这样训练几轮,优化的之后的白噪声能够丢失outline以及细节信息,反而恢复的是一些style,feature
2.用grammer矩阵为何要除以/(c*w*h),我想了好久,找不出原因,难道是尺度的问题?
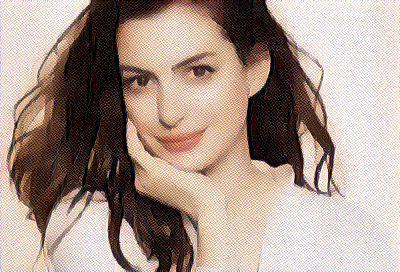
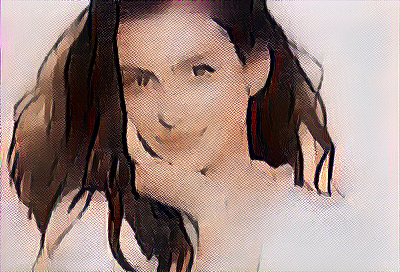
我做了一个小实验,content与style图片如下


我尝试了一下先除以/c*w*h,style的loss比较低
Step [4800/5000], Content Loss: 80.6877, Style Loss: 487.1260

Step [4810/5000], Content Loss: 80.7026, Style Loss: 486.3426

Step [4820/5000], Content Loss: 80.7246, Style Loss: 485.5407

Step [4830/5000], Content Loss: 80.7389, Style Loss: 484.7999

Step [4840/5000], Content Loss: 80.7581, Style Loss: 484.0170

Step [4850/5000], Content Loss: 80.7689, Style Loss: 483.3676

Step [4860/5000], Content Loss: 80.7863, Style Loss: 482.5543

Step [4870/5000], Content Loss: 80.8044, Style Loss: 481.7750

Step [4880/5000], Content Loss: 80.8238, Style Loss: 481.0148

Step [4890/5000], Content Loss: 80.8351, Style Loss: 480.3542

Step [4900/5000], Content Loss: 80.8555, Style Loss: 479.5468

Step [4910/5000], Content Loss: 80.8675, Style Loss: 478.8164

Step [4920/5000], Content Loss: 80.8801, Style Loss: 478.0892

Step [4930/5000], Content Loss: 80.8959, Style Loss: 477.3603

Step [4940/5000], Content Loss: 80.9091, Style Loss: 476.5545

Step [4950/5000], Content Loss: 80.9220, Style Loss: 475.8526

Step [4960/5000], Content Loss: 80.9387, Style Loss: 475.0789

Step [4970/5000], Content Loss: 80.9549, Style Loss: 474.3080

Step [4980/5000], Content Loss: 80.9718, Style Loss: 473.5461

Step [4990/5000], Content Loss: 80.9910, Style Loss: 472.7648

Step [5000/5000], Content Loss: 81.0086, Style Loss: 471.9411
输出的图片是这样的

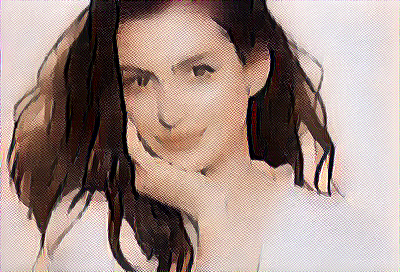
然后我尝试了一下没有进行除以/c*w*h网络的loss输出如下,
Step [4800/5000], Content Loss: 90.9087, Style Loss: 259023120.0000

Step [4810/5000], Content Loss: 90.9227, Style Loss: 258663088.0000

Step [4820/5000], Content Loss: 90.9379, Style Loss: 258286064.0000

Step [4830/5000], Content Loss: 90.9492, Style Loss: 257919232.0000

Step [4840/5000], Content Loss: 90.9621, Style Loss: 257566096.0000

Step [4850/5000], Content Loss: 90.9756, Style Loss: 257201568.0000

Step [4860/5000], Content Loss: 90.9899, Style Loss: 256855216.0000

Step [4870/5000], Content Loss: 91.0036, Style Loss: 256477552.0000

Step [4880/5000], Content Loss: 91.0191, Style Loss: 256127024.0000

Step [4890/5000], Content Loss: 91.0332, Style Loss: 255794784.0000

Step [4900/5000], Content Loss: 91.0459, Style Loss: 255433952.0000

Step [4910/5000], Content Loss: 91.0617, Style Loss: 255089968.0000

Step [4920/5000], Content Loss: 91.0733, Style Loss: 254741968.0000

Step [4930/5000], Content Loss: 91.0890, Style Loss: 254383136.0000

Step [4940/5000], Content Loss: 91.1015, Style Loss: 254048224.0000

Step [4950/5000], Content Loss: 91.1160, Style Loss: 253700608.0000

Step [4960/5000], Content Loss: 91.1338, Style Loss: 253371728.0000

Step [4970/5000], Content Loss: 91.1449, Style Loss: 253062304.0000

Step [4980/5000], Content Loss: 91.1602, Style Loss: 252754048.0000

Step [4990/5000], Content Loss: 91.1777, Style Loss: 252447952.0000

Step [5000/5000], Content Loss: 91.1934, Style Loss: 252113584.0000
输出的图片是这样的


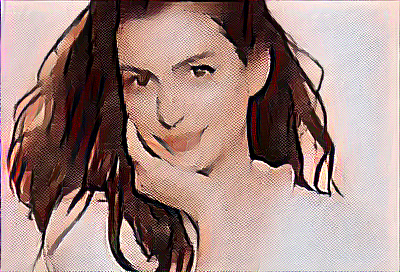

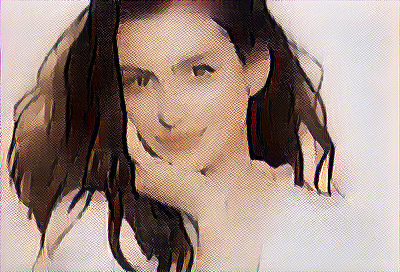
其实可以看出,style的loss很高,所以学习得到的style很多,上面的style loss大的图片显然学习到了更多的style
给自己挖个坑,刚刚尝试了一下用特征值之间的偶是距离来进行优化,好像没有收敛,不知道梯度没有传过去还是怎么回事
先放出来代码
# -*- coding: utf-8 -*-

from __future__ import division

from torch.backends import cudnn

from torch.autograd import Variable

from torchvision import models

from torchvision import transforms

from PIL import Image

import argparse

import torch

import torchvision

import torch.nn as nn

import numpy as np

use_cuda = torch.cuda.is_available()

dtype = torch.cuda.FloatTensor if use_cuda else torch.FloatTensor

# Load image file and convert it into variable

# unsqueeze for make the 4D tensor to perform conv arithmetic

def load_image(image_path, transform=None, max_size=None, shape=None):

    image = Image.open(image_path)

    if max_size is not None:

        scale = max_size / max(image.size)

        size = np.array(image.size) * scale

        image = image.resize(size.astype(int), Image.ANTIALIAS)

    if shape is not None:

        image = image.resize(shape, Image.LANCZOS)

    if transform is not None:

        image = transform(image).unsqueeze(0)

    return image.type(dtype)

# Pretrained VGGNet

class VGGNet(nn.Module):

    def __init__(self):

        """Select conv1_1 ~ conv5_1 activation maps."""

        super(VGGNet, self).__init__()

        self.select = ['', '', '', '', '']

        self.vgg = models.vgg19(pretrained=True).features

    def forward(self, x):

        """Extract 5 conv activation maps from an input image.

        Args:

            x: 4D tensor of shape (1, 3, height, width).

        Returns:

            features: a list containing 5 conv activation maps.

        """

        features = []

        for name, layer in self.vgg._modules.items():

            x = layer(x)  # 依次输出并且截取

            if name in self.select:

                features.append(x)

        return features

def main(config):

    # Image preprocessing

    # For normalization, see https://github.com/pytorch/vision#models

    transform = transforms.Compose([

        transforms.ToTensor(),

        transforms.Normalize((0.485, 0.456, 0.406),

                             (0.229, 0.224, 0.225))])

    # Load content and style images

    # make content.size() == style.size()

    content = load_image(config.content, transform, max_size=config.max_size)

    style = load_image(config.style, transform, shape=[content.size(2), content.size(3)])

    # Initialization and optimizer

    target = Variable(content.clone(), requires_grad=True)

    optimizer = torch.optim.Adam([target], lr=config.lr, betas=[0.5, 0.999])  # 优化目标:target,非网络参数

    # 优化的目标并不是网络参数,而是target,target与content要相似,并且target的grammer矩阵要和style的feature要相似

    vgg = VGGNet()

    if use_cuda:

        vgg.cuda()

    for step in range(config.total_step):

        # Extract multiple(5) conv feature vectors

        target_features = vgg(target)   # 每一次输入到网络中的是同样一张图片,反传优化的目标是输入的target

        content_features = vgg(Variable(content))

        style_features = vgg(Variable(style))

        style_loss = 0

        content_loss = 0

        for f1, f2, f3 in zip(target_features, content_features, style_features):

            # Compute content loss (target and content image)

            content_loss += torch.mean((f1 - f2)**2)  # 用内容来直接衡量loss

            # Reshape conv features

            _, c, h, w = f1.size()  # channel height width

            f1 = f1.view(c, h * w)  # reshape a vector, c是feature中的通道数目

            f3 = f3.view(c, h * w)  # reshape a vector

            # Compute gram matrix

            f1 = torch.mm(f1, f1.t())

            f3 = torch.mm(f3, f3.t())

            _, lam1, _, = torch.svd(f1)

            _, lam2, _, = torch.svd(f3)

            cond1 = lam1[1]/lam1[-1]

            cond2 = lam2[2]/lam2[-1]

            # Compute style loss (target and style image)

            # style_loss += torch.mean((f1 - f3)**2) / (c * h * w)   # 用两个gram矩阵之间的距离来衡量loss

            # style_loss += torch.mean((f1 - f3) ** 2)   # 用两个gram矩阵之间的距离来衡量loss

            style_loss += 0.001*torch.mean((lam1-lam2)**2)**(0.5)  # 用作特征值作为衡量标准

            # / c * h * w 保证二者之间的尺度相同

        # Compute total loss, backprop and optimize

        loss = content_loss + config.style_weight * style_loss

        optimizer.zero_grad()

        loss.backward()

        optimizer.step()

        if (step+1) % config.log_step == 0:

            print('Step [%d/%d], Content Loss: %.4f, Style Loss: %.4f'

                   %(step+1, config.total_step, content_loss.data[0], style_loss.data[0]))

            print(cond1.data.cpu().numpy(), cond2.data.cpu().numpy())

        if (step+1) % config.sample_step == 0:

            # Save the generated image

            denorm = transforms.Normalize((-2.12, -2.04, -1.80), (4.37, 4.46, 4.44))

            img = target.clone().cpu().squeeze()

            img = denorm(img.data).clamp_(0, 1)

            torchvision.utils.save_image(img, 'output-%d.png' %(step+1))

        '''

        if step == 0:

            for name, weight in vgg.state_dict().items():

                print(name, weight)

        if step == 21:

            for name, weight in vgg.state_dict().items():

                print(name, weight)

        '''

if __name__ == "__main__":

    parser = argparse.ArgumentParser()

    parser.add_argument('--content', type=str, default='./png/content.png')

    parser.add_argument('--style', type=str, default='./png/style.png')

    parser.add_argument('--max_size', type=int, default=400)

    parser.add_argument('--total_step', type=int, default=5000)

    parser.add_argument('--log_step', type=int, default=10)

    parser.add_argument('--sample_step', type=int, default=1000)

    parser.add_argument('--style_weight', type=float, default=100)

    parser.add_argument('--lr', type=float, default=0.003)

    config = parser.parse_args()

    print(config)

    main(config)
发现一个关于线代讲述比较好的网站
同样的贵系关于maniforld learning也有内容相关的中文讲义
上述链接里面有详细的关于grammer性质的讲义,但是仍然不怎么理解为毛要用grammer矩阵,
pytorch实现style transfer的更多相关文章
- Arbitrary Style Transfer in Real-time with Adaptive Instance Normalization
Arbitrary Style Transfer in Real-time with Adaptive Instance Normalization 2019-10-10 10:50:19 Paper ...
- Image Style Transfer:多风格 TensorFlow 实现
·其实这是一个选修课的present,整理一下作为一篇博客,希望对你有用.讲解风格迁移的博客蛮多的,我就不过多的赘述了.讲一点几个关键的地方吧,当然最后的代码和ppt也希望对你有用. 1.引入: 风格 ...
- 项目总结四:神经风格迁移项目(Art generation with Neural Style Transfer)
1.项目介绍 神经风格转换 (NST) 是深部学习中最有趣的技术之一.它合并两个图像, 即 内容图像 C(content image) 和 样式图像S(style image), 以生成图像 G(ge ...
- DeepLearning.ai-Week4-Deep Learning & Art: Neural Style Transfer
1 - Task Implement the neural style transfer algorithm Generate novel artistic images using your alg ...
- 课程四(Convolutional Neural Networks),第四 周(Special applications: Face recognition & Neural style transfer) —— 2.Programming assignments:Art generation with Neural Style Transfer
Deep Learning & Art: Neural Style Transfer Welcome to the second assignment of this week. In thi ...
- Art: Neural Style Transfer
Andrew Ng deeplearning courese-4:Convolutional Neural Network Convolutional Neural Networks: Step by ...
- (转) Supercharging Style Transfer
Supercharging Style Transfer Wednesday, October 26, 2016 Posted by Vincent Dumoulin*, Jonathon Shl ...
- Perceptual Losses for Real-Time Style Transfer and Super-Resolution and Super-Resolution 论文笔记
Perceptual Losses for Real-Time Style Transfer and Super-Resolution and Super-Resolution 论文笔记 ECCV 2 ...
- fast neural style transfer图像风格迁移基于tensorflow实现
引自:深度学习实践:使用Tensorflow实现快速风格迁移 一.风格迁移简介 风格迁移(Style Transfer)是深度学习众多应用中非常有趣的一种,如图,我们可以使用这种方法把一张图片的风格“ ...
随机推荐
- 基于Vue + webpack + Vue-cli 实现分环境打包项目
需求由来:我公司项目上线发布至服务器分为三个环境分别为测试环境.预发布环境.生产环境:前期做法是项目通过脚步打包时由脚步把域名和后缀名之类的全部替换成要发布的环境所需要的,因为我公司的项目比较大由许许 ...
- ONVIF协议学习笔记
一.理解 1.1 技术理解 ONVIF = 服务端 + 客户端 =(Web Services + RTSP)+ 客户端 = ((WSDL + SOAP) + RTSP) + 客户端 WSDL是服务端用 ...
- 同步socket处理
1.socket类是TCP通信的基本类,调用成员函数connect()可以连接到一个指定的通信端点,连接成功后用local_endpoint()和remote_endpoint()获得连接两端的端点信 ...
- python django 访问static静态文件
settings 文件配置: STATIC_URL = '/static/' STATICFILES_DIRS = ( os.path.join(BASE_DIR, 'static'),)PROJEC ...
- webpack+typescript
1. npm install --save typescript 2. npm install --save ts-loader webpack.config.js module.exports = ...
- sql2008r2安装失败的解决办法
setup fails with: '.', hexadecimal value 0x00, is an invalid character.SQL 2012 Setup issues - hexad ...
- OO第三次课程总结分析
OO第三次课程总结分析 规格化设计发展历史 在网上找了好久也没找到合适的信息,稍稍参考了同学的博客.大致如下:最初的的软件并没有形式化方法,随着软件工程的兴起,为了便于工程间的协调管理,人们提出采用工 ...
- 每天CSS学习之text-indent
text-indent是CSS的一个属性,其作用是定义首行文本的缩进.其值如下: 1.length:首行缩进固定的长度.默认值为0. 设置 首行缩进2em的长度. div{ width:300px; ...
- 【Appium】Appium工作原理
参考:http://www.cnblogs.com/zhjsll/p/5698878.html 原作者写的很好,所以直接放在这里. 一.什么是Appium Appium是一个开源.跨平台的测试框架,可 ...
- java语言登陆界面(菜鸟版)
最近在看的Java入门书是<Head First Java>,一本很棒的Java书. 老师要求的程序流程图我没有,之前我们的做法是写完代码再画流程图,我想这样的做法是不对的,流程图应该是在 ...