Tensorflow_入门学习_2_一个神经网络栗子
3.0 A Neural Network Example
载入数据:
from tensorflow.examples.tutorials.mnist import input_data

mnist = input_data.read_data_sets("MNIST_data/", one_hot=True)
ont_hot:将数据集的标签转换为ont-hot编码, i.e. “4”:[0, 0, 0, 0, 1, 0, 0, 0, 0, 0]。
3.1 Setting things up
1.为训练数据创建placeholder变量
# Python optimisation variables

learning_rate = 0.5

epochs = 10

batch_size = 100

# declare the training data placeholders

# input x - for 28 x 28 pixels = 784

x = tf.placeholder(tf.float32, [None, 784])

# now declare the output data placeholder - 10 digits

y = tf.placeholder(tf.float32, [None, 10])
2.创建一个三层神经网络的weights和bias
# now declare the weights connecting the input to the hidden layer

W1 = tf.Variable(tf.random_normal([784, 300], stddev=0.03), name='W1')

b1 = tf.Variable(tf.random_normal([300]), name='b1')

# and the weights connecting the hidden layer to the output layer

W2 = tf.Variable(tf.random_normal([300, 10], stddev=0.03), name='W2')

b2 = tf.Variable(tf.random_normal([10]), name='b2')
hidden layer有300个神经元。
tf.random_normal([784, 300], stddev=0.03):使用平均值为0,标准差为0.03的随机正态分布初始化weights和bias变量。
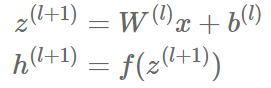
3.创建hidden layer的输入和激活函数:
# calculate the output of the hidden layer

hidden_out = tf.add(tf.matmul(x, W1), b1)

hidden_out = tf.nn.relu(hidden_out)
tf.matmul:矩阵乘法
这两行代码与下面两个等式等价:
4.创建输出层:
# now calculate the hidden layer output - in this case, let's use a softmax activated

# output layer

y_ = tf.nn.softmax(tf.add(tf.matmul(hidden_out, W2), b2))
这里使用softmax激活函数。
5.引入一个loss function用于反向传播算法优化上述weight和bias。这里使用交叉熵误差

y_clipped = tf.clip_by_value(y_, 1e-10, 0.9999999)

cross_entropy = -tf.reduce_mean(tf.reduce_sum(y * tf.log(y_clipped) + (1 - y) * tf.log(1 - y_clipped), axis=1))
第一行:
将y_转换为剪辑版本(clipped version),取值位于1e-10,0.999999之间,是为了避免在训练时遇见log(0)而返回NaN并中止训练。
第二行:
tensor间的标量运算* / + -,
tensor*tensor:对两个tensor中的对应位置元素都进行运算。
tensor*scaler:对tensor中每个元素乘scaler。
tf.reduce_sum:按给定的坐标进行加和运算:
y * tf.log(y_clipped) + (1 - y) * tf.log(1 - y_clipped) 的运算结果是一个m*10的tensor。第一求和运算是对下标j求和,所以是对tensor的第2维进行求和,所以axis=1;得到结果是1*10的tensor。
tf.reduce_mean :对任何tensor求均值。
6.创建一个optimiser:
# add an optimiser

optimiser = tf.train.GradientDescentOptimizer(learning_rate=learning_rate).minimize(cross_entropy)
使用tensorflow提供的梯度下降优化器。
7.初始化所有变量和衡量准确度的运算。
# finally setup the initialisation operator

init_op = tf.global_variables_initializer()

# define an accuracy assessment operation

correct_prediction = tf.equal(tf.argmax(y, 1), tf.argmax(y_, 1))

accuracy = tf.reduce_mean(tf.cast(correct_prediction, tf.float32))
tf.equal:根据传入参数判断是否相等,返回True or False。
tf.argmax(tensor, axis):根据axis返回tensor中的最大值。返回的也是一个tensor。
correct_prediction:m*1的boolean tensor。
将其转换为float,然后计算平均值,就是准确率。
8.执行训练:
# start the session

with tf.Session() as sess:

   # initialise the variables

   sess.run(init_op)

   total_batch = int(len(mnist.train.labels) / batch_size)

   for epoch in range(epochs):

        avg_cost = 0

        for i in range(total_batch):

            batch_x, batch_y = mnist.train.next_batch(batch_size=batch_size)

             _, c = sess.run([optimiser, cross_entropy], feed_dict={x: batch_x, y: batch_y})

            avg_cost += c / total_batch

        print("Epoch:", (epoch + 1), "cost =", "{:.3f}".format(avg_cost))

   print(sess.run(accuracy, feed_dict={x: mnist.test.images, y: mnist.test.labels}))
使用mini-batch gradient descent。
Tensorflow_入门学习_2_一个神经网络栗子的更多相关文章
- Tensorflow_入门学习_1
1.0 TensorFlow graphs Tensorflow是基于graph based computation: 如: a=(b+c)∗(c+2) 可分解为 d=b+c e=c+2 a=d∗e ...
- Flask入门学习——自定义一个url转换器
我们知道,flask的url规则是可以添加变量部分的,这个参数变量是写在尖括号里的,比如:/item/<id>/,如果需要指出参数的类型要符合<converter:vai ...
- 【PyTorch深度学习60分钟快速入门 】Part3:神经网络
神经网络可以通过使用torch.nn包来构建. 既然你已经了解了autograd,而nn依赖于autograd来定义模型并对其求微分.一个nn.Module包含多个网络层,以及一个返回输出的方法f ...
- Swift入门学习之一常量,变量和声明
版权声明:本文为博主原创文章,未经博主允许不得转载. 转载请表明出处:http://www.cnblogs.com/cavalier-/p/6059421.html Swift入门学习之一常量,变量和 ...
- 深度学习之卷积神经网络(CNN)
卷积神经网络(CNN)因为在图像识别任务中大放异彩,而广为人知,近几年卷积神经网络在文本处理中也有了比较好的应用.我用TextCnn来做文本分类的任务,相比TextRnn,训练速度要快非常多,准确性也 ...
- TensorFlow入门学习(让机器/算法帮助我们作出选择)
catalogue . 个人理解 . 基本使用 . MNIST(multiclass classification)入门 . 深入MNIST . 卷积神经网络:CIFAR- 数据集分类 . 单词的向量 ...
- 基于tensorflow搭建一个神经网络
一,tensorflow的简介 Tensorflow是一个采用数据流图,用于数值计算的 开源软件库.节点在图中表示数字操作,图中的线 则表示在节点间相互联系的多维数据数组,即张量 它灵活的架构让你可以 ...
- vue入门学习(基础篇)
vue入门学习总结: vue的一个组件包括三部分:template.style.script. vue的数据在data中定义使用. 数据渲染指令:v-text.v-html.{{}}. 隐藏未编译的标 ...
- Hadoop入门学习笔记---part4
紧接着<Hadoop入门学习笔记---part3>中的继续了解如何用java在程序中操作HDFS. 众所周知,对文件的操作无非是创建,查看,下载,删除.下面我们就开始应用java程序进行操 ...
随机推荐
- UVa 1645 Count (递推,数论)
题意:给定一棵 n 个结点的有根树,使得每个深度中所有结点的子结点数相同.求多棵这样的树. 析:首先这棵树是有根的,那么肯定有一个根结点,然后剩下的再看能不能再分成深度相同的子树,也就是说是不是它的约 ...
- Proteomes of paired human cerebrospinal fluid and plasma: Relation to blood-brain barrier permeability in older adults (文献分享一组-潘火珍)
题目:Proteomes of paired human cerebrospinal fluid and plasma: Relation to blood-brain barrier permeab ...
- Aufree/trip-to-iOS
https://github.com/Aufree/trip-to-iOS?utm_source=next.36kr.com
- Matlab图像处理相关
相关函数: 读取:imread() %参数为文件名(路径)或url,格式等 写入:imwrite() %参数为写入数据矩阵,写入文件名(路径),格式等 显示:imshow() %显示由输入决定,属性自 ...
- 大数加法 HDU 1002
#include <iostream> #include <cstring> #include <string> #include <cstdio> # ...
- Git本地分支与远程分支关联
当clone完版本库,切换到开发分支后,使用git pull -r 拉取并合并分支之后会出现一下提示: $ git pull -rFrom ssh://192.168.1.226:29418/etha ...
- GYM 101673E(暴搜预处理)
1.不会超过500个不同的串-- 2.样例没给has到has是怎么样的,实测是true. 3.记忆化别剪错枝就好,嘤嘤嘤-- const int maxn = 505 + 5; int n, m, t ...
- 在 Java 的多线程中,如何去判断给定的一个类是否是线程安全的(另外:synchronized 同步是否就一定能保证该类是线程安全的。)
同步代码块和同步方法的区别:同步代码块可以传入任意对象,同步方法中 如果多个线程检查的都是一个新的对象,不同的同步锁对不同的线程不具有排他性,不能实现线程同步的效果,这时候线程同步就失效了. 两者的区 ...
- 转 DG switchover
I. Pre-Switchover Checks These steps should be completed before the switchover planned maintenance w ...
- python采用sqlachmy购物商城
一.流程图: 二.目录结构: C:\USERS\DAISY\PYCHARMPROJECTS\S12\MARKET │ __init__.py │ __init__.pyc │ ├─backend │ ...