DesignSurface简介
Dinesh Chandnani - 三月 2006 (MSDN Magazine: C#)
- Understanding designers and services
- Creating a hosting form
- Building and using a toolbox
- Loading and managing designers
Code download available at: DesignerHosting.exe (官网VS2005) (VS2010)
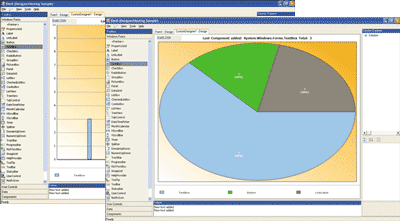
DesignSurface and DesignSurfaceManager
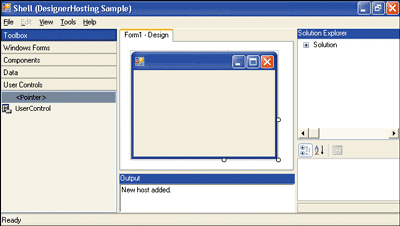
The Hosting Form
The Toolbox
Multiple DesignSurfaces
DesignerLoaders
CodeDomDesignerLoader
Conclusion

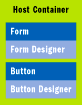
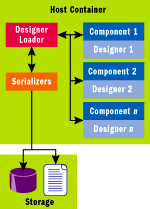
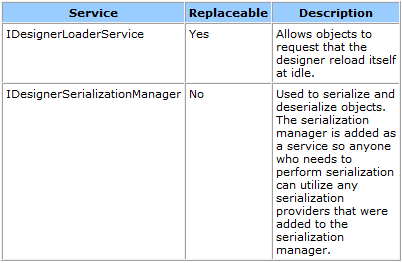
Figure 5 DesignSurfaceManager Design-Time Services
| Service | Description |
|---|---|
| IUIService | Provides a way for components to show a UI such as error messages and dialog boxes |
| IDesignerEventService | Provides a global eventing mechanism for designer events |
- // Create the DesignSurface and load it with a form
- DesignSurface ds = new DesignSurface();
- ds.BeginLoad(typeof(Form));
- // Get the View of the DesignSurface, host it in a form, and show it
- Control c = ds.View as Control;
- Form f = new Form();
- c.Parent = f;
- c.Dock = DockStyle.Fill;
- f.Show();
- // Add a Button to the Form
- IDesignerHost idh = (IDesignerHost)ds.GetService(typeof(IDesignerHost));
- Button b = (Button)idh.CreateComponent(typeof(Button));
- // Set the Parent of this Button to the RootComponent (the Form)
- b.Parent = (Form)idh.RootComponent;
- // Use ComponentChangeService to announce changing of the
- // Form's Controls collection */
- IComponentChangeService icc = (IComponentChangeService)
- idh.GetService(typeof(IComponentChangeService));
- icc.OnComponentChanging(idh.RootComponent,
- TypeDescriptor.GetProperties(idh.RootComponent)["Controls");
- /* Add a Button to the Form using IToolboxUser */
- IDesignerHost idh = (IDesignerHost)ds.GetService(typeof(IDesignerHost));
- IToolboxUser itu = (IToolboxUser)idh.GetDesigner(idh.RootComponent);
- itu.ToolPicked(new ToolboxItem(typeof(Button)));
| Method or Property | Description |
|---|---|
| GetSelectedToolboxItem | Returns the selected toolbox item |
| SerializeToolboxItem | Creates a binary serialized object (DataObject) from ToolboxItem |
| DeserializeToolboxItem | Returns the ToolboxItem from a binary serialized object (DataObject) |
- protected override DesignSurface CreateDesignSurfaceCore(
- IServiceProvider parentProvider)
- {
- return new HostSurface(parentProvider);
- }
- void HostSurfaceManager_ActiveDesignSurfaceChanged(
- object sender, ActiveDesignSurfaceChangedEventArgs e)
- {
- ToolWindows.OutputWindow o =
- this.GetService(typeof(ToolWindows.OutputWindow)) as
- ToolWindows.OutputWindow;
- o.RichTextBox.Text += "New host added./n";
- }
- // Load it using a Loader
- ds.BeginLoad(new MyLoader());
- <Object type="System.Windows.Forms.Form, System.Windows.Forms,
- Version=2.0.0.0, Culture=neutral, PublicKeyToken=b77a5c561934e089"
- name="Form1" children="Controls">
- <Property name="Name">Form1</Property>
- <Property name="DataBindings">
- <Property name="DefaultDataSourceUpdateMode">OnValidation</Property>
- </Property>
- <Property name="ClientSize">292, 273</Property>
- </Object>

- CompilerParameters cp = new CompilerParameters();
- AssemblyName[] assemblyNames =
- Assembly.GetExecutingAssembly().GetReferencedAssemblies();
- foreach (AssemblyName an in assemblyNames)
- {
- Assembly assembly = Assembly.Load(an);
- cp.ReferencedAssemblies.Add(assembly.Location);
- }
- cp.GenerateExecutable = true;
- cp.OutputAssembly = executable;
- cp.MainClass = "DesignerHostSample." +
- this.LoaderHost.RootComponent.Site.Name;
- // Compile CodeCompileUnit using CodeProvider
- CSharpCodeProvider cc = new CSharpCodeProvider();
- CompilerResults cr = cc.CompileAssemblyFromDom(cp, codeCompileUnit);
- if (cr.Errors.HasErrors)
- {
- string errors = string.Empty;
- foreach (CompilerError error in cr.Errors)
- {
- errors += error.ErrorText + "/n";
- }
- MessageBox.Show(errors, "Errors during compile.");
- }
DesignSurface简介的更多相关文章
- ASP.NET Core 1.1 简介
ASP.NET Core 1.1 于2016年11月16日发布.这个版本包括许多伟大的新功能以及许多错误修复和一般的增强.这个版本包含了多个新的中间件组件.针对Windows的WebListener服 ...
- MVVM模式和在WPF中的实现(一)MVVM模式简介
MVVM模式解析和在WPF中的实现(一) MVVM模式简介 系列目录: MVVM模式解析和在WPF中的实现(一)MVVM模式简介 MVVM模式解析和在WPF中的实现(二)数据绑定 MVVM模式解析和在 ...
- Cassandra简介
在前面的一篇文章<图形数据库Neo4J简介>中,我们介绍了一种非常流行的图形数据库Neo4J的使用方法.而在本文中,我们将对另外一种类型的NoSQL数据库——Cassandra进行简单地介 ...
- REST简介
一说到REST,我想大家的第一反应就是“啊,就是那种前后台通信方式.”但是在要求详细讲述它所提出的各个约束,以及如何开始搭建REST服务时,却很少有人能够清晰地说出它到底是什么,需要遵守什么样的准则. ...
- Microservice架构模式简介
在2014年,Sam Newman,Martin Fowler在ThoughtWorks的一位同事,出版了一本新书<Building Microservices>.该书描述了如何按照Mic ...
- const,static,extern 简介
const,static,extern 简介 一.const与宏的区别: const简介:之前常用的字符串常量,一般是抽成宏,但是苹果不推荐我们抽成宏,推荐我们使用const常量. 执行时刻:宏是预编 ...
- HTTPS简介
一.简单总结 1.HTTPS概念总结 HTTPS 就是对HTTP进行了TLS或SSL加密. 应用层的HTTP协议通过传输层的TCP协议来传输,HTTPS 在 HTTP和 TCP中间加了一层TLS/SS ...
- 【Machine Learning】机器学习及其基础概念简介
机器学习及其基础概念简介 作者:白宁超 2016年12月23日21:24:51 摘要:随着机器学习和深度学习的热潮,各种图书层出不穷.然而多数是基础理论知识介绍,缺乏实现的深入理解.本系列文章是作者结 ...
- Cesium简介以及离线部署运行
Cesium简介 cesium是国外一个基于JavaScript编写的使用WebGL的地图引擎,一款开源3DGIS的js库.cesium支持3D,2D,2.5D形式的地图展示,可以自行绘制图形,高亮区 ...
随机推荐
- [oldboy-django][5python基础][内置函数]zip
python3中,把两个或两个以上的迭代器封装成生成器,在循环遍历生成器中,不断产生元组. 如果提供的迭代器长度不对等,生成器的长度为最短迭代器的长度. # coding= utf-8 # zip 多 ...
- 爬虫:Scrapy2 - 命令行工具
Scrapy 是通过 scrapy 命令行工具进行控制的. 这里我们称之为 “Scrapy tool” 以用来和子命令进行区分.对于子命令,我们称为 “command” 或者 “Scrapy comm ...
- Linux中date命令的各种实用方法
原创作品,允许转载,转载时请务必以超链接形式标明文章 原始出处 .作者信息和本声明.否则将追究法律责任.http://521cto.blog.51cto.com/950229/935642 在linu ...
- 【转】Using Raycasts and Dynamically Generated Geometry to Create a Line of Sight on Unity3D
http://www.linkedin.com/pulse/using-raycasts-dynamically-generated-geometry-create-line-thomas José ...
- css盒模型与bfc与布局与垂直水平居中与css设计模式等
一.css盒子与布局相关 盒子内部的布局 盒子之间的布局visual formatting 脱离正常流normal flow的盒子的布局 absolute布局上下文下的布局 float布局上下文下的布 ...
- 第一个Maven案例Hello Maven
Maven目录结构 src:程序源代码 -main -java:java代码 -package:自定义的包 ...
- HDU 5884 Sort(二分答案+计算WPL的技巧)
Sort Time Limit: 3000/1000 MS (Java/Others) Memory Limit: 32768/32768 K (Java/Others) Total Submi ...
- iOS-读取txt文件中文乱码
一.情景描述: 后台给一个txt文件,编码是utf-8,在Mac电脑Xcode开发环境下读取txt文件内容,汉字会出现乱码,英文没有乱码这种情况. 二.尝试解决方法: 修改编码格式,尝试了NSUTF1 ...
- :nth-child :nth-type-of用法详解
ele:nth-of-type(n) 是指父元素下ele元素里的第n个ele:nth-child(n) 是指父元素下第n个元素且这个元素为ele
- 设置Animation 的播放位置
AnimationState.normalizedTime 官方文档的描述 Description The normalized time of the animation. A value of 1 ...