Android 完美解决bundle实现页面跳转并保留之前数据+传值
1.前言
前言:
昨天碰到了一个问题,我想实现页面跳转,采用了Bundle之后,再回到原来的页面,发现数据也没有了,
而且一直报错,网上查找了很多资料,发现要用一个startActivityForResult(),然而好景不长,
我又想在后面的页面把后面页面的数据和前面传过来的数据都传递给中间页面的数据,这样听起来有些复杂,
我简单写了一个Demo。
2.第一个活动+布局
2.1.第一个活动源代码
package com.example.kk.test1.Demo;

import android.content.Intent;

import android.support.v7.app.AppCompatActivity;

import android.os.Bundle;

import android.view.View;

import android.widget.Button;

import android.widget.TextView;

import com.example.kk.test1.R;

public class Main1Activity extends AppCompatActivity {

    private Button but1;

    private TextView txt1;

    private TextView txt2;

    private TextView txt3;

    @Override

    protected void onCreate(Bundle savedInstanceState) {

        super.onCreate(savedInstanceState);

        setContentView(R.layout.activity_main1);

        initView();

        butOnClick();

    }

    private void initView(){

        but1=(Button) findViewById(R.id.main1_but1);

        txt1=(TextView)findViewById(R.id.main1_txt1);

        txt2=(TextView)findViewById(R.id.main1_txt2);

        txt3=(TextView)findViewById(R.id.main1_txt3);

    }

    private void butOnClick(){

        but1.setOnClickListener(new View.OnClickListener() {

            @Override

            public void onClick(View v) {

                Intent intent=new Intent(Main1Activity.this,Main2Activity.class);

                Bundle bundle=new Bundle();

                String s_txt1=txt1.getText().toString();

                String s_txt2=txt1.getText().toString();

                String s_txt3=txt1.getText().toString();

                bundle.putString("first",s_txt1);

                bundle.putString("second",s_txt2);

                bundle.putString("third",s_txt3);

                intent.putExtras(bundle);

                startActivity(intent);

            }

        });

    }

}
2.2.第一个活动布局
<?xml version="1.0" encoding="utf-8"?>

<LinearLayout xmlns:android="http://schemas.android.com/apk/res/android"

    xmlns:app="http://schemas.android.com/apk/res-auto"

    xmlns:tools="http://schemas.android.com/tools"

    android:layout_width="match_parent"

    android:layout_height="match_parent"

    android:background="@color/colorAccent"

    android:orientation="vertical"

    tools:context="com.example.kk.test1.Demo.Main1Activity">

    <Button

        android:id="@+id/main1_but1"

        android:layout_height="wrap_content"

        android:layout_width="wrap_content"

        android:text="第一个活动"

        android:layout_gravity="center"

        />

    <TextView

        android:id="@+id/main1_txt1"

        android:layout_height="50dp"

        android:layout_width="100dp"

        android:text="第一个活动1"

        android:layout_gravity="center"

        android:background="@color/colorPrimary"

        />

    <TextView

        android:id="@+id/main1_txt2"

        android:layout_height="50dp"

        android:layout_width="100dp"

        android:text="第一个活动2"

        android:layout_gravity="center"

        android:background="@color/colorPrimary"

        />

    <TextView

        android:id="@+id/main1_txt3"

        android:layout_height="50dp"

        android:layout_width="100dp"

        android:text="第一个活动3"

        android:layout_gravity="center"

        android:background="@color/colorPrimary"

        />

</LinearLayout>
3.第二个活动+布局
3.1.第二个活动源代码
package com.example.kk.test1.Demo;

import android.content.Intent;

import android.support.v7.app.AppCompatActivity;

import android.os.Bundle;

import android.view.View;

import android.widget.Button;

import android.widget.TextView;

import com.example.kk.test1.R;

public class Main2Activity extends AppCompatActivity {

    private Button but1;

    private TextView txt1;

    private TextView txt2;

    private TextView txt3;

    private Intent intent;

    private Bundle bundle;

    private Bundle bundleFrom3;

    @Override

    protected void onCreate(Bundle savedInstanceState) {

        super.onCreate(savedInstanceState);

        setContentView(R.layout.activity_main2);

        initView();

        intent=getIntent();

        bundle=intent.getExtras();

        change_txt();

        butOnclick();

    }

    private void initView(){

        but1=(Button) findViewById(R.id.main2_but1);

        txt1=(TextView)findViewById(R.id.main2_txt1);

        txt2=(TextView)findViewById(R.id.main2_txt2);

        txt3=(TextView)findViewById(R.id.main2_txt3);

    }

    private void change_txt(){//从第一个页面拿来的东西

        String s_txt1=bundle.getString("first");

        String s_txt2=bundle.getString("second");

        String s_txt3=bundle.getString("third");

        txt1.setText(s_txt1);

        txt2.setText(s_txt2);

        txt3.setText(s_txt3);

    }

    private void butOnclick(){//记录跳转前第二个页面的数据

        but1.setOnClickListener(new View.OnClickListener() {

            @Override

            public void onClick(View v) {

                Intent intent=new Intent(Main2Activity.this,Main3Activity.class);

                Bundle bundle2=new Bundle();

                bundle2.putString("first_1",txt1.getText().toString());

                bundle2.putString("first_2",txt2.getText().toString());

                bundle2.putString("first_3",txt3.getText().toString());

                intent.putExtras(bundle2);//这里测试一下用之前的可不可以

                startActivityForResult(intent,0x717);

            }

        });

    }

    @Override

    protected void onActivityResult(int requestCode,int resultCode,Intent data){

        super.onActivityResult(requestCode,resultCode,data);

        if(resultCode==0x717){

            bundleFrom5=data.getExtras();

            txt3.setText(bundleFrom3.getString("main3_txt3"));

            txt1.setText(bundleFrom3.getString("first_1"));

            txt2.setText(bundleFrom3.getString("first_2"));

        }

    }

}
3.2.第二个活动布局
<?xml version="1.0" encoding="utf-8"?>

<LinearLayout xmlns:android="http://schemas.android.com/apk/res/android"

    xmlns:app="http://schemas.android.com/apk/res-auto"

    xmlns:tools="http://schemas.android.com/tools"

    android:layout_width="match_parent"

    android:layout_height="match_parent"

    android:background="@color/green"

    android:orientation="vertical"

    tools:context="com.example.kk.test1.Demo.Main2Activity">

    <Button

        android:id="@+id/main2_but1"

        android:layout_height="wrap_content"

        android:layout_width="wrap_content"

        android:text="第2个活动"

        android:layout_gravity="center"

        />

    <TextView

        android:id="@+id/main2_txt1"

        android:layout_height="50dp"

        android:layout_width="100dp"

        android:text="第2个活动1"

        android:layout_gravity="center"

        android:background="@color/colorPrimary"

        />

    <TextView

        android:id="@+id/main2_txt2"

        android:layout_height="50dp"

        android:layout_width="100dp"

        android:text="第2个活动2"

        android:layout_gravity="center"

        android:background="@color/colorPrimary"

        />

    <TextView

        android:id="@+id/main2_txt3"

        android:layout_height="50dp"

        android:layout_width="100dp"

        android:text="第2个活动3"

        android:layout_gravity="center"

        android:background="@color/colorPrimary"

        />

</LinearLayout>
4.第三个活动+布局
4.1.第三个活动源代码
package com.example.kk.test1.Demo;

import android.content.Intent;

import android.support.v7.app.AppCompatActivity;

import android.os.Bundle;

import android.view.View;

import android.widget.Button;

import android.widget.TextView;

import com.example.kk.test1.R;

public class Main3Activity extends AppCompatActivity {

    private Button but1;

    private TextView txt1;

    private TextView txt2;

    private TextView txt3;

    private Intent intent;

    private Bundle bundle;

    @Override

    protected void onCreate(Bundle savedInstanceState) {

        super.onCreate(savedInstanceState);

        setContentView(R.layout.activity_main3);

        initView();

        addIntent();

        butOnClick();

    }

    private void initView(){

        but1=(Button) findViewById(R.id.main3_but1);

        txt1=(TextView)findViewById(R.id.main3_txt1);

        txt2=(TextView)findViewById(R.id.main3_txt2);

        txt3=(TextView)findViewById(R.id.main3_txt3);

        intent=getIntent();

        bundle=intent.getExtras();

    }

    private void butOnClick(){

        but1.setOnClickListener(new View.OnClickListener() {

            @Override

            public void onClick(View v) {

                setResult(0x717,intent);//通过别人传过来的意图反向回去

                finish();

            }

        });

    }

    private void addIntent(){//把第三个中部分内容加到第二个页面传过来的bundle

        bundle.putString("main3_txt3",txt3.getText().toString());

        intent.putExtras(bundle);

    }

}
4.2.第三个活动布局
<?xml version="1.0" encoding="utf-8"?>

<LinearLayout xmlns:android="http://schemas.android.com/apk/res/android"

    xmlns:app="http://schemas.android.com/apk/res-auto"

    xmlns:tools="http://schemas.android.com/tools"

    android:layout_width="match_parent"

    android:layout_height="match_parent"

    android:background="@color/purple"

    android:orientation="vertical"

    tools:context="com.example.kk.test1.Demo.Main3Activity">

    <Button

        android:id="@+id/main3_but1"

        android:layout_height="wrap_content"

        android:layout_width="wrap_content"

        android:text="第3个活动"

        android:layout_gravity="center"

        />

    <TextView

        android:id="@+id/main3_txt1"

        android:layout_height="50dp"

        android:layout_width="100dp"

        android:text="第3个活动1"

        android:layout_gravity="center"

        android:background="@color/colorPrimary"

        />

    <TextView

        android:id="@+id/main3_txt2"

        android:layout_height="50dp"

        android:layout_width="100dp"

        android:text="第3个活动2"

        android:layout_gravity="center"

        android:background="@color/colorPrimary"

        />

    <TextView

        android:id="@+id/main3_txt3"

        android:layout_height="50dp"

        android:layout_width="100dp"

        android:text="第3个活动3"

        android:layout_gravity="center"

        android:background="@color/colorPrimary"

        />

</LinearLayout>
5.效果预览
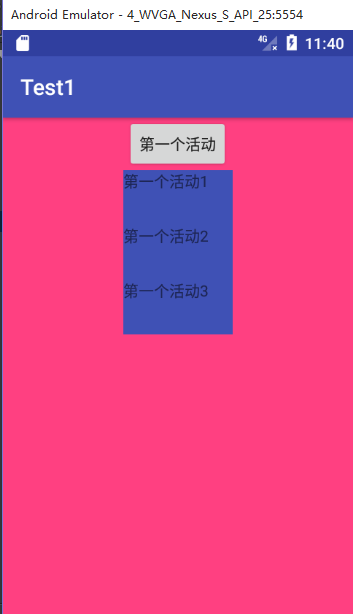
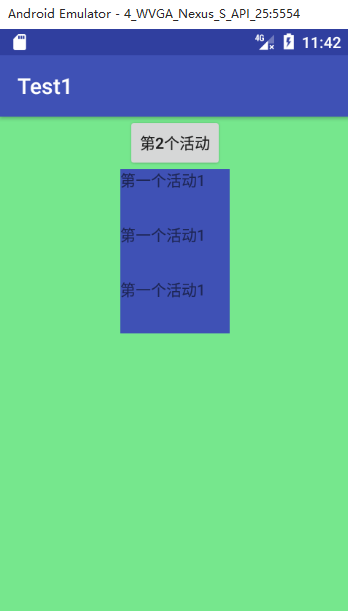
5.1.从Main1Activity==>点击按钮==>Main2Activity


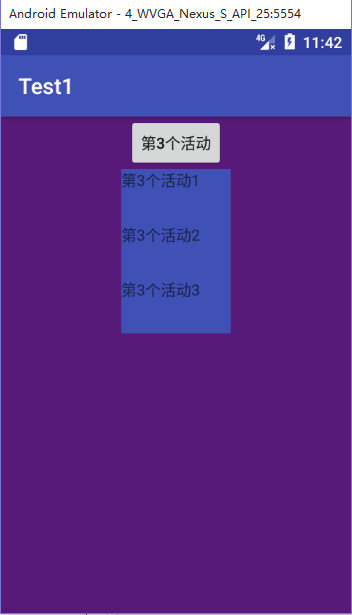
5.2 从Main2Activity==>点击按钮==>Main3Activity


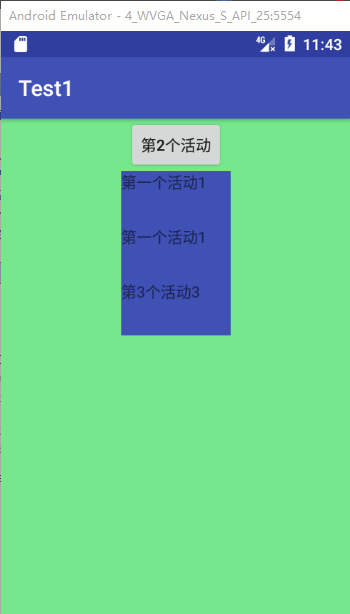
5.3.从Main3Activity==>点击按钮==>回到Main2Activity


可以发现,第二个活动即保存了前面第一个活动传过来的值,也保存了第三个活动传过来的值。
6.简单总结一下
6.1.当然最重要的就是一个跳转的函数=====startActivityForResult=====它要和另外一个活动的SetResult
互相配合,用一个唯一标识符整型,随便选,我用了0x717。
6.2.个人觉得bundle用来传数据非常方便,以前以为就是这个bundle用来传递活动之间的数据,后来我发现我太局限了
6.3.真正传递数据的是意图=====intent=====它才是老大,bundle只是它传递数据的一个工具。
6.4.所以说,当你需要修改传递的数据时,先添加bundle,之后千万不要忘记+intent.putExtras(bundle)。
6.5.案例很简单,简单Copy一下,自己研究一下就能懂。
早安呐=====2017/7/15 7:56
Android 完美解决bundle实现页面跳转并保留之前数据+传值的更多相关文章
- Android中实现activity的页面跳转并传值
一个Android应用程序很少会只有一个Activity对象,如何在多个Activity之间进行跳转,而且能够互相传值是一个很基本的要求. 本次我们就讲一下,Android中页面跳转以及传值的几种方式 ...
- Android Jetpack - 使用 Navigation 管理页面跳转
在今年的 IO 大会上,发布了一套叫 Android Jetpack 的程序库.Android Jetpack 里的组件大部分我们都接触过了,其中也有一些全新的组件,其中一个就是 Navigation ...
- [转]使用storyboard实现页面跳转,简单的数据传递
由于最近才接触到IOS,苹果已经建议storyboard来搭建所有界面了,于是我也追随时尚,直接开始使用storyboard.(不料在涉及到页面跳转的时候,遇到的问题是:点击后没有任何反应)众所周知, ...
- 使用storyboard实现页面跳转,简单的数据传递
由于最近才接触到IOS,苹果已经建议storyboard来搭建所有界面了,于是我 也追随时尚,直接开始使用storyboard.(不料在涉及到页面跳转的时候,遇到的问题是:点击后没有任何反应)众所周知 ...
- 完美解决Webpack多页面热加载缓慢问题【转载】
版权声明:本文为博主原创文章,遵循CC 4.0 BY-SA版权协议,转载请附上原文出处链接和本声明. 本文链接:https://blog.csdn.net/localhost_1314/article ...
- Android完美解决输入框EditText隐藏密码打勾显示密码问题
长话短说,一共有两种方法.首先你需要在布局文件里面给EditText设置一个android:inputType="numberPassword"属性.我这里默认规定密码只能是数字了 ...
- 完美解决PYQT5登录界面跳转主界面方法
该问题,有很多种方法,但是很多方法要么这个有问题,要么那个有问题,最后终于找到一种没问题的方法.记录一下: Login.py(登录窗口)文件 import sys from PyQt5 import ...
- Notice: Trying to get property of non-object problem(PHP)解决办法 中间件只能跳转不能返任何数据
这里实际是调用了一个zend的数据库访问的方法,使用了fetchAll方法,但由于数据库中没有该记录,所以返回的对象是null,所以我就判断对象是否为null: 复制代码代码如下: if($obj== ...
- .Net程序猿玩转Android开发---(11)页面跳转
在不论什么程序开发中,都会遇到页面之间跳转的情况,Android开发也不例外.这一节,我们来认识下Android项目中如何进行页面跳转.页面跳转分为有參数和无參数页面跳转,已经接受还有一个页面的返回值 ...
随机推荐
- 并发包阻塞队列之ArrayBlockingQueue
并发包阻塞队列之ArrayBlockingQueue jdk1.7.0_79 上一节中对并发包中的非阻塞队列ConcurrentLinkedQueue的入队.出队做了一个简要的分析,本文将对并发 ...
- 使用Kubernetes的java-client实现Deployment的部署及更新操作
1. 背景介绍 需求: 针对多种协议SDK构造探针,测试公司接入机服务状况(每一个探针应对单一接入机,接入机数量可能会动态变化). 难点: 大多数协议SDK均不支持多实例运行,且部分SDK通过生成文件 ...
- 移植MAVLINK到STM32详细教程之三
在前面教程的基础上继续移植优化,之前的没有加缓冲区,没有接收函数功能,这里进行统一的讲解 作者:恒久力行 qq:624668529 缓冲区对于接 ...
- angular 学习笔记(3) ng-repeat遍历json并且给样式
视图: <div ng-app="myapp" ng-controller="myctrl"> <ul> <li ng-repea ...
- Vue.js(2.x)之条件渲染
1.v-if:这里的官网文档看完后赶脚v-if就是用来判断元素是显示还是隐藏. 2.template这个包装元素感觉挺好用,以后把需要某些特定操作才出现的元素存放进去挺好. 3.前面看的网友写的还可以 ...
- css禁止文字被选中
有时候,为了让用户有更好的体验,需要禁用掉文本选中功能 比如:使用a标签模拟按钮,如果不禁用掉文本选中功能,那么双击时会选中文字,用起来很不爽. 多数情况下,只需要使用CSS样式就可以实现这个功能啦: ...
- 一个容易被忽视的css选择器
之前学的的迷糊了,也不知道什么会什么不会了,跑去面试了.别人列出一堆css选择器,本以为选择器没啥的,结果到那个多类选择器翻车了,.a.b选择同时含a,b类名的,很尴尬所以回来仔细整理了一下.目前根据 ...
- font:inherit
font:inherit 字体的设置 设置所有元素的字体保持一致: 所有元素:*{font:inherit;} /* IE8+ */ body体用percent:body{font:100%/1 sa ...
- LAMP stack-5.6.22 (OpenLogic CentOS 7.2)
平台: CentOS 类型: 虚拟机镜像 软件包: apache2.4.20 mysql5.6.30 php5.6.22 apache application server basic softwar ...
- http请求各种数据的接受
一.接受请求的http数据 1.接受客户请求的数据,例如xml数据格式,代码如下: 此代码相当于服务端 public String analyzeWeixinXMLStr(HttpServletReq ...
