Solr配置步骤
1. 配置步骤说明
(1)配置Solr服务器。
(2)配置SolrHome。(Solr服务的主目录,磁盘)
(3)在Solr服务器中加载SolrHome。
(4)java程序访问Solr服务器,实现全文搜索。
2. 配置步骤
第一部分:配置Solr服务器
说明:Solr可以独立运行,需要servlet容器加载它。本文使用tomcat。
1. 第一步:解压一个Tomcat
解压一个新的Tomcat,专门用来加载Solr
2. 第二步:部署Solr服务到Tomcat中
在Solr的下载包中,提供了Solr的war包程序。(空的war包程序)拷贝solr.war到Tomcat的webapp目录下。并解压
3. 第三步:添加Solr运行依赖的jar包
在Solr的下载包中,提供Solr服务器运行所依赖的jar包。

(1)拷贝/example/lib/ext下的所有包,到solr应用的lib目录中
(2)拷贝/example/resource/log4j.properties,到solr应用的classes目录下。
--前提:先在/WEB-INF/目录下,创建classes目录。
第二部分:配置SolrHome
第一步
Solr的下载包中,提供了标准的SolrHome配置。把example文件夹下的solr文件夹拷贝到本地,修改名称为SolrHome。
SolrHome目录结构:
(1)SolrHome是Solr配置搜索服务的主目录。
(2)collection1称为Solr服务的一个实例(solrCore)。
(3)一个solr实例对应一个索引库。
(4)Solr可以同时配置多个实例。以便为不同的java程序提供搜索服务。
配置solr服务,就是在配置solr实例。
第二步:配置SoleCore
在core.properties文件中配置,在这里,我们将其修改为:soreCore0719
在SolrHome同级目录下,创建depJar文件夹。(目的:方便管理jar依赖) 拷贝contrib、dist两个目录到depJar目录下。
修改/collection1/conf目录下的solrconfig.xml,加载jar包
说明:solr是通过<lib>标签,来加载运行所需要的jar包的。
第三部分:在Solr服务器中加载SolrHome
第一步:修改web.xml加载SolrHome
在solr的应用中,是通过web.xml来加载SolrHome的。把web.xml下的<env-entry>标签的注释放开。
第二步:启动Tomcat测试
访问地址 http://localhost:8080/solr
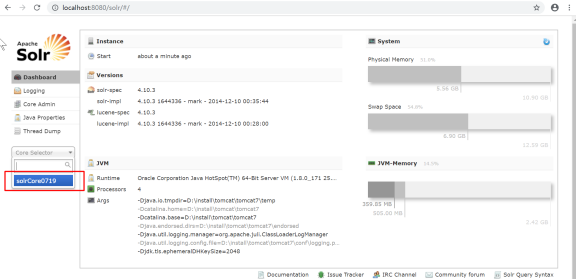
solr服务器配置成功!!!
第四部分:创建java程序访问solr服务器
前提:创建好了数据库。
配置步骤说明:
(1)创建项目。
(2)创建索引
(3)搜索索引
第一步:创建项目,导入jar包
|
SolrJ核心包 /solr-4.10.3/dist/solr-solrj-4.10.3.jar SolrJ依赖包 /solr-4.10.3/dist/solrj-lib下的所有包 日志依赖包 /solr-4.10.3/example/lib/ext目录下的所有jar包 JDBC驱动包 mysql-connector-java-5.1.10-bin.jar |
拷贝log4j.properties到src目录下。(或者创建一个Source Folder)
第二步:创建索引
采集数据
需求采集的字段说明:参与搜索的字段:名称、价格、商品类别、描述信息参与结果展示的字段:商品id、图片
(1)创建Product类
|
public class Product { private Integer pid; private String name; private String catalog_name; private double price; private String description; private String picture; // 补全get、set方法 } |
(2)创建ProductDao类
|
import java.sql.Connection; import java.sql.DriverManager; import java.sql.PreparedStatement; import java.sql.ResultSet; import java.sql.SQLException; import java.util.ArrayList; import java.util.List; import cn.gzsxt.solr.pojo.Product; public class ProductDao { private Connection connection; private PreparedStatement pst; private ResultSet rs; /** * 采集数据,查询所有商品 * @return */ public List<Product> getAllProducts() { List<Product> products = new ArrayList<>(); try { //1、加载驱动 Class.forName("com.mysql.jdbc.Driver"); //2、获取Connection连接 connection = DriverManager.getConnection("jdbc:mysql://localhost:3306/solr", "root", "gzsxt"); //3、获取PreparedStatement,执行预编译 pst = connection.prepareStatement("select pid,name, catalog_name,price,description,picture from products"); //4、执行sql搜索 rs = pst.executeQuery(); Product p = null; while(rs.next()){ p = new Product(); p.setPid(rs.getInt("pid")); p.setName(rs.getString("name")); p.setPrice(rs.getFloat("price")); p.setPicture(rs.getString("picture")); p.setDescription(rs.getString("description")); p.setCatalog_name(rs.getString("catalog_name")); products.add(p); } } catch (Exception e) { e.printStackTrace(); }finally { if(null!=rs){ try { rs.close(); } catch (SQLException e) { // TODO Auto-generated catch block e.printStackTrace(); } } if(null!=pst){ try { pst.close(); } catch (SQLException e) { // TODO Auto-generated catch block e.printStackTrace(); } } if(null!=connection){ try { connection.close(); } catch (SQLException e) { // TODO Auto-generated catch block e.printStackTrace(); } } } return products; } } |
(3)创建一个测试类ProductDaoTest
|
package cn.gzsxt.solr.test; import org.junit.Test; import cn.gzsxt.solr.dao.ProductDao; public class ProductDaoTest { @Test public void getAllProducts(){ ProductDao dao = new ProductDao(); System.out.println(dao.getAllProducts()); } } |
测试结果,采集数据成功!!!

将数据转换成Solr文档SolrInputDocument
solr是通过SolrInputDocument来封装数据的。部分源码如下:
|
public SolrInputDocument(Map fields){ _documentBoost = 1.0F; _fields = fields; } public void addField(String name, Object value){ addField(name, value, 1.0F); } |
问题:我们在Lucene中知道,域有三大属性,在创建文档的时候指定。而Solr的源码中,只是用一个Map集合来封装域的信息。那域的三大属性怎么定义呢?
答:Solr是通过一个配置文件schema.xml,事先定义域的信息的。
Solr域的说明
通过<field>标签定义域的名称等信息

name属性:域的名称
type属性: 域的类型(<FieldType>标签,加载了分词器,指定了分词属性)
indexed属性:是否索引
stored属性:是否存储
multiValued属性:是否支持多个值
--通过<fieldType>标签,定义域的类型信息
name属性:域类型的名称
class属性:指定域类型的solr类型。
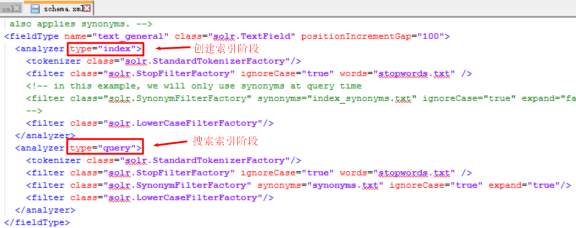
<analyzer>:指定分词器。
<analyzer type=”index”>:表示在创建索引时,对域做分词处理。
<analyzer type=”query”>:表示在检索索引时,对域做分词处理。
<tokenizer>标签:指定分词器
<filter>标签:指定过滤器
Solr域的特点
(1)、Solr的域必须先定义,后使用。(否则报错:unknown fieldName)
(2)、定义solr域的时候,必须指定是否索引、是否存储这两个属性。<field>
(3)、定义solr域的时候,必须指定域的类型<fieldType>:
因为域的类型确定了这个域在索引、搜索两个阶段的分词属性。
<field>标签: 来指定索引、存储两个属性
<fieldType>标签:来指定分词属性
(4)、每一个文档中,必须包含id这个域,它的值标记文档的唯一性

配置Solr业务域
商品各字段属性说明
|
域 |
Tokened |
Indexed |
Stored |
|
商品的id |
N |
Y |
Y |
|
商品的名称 |
Y |
Y |
Y |
|
商品的类别 |
N |
Y |
Y |
|
商品的价格 |
Y |
Y |
Y |
|
商品的图片 |
N |
N |
Y |
|
商品描述信息 |
Y |
Y |
N |
修改schema.xml,添加如下配置。(id域不用配置,直接使用solr的id域)
|
<!--product--> <field name="id" type="string" indexed="true" stored="true" required="true" multiValued="false" /> <field name="product_name" type="text_general" indexed="true" stored="true"/> <field name="product_catalog_name" type="string" indexed="true" stored="true" /> <field name="product_price" type="double" indexed="true" stored="true"/> <field name="product_description" type="text_general" indexed="true" stored="false" /> <field name="product_picture" type="string" indexed="false" stored="true" /> |
修改ProductDao,新增getDocuments方法
|
/** * 将采集到的商品数据,转换成solr文档类型 * @param products * @return */ public List<SolrInputDocument> getDocuments(List<Product> products){ List<SolrInputDocument> docs = new ArrayList<>(); SolrInputDocument doc = null; for (Product product : products) { doc = new SolrInputDocument(); doc.addField("id", product.getPid()); doc.addField("product_name", product.getName()); doc.addField("product_price", product.getPrice()); doc.addField("product_catalog_name", product.getCatalog_name()); doc.addField("product_description", product.getDescription()); doc.addField("product_picture", product.getPicture()); docs.add(doc); } return docs; } |
连接Solr服务器,创建索引
前提:已经启动了Tomcat,加载了Solr服务器。(前面给过schema.xml,需要重写启动Tomcat)
修改ProductDaoTest类,新增createIndex方法
|
@Test public void createIndex(){ // 1、 创建HttpSolrServer对象,通过它和Solr服务器建立连接。 // 参数:solr服务器的访问地址 HttpSolrServer server = new HttpSolrServer("http://localhost:8080/solr/solrCore0719"); // 2、 通过HttpSolrServer对象将SolrInputDocument添加到索引库。 ProductDao dao = new ProductDao(); try { server.add(dao.getDocuments(dao.getAllProducts())); // 3、 提交。 server.commit(); System.out.println("创建索引库成功!!!"); } catch (SolrServerException e) { e.printStackTrace(); } catch (IOException e) { e.printStackTrace(); } } |
访问Solr主界面,在Query选项下测试
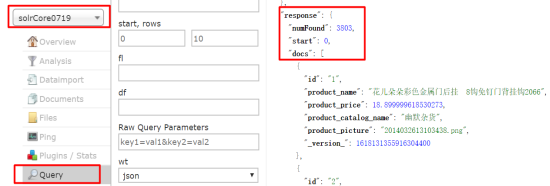
创建索引库成功!!!
第三步:搜索索引
修改ProductDaoTest类型,新增一个查询方法
|
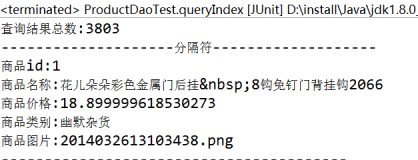
@Test public void queryIndex() throws Exception { // 创建HttpSolrServer对象,通过它和Solr服务器建立连接。 // 参数:solr服务器的访问地址 HttpSolrServer server = new HttpSolrServer("http://localhost:8080/solr/solrCore0719"); // 创建SolrQuery对象 SolrQuery query = new SolrQuery(); // 设置查询条件,参考主界面 query.set("q", "*:*"); // 调用server的查询方法,查询索引库 QueryResponse response = server.query(query); // 查询结果 SolrDocumentList results = response.getResults(); // 查询结果总数 long cnt = results.getNumFound(); System.out.println("查询结果总数:" + cnt); System.out.println("--------------------分隔符-------------------"); for (SolrDocument solrDocument : results) { System.out.println("商品id:"+solrDocument.get("id")); System.out.println("商品名称:"+solrDocument.get("product_name")); System.out.println("商品价格:"+solrDocument.get("product_price")); System.out.println("商品类别:"+solrDocument.get("product_catalog_name")); System.out.println("商品图片:"+solrDocument.get("product_picture")); System.out.println("----------------------------------------"); } } |
查询结果,非常成功!!!
1.1.1.1 SolrHome说明
--SolrHome目录结构:
Solr配置步骤的更多相关文章
- Sitecore8.2 Solr5.1.0配置步骤
1.首先下载Solr安装包,官方提供了几种下载,我选的的solr的5.1.0版本zip包,下载链接:http://mirror.bit.edu.cn/apache/lucene/solr. 2.下载后 ...
- log4j.properties 详解与配置步骤
一.log4j.properties 的使用详解 1.输出级别的种类 ERROR.WARN.INFO.DEBUGERROR 为严重错误 主要是程序的错误WARN 为一般警告,比如session丢失IN ...
- log4j.properties 详解与配置步骤(转)
找的文章,供参考使用 转自 log4j.properties 详解与配置步骤 一.log4j.properties 的使用详解 1.输出级别的种类 ERROR.WARN.INFO.DEBUGERROR ...
- MySQL数据库集群进行正确配置步骤
MySQL数据库集群进行正确配置步骤 2010-06-09 10:47 arrowcat 博客园 字号:T | T 我们今天是要和大家一起分享的是对MySQL数据库集群进行正确配置,我前两天在相关网站 ...
- Apache安装配置步骤
注释:这里以Linux 红帽商业版为例~~~~~~~纯手打啊 Apache安装配置步骤 准备:关闭其他虚拟设备 #/etc/init.d/libvirtd stop #/etc/init.d/xend ...
- Windows Live Writer配置步骤
推荐文档: [超详细教程]使用Windows Live Writer 2012和Office Word 2013 发布文章到博客园全面总结 Live Writer 使用小贴示:发博客时始终使用图片原始 ...
- Oracle 11g客户端在Linux系统上的配置步骤详解
Oracle 11g客户端在Linux系统上的配置步骤详解 2011-07-26 10:47 newhappy2008 CSDN博客 字号:T | T 本文我们主要介绍了Oracle 11g客户端在L ...
- jenkins 邮件配置步骤
一.进行系统管理中的邮件配置步骤: 1.设置Extended E-mail Notification 二.对构建的job 添加邮件发送的步骤: 3.成功截图:
- an'gularjs 环境搭建之NodeJS、NPM安装配置步骤(windows版本)
NodeJS.NPM安装配置步骤(windows版本) :http://xiaoyaojones.blog.163.com/blog/static/28370125201351501113581/ ...
随机推荐
- SQL COUNT() 函数
COUNT() 函数返回匹配指定条件的行数. SQL COUNT() 语法 SQL COUNT(column_name) 语法 COUNT(column_name) 函数返回指定列的值的数目(NULL ...
- 第一课android开发之在activity间传递参数
一.活动间简单参数传递:1.在布局中添加按钮,用<Button,用id设置id名称,id="@+id/这儿填写你要设置成的名称":用text设置按钮上显示的文字.text=& ...
- UVA11419 SAM I AM
UVA11419 SAM I AM 给定一个 \(R\times C\) 的矩阵中的 \(N\) 个点,求最少选取多少个行或列才能使得每个给出的点都被一行或一列覆盖,输出方案 \(R,\ C\leq1 ...
- Elasticsearch 通关教程(四): 分布式工作原理
前言 通过前面章节的了解,我们已经知道 Elasticsearch 是一个实时的分布式搜索分析引擎,它能让你以一个之前从未有过的速度和规模,去探索你的数据.它被用作全文检索.结构化搜索.分析以及这三个 ...
- 特殊需求:EF 6.x如何比较TimeSpan格式的字符串?EF Core实现方式是否和EF 6.x等同?
前言 我们知道C#中的TimeSpan对应SQL Server数据库中的Time类型,但是如果因为特殊需求数据库存储的不是Time类型,而是作为字符串,那么我们如何在查询数据时对数据库所存储的字符串类 ...
- linux 基本命令2
linux没有磁盘的概念,这一点不同于windows,Linux所有的文件系统采用树的结构完成(核心本质)树自然有根节点 也就是linux存在一个根目录,用/表示ls 表示查看命令 我们使用 ls / ...
- 利用eval函数实现简单的计算器
""" description : use python eval() function implement a simple calculator functions ...
- java.util.NoSuchElementException错误原因及解决方案
1.原因:没有控制语句导致的迭代器的越界,使得map中的数据无法传入reduce,从而无法把结果传入目标文件中. 在进行Mapreduce实例——WordCount实验时遇到的错误,开始以为是lib包 ...
- 使用sqlserver 链接远程服务器进行查询
--创建链接服务器 exec sp_addlinkedserver 'ITSV ', ' ', 'SQLOLEDB ', '远程服务器名或ip地址 ' exec sp_addlinkedsrvlogi ...
- 在windows环境利用celery实现简单的任务队列
测试使用环境: 1.Python==3.6.1 2.MongoDB==3.6.2 3.celery==4.1.1 4.eventlet==0.23.0 Celery分为3个部分 (1)worker部分 ...