Scrapy爬取伯乐在线的所有文章
本篇文章将从搭建虚拟环境开始,爬取伯乐在线上的所有文章的数据。
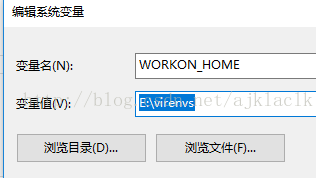
搭建虚拟环境之前需要配置环境变量,该环境变量的变量值为虚拟环境的存放目录
1. 配置环境变量
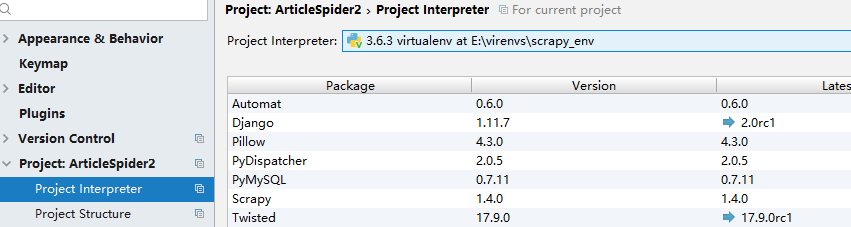
2.创建虚拟环境
用mkvirtualenv命令进行创建,--python后面加上python的安装目录,可以选择不同版本的python.这也是用到虚拟环境的好处。最后的scrapy_env是虚拟环境的名字。创建完成之后可以看到前面小括号里切换到了该虚拟环境下。

当然你也可以用workon命令来查看或者切换已经装上的虚拟环境,如果workon命令无法识别,需要先安装这个包 pip install virtualenvwrapper-win

3. 安装scrapy
安装scrapy之前需要安装几个前置文件:
a.安装TWisted 。
b.安装pywin32 。
该文件是一个exe文件,下载地址 https://sourceforge.net/projects/pywin32/ 。注意一定要下载python版本和操作系统版本对应的pywin32,
安装完成之后,在python交互模式下,输入以下命令,若不报错则说明安装成功了
c.安装pyOPENSSL
下载地址:https://launchpad.net/pyopenssl
d.安装scrapy (pip install...)
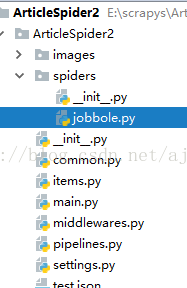
4.创建scrapy项目
因为pycharm默认是没有创建scrapy项目的选项,所以需要用到scrapy startproject 命令创建:

6.打开刚才创建的scrapy项目,可以发现scrapy包自动给我们生成了许多py文件,创建一个spider ,名为jobbole;再创建一个main.py文件用于测试。
main.py中的代码为:
import os,sys

from scrapy.cmdline import  execute
   sys.path.append(os.path.dirname(os.path.abspath(__file__)))

execute(["scrapy","crawl","jobbole"])
jobbole中代码如下:
import scrapy
class JobboleSpider(scrapy.Spider):

    name="jobbole"

allowed_domains=['blog.jobbole.com']

    start_urls=['http://blog.jobbole.com/all-posts/'] #被爬取的页面
在命令行进行测试:
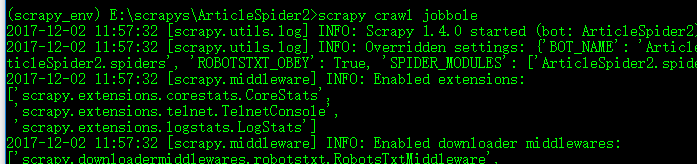
出现上述信息说明你已经链接到了被爬取的url
7. 下面运行一下main
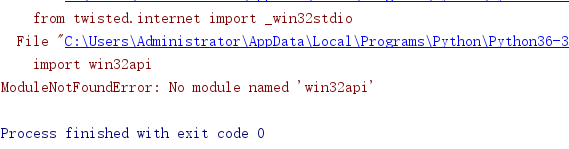
出现了这个错误,是因为我们在该虚拟环境上没有装pywin32 。
解决方法可以参考:
http://blog.csdn.net/ajklaclk/article/details/78632688
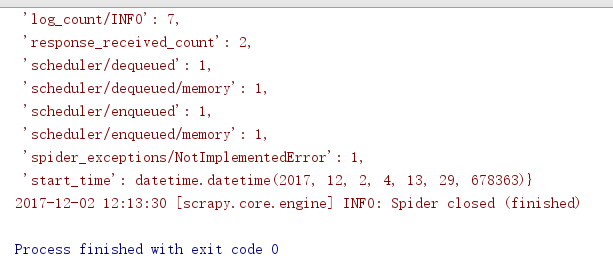
再次运行main.若出现以下情况说明已经正常链接到了你需要爬取的网站:
8.项目可以正常跑起来的情况下,下面就是开始写代码,爬取伯乐在线网上的所有文章。
首先分析一下该网站:

在list页面中的每一篇文章都有图片和内容本身,那么我们可以定义一下我们的爬取策略:
检查元素发现:
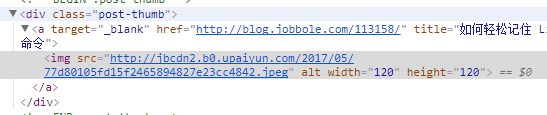
每一篇文章的地址及对应的图片的地址在同一个节点中可以获取,所以我们首先获取到该节点。
可以在scrapy shell界面中进行调试:

defparse(self,response):
article_node=response.css(".post.floated-thumb .post-thumb a") #获取节点
forurl_nodeinarticle_node:
article_urls=url_node.css("::attr(href)").extract_first() #获取文章地址
img_urls=url_node.css("img::attr(src)") .extract_first() #获取图片地址
yieldRequest(url=parse.urljoin(response.url,article_urls),meta={"front_image_url":img_urls},callback=self.parse_detail)
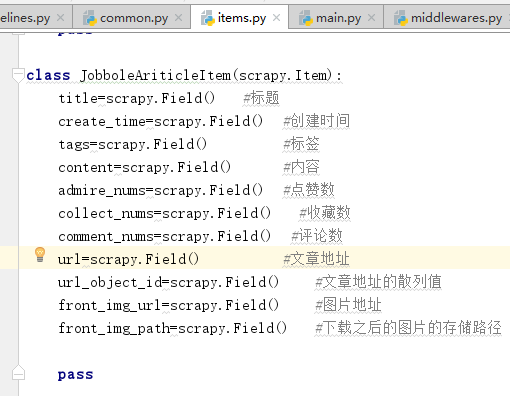
9. 在items中定义我们需要爬取的变量
下面开始提取各个字段的位置,可以根据自己的喜好采用CSS选择器获取XPATH来提取:
以title为例,打上断点进行调试(也可以用scrapy shell进行调试),确保我们得到正确的数据。
其他字段采用相同的方法,这里不再重复。
提取字段的代码:
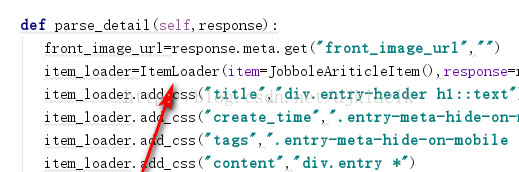
def parse_detail(self,response):
create_time = response.css("p.entry-meta-hide-on-mobile::text").extract()[].strip().replace("·", "").strip()
front_image_url=response.meta.get("front_image_url","")
item_loader=ArticleItemLoader(item=JobboleAriticleItem(),response=response)
item_loader.add_css("title","div.entry-header h1::text")
item_loader.add_value("create_time",create_time)
item_loader.add_css("tags",".entry-meta-hide-on-mobile a::text")
item_loader.add_css("content","div.entry")
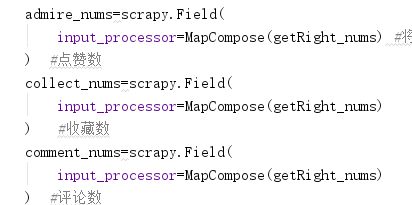
item_loader.add_css("admire_nums",".post-adds h10::text")
item_loader.add_css("collect_nums",".btn-bluet-bigger.href-style.bookmark-btn.register-user-only::text")
item_loader.add_css("comment_nums",".btn-bluet-bigger.href-style.hide-on-480::text")
item_loader.add_value("url",response.url)
item_loader.add_value("front_img_url",front_image_url)
item_loader.add_value("url_object_id",get_md5(response.url))
article_item=item_loader.load_item()
yield article_item
需要说明的是url_object_id用到了get_md5方法将URL转换为散列值,作为我们等会用到的数据表的主键。
创建一个common.py,用下面的方法得到散列值:
import hashlib

def get_md5(url):

    if isinstance(url,str):  #若是Unicode类型,则转换为utf8类型

url=url.encode("utf8")

    m=hashlib.md5()

    m.update(url)

    return m.hexdigest()
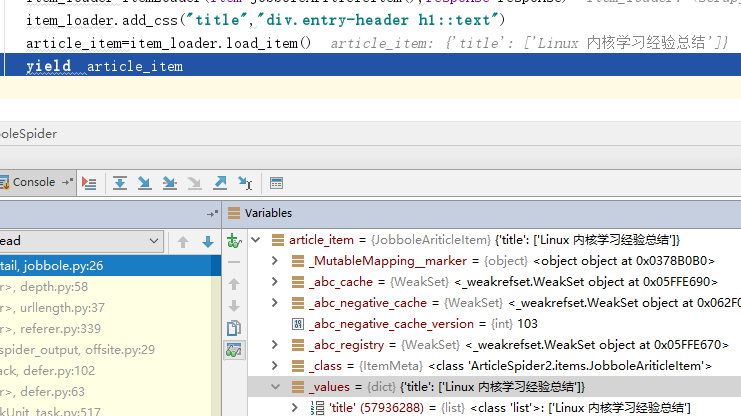
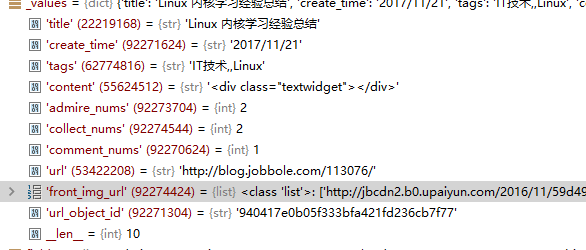
10.通过debug查看当前item中的值
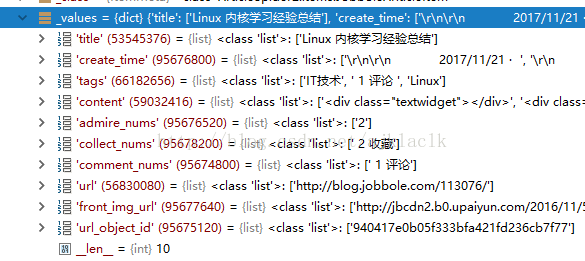
可以发现,现在的字段全为list类型。所以我们需要进行相应的转换。这也算是比较麻烦的地方:
首先我们可以让所有字段都转换为str类型,并取第一个元素:

所以,我们之前调用的ItemLoader方法需要进行修改:
修改前:
修改后:
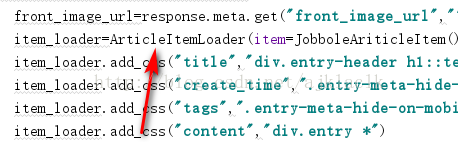
需要导入相应的类,不然会报错。完成之后我们就使用了自定义的ItemLoader.我们在该ItemLoader中加了一个输出时取首个的方法。下面再次debuge查看结果:
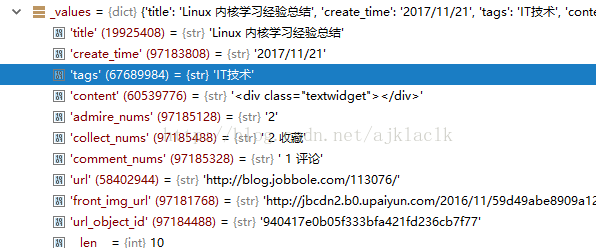
可以发现,现在的所有字段都变为了str类型。但是这并不是我们想获取的数据的格式,比如说收藏数评论数我们只需要数字而不需要文字 等等;同样我们继续在items中定义方法来进行控制。


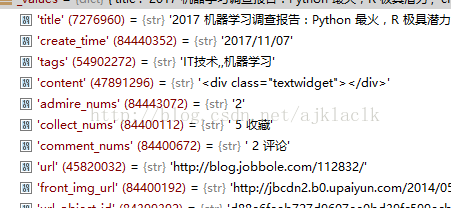
首先,我们发现上面两篇文章的日期旁边的tags(标签)字段,第一篇文章中出现了 “评论的字样” 而第二篇文章则是正常的tags。由于评论数我们设置了专门的字段来爬取,所以这里的2评论是多余的,那么我们可以定义函数来进行筛选。
在tags中调用该函数,此时tags仍然是一个List,然后会执行output_processor=Join(“,”)语句,也就是将list中的内容通过逗号相连,并转换为str类型
运行:
此时的tags字段的值,才是我们想要爬取的内容。
同理对点赞数,收藏数,评论数通过正则表达式进行控制:
Debug:

通常情况下,我们的图片的url一般设置为list类型。所以也需要进行 转换:
这是将str转为list的小技巧

Debug:
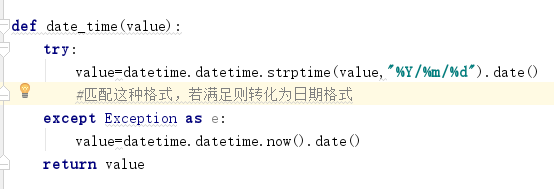
由于create_time是str格式,我们将他转为日期格式:
Debug

11.至此,我们就获取到了jobbole网站的所有文章的数据,拿到数据之后有很多应用,常见的有 1.根据图片url下载对应的图片 2.将数据保存为多种格式的文件 3.将数据保存到数据库中。下面就来讲讲这三种应用。
前置工作:
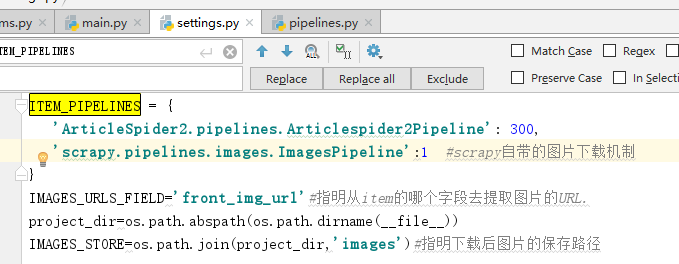
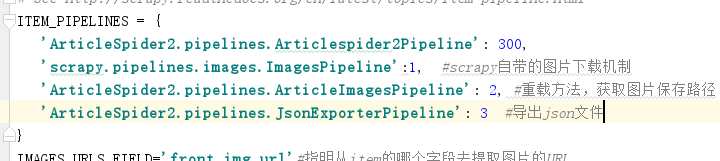
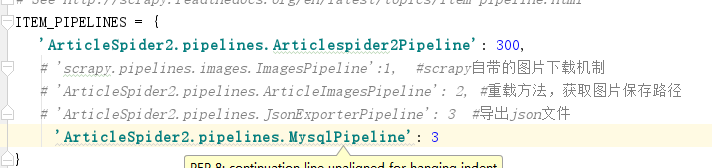
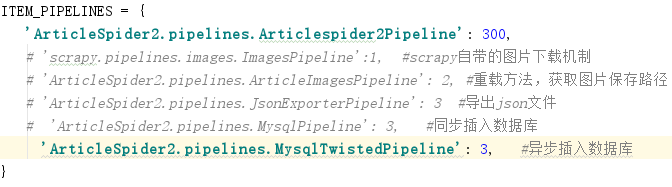
在setting中打开ITEM_PIPELINES(默认是注释掉的)

原理:所有的item在运行时都会流经PIPELINES(管道),这里的300表示优先级,数字越小,越先被处理。当pipeline.py中有多个类的时候,需要在上图所对应的位置进行配置。
应用:
1. 根据图片url让scrapy自动下载对应的图片
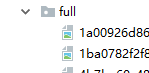
运行main:
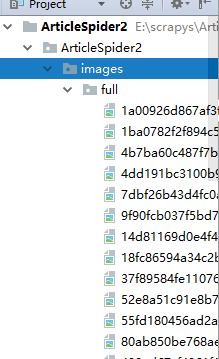
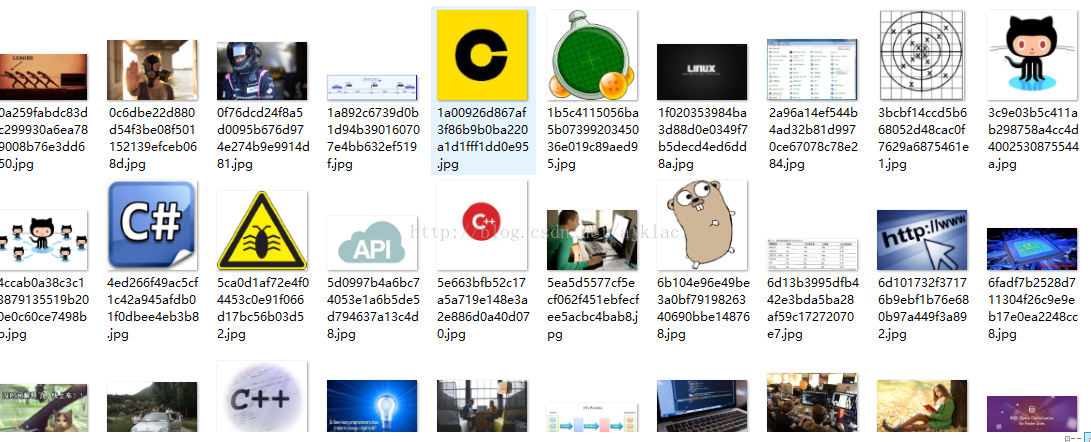
可以发现图片已经被下载完成。运行完之后图片的量是非常庞大的。上面截图只是部分。
上面采用的是scrapy自带的ImagesPipeline。这个类中还有很多属性。感兴趣的可以进行看看,比如说下载图片时还可以根据图片大小来过滤图片,大家可以根据具体的需求进行配置:

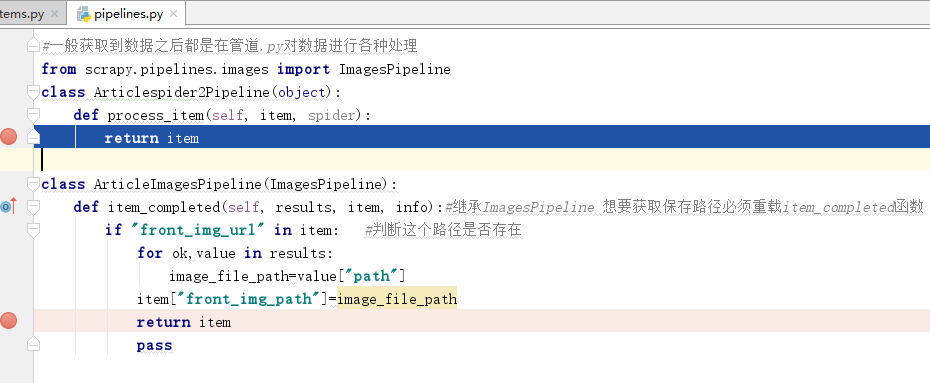
虽然ImagesPipeline类中能满足大多数需求,不过如果我们想下载之后的图片的保存路径,那么我们需要继承该类,根据需求重载该类中的一些方法:
在setting中配置:

Debug:

可以发现,获取到了图片的下载路径
2. 将数据保存为多种格式的文件(这里以json文件为例)
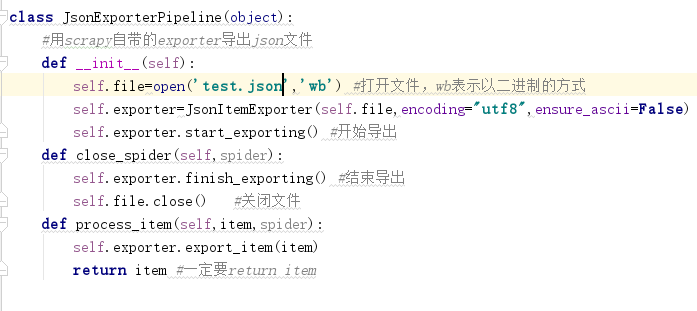
运行:
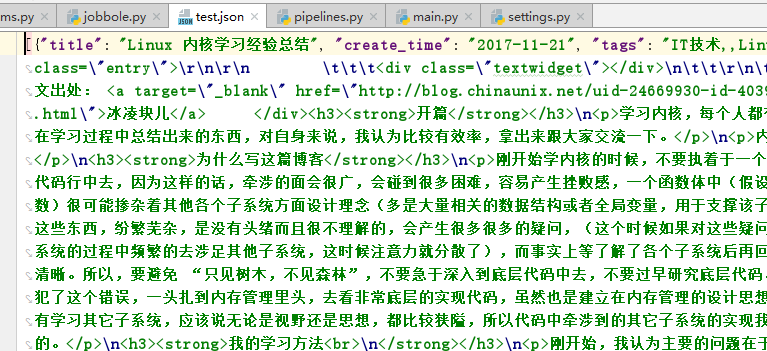
注意,在pipeline中配好之后需要在setting中设置才能生效
3.将数据存到数据库中(以mysql数据库为例)
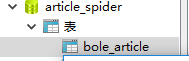
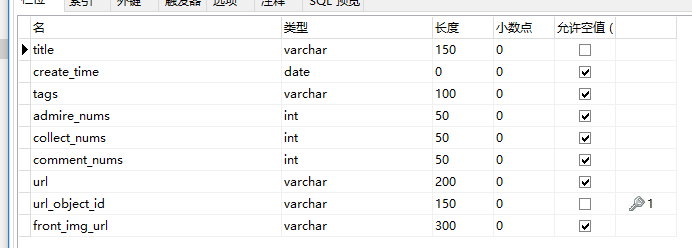
首先创建数据库和数据表:
下面在pipeline中编写代码:

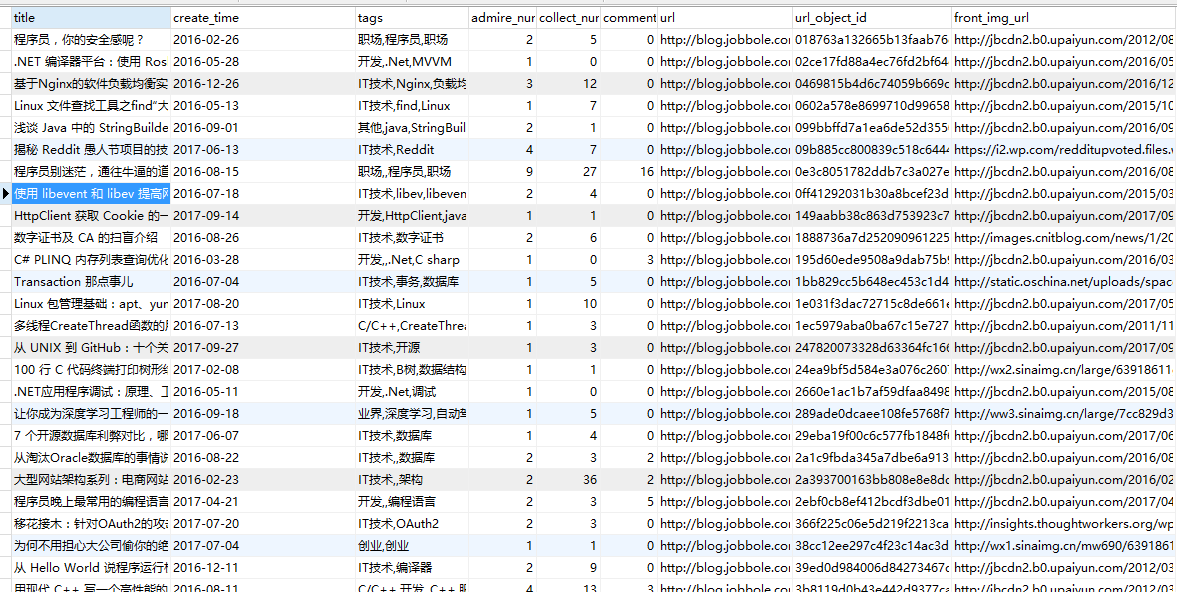
运行结果:
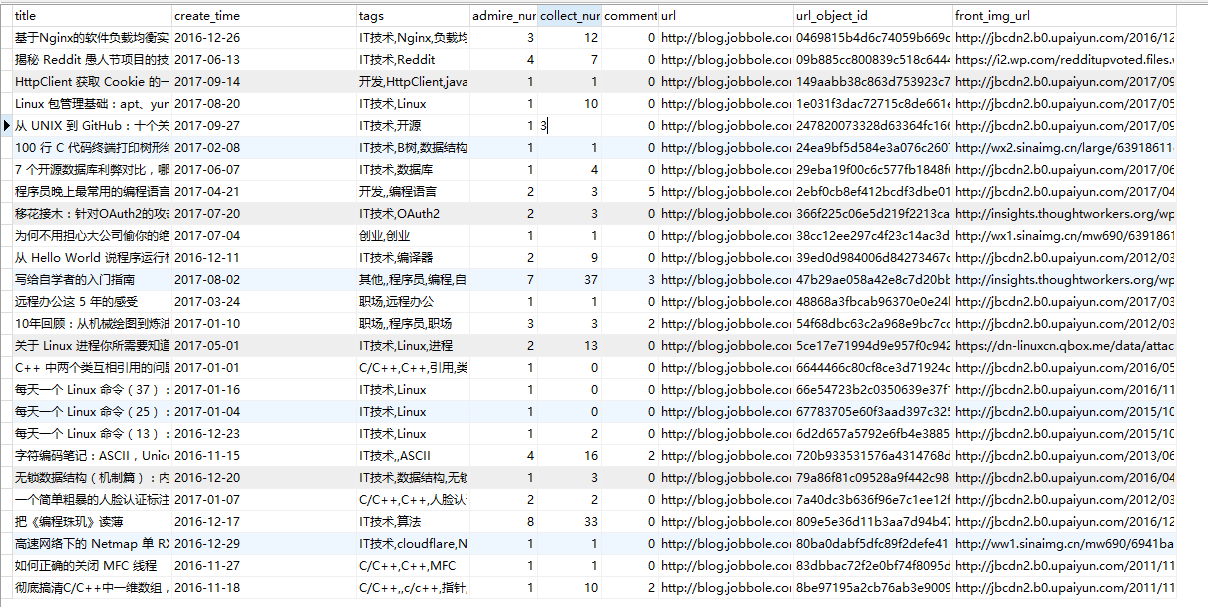
这样我们就将伯乐在线的所有文章的数据爬取完成并存入了数据库,这里共有上万条记录。所以采用上述方法,也就是同步的插入方式效率相对来说比较低。若数据量上亿的话,那这种插入方法的劣势就很明显了。所以我们可以采用python中的Twisted框架提供了异步容器,我们可以将数据通过异步的方式插入到数据库中。具体做法如下:
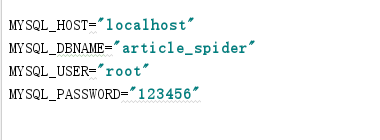
在setting中定义4个常量:
在管道中编写方法:
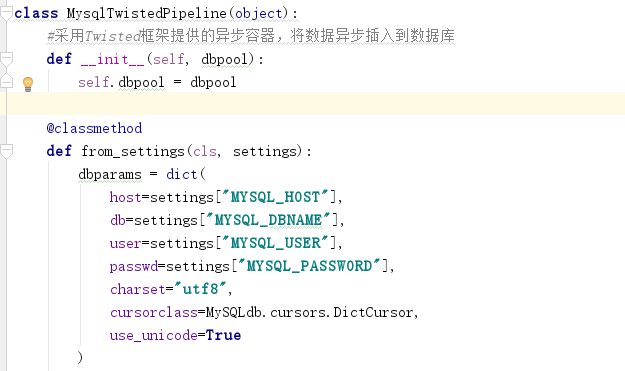
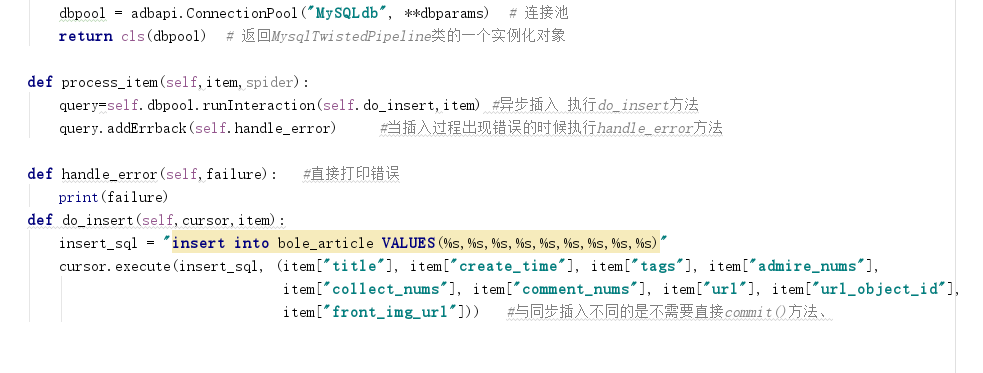
Setting中:
运行:
运行结果一致,不过当数据量大的时候,异步插入数据的方式会提高效率。
总结:至此,整个项目就完成了,爬取伯乐在线的所有文章。
项目源码如下:
目录结构:
jobbole.py代码:
import scrapy

from scrapy.http import Request

from urllib import parse

from scrapy.loader import ItemLoader

from ArticleSpider2.items import JobboleAriticleItem,ArticleItemLoader

from ArticleSpider2.common import get_md5

class JobboleSpider(scrapy.Spider):

    name="jobbole"

allowed_domains=['blog.jobbole.com']

    start_urls=['http://blog.jobbole.com/all-posts/'] #被爬取的页面

def parse(self, response):

        article_node=response.css(".post.floated-thumb .post-thumb a")  #获取节点

for url_node in article_node:

            article_urls=url_node.css("::attr(href)").extract_first()    #获取文章地址

img_urls=url_node.css("img::attr(src)") .extract_first()       #获取图片地址

yield Request(url=parse.urljoin(response.url,article_urls),meta={"front_image_url":img_urls},callback=self.parse_detail) #提交给scrapy进行下载

            #response.url表示域名 article_urls该页面提取的地址

        #获取下一页的url.如果存在,则将url交给parse函数进行提取。提取之后通过yield交给scrapy下载器进行下载

next_url=response.css(".next.page-numbers::attr(href)").extract_first("")

        if next_url:

            yield Request(url=parse.urljoin(response.url,next_url),callback=self.parse)

    def parse_detail(self,response):

       create_time = response.css("p.entry-meta-hide-on-mobile::text").extract()[].strip().replace("·", "").strip()

       front_image_url=response.meta.get("front_image_url","")

       item_loader=ArticleItemLoader(item=JobboleAriticleItem(),response=response)

       item_loader.add_css("title","div.entry-header h1::text")

       item_loader.add_value("create_time",create_time)

       item_loader.add_css("tags",".entry-meta-hide-on-mobile a::text")

       item_loader.add_css("content","div.entry")

       item_loader.add_css("admire_nums",".post-adds h10::text")

       item_loader.add_css("collect_nums",".btn-bluet-bigger.href-style.bookmark-btn.register-user-only::text")

       item_loader.add_css("comment_nums",".btn-bluet-bigger.href-style.hide-on-480::text")

       item_loader.add_value("url",response.url)

       item_loader.add_value("front_img_url",front_image_url)

       item_loader.add_value("url_object_id",get_md5(response.url))

       article_item=item_loader.load_item()

       yield  article_item

       pass
common.py代码:
import hashlib

def get_md5(url):

    if isinstance(url,str):  #若是Unicode类型,则转换为utf8类型

url=url.encode("utf8")

    m=hashlib.md5()

    m.update(url)

    return m.hexdigest()
items.py代码:
# -*- coding: utf-8 -*-
# Define here the models for your scraped items
#
# See documentation in:
# http://doc.scrapy.org/en/latest/topics/items.html
import scrapy
from scrapy.loader import ItemLoader
from scrapy.loader.processors import TakeFirst,MapCompose,Join
import re
import datetime
class Articlespider2Item(scrapy.Item):
# define the fields for your item here like:
# name = scrapy.Field()
pass
class ArticleItemLoader(ItemLoader):
default_output_processor = TakeFirst()
pass #定义一个类,继承scrapy自带的ItemLoader 。
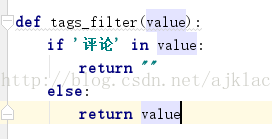
def tags_filter(value):
if '评论' in value:
return ""
else: #过滤评论
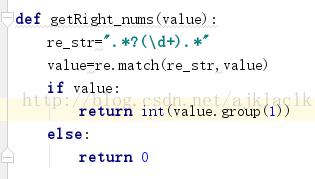
return value def getRight_nums(value):
re_str=".*?(\d+).*"
value=re.match(re_str,value)
if value:
return int(value.group())
else:
return 0
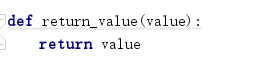
def return_value(value):
return value def date_time(value):
try:
value=datetime.datetime.strptime(value,"%Y/%m/%d").date()
#匹配这种格式,若满足则转化为日期格式
except Exception as e:
value=datetime.datetime.now().date()
return value class JobboleAriticleItem(scrapy.Item):
title=scrapy.Field() #标题
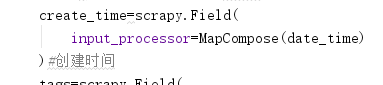
create_time=scrapy.Field(
input_processor=MapCompose(date_time)
)#创建时间
tags=scrapy.Field(
input_processor=MapCompose(tags_filter),
output_processor=Join(",") #覆盖掉前面定义的默认TakeFirst()
) #标签
content=scrapy.Field() #内容
admire_nums=scrapy.Field(
input_processor=MapCompose(getRight_nums) #将admire_nums的值传过去,调用函数得到新的admire_nums值
) #点赞数
collect_nums=scrapy.Field(
input_processor=MapCompose(getRight_nums)
) #收藏数
comment_nums=scrapy.Field(
input_processor=MapCompose(getRight_nums)
) #评论数
url=scrapy.Field() #文章地址
url_object_id=scrapy.Field() #文章地址的散列值
front_img_url=scrapy.Field(
output_processor=MapCompose(return_value)
) #图片地址
front_image_path=scrapy.Field() #下载之后的图片的存储路径
pass
mian.py代码:
import os,sys

from scrapy.cmdline import  execute

sys.path.append(os.path.dirname(os.path.abspath(__file__)))

execute(["scrapy","crawl","jobbole"])
pipelines.py代码:
# -*- coding: utf-8 -*-

# Define your item pipelines here

#

# Don't forget to add your pipeline to the ITEM_PIPELINES setting

# See: http://doc.scrapy.org/en/latest/topics/item-pipeline.html

#一般获取到数据之后都是在管道.py对数据进行各种处理

from scrapy.pipelines.images import ImagesPipeline

from scrapy.exporters import JsonItemExporter

import MySQLdb

import MySQLdb.cursors

from twisted.enterprise import adbapi

class Articlespider2Pipeline(object):

    def process_item(self, item, spider):  #自带的

return item

class ArticleImagesPipeline(ImagesPipeline):

    def item_completed(self, results, item, info):#继承ImagesPipeline 想要获取保存路径必须重载item_completed函数

if "front_img_url" in item:   #判断这个路径是否存在

for ok,value in results:

                image_file_path=value["path"]

            item["front_img_path"]=image_file_path

            return item

            pass

class JsonExporterPipeline(object):

    #用scrapy自带的exporter导出json文件

def __init__(self):

        self.file=open('test.json','wb') #打开文件,wb表示以二进制的方式

self.exporter=JsonItemExporter(self.file,encoding="utf8",ensure_ascii=False)

        self.exporter.start_exporting() #开始导出

def close_spider(self,spider):

        self.exporter.finish_exporting() #结束导出

self.file.close()   #关闭文件

def process_item(self,item,spider):

        self.exporter.export_item(item)

        return item #一定要return item

class MysqlPipeline(object):

    #采用同步的方式将数据插入到mysql

def __init__(self):

        self.conn=MySQLdb.connect('localhost','root','123456','article_spider',charset="utf8",use_unicode=True)

        self.cursor=self.conn.cursor()  #获取连接对象

def process_item(self,item,spider):

        insert_sql="insert into bole_article VALUES(%s,%s,%s,%s,%s,%s,%s,%s,%s,%s,%s)"

self.cursor.execute(insert_sql,(item["title"],item["create_time"],item["tags"],item["admire_nums"],

                                        item["collect_nums"],item["comment_nums"],item["url"],item["url_object_id"],

                                        item["front_img_url"],item["content"],item["front_image_path"]))

        self.conn.commit()

class MysqlTwistedPipeline(object):

    #采用Twisted框架提供的异步容器,将数据异步插入到数据库

def __init__(self, dbpool):

        self.dbpool = dbpool

    @classmethod

def from_settings(cls, settings):

        dbparams = dict(

            host=settings["MYSQL_HOST"],

            db=settings["MYSQL_DBNAME"],

            user=settings["MYSQL_USER"],

            passwd=settings["MYSQL_PASSWORD"],

            charset="utf8",

            cursorclass=MySQLdb.cursors.DictCursor,

            use_unicode=True

)

        dbpool = adbapi.ConnectionPool("MySQLdb", **dbparams)  # 连接池

return cls(dbpool)  # 返回MysqlTwistedPipeline类的一个实例化对象

def process_item(self,item,spider):

        query=self.dbpool.runInteraction(self.do_insert,item) #异步插入 执行do_insert方法

query.addErrback(self.handle_error)     #当插入过程出现错误的时候执行handle_error方法

def handle_error(self,failure):   #直接打印错误

print(failure)

    def do_insert(self,cursor,item):

        insert_sql = "insert into bole_article VALUES(%s,%s,%s,%s,%s,%s,%s,%s,%s,%s,%s)"

cursor.execute(insert_sql, (item["title"], item["create_time"], item["tags"], item["admire_nums"],

                                    item["collect_nums"], item["comment_nums"], item["url"], item["url_object_id"],

                                    item["front_img_url"],item["content"],item["front_image_path"]))   #与同步插入不同的是不需要直接commit()方法、

class ArticleImagesPipeline(ImagesPipeline):  # 继承ImagesPipeline这个类,我们可以重载这里面的部分方法。从而可以获取到图片的保存路径

def item_completed(self, results, item, info):  # results中存放了我们下载之后图片的存放路径。要获取到下载路径必须重写item_completed这个方法。

if "front_img_url" in item:

            for ok, value in results:

                image_file_path = value["path"]  # value是一个dict ,他有一个path属性,他的值就是下载之后的图片的存放路径

item["front_image_path"] = image_file_path  # 将下载路径存放给我们的items的属性中。

return item
setting.py代码:
# -*- coding: utf-8 -*-

# Scrapy settings for ArticleSpider2 project

#

# For simplicity, this file contains only settings considered important or

# commonly used. You can find more settings consulting the documentation:

#

#     http://doc.scrapy.org/en/latest/topics/settings.html

#     http://scrapy.readthedocs.org/en/latest/topics/downloader-middleware.html

#     http://scrapy.readthedocs.org/en/latest/topics/spider-middleware.html

import os

BOT_NAME = 'ArticleSpider2'

SPIDER_MODULES = ['ArticleSpider2.spiders']

NEWSPIDER_MODULE = 'ArticleSpider2.spiders'

# Crawl responsibly by identifying yourself (and your website) on the user-agent

#USER_AGENT = 'ArticleSpider2 (+http://www.yourdomain.com)'

# Obey robots.txt rules

ROBOTSTXT_OBEY = True

# Configure maximum concurrent requests performed by Scrapy (default: 16)

#CONCURRENT_REQUESTS = 32

# Configure a delay for requests for the same website (default: 0)

# See http://scrapy.readthedocs.org/en/latest/topics/settings.html#download-delay

# See also autothrottle settings and docs

#DOWNLOAD_DELAY = 3

# The download delay setting will honor only one of:

#CONCURRENT_REQUESTS_PER_DOMAIN = 16

#CONCURRENT_REQUESTS_PER_IP = 16

# Disable cookies (enabled by default)

#COOKIES_ENABLED = False

# Disable Telnet Console (enabled by default)

#TELNETCONSOLE_ENABLED = False

# Override the default request headers:

#DEFAULT_REQUEST_HEADERS = {

#   'Accept': 'text/html,application/xhtml+xml,application/xml;q=0.9,*/*;q=0.8',

#   'Accept-Language': 'en',

#}

# Enable or disable spider middlewares

# See http://scrapy.readthedocs.org/en/latest/topics/spider-middleware.html

#SPIDER_MIDDLEWARES = {

#    'ArticleSpider2.middlewares.Articlespider2SpiderMiddleware': 543,

#}

# Enable or disable downloader middlewares

# See http://scrapy.readthedocs.org/en/latest/topics/downloader-middleware.html

#DOWNLOADER_MIDDLEWARES = {

#    'ArticleSpider2.middlewares.MyCustomDownloaderMiddleware': 543,

#}

# Enable or disable extensions

# See http://scrapy.readthedocs.org/en/latest/topics/extensions.html

#EXTENSIONS = {

#    'scrapy.extensions.telnet.TelnetConsole': None,

#}

# Configure item pipelines

# See http://scrapy.readthedocs.org/en/latest/topics/item-pipeline.html

ITEM_PIPELINES = {

   'ArticleSpider2.pipelines.Articlespider2Pipeline': ,

   'scrapy.pipelines.images.ImagesPipeline':,  #scrapy自带的图片下载机制

'ArticleSpider2.pipelines.ArticleImagesPipeline': , #重载方法,获取图片保存路径

   # 'ArticleSpider2.pipelines.JsonExporterPipeline': 3  #导出json文件

   #  'ArticleSpider2.pipelines.MysqlPipeline': 3,   #同步插入数据库

'ArticleSpider2.pipelines.MysqlTwistedPipeline': 3  #异步插入数据库

}

IMAGES_URLS_FIELD='front_img_url'#指明从item的哪个字段去提取图片的URL.

project_dir=os.path.abspath(os.path.dirname(__file__))

IMAGES_STORE=os.path.join(project_dir,'images')#指明下载后图片的保存路径

# Enable and configure the AutoThrottle extension (disabled by default)

# See http://doc.scrapy.org/en/latest/topics/autothrottle.html

#AUTOTHROTTLE_ENABLED = True

# The initial download delay

#AUTOTHROTTLE_START_DELAY = 5

# The maximum download delay to be set in case of high latencies

#AUTOTHROTTLE_MAX_DELAY = 60

# The average number of requests Scrapy should be sending in parallel to

# each remote server

#AUTOTHROTTLE_TARGET_CONCURRENCY = 1.0

# Enable showing throttling stats for every response received:

#AUTOTHROTTLE_DEBUG = False

# Enable and configure HTTP caching (disabled by default)

# See http://scrapy.readthedocs.org/en/latest/topics/downloader-middleware.html#httpcache-middleware-settings

#HTTPCACHE_ENABLED = True

#HTTPCACHE_EXPIRATION_SECS = 0

#HTTPCACHE_DIR = 'httpcache'

#HTTPCACHE_IGNORE_HTTP_CODES = []

#HTTPCACHE_STORAGE = 'scrapy.extensions.httpcache.FilesystemCacheStorage'

MYSQL_HOST="localhost"

MYSQL_DBNAME="article_spider"

MYSQL_USER="root"

MYSQL_PASSWORD="123456"
Scrapy爬取伯乐在线的所有文章的更多相关文章
- 爬虫实战——Scrapy爬取伯乐在线所有文章
Scrapy简单介绍及爬取伯乐在线所有文章 一.简说安装相关环境及依赖包 1.安装Python(2或3都行,我这里用的是3) 2.虚拟环境搭建: 依赖包:virtualenv,virtualenvwr ...
- Scrapy基础(六)————Scrapy爬取伯乐在线一通过css和xpath解析文章字段
上次我们介绍了scrapy的安装和加入debug的main文件,这次重要介绍创建的爬虫的基本爬取有用信息 通过命令(这篇博文)创建了jobbole这个爬虫,并且生成了jobbole.py这个文件,又写 ...
- Scrapy爬取伯乐在线文章
首先搭建虚拟环境,创建工程 scrapy startproject ArticleSpider cd ArticleSpider scrapy genspider jobbole blog.jobbo ...
- scrapy爬取伯乐在线文章数据
创建项目 切换到ArticleSpider目录下创建爬虫文件 设置settings.py爬虫协议为False 编写启动爬虫文件main.py
- python爬虫scrapy框架——爬取伯乐在线网站文章
一.前言 1. scrapy依赖包: 二.创建工程 1. 创建scrapy工程: scrapy staratproject ArticleSpider 2. 开始(创建)新的爬虫: cd Artic ...
- 爬取伯乐在线文章(五)itemloader
ItemLoader 在我们执行scrapy爬取字段中,会有大量的CSS或是Xpath代码,当要爬取的网站多了,要维护起来很麻烦,为解决这类问题,我们可以根据scrapy提供的loader机制. 导入 ...
- 爬取伯乐在线文章(四)将爬取结果保存到MySQL
Item Pipeline 当Item在Spider中被收集之后,它将会被传递到Item Pipeline,这些Item Pipeline组件按定义的顺序处理Item. 每个Item Pipeline ...
- 第三天,爬取伯乐在线文章代码,编写items.py,保存数据到本地json文件中
一. 爬取http://blog.jobbole.com/all-posts/中的所有文章 1. 编写jobbole.py简单代码 import scrapy from scrapy. ...
- 爬取伯乐在线文章(二)通过xpath提取源文件中需要的内容
爬取说明 以单个页面为例,如:http://blog.jobbole.com/110287/ 我们可以提取标题.日期.多少个评论.正文内容等 Xpath介绍 1. xpath简介 (1) xpath使 ...
随机推荐
- 0级搭建类008-Ubuntu Server Linux安装 (18.04.2) 公开
项目文档引子系列是根据项目原型,制作的测试实验文档,目的是为了提升项目过程中的实际动手能力,打造精品文档AskScuti. 项目文档引子系列目前不对外发布,仅作为博客记录.如学员在实际工作过程中需提前 ...
- BZOJ 3698: XWW的难题
Description XWW是个影响力很大的人,他有很多的追随者.这些追随者都想要加入XWW教成为XWW的教徒.但是这并不容易,需要通过XWW的考核. XWW给你出了这么一个难题:XWW给你一个N ...
- C++&C语言 -> //有一头母牛,它每年年初生一头小母牛。每头小母牛从第四个年头开始,每年年初也生一头小母牛。请编程实现在第n年的时候,共有多少头母牛?
/* a b c d 1 5 5 ...
- (转)Android访问webservice
纠正网上乱传的android调用Webservice方法. 1.写作背景: 笔者想实现android调用webservice,可是网上全是不管对与错乱转载的文章,结果不但不能解决问题,只会让人心烦 ...
- Wormholes POJ - 3259 spfa判断负环
//判断负环 dist初始化为正无穷 //正环 负无穷 #include<iostream> #include<cstring> #include<queue> # ...
- vjudge 最大公约数GCD 直接求最大共约束和最小公倍数的指令
原题链接https://vjudge.net/contest/331993#problem/C 输入2个正整数A,B,求A与B的最大公约数. Input2个数A,B,中间用空格隔开.(1<= A ...
- php私有组件以及创建自己的composer私有组件(packagist+git+composer)
1.私有组件 大多数时候我们使用的都是公开可用的开源组件,但有时候如果公司使用内部开发的PHP组件,而基于许可证和安全方面的问题不能将其开源,就需要使用私有组件.对Composer而言,这是小菜一碟. ...
- 机器学习作业(七)非监督学习——Matlab实现
题目下载[传送门] 第1题 简述:实现K-means聚类,并应用到图像压缩上. 第1步:实现kMeansInitCentroids函数,初始化聚类中心: function centroids = kM ...
- eureka server 单节点与多节点部署演示
环境搭建 目录结构(ad-eureka为子模块) --ad-spring-cloud --ad-eureka --pom.xml --pom.xml 主pom.xml <?xml version ...
- python基础数据类型整理
一.数据类型 (一).小技巧 1.PyCharm:选中多行,按"Ctrl+/"可批量注释掉 (二).字符串 1.startswith(str,[,start][,end]) #判断 ...