SpringBoot专题1----springboot与mybatis的完美融合
springboot大家都知道了,搭建一个spring框架只需要秒秒钟。下面给大家介绍一下springboot与mybatis的完美融合:
首先:创建一个名为springboot-mybatis的maven项目,记住:一定要maven哦,不懂maven的可以自己恶补一下maven知识,这里就不介绍maven了。
下面给出pom.xml的完整配置:
 <?xml version="1.0" encoding="UTF-8"?>

 <project xmlns="http://maven.apache.org/POM/4.0.0"

          xmlns:xsi="http://www.w3.org/2001/XMLSchema-instance"

          xsi:schemaLocation="http://maven.apache.org/POM/4.0.0 http://maven.apache.org/xsd/maven-4.0.0.xsd">

     <modelVersion>4.0.0</modelVersion>

     <groupId>springboot-mybatis</groupId>

     <artifactId>springboot-mybatis</artifactId>

     <version>1.0.0</version>

     <packaging>war</packaging>

     <name>springBoot-mybatis</name>

     <description>Spring Boot project</description>

     <parent>

         <groupId>org.springframework.boot</groupId>

         <artifactId>spring-boot-starter-parent</artifactId>

         <version>1.3.2.RELEASE</version>

         <relativePath/>

     </parent>

     <properties>

         <project.build.sourceEncoding>UTF-8</project.build.sourceEncoding>

         <java.version>1.8</java.version>

     </properties>

     <dependencies>

         <dependency>

             <groupId>org.springframework.boot</groupId>

             <artifactId>spring-boot-starter</artifactId>

         </dependency>

         <dependency>

             <groupId>org.springframework.boot</groupId>

             <artifactId>spring-boot-starter-test</artifactId>

             <scope>test</scope>

         </dependency>

         <dependency>

             <groupId>org.mybatis.spring.boot</groupId>

             <artifactId>mybatis-spring-boot-starter</artifactId>

             <version>1.1.1</version>

         </dependency>

         <dependency>

             <groupId>org.springframework.boot</groupId>

             <artifactId>spring-boot-starter-web</artifactId>

         </dependency>

         <dependency>

             <groupId>mysql</groupId>

             <artifactId>mysql-connector-java</artifactId>

             <version>5.1.21</version>

         </dependency>

     </dependencies>

     <build>

         <plugins>

             <plugin>

                 <groupId>org.springframework.boot</groupId>

                 <artifactId>spring-boot-maven-plugin</artifactId>

             </plugin>

             <plugin>

                 <groupId>org.apache.maven.plugins</groupId>

                 <artifactId>maven-surefire-plugin</artifactId>

                 <configuration>

                     <skip>true</skip>

                 </configuration>

             </plugin>

         </plugins>

     </build>

 </project>
之后创建一个启动类:
 package org.shenlan;

 import org.springframework.boot.SpringApplication;

 import org.springframework.boot.autoconfigure.SpringBootApplication;

 /**

  * Created by wangwei on 2016/9/2.

  */

 @SpringBootApplication

 public class Application {

     public static void main(String[] args){

         SpringApplication.run(Application.class,args);

     }

 }
这样一个完整的springboot项目就完成了,是不是很简单。
接下来就可以整理与mybatis的东东了。
首先,创建配置文件:application.properties
 spring.datasource.url=jdbc:mysql://localhost:3306/test

 spring.datasource.username=root

 spring.datasource.password=root

 spring.datasource.driver-class-name=com.mysql.jdbc.Driver

 server.port=1111
这里server.port=1111是定义了改项目的端口,默认的是8080.
然后,定义一个java的实体类:
 package org.shenlan.web;

 /**

  * Created by wangwei on 2016/9/2.

  */

 public class User {

     private Integer id;

     private String name;

     private Integer age;

     public Integer getId() {

         return id;

     }

     public void setId(Integer id) {

         this.id = id;

     }

     public String getName() {

         return name;

     }

     public void setName(String name) {

         this.name = name;

     }

     public Integer getAge() {

         return age;

     }

     public void setAge(Integer age) {

         this.age = age;

     }

 }
这里实体类的字段要和数据库的字段对应起来,不然就要取别名了。
之后,定义一个dao的接口:
 package org.shenlan.web;

 import org.apache.ibatis.annotations.Mapper;

 import org.apache.ibatis.annotations.Param;

 import org.apache.ibatis.annotations.Select;

 /**

  * Created by Administrator on 2016/9/2.

  */

 @Mapper

 public interface UserMapper {

     @Select("select * from user where name = #{name}")

     User findUserByName(@Param("name")String name);

 }
@Mapper就是我们要与mybatis融合关键的一步,只要一个注解就搞定了。
哈哈哈,最后我们就来写一个测试类吧:
 package org.shenlan.web;

 import org.springframework.beans.factory.annotation.Autowired;

 import org.springframework.web.bind.annotation.RequestMapping;

 import org.springframework.web.bind.annotation.ResponseBody;

 import org.springframework.web.bind.annotation.RestController;

 /**

  * Created by wangwei on 2016/9/2.

  */

 @RestController

 @RequestMapping({"/home"})

 public class UserController {

     @Autowired

     UserMapper userMapper;

     @RequestMapping(value = "/user")

     @ResponseBody

     public String user(){

         User user = userMapper.findUserByName("王伟");

         return user.getName()+"-----"+user.getAge();

     }

 }
@RestController是对应的restful风格的控制器,@RequestMapping里面可以对应一个数组哦
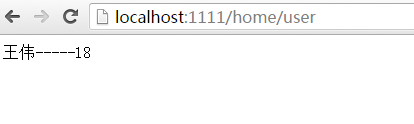
打开浏览器,输入:http://localhost:1111/home/user
效果如下:
上面的对于简单的sql确实是非常的容易搞定,但是对于复杂的sql还是要到专门的地方去写啊!
接下来就为大家说说如何配置mapper.xml.
mybatis:

  type-aliases-package: com.wangsu_bi.web.entity

  config-location: classpath:mybatis/mybatis-config.xml

  mapper-locations: classpath:mybatis/mapper/*.xml
以上是在application.yml中配置的mybatis属性:
mybatis-config.xml的结构如下:
<?xml version="1.0" encoding="UTF-8"?>

<!DOCTYPE configuration PUBLIC "-mybatis.org//DTD Config 3.0//EN" "http://mybatis.org.dtd/mybatis-3-config.dtd">

<configuration>

    <typeAliases>

        <typeAlias alias="Integer" type="java.lang.Integer" />

        <typeAlias alias="Long" type="java.lang.Long" />

        <typeAlias alias="HashMap" type="java.util.HashMap" />

        <typeAlias alias="LinkedHashMap" type="java.util.LinkedHashMap" />

        <typeAlias alias="ArrayList" type="java.util.ArrayList" />

        <typeAlias alias="LinkedList" type="java.util.LinkedList" />

    </typeAliases>

</configuration>
这样就ok啦。就可以在mapper.xml中疯狂的写我们所需要的SQL啦!
本博客涉及的项目的地址:https://github.com/shenlanzhizunjustwangwei/springBoot
希望大家喜欢。
SpringBoot专题1----springboot与mybatis的完美融合的更多相关文章
- Springboot 2.0.4 整合Mybatis出现异常Property 'sqlSessionFactory' or 'sqlSessionTemplate' are required
在使用Springboot 2.0.4 整合Mybatis的时候出现异常Property 'sqlSessionFactory' or 'sqlSessionTemplate' are require ...
- SpringBoot:4.SpringBoot整合Mybatis实现数据库访问
在公司项目开发中,使用Mybatis居多.在 SpringBoot:3.SpringBoot使用Spring-data-jpa实现数据库访问 中,这种jpa风格的把sql语句和java代码放到一起,总 ...
- JAVA - SpringBoot项目引用generator生成 Mybatis文件
JAVA - SpringBoot项目引用generator生成 Mybatis文件 在spring官网https://start.spring.io/自动生成springboot项目,这里选择项目 ...
- SpringBoot系列(五)Mybatis整合完整详细版
SpringBoot系列(五)Mybatis整合 目录 mybatis简介 项目创建 entity dao service serviceImpl mapper controller 1. Mybat ...
- SpringBoot数据访问之整合mybatis注解版
SpringBoot数据访问之整合mybatis注解版 mybatis注解版: 贴心链接:Github 在网页下方,找到快速开始文档 上述链接方便读者查找. 通过快速开始文档,搭建环境: 创建数据库: ...
- SpringBoot学习(八)-->SpringBoot之过滤器、监听器
本文将直接使用@WebFilter和@WebListener的方式,完成一个Filter 和一个 Listener. 过滤器(Filter)和 监听器(Listener)的注册方法和 Servlet ...
- SpringBoot基础系列-SpringBoot配置
原创作品,可以转载,但是请标注出处地址:https://www.cnblogs.com/V1haoge/p/9990680.html SpringBoot基础系列-SpringBoot配置 概述 属性 ...
- springboot(一).初识springboot以及基本项目搭建
初识springboot 以及基本项目搭建 由于新的项目需要搭建后台框架,之前的springmvc架构也使用多次,在我印象中springboot的微服务架构更轻量级更容易搭建,所以想去试试spring ...
- SpringBoot(19)---SpringBoot整合Apollo
SpringBoot(19)---SpringBoot整合Apollo 有关Apollo之前已经写了两篇文章: 1.[Apollo](1)--- Apollo入门介绍篇 2.[Apollo](2)-- ...
随机推荐
- jqchart 使用的几点小技巧
官网demo地址:http://www.jqchart.com/jquery/chart 简单示例: [javascript] $('#jqChart').jqChart({ title: 'jqCh ...
- sql自动增长标识(转载)
sql自动增长标识 对于一个设了自动增长标识的数据表来说,它的字段的值是由数据库自动设置的:这在导数据时很麻烦. 当我们导数据时,我们往往想想将标识字段的数据也导进来,怎么办呢? 方法有两 ...
- Hive查询表,返回数据全是NULL
情况1: hive> create table users(id int, name string); hive> load data local inpath '/usr/local/u ...
- builtroot make menuconfig流程
本文主要介绍一下,buildroot(buildroot-2018.02.1)的make menuconfig.众所周知,在我们执行menuconfig时,会生成一个图形化界面,然后进行相关的配置.同 ...
- 正则过滤html的标签
$('#Text').find('br').remove();//移除br标签 let content = $('#smsText').html().replace(/ /g, ' ').replac ...
- 项目红色感叹号eclipse因Web App Libraries中的jar包missing导致项目红色感叹号
症状: 如题 分析: 修改.更换或者删除了WEB-INF/lib中的jar包 解决方案: 右击项目>build path>Libraries 直接remove Web App Librar ...
- 关于EasyUI的Layout总结
版权声明:本文为博主原创文章,未经博主允许不得转载. 1.layout以html标签方式建立的 <div id="content" region="center&q ...
- 木马suppoie 处理的几个思路 木马文件的权限所有者 属主数组 定时任务 目录权限
木马suppoie 处理的几个思路 木马文件的权限所有者 属主数组 定时任务 目录权限
- spring boot +mybatis分页查询
这是spring boot集合mybatis的分页查询. pom依赖: <!-- 分页插件 --> <dependency> <groupId>com.github ...
- git 入门一(初识)
分布式版本控制系统 & 集中式版本控制系统 分布式版本控制系统( Distributed Version Control System)在这类系统中,像 Git,Mercurial,Baz ...