从零开始学 Web 之 HTML(三)表单
大家好,这里是「 Daotin的梦呓 」从零开始学 Web 系列教程。此文首发于「 Daotin的梦呓 」公众号,欢迎大家订阅关注。在这里我会从 Web 前端零基础开始,一步步学习 Web 相关的知识点,期间也会分享一些好玩的项目。现在就让我们一起进入 Web 前端学习的冒险之旅吧!
一、表格
1、表格的结构
表格的标准结构:
 1<table>
 2  <thead>
 3    <tr>
 4    <td></td>
 5    <td></td>
 6    </tr>
 7  </thead>
 8
 9  <tbody>
10    <tr>
11    <td></td>
12    <td></td>
13    </tr>
14  </tbody>
15
16  <tfoot>
17    <tr>
18    <td></td>
19    <td></td>
20    </tr>
21  </tfoot>
22</table>
PS:写
<thead> <tbody> <tfoot>对SEO更好,不写也没问题。
2、常见写法
 1<table width="300px" height="300px" border="5px" cellspacing="10px" cellpadding="0" bgcolor="pink" align="center" >
 2        <tr>
 3            <td>窗外的麻雀</td>
 4            <td>窗外的麻雀</td>
 5            <td>窗外的麻雀</td>
 6        </tr>
 7        <tr>
 8            <td>窗外的麻雀</td>
 9            <td>窗外的麻雀</td>
10            <td>窗外的麻雀</td>
11        </tr>
12        <tr>
13            <td>窗外的麻雀</td>
14            <td>窗外的麻雀</td>
15            <td>窗外的麻雀</td>
16        </tr>
17    </table>
width:宽度
height:高度
border:边框宽度
cellspacing:单元格与单元格的距离
cellpadding:内容距边框的距离
bgcolor:表格背景颜色
align=”left | right | center”
如果直接给表格用align=”center” 表格居中
如果给tr或者td使用 ,tr或者td内容居中。
3、快速建表格的方式
webstorm 下的快捷方式:
table>tr3>td5 + tab键 <!-- 建立3行5列的表格 -->
PS:sublime 下需要安装 Emmet 插件。
4、表头
<caption></caption>:位于 table 标签和 tr 标签之间
 1<table>
 2        <caption>表头</caption>
 3        <tr>
 4            <td></td>
 5            <td></td>
 6            <td></td>
 7        </tr>
 8        <tr>
 9            <td></td>
10            <td></td>
11            <td></td>
12        </tr>
13        <tr>
14            <td></td>
15            <td></td>
16            <td></td>
17        </tr>
18    </table>
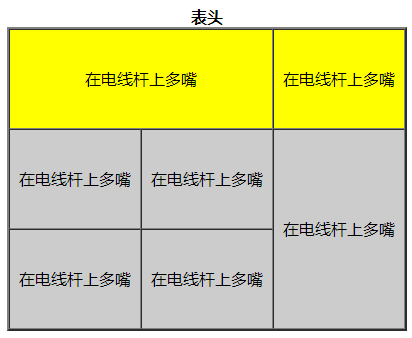
5、单元格合并
<td colspan=“2”>填写内容</td>:合并同一行的单元格,合并行数为2
<td rowspan=“3”>填写内容</td> :合并同一列的单元格,合并列数为3
 1<table border="2" cellspacing="0" width="400" height="100" align="center">
 2    <caption><strong>表头</strong></caption>
 3        <tr align="center" bgcolor="yellow" height="100">
 4            <td colspan="2">在电线杆上多嘴</td>
 5            <!-- <td><strong>2</strong></td> -->
 6            <td>在电线杆上多嘴</td>
 7        </tr>
 8
 9        <tr align="center" bgcolor="#CCC" height="100">
10            <td>在电线杆上多嘴</td>
11            <td>在电线杆上多嘴</td>
12            <td rowspan="2">在电线杆上多嘴</td>
13        </tr>
14
15        <tr align="center" bgcolor="#CCC" height="100">
16            <td>在电线杆上多嘴</td>
17            <td>在电线杆上多嘴</td>
18            <!-- <td><strong>3</strong></td> -->
19        </tr>
20    </table>


6、表格标题
1<tr>
2  <th></th>
3  <th></th>
4  <th></th>
5</tr>
注意:将 td 改为 th
特点:标题的文字自动加粗水平居中对齐
7、边框颜色
1<table bordercolor=""></table>
8、内容对齐方式
1<tr>
2    <td valign="bottom">张三</td>
3</tr>
valign="top "内容顶部对齐
valign=" middle"内容居中对齐
valign="bottom"内容底部对齐
9、补充:细线表格
 1<table width="500" height="300" bgcolor="green" cellspacing="1" >
 2        <tr bgcolor="white">
 3            <td></td>
 4            <td></td>
 5            <td></td>
 6            <td></td>
 7        </tr>
 8        <tr bgcolor="white">
 9            <td></td>
10            <td></td>
11            <td></td>
12            <td></td>
13        </tr>
14        <tr bgcolor="white">
15            <td></td>
16            <td></td>
17            <td></td>
18            <td></td>
19        </tr>
20        <tr bgcolor="white">
21            <td></td>
22            <td></td>
23            <td></td>
24            <td></td>
25        </tr>
26    </table>
思路:将整个 table 的背景设置为边框的颜色,然后填充表格为其他的颜色,设置边框距边框的距离 cellpadding 为0,单元格与单元格之间的距离 cellspacing 为细线边框的宽度,最后看到的细线边框其实是背景颜色。
二、表单
1、组成
文本(提示信息)
表单控件

- 表单域
上面提示信息和表单控件等所在的区域 。
1<form action="1.php" method="get"></form>
action:处理信息,就是这里面如果有信息提交了,将由什么来处理。method=”get | post”
get:通过地址栏提供(传输)信息(可以在地址栏里看到你输入的账号和密码),安全性差。 post :通过文件例如 1.php 来处理信息,安全性高。
2、文本输入框
1<input type="text"
2    name="username"
3    maxlength="6"
4    readonly="readonly"
5    disabled="disabled"
6    value="用户名">
type:类型,输入的是文本内容
name:输入框的名字
maxlength:限定输入文本长度
readonly:文本框只读
disabled:文本框未激活
value:输入框中的默认内容placeholder:引导文字,当文本框无文字并且未获取鼠标焦点时显示引导文字,当获取焦点或者输入文字时隐藏引导文字。
3、密码输入框
1<input type="password" name="pwd">
PS:文本输入框的所有属性对密码输入框都有效
4、单选框
1<input type="radio" name="gender" checked="checked">男
checked=”checked”设置默认选择项。PS:当有多个单选框是如何设置只能有一个被选中?
只有将 name 的值设置相同的时候,才能实现单选效果。
5、下拉列表
1<select multiple="multiple">
2  <optgroup lable="分组名称">
3    <option>下拉列表选项</option>
4    <option selected="selected">下拉列表选项</option>
5  </optgroup>
6</select>
multiple=”multiple”: 将下拉列表设置为多选selected=”selected”:设置默认选中项目<optgroup></optgroup>对下拉列表进行分组。Label="分组名称"分组名称。
6、多选框
1<input type="checkbox" checked="checked">
checked=”checked”设置默认选中项
7、多行文本框
1<textarea cols="130" rows="10"></textarea>
cols:控制输入字符的长度
rows:控制输入字符的行数
8、文本上传控件
1<input type="file">
9、文件提交按钮
1<input type="submit">
可以实现信息提交功能
10、普通按钮
1<input type="button" value="普通按钮">
不能提交信息,一般配合 js 按钮点击事件使用 。
11、图片按钮
1<input type="image" src="图片路径">
图片按钮可实现信息提交功能
12、重置按钮
1<input type="reset">
将信息重置到默认状态
13、表单信息分组
1<form action="1.php" method="post">
2    <fieldset>
3        <legend>分组1</legend>
4    </fieldset>
5    <fieldset>
6        <legend>分组2</legend>
7    </fieldset>
8</form>
<fieldset></fieldset>:对表单信息分组
<legend></legend>:表单信息分组名称
14、html5 补充表单控件
1<input type="url">               <!-- 网址控件 -->
2<input type="date">              <!-- 日期控件 -->
3<input type="time">              <!-- 时间控件 -->
4<input type="email">             <!-- 邮件控件 -->
5<input type="number" step="5">   <!-- 数字控件 -->
6<input type="range" step="50">   <!-- 滑块控件 -->
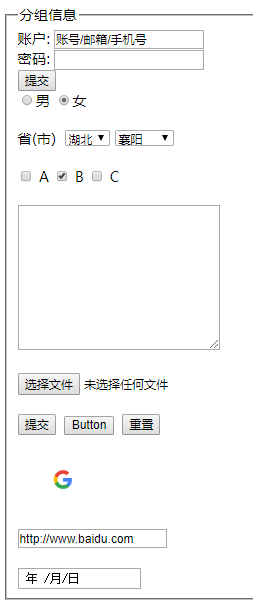
15、综合示例
1<!-- 表单域 -->
2 <form action="1.php" method="post">
3 <!-- 对表单信息分组 -->
4 <fieldset>
5 <!-- 表单信息分组名称 -->
6 <legend>分组信息</legend>
7 <!-- 文本输入框 -->
8 账户: <input type="text" name="User" value="账号/邮箱/手机号">
9 <br>
10 <!-- 密码输出框 -->
11 密码: <input type="password" name="Pwd">
12 <br>
13 <!-- 文件提交按钮 -->
14 <input type="submit">
15 <br>
16 <!-- 单选框 -->
17 <input type="radio" name="gender">男
18 <input type="radio" name="gender" checked="checked">女
19
20 <br>
21 <br>
22 <!-- 下拉列表 -->
23 省(市) <select>
24 <!-- 下拉列表选项 -->
25 <option value="">北京</option>
26 <option value="">山东</option>
27 <option value="">广东</option>
28 <option value="">福建</option>
29 <option value="">河南</option>
30 <option value="" selected="selected">湖北</option>
31 </select>
32
33 <select>
34 <!-- 对下拉列表分组 -->
35 <optgroup label="湖北省">
36 <option value="">武汉</option>
37 <option value="" selected="selected">襄阳</option>
38 <option value="">天门</option>
39 <option value="">荆州</option>
40 <option value="">仙桃</option>
41 </optgroup>
42 </select>
43
44 <br><br>
45 <!-- 多选框 -->
46 <input type="checkbox"> A
47 <input type="checkbox" checked="checked"> B
48 <input type="checkbox"> C
49
50 <br><br>
51 <!-- 多行文本框 -->
52 <textarea cols="30" rows="10"></textarea><br><br>
53 <!-- 文本上传控件 -->
54 <input type="file"><br><br>
55
56 <input type="submit">
57 <!-- 普通按钮 -->
58 <input type="button" value="Button">
59 <!-- 重置按钮 -->
60 <input type="reset"><br><br>
61 <!-- 图片按钮 -->
62 <input type="image" src="1.png" width="100"><br><br>
63 <!-- 网址控件 -->
64 <input type="url" value="http://www.baidu.com"><br><br>
65 <!-- 日期控件 -->
66 <input type="date">
67
68 </fieldset>
69 </form>

三、标签语义化
好的语义化的网站标准就是去掉样式表文件(css文件)之后,结构依然很清晰。
根据内容的结构化(内容语义化),选择合适的标签(代码语义化)
- 有什么用?
1、网页结构合理。
2、有了良好的结构和语义你的网页内容自然容易被搜索引擎抓取。
3、方便其他设备解析(如屏幕阅读器、盲人阅读器、移动设备)。
4、便于团队开发和维护。
- 那怎么做?
1、尽可能少的使用无语义的标签div和span。(比如使用p是段落标签)
2、在语义不明显时,既可以使用div或者p时,尽量用p, 因为p在默认情况下有上下间距,对兼容特殊终端有利。
3、不要使用纯样式标签,如:b、font、u 等,改用 css 设置。
4、需要强调的文本,可以包含在 strong 或者 em 标签中。

从零开始学 Web 之 HTML(三)表单的更多相关文章
- 从零开始学 Web 之 HTML5(二)表单,多媒体新增内容,新增获取操作元素,自定义属性
大家好,这里是「 从零开始学 Web 系列教程 」,并在下列地址同步更新...... github:https://github.com/Daotin/Web 微信公众号:Web前端之巅 博客园:ht ...
- 从零开始学 Web 之 Ajax(三)Ajax 概述,快速上手
大家好,这里是「 从零开始学 Web 系列教程 」,并在下列地址同步更新...... github:https://github.com/Daotin/Web 微信公众号:Web前端之巅 博客园:ht ...
- 从零开始学 Web 之 HTML5(三)网络监听,全屏,文件读取,地理定位接口,应用程序缓存
大家好,这里是「 从零开始学 Web 系列教程 」,并在下列地址同步更新...... github:https://github.com/Daotin/Web 微信公众号:Web前端之巅 博客园:ht ...
- 从零开始学 Web 之 移动Web(三)Zepto
大家好,这里是「 从零开始学 Web 系列教程 」,并在下列地址同步更新...... github:https://github.com/Daotin/Web 微信公众号:Web前端之巅 博客园:ht ...
- 从零开始学 Web 之 CSS(三)链接伪类、背景、行高、盒子模型、浮动
大家好,这里是「 Daotin的梦呓 」从零开始学 Web 系列教程.此文首发于「 Daotin的梦呓 」公众号,欢迎大家订阅关注.在这里我会从 Web 前端零基础开始,一步步学习 Web 相关的知识 ...
- 从零开始学 Web 之 JavaScript(三)函数
大家好,这里是「 Daotin的梦呓 」从零开始学 Web 系列教程.此文首发于「 Daotin的梦呓 」公众号,欢迎大家订阅关注.在这里我会从 Web 前端零基础开始,一步步学习 Web 相关的知识 ...
- 从零开始学 Web 之 BOM(三)offset,scroll,变速动画函数
大家好,这里是「 从零开始学 Web 系列教程 」,并在下列地址同步更新...... github:https://github.com/Daotin/Web 微信公众号:Web前端之巅 博客园:ht ...
- 从零开始学 Web 之 JS 高级(三)apply与call,bind,闭包和沙箱
大家好,这里是「 从零开始学 Web 系列教程 」,并在下列地址同步更新...... github:https://github.com/Daotin/Web 微信公众号:Web前端之巅 博客园:ht ...
- 从零开始学 Web 之 jQuery(三)元素操作,链式编程,动画方法
大家好,这里是「 从零开始学 Web 系列教程 」,并在下列地址同步更新...... github:https://github.com/Daotin/Web 微信公众号:Web前端之巅 博客园:ht ...
随机推荐
- [leetcode]98. Validate Binary Search Tree验证二叉搜索树
Given a binary tree, determine if it is a valid binary search tree (BST). Assume a BST is defined as ...
- sql-多表查询
一:外连接 1.左外连接(left join) select * from A left join B on A.id=B.a_id 结果如下 很明显,A表的所有数据都显示出来了 ...
- FastFDS基础
1. FastDFS介绍 FastDFS( Fast Distributed file system)是一款轻量级的.高性能的.阿里巴巴开源的分布式文件系统.该系统的作者是余庆 (happyfish1 ...
- 我的java学习之旅--一些基础
(因为我粗略学过C,C++,Python,了解过他们的一些语法,所以为了使得java的入门更为顺畅,便会忽略一些和C语法相类似的地方,着重点明一些java自己的特色之处.也减轻一下自己写文字的负担.) ...
- linux就该这么学,第五课,
今天讲的比较难理解,要重预习和复习 今天讲了2个多小进,主要讲了SHELL,shell的组成:第一行为脚本声明 #!/bin/bash ,第二行为脚本的注释信息,第三为 脚本的执行语句 接收用户参 ...
- linux批量修改文件中包含字符串的查找替换
find -name "*.env" | xargs perl -pi -e 's|\babcdefg\b|hahaha|g' .env 文件中abcdef 改为hahaha
- Spring 框架XML文件的配置文件
<?xml version="1.0" encoding="UTF-8"?><beans xmlns:xsi="http://www ...
- linux_文件夹实现挂载(必须在同一网段)
将外部想要挂载传输的目录开启共享文件夹 首先进行安装 yum install nfs-utils rpcbind yum install nfs* 建立想要挂载的目录 查看可以执行挂载的目录有哪些 s ...
- MFC源码解读(一)最原始一个MFC程序,手写不用向导
从这一篇开始,详细记录一下MFC的源码解读 四个文件,分别为: stdafx.h,stdafx.cpp,hello.h,hello.cpp 代码如下: //stdafx.h #include < ...
- EF6 学习笔记(五):数据库迁移及部署
EF6学习笔记总目录:ASP.NET MVC5 及 EF6 学习笔记 - (目录整理) 原文地址:Code First Migrations and Deployment 原文主要讲两部分:开发环境下 ...

