14.Nginx四层负载均衡
1.七层负载均衡:
根据url 调度不同的集群 url.cheng.com10.0.0.510.0.0.7 /pass10.0.0.8 /user1.web01和web02配置 (只不过代码不一样)[root@web01 conf.d]# cat url.cheng.com.confserver {listen 80;server_name url.cheng.com;root /code;location / {index index.html;}}[root@web01 code]# cat index.htmlHello PC.....[root@web02 code]# cat index.htmlHello phone....2.lb【10.0.0.5】配置[root@lb01 conf.d]# cat proxy_url.cheng.com.confupstream user {server 172.16.1.8;}upstream pass {server 172.16.1.7;}server {listen 80;server_name url.cheng.com;location /user {proxy_pass http://user/;include proxy_params;}location /pass {proxy_pass http://pass/;include proxy_params;}}3.检测语法并重启nginx服务[root@lb01 ~]# nginx -t[root@lb01 conf.d]# systemctl restart nginx
2.在使用proxy_pass反向代理时,最后结尾添加/和不添加/有什么区别?
查看区别详细描述链接
1.不添加 /用户如果请求: http://url.cheng.com/user会被代理至后端: http://url.cheng.com/user2.添加 /用户如果请求: http://url.cheng.com/user会被代理至后端: http://url.cheng.com/
3.根据设备调度不同的集群( 浏览器 ) ( 手机 )
10.0.0.5--------》lb【负载均衡】10.0.0.7 pc10.0.0.8 phone
1.所有的web【01-02】都需要配置 ( 代码不一样)[root@web01 conf.d]# cat agent.cheng.com.confserver {listen 80;server_name agent.cheng.com;root /code;location / {index index.html;}}2.代理配置【10.0.0.5】[root@lb01 conf.d]# cat proxy_agent.cheng.com.confupstream pc {server 172.16.1.7:80;}upstream phone {server 172.16.1.8:80;}server {listen 80;server_name agent.cheng.com;location / {#默认都走PCproxy_pass http://pc;include proxy_params;default_type text/html;charset utf-8;#如果是Android或iphone,则走phoneif ( $http_user_agent ~* "android|iphone|iPad") {proxy_pass http://phone;}#如果是IE浏览器,要么拒绝访问,要么返回一个正版的浏览器下载界面if ( $http_user_agent ~* "Trident"){return 200 '<a href="https://www.cnblogs.com/yinwu/p/11569452.html" target="_blank">点击访问正版</a>';}}}
4.四层负载均衡
1、什么是四层 OSI 传输层 TCP/IP UDP/TCP
四层是基于转发方式:
2、四层负载均衡使用场景
1.四层负载均衡 + 七层负载均衡
2.dns + 多机房 + 四层负载均衡+七层负载均衡
3.SOA 松耦合架构
登录 passport.jd.com
注册 reg.jd.com
商品详情 pro.jd.com
4.基于端口的转发
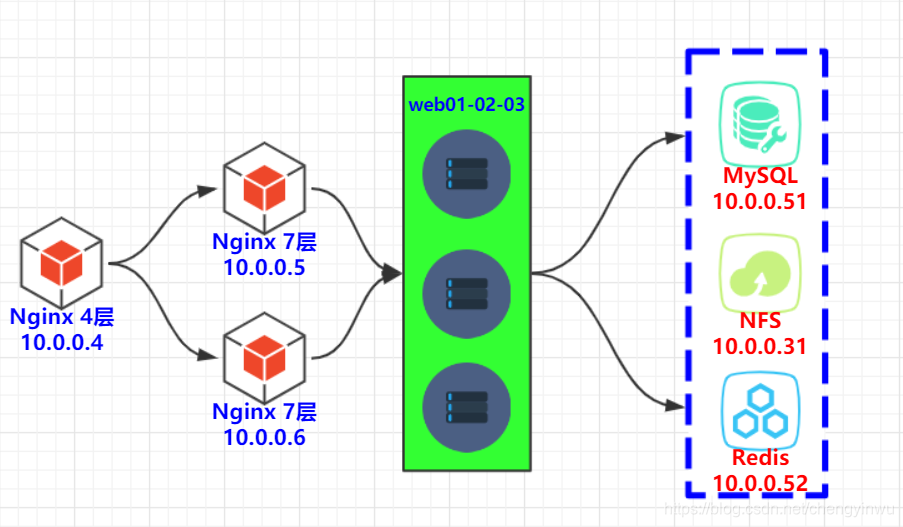
5.Nginx四层配置+nginx七层+web集群--->场景实战
环境准备:

实战操作:
1.服务器10.0.0.6安装nginx[root@lb02 ~]# yum install nginx2.将10.0.0.5(七层负载)这台机器nginx下的所有文件分别推送至10.0.0.6和10.0.0.4[root@lb01 ~]# scp -rp /etc/nginx root@172.16.1.6:/etc/[root@lb01 ~]# scp -rp /etc/nginx root@172.16.1.4:/etc/3.检测并重启nginx服务[root@lb02 ~]# nginx -t[root@lb02 ~]# systemctl restart nginx4.将zh.cheng.com域名作解析,测试10.0.0.6七层负载是否配置?5.将所有域名做解析至10.0.0.46.定义四层配置文件路径:[root@lb03 ~]# vim /etc/nginx/nginx.confinclude /etc/nginx/conf.c/*.conf;7.进行初始化操作 【注意:若不删除七层负载的配置,无法正常使用四层,因为都是占用80端口导致nginx启动失败】[root@lb03 ~]# rm -f /etc/nginx/conf.d/default.conf[root@lb03 ~]# mkdir /etc/nginx/conf.c8.配置四层负载均衡[root@lb03 conf.c]# cat all.confstream {upstream zh {server 172.16.1.5:80;server 172.16.1.6:80;}server {listen 80;proxy_pass zh;proxy_timeout 3s; #超时时间proxy_connect_timeout 3s; #连接时间}}[root@lb03 conf.c]# nginx -t[root@lb03 conf.c]# systemctl restart nginx
9.通过浏览器访问以及查看5和6的日志进行验证

通过以下日志我们可以看出轮询的效果!!!


nginx是1.9版本以后才引入的四层负载均衡
stream模块实现,但stream不能出现在http层
--with-stream
-with-stream_ssl_module
-with-stream_realip_module
1.stream模块介绍:
stream {upstream backend {hash $remote_addr consistent;server backend1.example.com:12345 weight=5;server 127.0.0.1:12345 max_fails=3 fail_timeout=30s;server unix:/tmp/backend3;}server {listen 12345;proxy_connect_timeout 1s;proxy_timeout 3s;proxy_pass backend;}}
2.基于端口的转发:
需求: 用户连接10.0.0.4的6666端口,其实连接的是172.16.1.7的22/TCP端口
需求: 用户连接10.0.0.4的5555端口,其实连接的是172.16.1.51的3306/TCP端口
1.将7和51这台机器的WAN口断掉2.配置四层负载[root@lb03 conf.c]# cat all.confstream {upstream zh {server 172.16.1.5:80;server 172.16.1.6:80;}upstream ssh {server 172.16.1.7:22;}upstream mysql {server 172.16.1.51:3306;}server {listen 6666;proxy_pass ssh;}server {listen 5555;proxy_pass mysql;}server {listen 80;proxy_pass zh;proxy_timeout 3s; #超时时间proxy_connect_timeout 3s; #连接时间}}3.测试转发后的端口是否能正常登陆[root@lb03 conf.c]# ssh root@172.16.1.7 6666 ------>>>可正常登陆


4.四层负载均衡怎么记录日志 必须在stream层,不能出现在http层?
log_format proxy '$remote_addr - [$time_local] $status $protocol'' "$upstream_addr" "$upstream_bytes_sent" "$upstream_connect_time"' ;access_log /var/log/nginx/tcp.log proxy;

6.配置阿里云四层负载均衡 实现端口转发
公网666转到内网的22
公网80 转到内网的多台7层负载均衡的80
- 根据url调度
- 根据设备调度
- 四层负载均衡
- 四层负载均衡使用场景
4+7
dns+4+7
SOA - 四层+七层负载的配置
- 四层转发的配置
- 四层日志记录
- 阿里云四层负载
7.架构图

14.Nginx四层负载均衡的更多相关文章
- 14、Nginx四层负载均衡
1.Nginx四层负载均衡基本概述 1.1.什么是四层负载均衡 四层负载均衡基于传输层协议包来封装的(如:TCP/IP),那我们前面使用到的七层是指的应用层,它的组装在四层基础之上,无论四层还是七层都 ...
- nginx四层负载均衡配置
nginx四层负载均衡配置代理Mysql集群 环境如下: ip 192.168.6.203 Nginx ip 192.168.6.*(多台) Mysql 步骤一 查看Nginx是否安装stream模块 ...
- Nginx四层负载均衡概述
目录 Nginx四层负载均衡概述 什么是负载均衡 负载均衡应用场景 四层,七层集群架构 四层负载均衡总结 Nginx如何配置四层负载均衡 nginx四层负载均衡端口转发 Nginx四层负载均衡概述 什 ...
- Nginx四层负载均衡
目录 Nginx四层负载均衡概述 Nginx如何配置四层负载均衡 使用nginx四层负载均衡实现tcp的转发 Nginx四层负载均衡概述 什么是四层负载均衡 四层负载均衡是基于传输层协议包来封装的(如 ...
- 安装Nginx四层负载均衡
Nginx1.9开始支持tcp层的转发,通过stream实现的,而socket也是基于tcp通信. stream模块默认不安装的,需要手动添加参数:–with-stream,官方下载地址:downlo ...
- Nginx 四层负载均衡
目录 四层负载均衡概述 配置七层负载均衡 配置四层负载均衡 四层负载均衡概述 四层负载均衡是基于IP+端口的负载均衡,七层负载均衡是基于URL或主机名等应用层信息的负载均衡. 其他层负载均衡(转载): ...
- linux+asp.net core+nginx四层负载均衡
Linux Disibutaion:Ubuntu 16.04.1 LTS Web Server:Nginx.Kestrel 关于如何在linux中部署asp.net core我这里不再详细介绍,可以参 ...
- 配置Nginx四层负载均衡
nginx 支持TCP转发和负载均衡的支持 实现下面的架构: 看配置: #user nobody; worker_processes 1; #error_log logs/error.log; #er ...
- Nginx四层负载均衡1
1.Nginx负载均衡Redis 服务器 IP地址 作用 系统版本 Nginx代理服务器 10.0.0.38 负载均衡服务器 Rocky8.6 Redis服务器1 10.0.0.18 Redis服务器 ...
随机推荐
- F#周报2019年第38期
新闻 宣告.NET Core 3.0第一个候选版本 .NET Core 3.0第一个候选版本中ASP.NET Core与Blazor的更新 F#的就业市场情形如何 Finalization实现细节 G ...
- select2的多选下拉框上传
1.加入multiple: true,属性实现多选下拉框样式 2.下拉框选择后的值是数组类型不要经过数据处理才能进行表单提交 提交的时候原下拉框所在的标签不提交,而是将多选后的值存入页面中的一个隐藏标 ...
- 睡梦中被拉起来执行Spring事务
梦中惊醒 在Tomcat的线程池里,有这样一个线程,自打出生后,从来不去干活儿,有好多次走出线程池“这座大山”去看世界的机会,都被他拱手让给了弟兄们. 弟兄们给他取了个名字叫二师兄.没错,好吃懒做,饱 ...
- centos赋予访问权限
chmod u+x *.sh (代表授权现在所处的文件目录下的所有以:.sh的文件 启动tomcat:/usr/local/tomcat9/bin/shutdown.sh 关闭tomcat:/usr/ ...
- 线上CPU飙升100%问题排查,一篇足矣
一.引子 对于互联网公司,线上CPU飙升的问题很常见(例如某个活动开始,流量突然飙升时),按照本文的步骤排查,基本1分钟即可搞定!特此整理排查方法一篇,供大家参考讨论提高. 二.问题复现 线上系统突然 ...
- Audio Bit Depth Super-Resolution with Neural Networks
Audio Bit Depth Super-Resolution with Neural Networks 作者:Thomas Liu.Taylor Lundy.William Qi 摘要 Audio ...
- 使用webgl(three.js)搭建3D智慧园区、3D大屏,3D楼宇,智慧灯杆三维展示,3D灯杆,web版3D,bim管理系统——第六课
前言: 今年是建国70周年,爱国热情异常的高涨,为自己身在如此安全.蓬勃发展的国家深感自豪. 我们公司楼下为庆祝国庆,拉了这样的标语,每个人做好一件事,就组成了我们强大的祖国. 看到这句话,深有感触, ...
- Spring 梳理 - @Component
使用@Component注解,表示该类定义为Spring管理Bean,使用默认value(可选)属性表示Bean标识符.如果不指定标识符,默认为首字母小写类名.例如类UserController的标识 ...
- .net core 使用Rotativa创建PDF文档
一.下载Rotaiva 工具 = > NuGet包管理器 = > 管理解决方案的NuGet程序包 在打开的页面中搜索 Rotativa.AspNetCore 如下图: 选中红框的记 ...
- httpSession和Cookie
1.session在何时被创建一个常见的误解是以为session在有客户端访问时就被创建,然而事实是直到某server端程序调用 HttpServletRequest.getSession(true) ...
