日志分析平台ELK之搜索引擎Elasticsearch集群
一、简介
什么是ELK?ELK是Elasticsearch、Logstash、Kibana这三个软件的首字母缩写;其中elasticsearch是用来做数据的存储和搜索的搜索引擎;logstash是数据收集处理平台,它能够对特定的数据做分析、切词、收集、过滤等等处理,通常用于对日志的处理;kibana是用于把处理后的数据做可视化展示,提供一个web界面,方便我们去elasticsearch中检索想要的数据;elasticsearch是一个高度可扩展的开源全文搜索和分析引擎,它可实现数据的实时全文搜索,支持分布式实现高可用,提供RUSTfull风格的API接口,可以处理大规模日志数据;
elasticsearch是基于java语言在lucene的框架上进行开发实现;lucene是java中的一个成熟免费的开源搜索类库,本质上lucene只是提供编程API接口,要想使用lucene框架做搜索引擎,需要用户自行开发lucene的外壳,实现调用lucene的API接口实现全文检索和搜寻;elasticsearch就是以lucene为信息检索库的搜索引擎;
elasticsearch的基本组件
索引(index):文档容器,具有类似属性的文档的集合。类似关系型数据库中的表的概念;在elasticsearch中索引名称必须使用小写字母;
类型(type):类型是索引内部的逻辑分区,其意义完全取决于用户需求。一个索引内部可定义一个或多个类型。一搬来说,类型就是拥有相同的域的文档的预定义;
文档(document):文档是lucene索引和搜索的原子单位,它包含了一个或多个域。是域的容器,基于JSON格式表示。一个域由一个名字,一个或多个值组成;拥有多个值得域,通常我们称为多值域;
映射(mapping):原始内容存储为文档之前需要事先进行分析,例如切词、过滤掉某些词等;映射用于定义此分析机制该如何实现;除此之外,ES(elasticsearch)还为映射提供了诸如将域中的内容排序等功能。
elasticsearch集群组件
cluster:ES的集群标识为集群名称;默认为"elasticsearch"。节点就是靠此名字来决定加入到哪个集群中。一个节点只能属于于一个集群。
Node:运行了单个ES实例的主机即为节点。用于存储数据、参与集群索引及搜索操作。节点的标识靠节点名。
Shard:将索引切割成为的物理存储组件;但每一个shard都是一个独立且完整的索引;创建索引时,ES默认将其分割为5个shard,用户也可以按需自定义,创建完成之后不可修改。shard有两种类型primary shard和replica。Replica用于数据冗余及查询时的负载均衡。每个主shard的副本数量可自定义,且可动态修改。
ES Cluster工作过程
启动时,通过多播(默认)或单播方式在9300/tcp查找同一集群中的其它节点,并与之建立通信。集群中的所有节点会选举出一个主节点负责管理整个集群状态,以及在集群范围内决定各shards的分布方式。站在用户角度而言,每个node均可接收并响应用户的各类请求。
集群有状态:green, red, yellow;green表示集群状态健康,各节点上的shard和我们定义的一样;yellow表示集群状态亚健康,可能存在shard和我们定义的不一致,比如某个节点宕机了,它上面的shard也随着消失,此时集群的状态就是亚健康状态;一般yellow状态是很容易转变为green状态的;red表示集群状态不健康,比如3个节点有2个节点都宕机了,那么也就意味着这两个节点上的shard丢失,当然shard丢失,对应的数据也会随之丢失;所以red状态表示集群有丢失数据的风险;
二、elasticsearch集群部署
环境说明
某个服务如果以分布式或集群的模式工作,首先我们要把各节点的时间进行同步,这是集群的基本原则;其次,一个集群的名称解析不能也不应该依赖外部的dns服务来解析,因为一旦dns服务挂掉,它会影响整个集群的通信,所以如果需要用到名称解析,我们应该首先考虑hosts文件来解析各节点名称;如果集群各节点间需要互相拷贝数据,我们应该还要做ssh 互信;以上三个条件是大多数集群的最基本条件;
| 名称 | ip地址 | 端口 |
| es1 | 192.168.0.41 | 9200/9300 |
| es2 | 192.168.0.42 | 9200/9300 |
各节点安装jdk
yum install -y java-1.8.0-openjdk-devel
提示:不同的es版本对jdk的版本要求也不一样,这个可以去官方文档中看,对应es版本需要用到的jdk版本;
导出JAVA_HOME

验证java版本和JAVA_HOME环境变量

下载elasticsearch rpm包
[root@node01 ~]# wget https://artifacts.elastic.co/downloads/elasticsearch/elasticsearch-6.8.12.rpm

--2020-10-01 20:44:29--  https://artifacts.elastic.co/downloads/elasticsearch/elasticsearch-6.8.12.rpm

Resolving artifacts.elastic.co (artifacts.elastic.co)... 151.101.110.222, 2a04:4e42:36::734

Connecting to artifacts.elastic.co (artifacts.elastic.co)|151.101.110.222|:443... connected.

HTTP request sent, awaiting response... 200 OK

Length: 148681336 (142M) [application/octet-stream]

Saving to: ‘elasticsearch-6.8.12.rpm’

100%[==========================================================================>] 148,681,336  133MB/s   in 1.1s

2020-10-01 20:45:07 (133 MB/s) - ‘elasticsearch-6.8.12.rpm’ saved [148681336/148681336]
安装elasticsearch rpm包
[root@node01 ~]# ll

total 145200

-rw-r--r-- 1 root root 148681336 Aug 18 19:38 elasticsearch-6.8.12.rpm

[root@node01 ~]# yum install ./elasticsearch-6.8.12.rpm

Loaded plugins: fastestmirror

Examining ./elasticsearch-6.8.12.rpm: elasticsearch-6.8.12-1.noarch

Marking ./elasticsearch-6.8.12.rpm to be installed

Resolving Dependencies

--> Running transaction check

---> Package elasticsearch.noarch 0:6.8.12-1 will be installed

--> Finished Dependency Resolution

Dependencies Resolved

===================================================================================================================================

 Package                         Arch                     Version                    Repository                               Size

===================================================================================================================================

Installing:

 elasticsearch                   noarch                   6.8.12-1                   /elasticsearch-6.8.12                   229 M

Transaction Summary

===================================================================================================================================

Install  1 Package

Total size: 229 M

Installed size: 229 M

Is this ok [y/d/N]: y

Downloading packages:

Running transaction check

Running transaction test

Transaction test succeeded

Running transaction

Creating elasticsearch group... OK

Creating elasticsearch user... OK

  Installing : elasticsearch-6.8.12-1.noarch                                                                                   1/1

### NOT starting on installation, please execute the following statements to configure elasticsearch service to start automatically using systemd

 sudo systemctl daemon-reload

 sudo systemctl enable elasticsearch.service

### You can start elasticsearch service by executing

 sudo systemctl start elasticsearch.service

Created elasticsearch keystore in /etc/elasticsearch

  Verifying  : elasticsearch-6.8.12-1.noarch                                                                                   1/1

Installed:

  elasticsearch.noarch 0:6.8.12-1

Complete!

[root@node01 ~]#
编辑配置文件
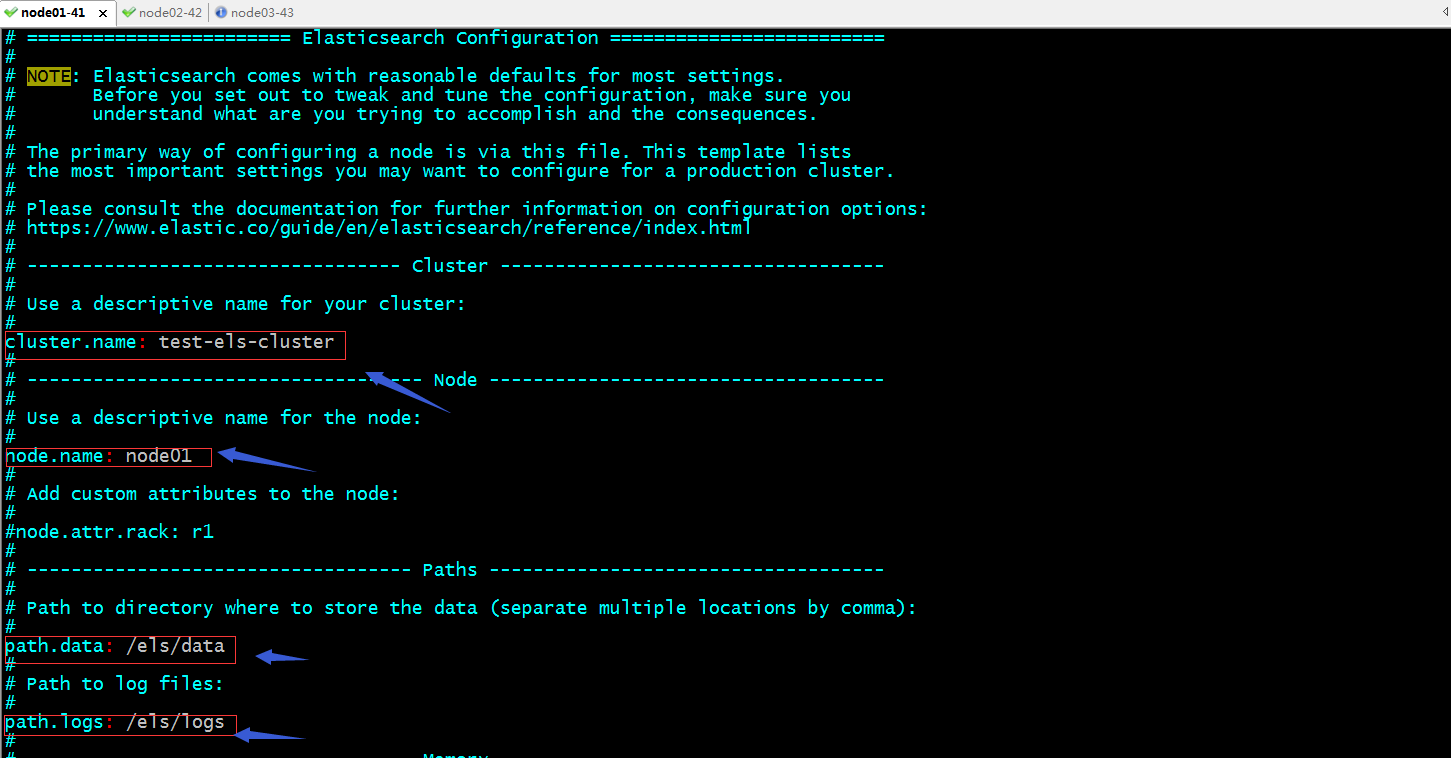
提示:es的主配置文件是/etc/elasticsearch/elasticsearch.yml;其中我们需要配置cluster.name,node.name,path.data,path.log,这四项是非常重要的,cluster.name是配置的集群名称,同一集群各主机就是依赖这个配置判断是否是同一集群,所以在同一集群的其他节点的配置,这个名称必须一致;node.name是用于标识节点名称,这个名称在集群中是唯一的,也就说这个名称在同一集群的其他节点必须唯一,不能重复;path.data用于指定es存放数据的目录,建议各节点都配置同一个目录方便管理;其次这个目录还建议挂载一个存储;path.logs用于指定es的日志存放目录;
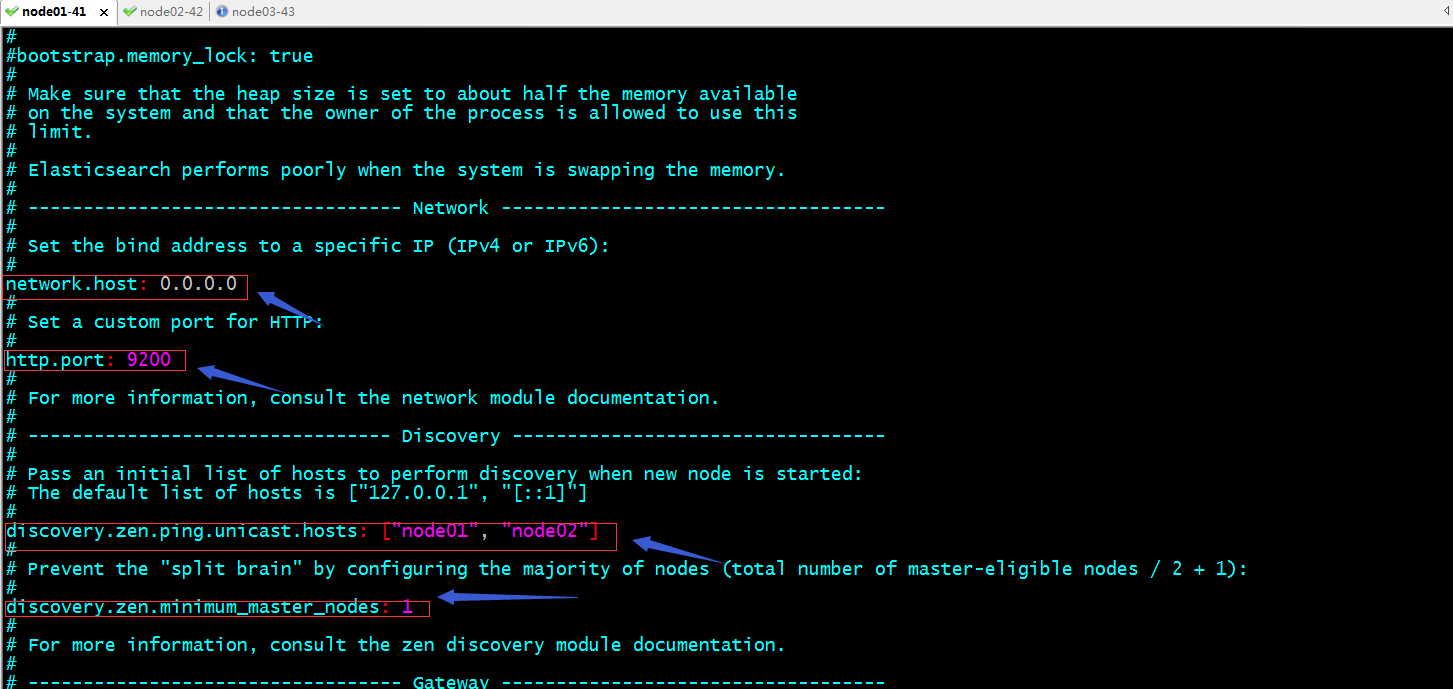
提示:bootstrap.memory_lock: true这项配置表示启动es时,立即分配jvm.options这个文件中定义的内存大小;默认没有启用,如果要启用,我们需要主机节点内存是否够用,以及elasticsearch用户是否能够申请对应大小的内存;network.host用于指定es监听的ip地址,0.0.0.0表示监听本机所有可用地址;http.port用于指定对用户提供服务的端口地址;discovery.zen.ping.unicast.hosts指定对那些主机做单播通信来发现节点;discovery.zen.minimum_master_nodes指定master节点的的最小数量;不指定默认就是1;
完整的配置


[root@node01 ~]# cat /etc/elasticsearch/elasticsearch.yml

# ======================== Elasticsearch Configuration =========================

#

# NOTE: Elasticsearch comes with reasonable defaults for most settings.

#       Before you set out to tweak and tune the configuration, make sure you

#       understand what are you trying to accomplish and the consequences.

#

# The primary way of configuring a node is via this file. This template lists

# the most important settings you may want to configure for a production cluster.

#

# Please consult the documentation for further information on configuration options:

# https://www.elastic.co/guide/en/elasticsearch/reference/index.html

#

# ---------------------------------- Cluster -----------------------------------

#

# Use a descriptive name for your cluster:

#

cluster.name: test-els-cluster

#

# ------------------------------------ Node ------------------------------------

#

# Use a descriptive name for the node:

#

node.name: node01

#

# Add custom attributes to the node:

#

#node.attr.rack: r1

#

# ----------------------------------- Paths ------------------------------------

#

# Path to directory where to store the data (separate multiple locations by comma):

#

path.data: /els/data

#

# Path to log files:

#

path.logs: /els/logs

#

# ----------------------------------- Memory -----------------------------------

#

# Lock the memory on startup:

#

#bootstrap.memory_lock: true

#

# Make sure that the heap size is set to about half the memory available

# on the system and that the owner of the process is allowed to use this

# limit.

#

# Elasticsearch performs poorly when the system is swapping the memory.

#

# ---------------------------------- Network -----------------------------------

#

# Set the bind address to a specific IP (IPv4 or IPv6):

#

network.host: 0.0.0.0

#

# Set a custom port for HTTP:

#

http.port: 9200

#

# For more information, consult the network module documentation.

#

# --------------------------------- Discovery ----------------------------------

#

# Pass an initial list of hosts to perform discovery when new node is started:

# The default list of hosts is ["127.0.0.1", "[::1]"]

#

discovery.zen.ping.unicast.hosts: ["node01", "node02"]

#

# Prevent the "split brain" by configuring the majority of nodes (total number of master-eligible nodes / 2 + 1):

#

discovery.zen.minimum_master_nodes: 1

#

# For more information, consult the zen discovery module documentation.

#

# ---------------------------------- Gateway -----------------------------------

#

# Block initial recovery after a full cluster restart until N nodes are started:

#

#gateway.recover_after_nodes: 3

#

# For more information, consult the gateway module documentation.

#

# ---------------------------------- Various -----------------------------------

#

# Require explicit names when deleting indices:

#

#action.destructive_requires_name: true

[root@node01 ~]#
创建数据目录和日志目录,并把对应目录修改成elasticsearch属主和属组

复制配置文件到其他节点对应位置,并修改node.name为对应节点名称,并在对应节点上创建数据目录和日志目录并把其属主和属组修改成elasticsearch

提示:对于node02上的es配置和node01上的配置,唯一不同的就是节点名称,其余都是一样的;
启动node01、node02上的es,并把es设置为开机启动
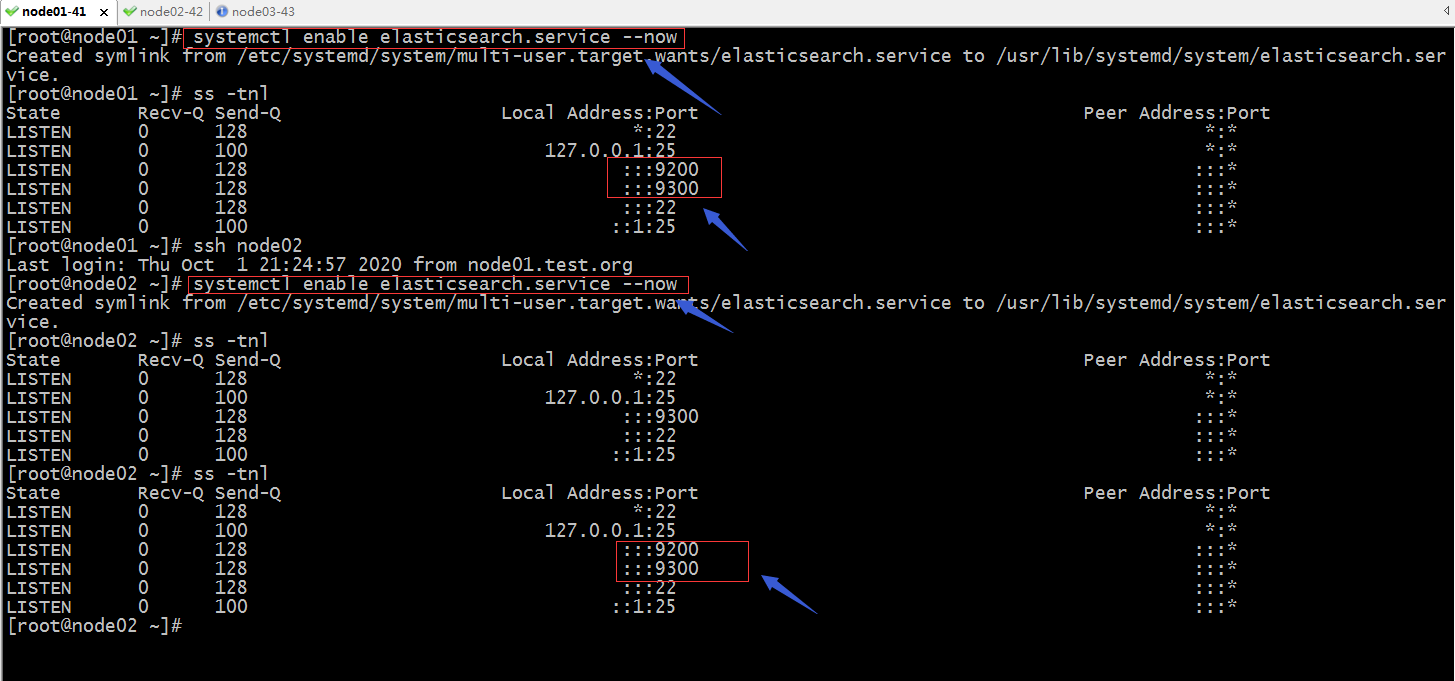
提示:可以看到node01和node02上的9200和9300都处于监听状态了;9200是用户对外提供服务的端口,9300是用于集群各节点通信端口;到此2节点的es集群就搭建好了;
验证:访问node01和node02的9200端口,看看响应内容cluster_name和cluster_uuid是否是一样?
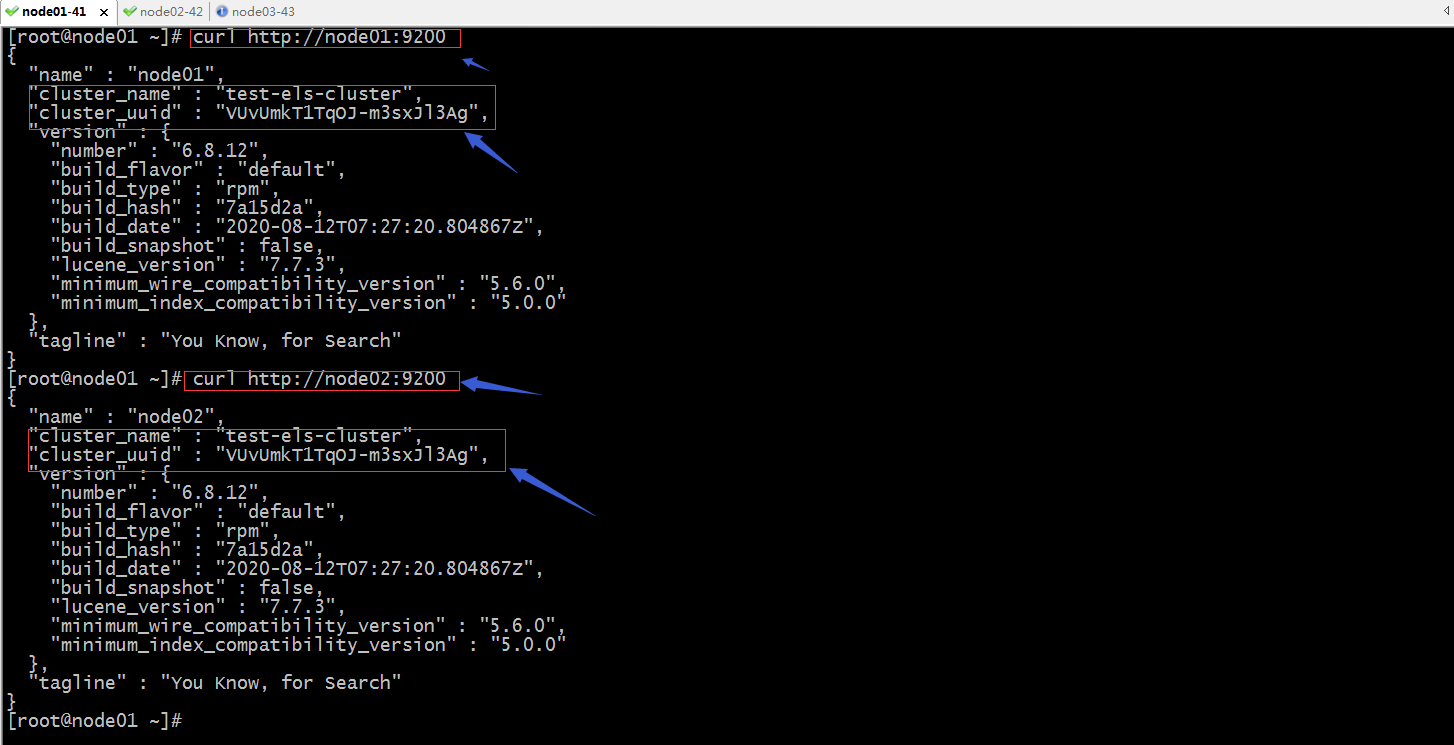
提示:可以看到访问node01和node02的9200端口,响应内容都响应了相同cluster_name和cluster_uuid;说明node01和node02属于同一个集群;
查看es接口提供的cat接口
[root@node01 ~]# curl http://node02:9200/_cat

=^.^=

/_cat/allocation

/_cat/shards

/_cat/shards/{index}

/_cat/master

/_cat/nodes

/_cat/tasks

/_cat/indices

/_cat/indices/{index}

/_cat/segments

/_cat/segments/{index}

/_cat/count

/_cat/count/{index}

/_cat/recovery

/_cat/recovery/{index}

/_cat/health

/_cat/pending_tasks

/_cat/aliases

/_cat/aliases/{alias}

/_cat/thread_pool

/_cat/thread_pool/{thread_pools}

/_cat/plugins

/_cat/fielddata

/_cat/fielddata/{fields}

/_cat/nodeattrs

/_cat/repositories

/_cat/snapshots/{repository}

/_cat/templates

[root@node01 ~]#
查看集群node信息
[root@node01 ~]# curl http://node02:9200/_cat/nodes

192.168.0.42 19 96 1 0.00 0.05 0.05 mdi - node02

192.168.0.41 15 96 1 0.03 0.04 0.05 mdi * node01

[root@node01 ~]#
提示:后面带*号的表示master节点;
查看集群健康状态
[root@node01 ~]# curl http://node02:9200/_cat/health

1601559464 13:37:44 test-els-cluster green 2 2 0 0 0 0 0 0 - 100.0%

[root@node01 ~]#
查看集群索引信息
[root@node01 ~]# curl http://node02:9200/_cat/indices

[root@node01 ~]#
提示:这里显示空,是因为集群里没有任何数据;
查看集群分片信息
[root@node01 ~]# curl http://node02:9200/_cat/shards

[root@node01 ~]#
获取myindex索引下的test类型的1号文档信息
[root@node01 ~]# curl http://node02:9200/myindex/test/1

{"error":{"root_cause":[{"type":"index_not_found_exception","reason":"no such index","resource.type":"index_expression","resource.id":"myindex","index_uuid":"_na_","index":"myindex"}],"type":"index_not_found_exception","reason":"no such index","resource.type":"index_expression","resource.id":"myindex","index_uuid":"_na_","index":"myindex"},"status":404}[root@node01 ~]#

[root@node01 ~]# curl http://node02:9200/myindex/test/1?pretty

{

  "error" : {

    "root_cause" : [

      {

        "type" : "index_not_found_exception",

        "reason" : "no such index",

        "resource.type" : "index_expression",

        "resource.id" : "myindex",

        "index_uuid" : "_na_",

        "index" : "myindex"

      }

    ],

    "type" : "index_not_found_exception",

    "reason" : "no such index",

    "resource.type" : "index_expression",

    "resource.id" : "myindex",

    "index_uuid" : "_na_",

    "index" : "myindex"

  },

  "status" : 404

}

[root@node01 ~]#
提示:?pretty表示用易读的JSON格式输出;从上面的反馈内容,它告诉我们没有找到指定的索引;
添加一个文档到es集群的指定索引
[root@node01 ~]# curl -XPUT http://node01:9200/myindex/test/1 -d '

{"name":"zhangsan","age":18,"gender":"nan"}'

{"error":"Content-Type header [application/x-www-form-urlencoded] is not supported","status":406}[root@node01 ~]#
提示:这里向es写指定文档到指定索引下,返回不支持header头部;解决办法,手动指定头部类型;
[root@node01 ~]# curl -XPUT http://node01:9200/myindex/test/1  -H 'content-Type:application/json'  -d '

{"name":"zhangsan","age":18,"gender":"nan"}'

{"_index":"myindex","_type":"test","_id":"1","_version":1,"result":"created","_shards":{"total":2,"successful":2,"failed":0},"_seq_no":0,"_primary_term":1}[root@node01 ~]#
验证:查看myindex索引下的test类型的1号文档,看看是否能够查到我们刚才写的数据?
[root@node01 ~]# curl  http://node01:9200/myindex/test/1?pretty

{

  "_index" : "myindex",

  "_type" : "test",

  "_id" : "1",

  "_version" : 1,

  "_seq_no" : 0,

  "_primary_term" : 1,

  "found" : true,

  "_source" : {

    "name" : "zhangsan",

    "age" : 18,

    "gender" : "nan"

  }

}

[root@node01 ~]#
提示:可以看到返回了我们刚才写的文档内容;
现在再次查看集群的索引信息和分片信息
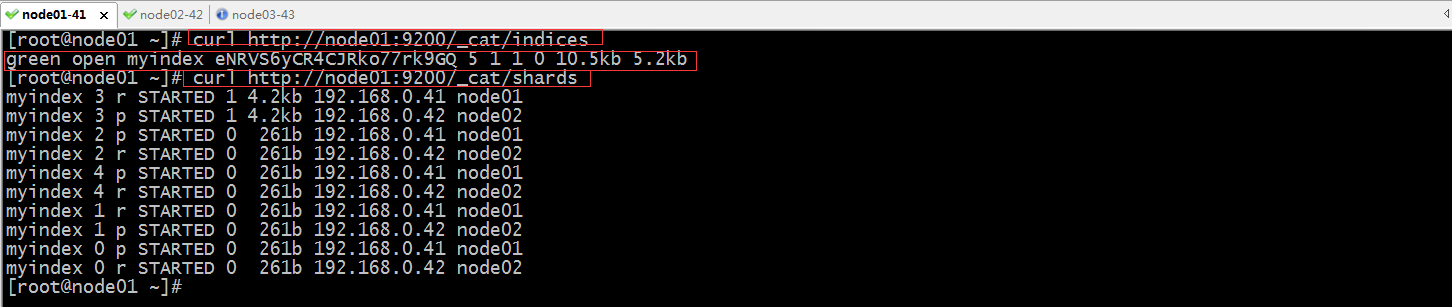
提示:可以看到现在es集群中有一个myindex的索引,其状态为green;分片信息中也可以看到有5各主分片和5个replica分片;并且每个分片都的master和replica都没有在同一个节点;
搜索所有的索引和类型

提示:jq是用于以美观方式显示json数据,作用同pretty的一样;以上命令表示从所有类型所用索引中搜索,name字段为zhangsan的信息;如果命中了,就会把对应文档打印出来;未命中就告诉我们未命中;如下
[root@node01 ~]# curl http://node01:9200/_search?q=age:19|jq

  % Total    % Received % Xferd  Average Speed   Time    Time     Time  Current

                                 Dload  Upload   Total   Spent    Left  Speed

100   135  100   135    0     0   2906      0 --:--:-- --:--:-- --:--:--  2934

{

  "took": 37,

  "timed_out": false,

  "_shards": {

    "total": 5,

    "successful": 5,

    "skipped": 0,

    "failed": 0

  },

  "hits": {

    "total": 0,

    "max_score": null,

    "hits": []

  }

}

[root@node01 ~]# curl http://node01:9200/_search?q=age:18|jq

  % Total    % Received % Xferd  Average Speed   Time    Time     Time  Current

                                 Dload  Upload   Total   Spent    Left  Speed

100   247  100   247    0     0  10795      0 --:--:-- --:--:-- --:--:-- 11227

{

  "took": 12,

  "timed_out": false,

  "_shards": {

    "total": 5,

    "successful": 5,

    "skipped": 0,

    "failed": 0

  },

  "hits": {

    "total": 1,

    "max_score": 1,

    "hits": [

      {

        "_index": "myindex",

        "_type": "test",

        "_id": "1",

        "_score": 1,

        "_source": {

          "name": "zhangsan",

          "age": 18,

          "gender": "nan"

        }

      }

    ]

  }

}

[root@node01 ~]#
提示:如果要在指定索引中搜索在前面的url加上指定的索引名称即可;

提示:如果有多个索引我们也可以根据多个索引名称的特点来使用*来匹配;如下
[root@node01 ~]# curl http://node01:9200/*/_search?q=age:18|jq

  % Total    % Received % Xferd  Average Speed   Time    Time     Time  Current

                                 Dload  Upload   Total   Spent    Left  Speed

100   247  100   247    0     0   8253      0 --:--:-- --:--:-- --:--:--  8517

{

  "took": 20,

  "timed_out": false,

  "_shards": {

    "total": 5,

    "successful": 5,

    "skipped": 0,

    "failed": 0

  },

  "hits": {

    "total": 1,

    "max_score": 1,

    "hits": [

      {

        "_index": "myindex",

        "_type": "test",

        "_id": "1",

        "_score": 1,

        "_source": {

          "name": "zhangsan",

          "age": 18,

          "gender": "nan"

        }

      }

    ]

  }

}

[root@node01 ~]# curl http://node01:9200/my*/_search?q=age:18|jq

  % Total    % Received % Xferd  Average Speed   Time    Time     Time  Current

                                 Dload  Upload   Total   Spent    Left  Speed

100   247  100   247    0     0   7843      0 --:--:-- --:--:-- --:--:--  7967

{

  "took": 19,

  "timed_out": false,

  "_shards": {

    "total": 5,

    "successful": 5,

    "skipped": 0,

    "failed": 0

  },

  "hits": {

    "total": 1,

    "max_score": 1,

    "hits": [

      {

        "_index": "myindex",

        "_type": "test",

        "_id": "1",

        "_score": 1,

        "_source": {

          "name": "zhangsan",

          "age": 18,

          "gender": "nan"

        }

      }

    ]

  }

}

[root@node01 ~]#
搜索指定的单个索引的指定类型

提示:以上就是在es集群的命令行接口常用操作,通常我们用es集群,不会在命令行中做搜索,我们会利用web界面来做;命令行只是用于测试;好了到此es集群就搭建好了;后续我们就可以用logstash收集指定地方的数据,传给es,然后再利用kibana的web界面来展示es中的数据;
日志分析平台ELK之搜索引擎Elasticsearch集群的更多相关文章
- 集中式日志分析平台 - ELK Stack - 安全解决方案 X-Pack
大数据之心 关注 0.6 2017.02.22 15:36* 字数 2158 阅读 16457评论 7喜欢 9 简介 X-Pack 已经作为 Elastic 公司单独的产品线,前身是 Shield, ...
- 日志分析平台ELK之日志收集器logstash
前文我们聊解了什么是elk,elk中的elasticsearch集群相关组件和集群搭建以及es集群常用接口的说明和使用,回顾请查看考https://www.cnblogs.com/qiuhom-187 ...
- 日志分析平台ELK之日志收集器filebeat
前面我们了解了elk集群中的logstash的用法,使用logstash处理日志挺好的,但是有一个缺陷,就是太慢了:当然logstash慢的原因是它依赖jruby虚拟机,jruby虚拟机就是用java ...
- 日志分析平台ELK之前端展示kibana
之前的博客一直在聊ELK集群中的存储.日志收集相关的组件的配置,但通常我们给用户使用不应该是一个黑黑的shell界面,通过接口去查询搜索:今天我们来了ELK中的前端可视化组件kibana:kibana ...
- ELK 中的elasticsearch 集群的部署
本文内容 背景 ES集群中第一个master节点 ES slave节点 本文总结 Elasticsearch(以下简称ES)搭建集群的经验.以 Elasticsearch-rtf-2.2.1 版本为例 ...
- 大数据时代日志分析平台ELK的搭建
A,首先说说ELK是啥, ELK是ElasticSearch . Logstash 和 Kiabana 三个开源工具组成.Logstash是数据源,ElasticSearch是分析数据的,Kiaba ...
- 日志分析平台ELK之日志收集器logstash常用插件配置
前文我们了解了logstash的工作流程以及基本的收集日志相关配置,回顾请参考https://www.cnblogs.com/qiuhom-1874/p/13761906.html:今天我们来了解下l ...
- 安装logstash+kibana+elasticsearch+redis搭建集中式日志分析平台
安装logstash+kibana+elasticsearch+redis搭建集中式日志分析平台 2014-01-16 19:40:57| 分类: logstash | 标签:logstash ...
- 手把手教你搭建 ELK 实时日志分析平台
本篇文章主要是手把手教你搭建 ELK 实时日志分析平台,那么,ELK 到底是什么呢? ELK 是三个开源项目的首字母缩写,这三个项目分别是:Elasticsearch.Logstash 和 Kiban ...
随机推荐
- Java 将Html转为PDF
本文介绍如何在Java程序中将html文件转换成PDF文件.转换时,需要注意以下两点: 一.需要使用转换插件 可根据不同的系统来下载对应的插件,下载地址:windows-x86.zip, window ...
- py_冒泡排序
import random """ 排序:将一组无序记录序列调整为有序记录序列 列表排序:将无序列表调整为有序列表 输入:列表 输出:有序列表 升序与降序 内置函数sor ...
- mysql 8.0.19 win10快速安装教程
本文教程为大家分享了mysql 8.0.19安装教程,供大家参考,具体内容如下 1.下载.zip安装文件 2.根目录存放my.ini,文件路径用“/”分割,例如: [mysqld] port=3306 ...
- js实现csv下载
var TableDatas = '数据源';function getCSV(){ if(this.TableDatas.length === 0){ alert("没有数据呀呀呀呀!&q ...
- 《神经网络的梯度推导与代码验证》之CNN的前向传播和反向梯度推导
在FNN(DNN)的前向传播,反向梯度推导以及代码验证中,我们不仅总结了FNN(DNN)这种神经网络结构的前向传播和反向梯度求导公式,还通过tensorflow的自动求微分工具验证了其准确性.在本篇章 ...
- Cython编译独立的可执行文件
cython --embed -o hello.c hello.pygcc hello.c -o hello -I /Library/Frameworks/Python.framework/Versi ...
- Mybatis入门篇之结果映射,你射准了吗?
目录 前言 什么是结果映射? 如何映射? 别名映射 驼峰映射 配置文件开启驼峰映射 配置类中开启驼峰映射 resultMap映射 总结 高级结果映射 关联(association) 例子 关联的嵌套 ...
- Jwt快速入门(copy即可)
Jwt 什么是jwt JSON Web Token(缩写 JWT)是目前最流行的跨域认证解决方案,本文介绍它的原理和用法. 互联网服务离不开用户认证.一般流程是下面这样. 1.用户向服务器发送用户名和 ...
- Redux异步解决方案之Redux-Thunk原理及源码解析
前段时间,我们写了一篇Redux源码分析的文章,也分析了跟React连接的库React-Redux的源码实现.但是在Redux的生态中还有一个很重要的部分没有涉及到,那就是Redux的异步解决方案.本 ...
- 详解 Python 的二元算术运算,为什么说减法只是语法糖?
原题 | Unravelling binary arithmetic operations in Python 作者 | Brett Cannon 译者 | 豌豆花下猫("Python猫&q ...