25、springboot与缓存整合Redis


<dependency>
<groupId>org.springframework.boot</groupId>
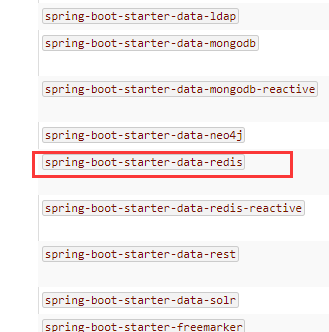
<artifactId>spring-boot-starter-data-redis</artifactId>
</dependency>
public class RedisAutoConfiguration {

    public RedisAutoConfiguration() {

    }

    @Bean

    @ConditionalOnMissingBean(

        name = {"redisTemplate"}

    )

    public RedisTemplate<Object, Object> redisTemplate(RedisConnectionFactory redisConnectionFactory) throws UnknownHostException {

        RedisTemplate<Object, Object> template = new RedisTemplate();

        template.setConnectionFactory(redisConnectionFactory);

        return template;

    }

    @Bean

    @ConditionalOnMissingBean

    public StringRedisTemplate stringRedisTemplate(RedisConnectionFactory redisConnectionFactory) throws UnknownHostException {

        StringRedisTemplate template = new StringRedisTemplate();

        template.setConnectionFactory(redisConnectionFactory);

        return template;

    }

}
在配置文件中引入redis的地址:

//操作kv键值对的
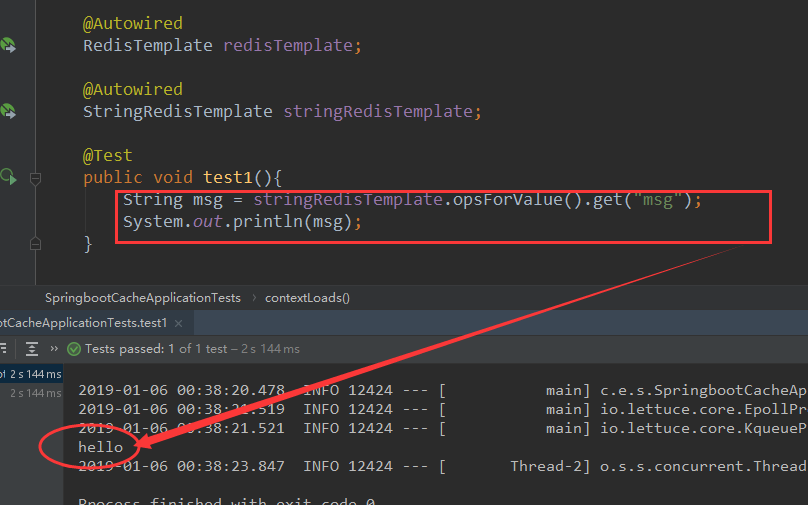
@Autowired
RedisTemplate redisTemplate; //操作kv都是字符串
@Autowired
StringRedisTemplate stringRedisTemplate;

测试:
public class Employee implements Serializable {
//测试保存对象
@Test
public void test2(){
//保存的是emp的对象
Employee emp = employeeMapper.getEmpById();
//保存的是employee的对象
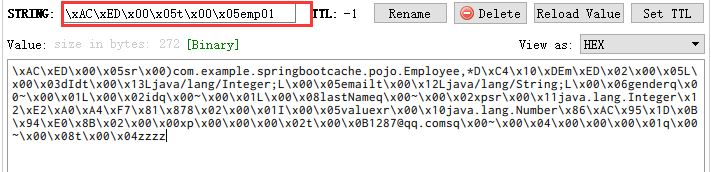
//默认如果使用保存对象,使用jdk序列化机制,序列化后的数据保存在redis中
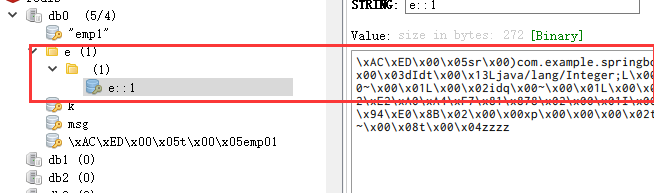
redisTemplate.opsForValue().set("emp01",emp);
}
@Configuration
public class redisConfig {
//专门序列化Employee
@Bean
public RedisTemplate<Object, Employee> redisTemplateEmp(RedisConnectionFactory redisConnectionFactory) throws UnknownHostException {
RedisTemplate<Object, Employee> template = new RedisTemplate();
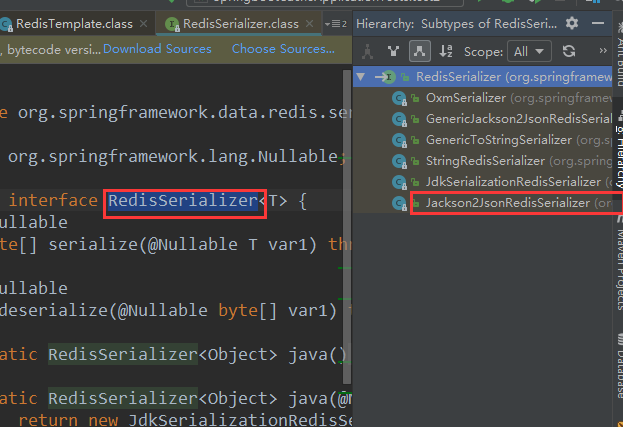
template.setConnectionFactory(redisConnectionFactory); Jackson2JsonRedisSerializer<Employee> json = new Jackson2JsonRedisSerializer<Employee>(Employee.class);
template.setDefaultSerializer(json);
return template;
}
}
@Autowired
RedisTemplate redisTemplateEmp; //测试保存对象
@Test
public void test2(){
//保存的是emp的对象
Employee emp = employeeMapper.getEmpById();
//将数据以json的方式
//实现redisTemplate默认的序列化规则,改变默认的序列化规则
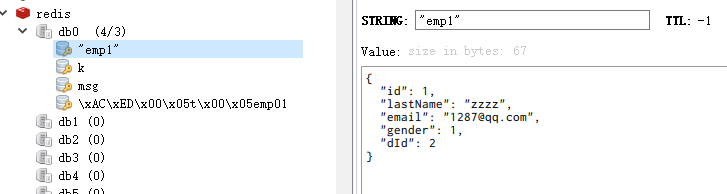
redisTemplateEmp.opsForValue().set("emp1",emp);
}
测试缓存:
RedisCacheConfiguration.class

@Bean

public RedisCacheManager cacheManager(RedisConnectionFactory redisConnectionFactory, ResourceLoader resourceLoader) {

    RedisCacheManagerBuilder builder = RedisCacheManager.builder(redisConnectionFactory).cacheDefaults(this.determineConfiguration(resourceLoader.getClassLoader()));

    List<String> cacheNames = this.cacheProperties.getCacheNames();

    if (!cacheNames.isEmpty()) {

        builder.initialCacheNames(new LinkedHashSet(cacheNames));

    }

    return (RedisCacheManager)this.customizerInvoker.customize(builder.build());

}
protected Collection<RedisCache> loadCaches() {

    List<RedisCache> caches = new LinkedList();

    Iterator var2 = this.initialCacheConfiguration.entrySet().iterator();

    while(var2.hasNext()) {

        Entry<String, RedisCacheConfiguration> entry = (Entry)var2.next();

        caches.add(this.createRedisCache((String)entry.getKey(), (RedisCacheConfiguration)entry.getValue()));

    }

    return caches;

}
@Bean

public RedisCacheManager cacheManager(RedisConnectionFactory redisConnectionFactory, ResourceLoader resourceLoader) {

    RedisCacheManagerBuilder builder = RedisCacheManager.builder(redisConnectionFactory).cacheDefaults(this.determineConfiguration(resourceLoader.getClassLoader()));

    List<String> cacheNames = this.cacheProperties.getCacheNames();

    if (!cacheNames.isEmpty()) {

        builder.initialCacheNames(new LinkedHashSet(cacheNames));

    }

    return (RedisCacheManager)this.customizerInvoker.customize(builder.build());

}
public class RedisAutoConfiguration {

    @Bean

    @ConditionalOnMissingBean(

        name = {"redisTemplate"}

    )

    public RedisTemplate<Object, Object> redisTemplate(RedisConnectionFactory redisConnectionFactory) throws UnknownHostException {

        RedisTemplate<Object, Object> template = new RedisTemplate();

        template.setConnectionFactory(redisConnectionFactory);

        return template;

    }
RedisTemplate.java

public void afterPropertiesSet() {

    super.afterPropertiesSet();

    boolean defaultUsed = false;

    if (this.defaultSerializer == null) {

        this.defaultSerializer = new JdkSerializationRedisSerializer(this.classLoader != null ? this.classLoader : this.getClass().getClassLoader());

    }

}

25、springboot与缓存整合Redis的更多相关文章
- MyBatis功能点一应用:二级缓存整合redis
Mybatis提供了默认的cache实现PerpetualCache,那为什么还要整合第三方的框架redis?因为Mybatis提供的cache实现为单机版,无法实现分布式存储(即本机存储的数据,其他 ...
- 【快学springboot】11.整合redis实现session共享
前言 这里都是基于前面的项目基础上的.springboot整合redis非常的方便,这也是springboot的宗旨,简化配置.这篇文章就教大家如何使用springboot整合redis来实现sess ...
- springboot 2.x整合redis,spring aop实现接口缓存
pox.xml: <dependency> <groupId>org.springframework.boot</groupId> <artifactId&g ...
- SpringBoot + MySQL + MyBatis 整合 Redis 实现缓存操作
本地安装 Redis Redis 安装:https://www.cnblogs.com/oukele/p/11373052.html 项目结构: SpringBootRedis 工程项目结构如下: ...
- redis(Springboot中封装整合redis,java程序如何操作redis的5种基本数据类型)
平常测试redis操作命令,可能用的是cmd窗口 操作redis,记录一下 java程序操作reids, 操作redis的方法 可以用Jedis ,在springboot 提供了两种 方法操作 Red ...
- SpringBoot学习:整合Redis
项目下载地址:http://download.csdn.NET/detail/aqsunkai/9805821 pom.xml添加对redis的依赖: <!-- https://mvnrepos ...
- springboot笔记10——整合Redis
依赖 <dependencies> <!--web依赖--> <dependency> <groupId>org.springframework.boo ...
- SpringBoot:Shiro 整合 Redis
前言 前段时间做了一个图床的小项目,安全框架使用的是Shiro.为了使用户7x24小时访问,决定把项目由单机升级为集群部署架构.但是安全框架shiro只有单机存储的SessionDao,尽管Shrio ...
- 【快学springboot】13.操作redis之String数据结构
前言 在之前的文章中,讲解了使用redis解决集群环境session共享的问题[快学springboot]11.整合redis实现session共享,这里已经引入了redis相关的依赖,并且通过spr ...
随机推荐
- Z_Tree的使用案例(出差地点的演示)
1.准备工作(下载zTree并添加到项目JS中) 2.HTML代码 <link rel="stylesheet" href="./js/zTree_v3-3.5.2 ...
- java技术秘籍 转摘
- java核心技术-IO
一 .IO 1.1 流的简单介绍和分类 Java流操作的相关的类和接口: Java流类图结构: 四个抽象基类分别为:InputStream .OutputStream .Reader .Writer: ...
- 【SSH网上商城项目实战15】线程、定时器同步首页数据(类似于博客定期更新排名)
转自:https://blog.csdn.net/eson_15/article/details/51387378 上一节我们做完了首页UI界面,但是有个问题:如果我在后台添加了一个商品,那么我必须重 ...
- 《JavaWeb从入门到改行》fileupload,没毛病
目录: » fileupload API > 文件上传的要求 > fileupload组件 » 上传细节的代码演示 » 项目案例-上传头像并显示 fileupload API 文 ...
- PoPo数据可视化周刊第3期 - 台风可视化
9月台风席卷全球,本刊特别选取台风最佳可视化案例,数据可视化应用功力最深厚者,当属纽约时报,而传播效果最佳的是The Weather Channel关于Florence的视频预报,运用了数据可视化.可 ...
- 牛客Wannafly挑战赛11E 白兔的刁难
传送门 如果大力推单位根反演就可以获得一个 \(k^2logn\) 的好方法 \[ans_{t}=\frac{1}{k}\sum_{i=0}^{k-1}(w_k^{-t})^i(w_k^i+1)^n\ ...
- Chrome控制台毫无反应,打印不出信息了?
最近在使用console.log()方法的时候遇到一个奇怪的问题,打开chrome控制台想调试代码,结果控制台半天无反应,让我纳闷了半天.详情如图所示: 然后我又打开了新的标签页,不行!接着干脆关闭浏 ...
- linux 服务器 keras 深度学习环境搭建
感慨: 程序跑不起来,都是环境问题. 1. 安装Anaconda https://blog.csdn.net/gdkyxy2013/article/details/79463859 2. 在 Anac ...
- SQL点点滴滴_判断字段或者字符中是否包含有特殊字符
SQL Server中,如果我们想判断一个字符串或者数据字段中是否包含有特殊字符.可以使用正则来实现.除了大小字母和数字之外全是特殊字符[^a-zA-Z0-9]