CNN识别验证码1
之前学习python的时候,想尝试用requests实现自动登陆,但是现在网站登陆都会有验证码保护,主要是为了防止暴力破解,任意用户注册。最近接触深度学习,cnn能够进行图像识别,能够进行验证码识别。
主要步骤:
1、采样制作样本文件
2、根据样本文件类型创建识别模型
3、对样本文件分为训练样本和测试样本来训练识别模型
4、保存识别模型和验证
第一步生成验证码,保存文件为generate_captcha.py:
- #-*- coding:utf-8 -*-
- from captcha.image import ImageCaptcha
- from PIL import Image
- import numpy as np
- import random
- import string
- class generateCaptcha():
- def __init__(self,
- width = 160,#验证码图片的宽
- height = 60,#验证码图片的高
- char_num = 4,#验证码字符个数
- characters = string.digits + string.ascii_uppercase + string.ascii_lowercase):#验证码组成,数字+大写字母+小写字母
- self.width = width
- self.height = height
- self.char_num = char_num
- self.characters = characters
- self.classes = len(characters) #10+26+26=62
- def gen_captcha(self,batch_size = 50):
- X = np.zeros([batch_size,self.height,self.width,1])
- img = np.zeros((self.height,self.width),dtype=np.uint8)
- Y = np.zeros([batch_size,self.char_num,self.classes])
- image = ImageCaptcha(width = self.width,height = self.height)
- while True:
- for i in range(batch_size):
- captcha_str = ''.join(random.sample(self.characters,self.char_num))
- img = image.generate_image(captcha_str).convert('L')
- img = np.array(img.getdata())
- X[i] = np.reshape(img,[self.height,self.width,1])/255.0
- for j,ch in enumerate(captcha_str):
- Y[i,j,self.characters.find(ch)] = 1
- Y = np.reshape(Y,(batch_size,self.char_num*self.classes))
- yield X,Y
- def decode_captcha(self,y):
- y = np.reshape(y,(len(y),self.char_num,self.classes))
- return ''.join(self.characters[x] for x in np.argmax(y,axis = 2)[0,:])
- def get_parameter(self):
- return self.width,self.height,self.char_num,self.characters,self.classes
- def gen_test_captcha(self):
- image = ImageCaptcha(width = self.width,height = self.height)
- captcha_str = ''.join(random.sample(self.characters,self.char_num))
- img = image.generate_image(captcha_str)
- img.save(captcha_str + '.jpg')
- X = np.zeros([1,self.height,self.width,1])
- Y = np.zeros([1,self.char_num,self.classes])
- img = img.convert('L')
- img = np.array(img.getdata())
- X[0] = np.reshape(img,[self.height,self.width,1])/255.0
- for j,ch in enumerate(captcha_str):
- Y[0,j,self.characters.find(ch)] = 1
- Y = np.reshape(Y,(1,self.char_num*self.classes))
- return X,Y
返回参数的含义:
- X:一个 mini-batch 的训练数据,其 shape 为 [ batch_size, height, width, 1 ],batch_size 表示每批次多少个训练数据,height 表示验证码图片的高,width 表示验证码图片的宽,1 表示图片的通道。
- Y:X 中每个训练数据属于哪一类验证码,其形状为 [ batch_size, class ] ,对验证码中每个字符进行 One-Hot 编码,所以 class 大小为 4*62。
调用这个类的时候会生成这样的验证码图片:

第二步创建识别模型
这里用到了 5 层网络,前 3 层为卷积层,第 4、5 层为全连接层。对 4 层隐藏层都进行 dropout。网络结构如下所示: input——>conv——>pool——>dropout——>conv——>pool——>dropout——>conv——>pool——>dropout——>fully connected layer——>dropout——>fully connected layer——>output
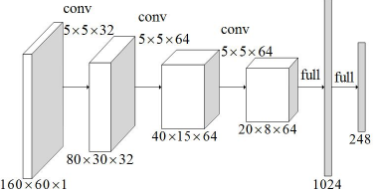
主要代码(captcha_model.py):
- # -*- coding: utf-8 -*
- import tensorflow as tf
- import math
- class captchaModel():
- def __init__(self,
- width = 160,
- height = 60,
- char_num = 4,
- classes = 62):
- self.width = width
- self.height = height
- self.char_num = char_num
- self.classes = classes
- def conv2d(self,x, W):
- return tf.nn.conv2d(x, W, strides=[1, 1, 1, 1], padding='SAME') #步长是1,卷积的时候图片大小没有缩小。最大池化的时候图片减为一半。
- def max_pool_2x2(self,x):
- return tf.nn.max_pool(x, ksize=[1, 2, 2, 1], #用2*2的过滤器
- strides=[1, 2, 2, 1], padding='SAME') #最大池化步长是2
- def weight_variable(self,shape):
- initial = tf.truncated_normal(shape, stddev=0.1)
- return tf.Variable(initial)
- def bias_variable(self,shape):
- initial = tf.constant(0.1, shape=shape)
- return tf.Variable(initial)
- def create_model(self,x_images,keep_prob):
- #first layer
- w_conv1 = self.weight_variable([5, 5, 1, 32]) #通过过滤器计算权重值5*5*32
- b_conv1 = self.bias_variable([32]) #32是[5,5,1,32]中的32的输出。a[1]=Relu(w[1]a[0]+b[1]),因为w[1]a[0]是32,矩阵相加。
- h_conv1 = tf.nn.relu(tf.nn.bias_add(self.conv2d(x_images, w_conv1), b_conv1))
- h_pool1 = self.max_pool_2x2(h_conv1)
- h_dropout1 = tf.nn.dropout(h_pool1,keep_prob)
- conv_width = math.ceil(self.width/2)
- conv_height = math.ceil(self.height/2)
- #second layer
- w_conv2 = self.weight_variable([5, 5, 32, 64])
- b_conv2 = self.bias_variable([64])
- h_conv2 = tf.nn.relu(tf.nn.bias_add(self.conv2d(h_dropout1, w_conv2), b_conv2))
- h_pool2 = self.max_pool_2x2(h_conv2)
- h_dropout2 = tf.nn.dropout(h_pool2,keep_prob)
- conv_width = math.ceil(conv_width/2)
- conv_height = math.ceil(conv_height/2)
- #third layer
- w_conv3 = self.weight_variable([5, 5, 64, 64])
- b_conv3 = self.bias_variable([64])
- h_conv3 = tf.nn.relu(tf.nn.bias_add(self.conv2d(h_dropout2, w_conv3), b_conv3))
- h_pool3 = self.max_pool_2x2(h_conv3)
- h_dropout3 = tf.nn.dropout(h_pool3,keep_prob)
- conv_width = math.ceil(conv_width/2)
- conv_height = math.ceil(conv_height/2)
- #first fully layer
- conv_width = int(conv_width)
- conv_height = int(conv_height)
- w_fc1 = self.weight_variable([64*conv_width*conv_height,1024]) #64*20*8
- b_fc1 = self.bias_variable([1024])
- h_dropout3_flat = tf.reshape(h_dropout3,[-1,64*conv_width*conv_height])
- h_fc1 = tf.nn.relu(tf.nn.bias_add(tf.matmul(h_dropout3_flat, w_fc1), b_fc1))
- h_fc1_drop = tf.nn.dropout(h_fc1, keep_prob)
- #second fully layer
- w_fc2 = self.weight_variable([1024,self.char_num*self.classes])
- b_fc2 = self.bias_variable([self.char_num*self.classes])
- y_conv = tf.add(tf.matmul(h_fc1_drop, w_fc2), b_fc2)
- return y_conv
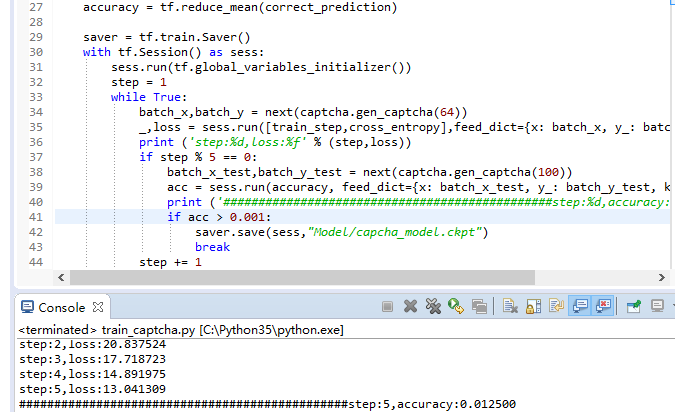
第三步,有了样本和模型可以训练识别模型
每 100 次循环采用 100 个测试样本检查识别准确度,当准确度大于 99% 时,训练结束,采用 GPU 需要 4-5 个小时左右,CPU 大概需要 20 个小时左右。
主要代码(train_captcha.py):
- #-*- coding:utf-8 -*-
- import tensorflow as tf
- import numpy as np
- import string
- import generate_captcha
- import captcha_model
- if __name__ == '__main__':
- captcha = generate_captcha.generateCaptcha()
- width,height,char_num,characters,classes = captcha.get_parameter()
- x = tf.placeholder(tf.float32, [None, height,width,1]) #占位符
- y_ = tf.placeholder(tf.float32, [None, char_num*classes])
- keep_prob = tf.placeholder(tf.float32)
- model = captcha_model.captchaModel(width,height,char_num,classes)
- y_conv = model.create_model(x,keep_prob)
- cross_entropy = tf.reduce_mean(tf.nn.sigmoid_cross_entropy_with_logits(labels=y_,logits=y_conv))#將tensor取平均,第二個參數代表沿著那一維取平均
- train_step = tf.train.AdamOptimizer(1e-4).minimize(cross_entropy) #优化器
- predict = tf.reshape(y_conv, [-1,char_num, classes]) #y_conv通过模型获得的
- real = tf.reshape(y_,[-1,char_num, classes])
- correct_prediction = tf.equal(tf.argmax(predict,2), tf.argmax(real,2))
- correct_prediction = tf.cast(correct_prediction, tf.float32)
- accuracy = tf.reduce_mean(correct_prediction)
- saver = tf.train.Saver()
- with tf.Session() as sess:
- sess.run(tf.global_variables_initializer())
- step = 1
- while True:
- batch_x,batch_y = next(captcha.gen_captcha(64))
- _,loss = sess.run([train_step,cross_entropy],feed_dict={x: batch_x, y_: batch_y, keep_prob: 0.75})
- print ('step:%d,loss:%f' % (step,loss))
- if step % 100 == 0:
- batch_x_test,batch_y_test = next(captcha.gen_captcha(100))
- acc = sess.run(accuracy, feed_dict={x: batch_x_test, y_: batch_y_test, keep_prob: 1.})
- print ('###############################################step:%d,accuracy:%f' % (step,acc))
- if acc > 0.99: #准确率
- saver.save(sess,"capcha_model.ckpt") #保存模型文件
- break
- step += 1
进行训练,查看训练过程(这里为了快速得到模型,我们将acc改的很小。训练模型也不准确):
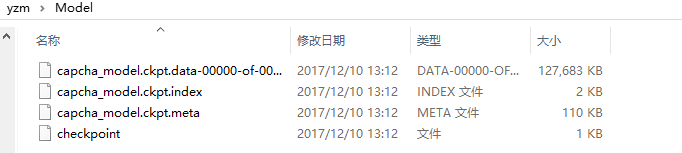
当训练好后会生成以下模型文件,其中checkpoint保存模型路劲和一些模型信息,方便下次训练:
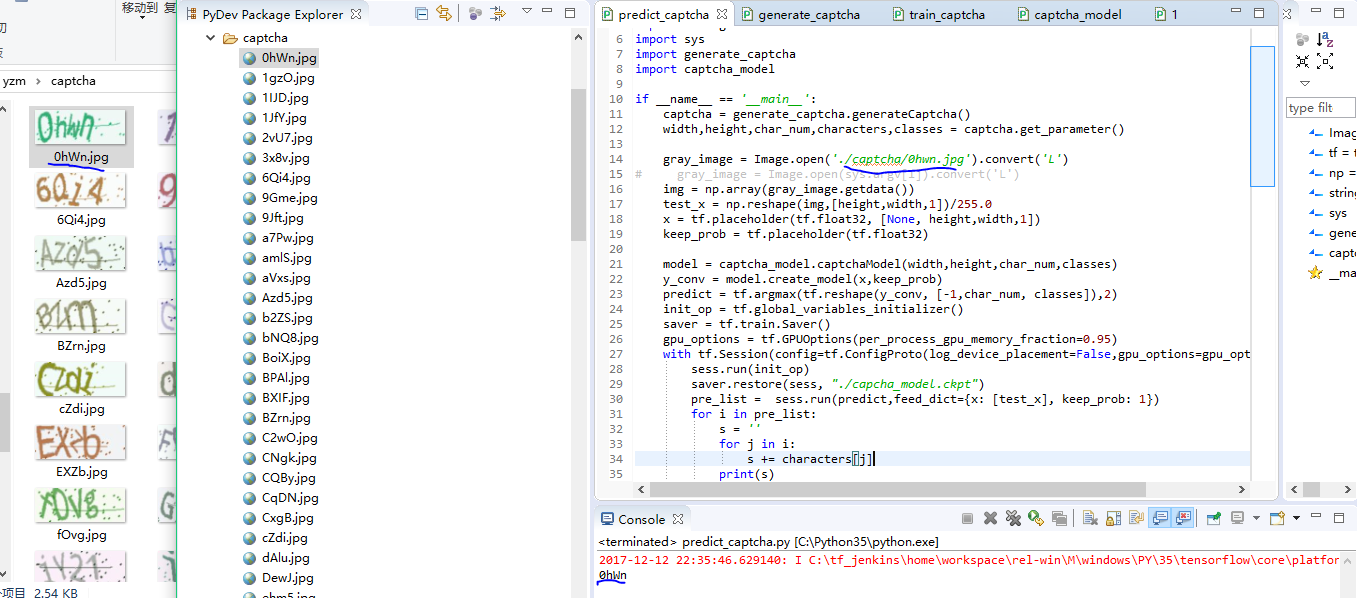
第四步,进行预测:
主要代码(predict_captcha.py):
- #-*- coding:utf-8 -*-
- from PIL import Image, ImageFilter
- import tensorflow as tf
- import numpy as np
- import string
- import sys
- import generate_captcha
- import captcha_model
- if __name__ == '__main__':
- captcha = generate_captcha.generateCaptcha()
- width,height,char_num,characters,classes = captcha.get_parameter()
- gray_image = Image.open('./captcha/0hwn.jpg').convert('L') #要预测的验证码图片位置
- # gray_image = Image.open(sys.argv[1]).convert('L')
- img = np.array(gray_image.getdata())
- test_x = np.reshape(img,[height,width,1])/255.0
- x = tf.placeholder(tf.float32, [None, height,width,1])
- keep_prob = tf.placeholder(tf.float32)
- model = captcha_model.captchaModel(width,height,char_num,classes)
- y_conv = model.create_model(x,keep_prob)
- predict = tf.argmax(tf.reshape(y_conv, [-1,char_num, classes]),2)
- init_op = tf.global_variables_initializer()
- saver = tf.train.Saver()
- gpu_options = tf.GPUOptions(per_process_gpu_memory_fraction=0.95)
- with tf.Session(config=tf.ConfigProto(log_device_placement=False,gpu_options=gpu_options)) as sess:
- sess.run(init_op)
- saver.restore(sess, "./capcha_model.ckpt") #训练好模型文件的位置
- pre_list = sess.run(predict,feed_dict={x: [test_x], keep_prob: 1})
- for i in pre_list:
- s = ''
- for j in i:
- s += characters[j]
- print(s)
查看结果:
参考链接:
https://xianzhi.aliyun.com/forum/topic/1470/
https://xianzhi.aliyun.com/forum/topic/1505/
https://xianzhi.aliyun.com/forum/topic/1552/
https://cloud.tencent.com/developer/labs/lab/10325
CNN识别验证码1的更多相关文章
- Python Tensorflow CNN 识别验证码
Python+Tensorflow的CNN技术快速识别验证码 文章来源于: https://www.jianshu.com/p/26ff7b9075a1 验证码处理的流程是:验证码分析和处理—— te ...
- tensorflow识别验证码(2)-tensorflow 编写CNN 识别验证码
1. 导入依赖包 #coding:utf-8 from gen_captcha import gen_captcha_text_and_image from gen_captcha import nu ...
- CNN识别验证码2
获得验证码图片的俩个来源: 1.有网站生成验证码图片的源码 2.通过python的requests下载验证码图片当我们的训练样本 我们通过第一种方式来得到训练样本,下面是生成验证码的php程序: &l ...
- 使用卷积神经网络CNN完成验证码识别
gen_sample_by_captcha.py 生成验证码图片 # -*- coding: UTF-8 -*- """ 使用captcha lib生成验证码(前提:pi ...
- RNN入门(二)识别验证码
介绍 作为RNN的第二个demo,笔者将会介绍RNN模型在识别验证码方面的应用. 我们的验证码及样本数据集来自于博客: CNN大战验证码,在这篇博客中,我们已经准备好了所需的样本数据集,不需要 ...
- CNN大战验证码
介绍 爬虫江湖,风云再起.自从有了爬虫,也就有了反爬虫:自从有了反爬虫,也就有了反反爬虫. 反爬虫界的一大利器,就是验证码(CAPTCHA),各种各样的验证码让人眼花缭乱,也让很多人在爬虫的过 ...
- tensorFlow(六)应用-基于CNN破解验证码
TensorFlow基础见前博客 简介 传统的验证码识别算法一般需要把验证码分割为单个字符,然后逐个识别.本教程将验证码识别问题转化为分类的问题,实现对验证码进行整体识别. 步骤简介 本教程一共分为四 ...
- 使用tensorflow深度学习识别验证码
除了传统的PIL包处理图片,然后用pytessert+OCR识别意外,还可以使用tessorflow训练来识别验证码. 此篇代码大部分是转载的,只改了很少地方. 代码是运行在linux环境,tesso ...
- 利用modelarts和物体检测方式识别验证码
近来有朋友让老山帮忙识别验证码.在github上查看了下,目前开源社区中主要流行以下几种验证码识别方式: tesseract-ocr模块: 这是HP实验室开发由Google 维护的开源 OCR引擎,内 ...
随机推荐
- spring security认证
1 开发基于表单的认证 Spring security核心的功能 认证(你是谁?) 授权(你能干什么?) 攻击防护(防止伪造身份) spring security实现了默认的用户名+密码认证,默认用户 ...
- 七、并发容器ConcurrentHashMap
一.简介 我们知道,HashMap是线程不安全的.而HashTable是线程安全的,但是JDK已经不建议使用HashTable,它已经被作为废除的实现. 在JDK并发包里面,ConcurrentHas ...
- JDBC入门(1)—— 入门案例
JDBC(Java DataBase Connectivity,java数据库连接)是一种用于执行SQL语句的Java API,可以为多种关系数据库提供统一访问,它由一组用Java语言编写的类和接口组 ...
- 创建Web项目运行时出小错误及解决方法
1.目录结构 2.各文件内容 index.jsp <%@ page contentType="text/html;charset=UTF-8" language=" ...
- BZOJ1258 [CQOI2007]三角形
Description 画一个等边三角形,把三边的中点连接起来,得到四个三角形,把它们称为T1,T2,T3,T4,如图1.把前三个三角形也这样划分,得到12个更小的三角形:T11,T12,T13,T1 ...
- axios中设置post请求,后台却无法识别参数
场景:在使用iview时,定义api请求时,代码如下 export const delWord = (data) => { return axios.request({ url: '/words ...
- C# 读取config
控制台应用程序 App.config: AppSettings.config: Program.cs: string a = ConfigurationManager.AppSettings[&quo ...
- Java内存模型(JMM)以及 垃圾回收机制 小结
内存模型: 内存模型描述了程序中各个变量(实例域.静态域和数组元素)之间的关系,以及在实际计算机系统中将变量存储到内存和从内存中取出变量这样的底层细节,对象最终是存储在内存里面的,这点没有错,但是编译 ...
- Java设计模式—状态模式
状态模式又是一个比较难的设计模式 定义如下: 当一个对象内在状态改变时允许其改变行为,这个对象看起来像改变了其类. 个人理解:通俗的讲,状态模式就是状态的改变引起了行为的改变,但是,我们只能看到行为的 ...
- Android解析WindowManagerService(三)Window的删除过程
前言 在本系列文章中,我提到过:Window的操作分为两大部分,一部分是WindowManager处理部分,另一部分是WMS处理部分,Window的删除过程也不例外,本篇文章会介绍Window的删除过 ...