spring boot 入门及示例
需要环境:eclipse4.7.3 + jdk1.8 +maven3.6.1 + tomcat(web需要)
spring boot官网介绍:https://spring.io/guides/gs/spring-boot/
sts官网:https://spring.io/tools/sts/ 找到合适的版本
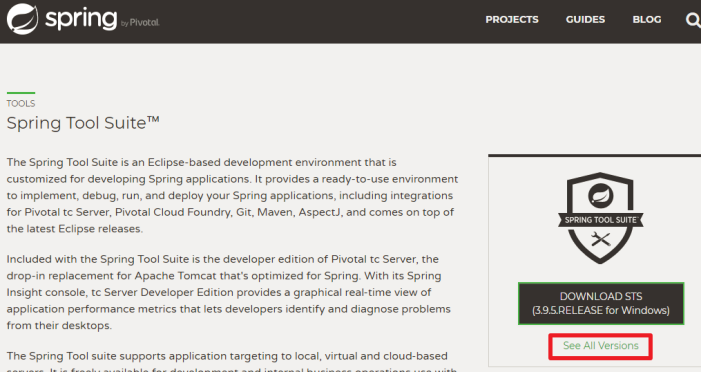
选择安装方式 如果是离线安装下载对应的离线安装包

查看自己对应的版本信息
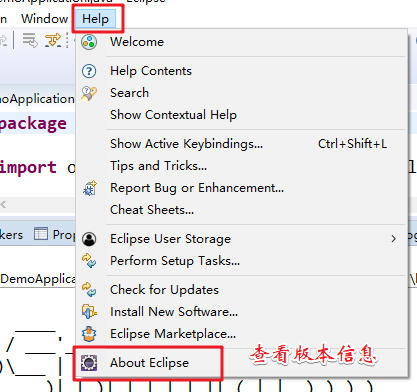

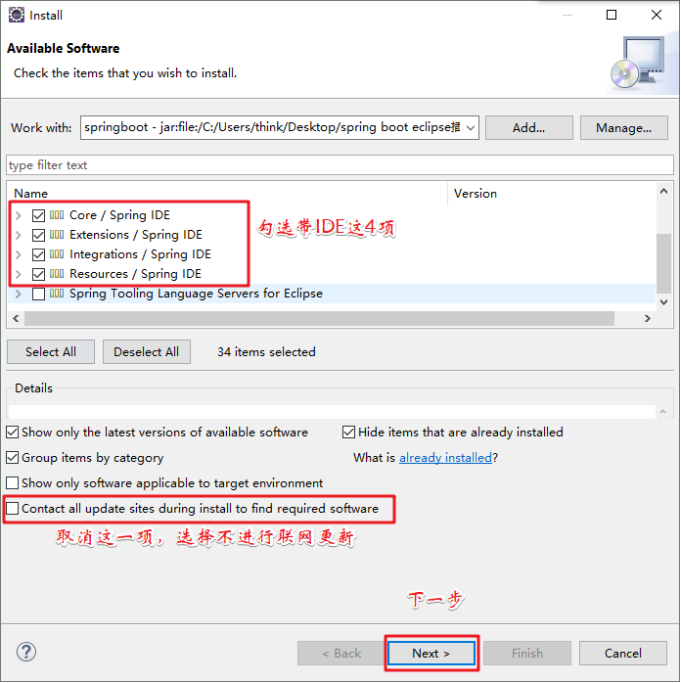
Eclipse进行安装
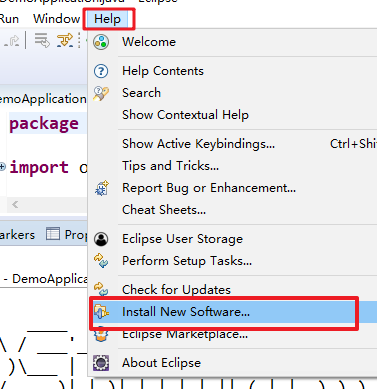
在线安装复制对应的版本连接到安装目录

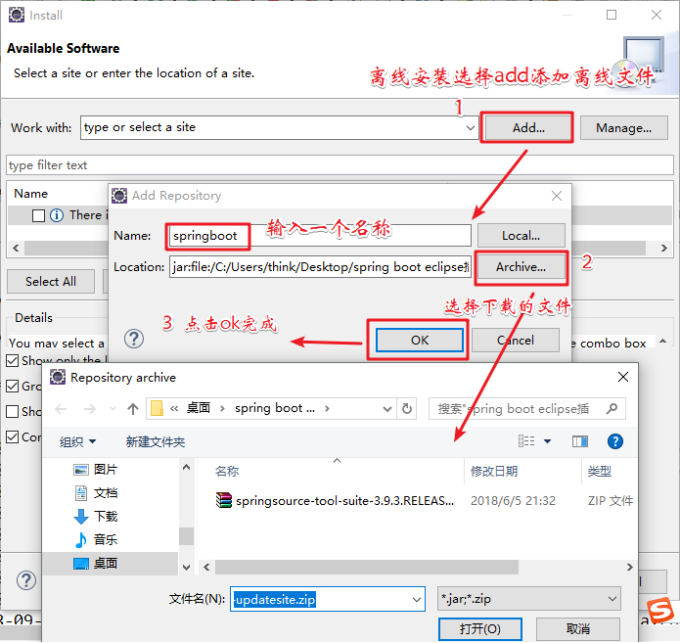
离线安装打开目录选择下载的文件
创建示例:
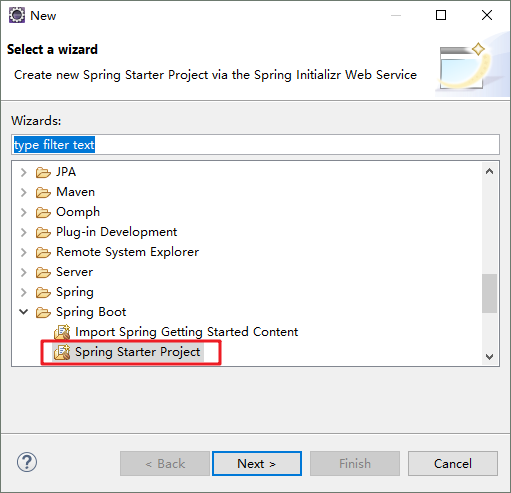
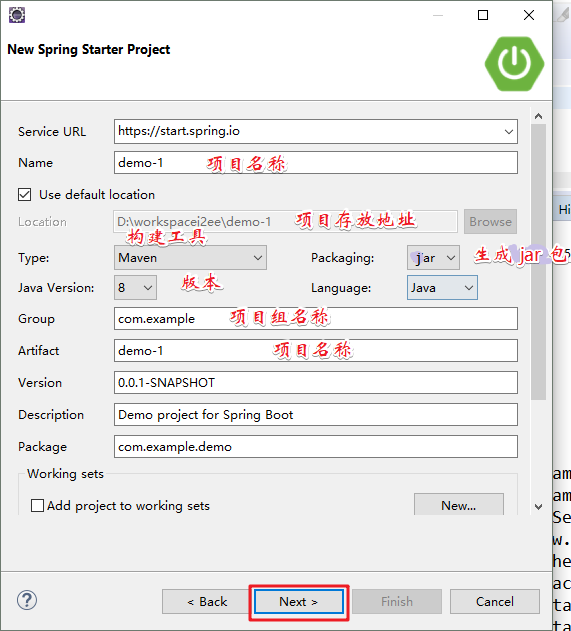
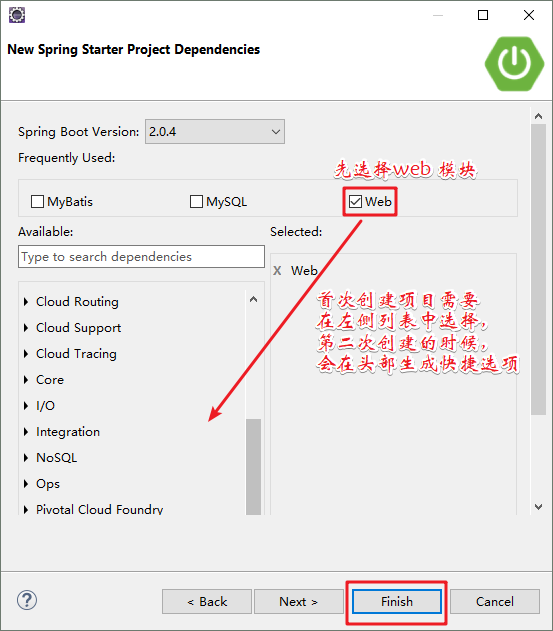
打开eclipse:file ->new -> spring starter project
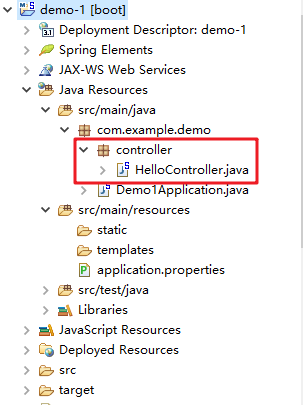

运行Demo1Application.java,右键->run as->Spring Boot App,控制台出现如下结果并无报错:
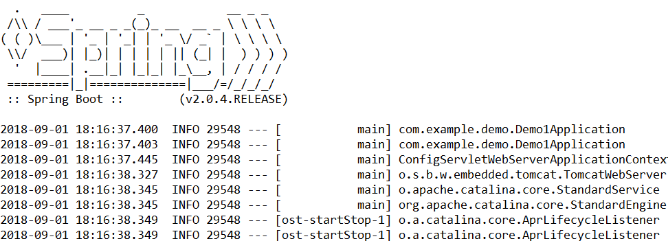
这里需要注意的是:每次运行一定要先将上次的停掉,否则会报错:tomcat端口被占用。
打开浏览器,输入http://localhost:8080/hello,则会出现如下结果。成功!!!

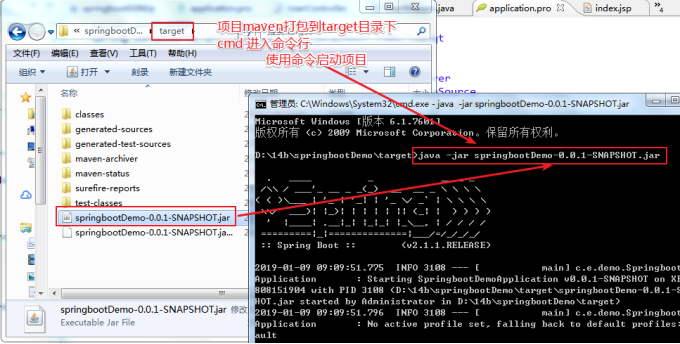
项目部署启动方式 java -jar 项目名称 -port 端口(可以指定配置文件中的参数)
创建spring mybatis 整合项目
在pom.xml文件中添加依赖包 或者从新创建一个项目
添加的依赖包
<dependency>

            <groupId>org.mybatis.spring.boot</groupId>

            <artifactId>mybatis-spring-boot-starter</artifactId>

            <version>1.3.2</version>

        </dependency>

        <dependency>

            <groupId>mysql</groupId>

            <artifactId>mysql-connector-java</artifactId>

            <scope>runtime</scope>

        </dependency>

        <dependency>

            <groupId>org.springframework.boot</groupId>

            <artifactId>spring-boot-starter-tomcat</artifactId>

            <scope>provided</scope>

        </dependency>
新建项目的过程
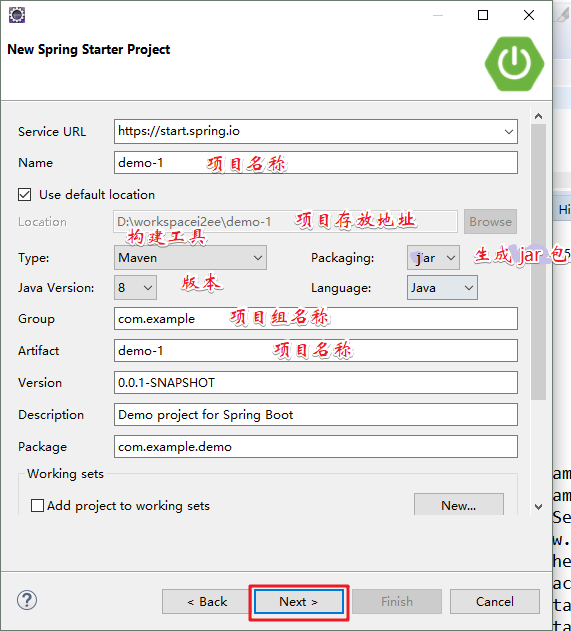

这样,Spring boot就搭建好了,pom.xml里已经有了Spring boot的jar包,包括我们的mysql数据连接的jar包。Spring boot内置了类似tomcat这样的中间件,所以,只要运行DemoApplication中的main方法就可以启动项目了,不过需要先配置数据库。
配置数据库连接在application.properties中
server.port=8080

spring.datasource.url=jdbc:mysql://localhost:3306/shop1

spring.datasource.username=root

spring.datasource.password=root

spring.datasource.driver-class-name=com.mysql.jdbc.Driver

spring.datasource.type=com.alibaba.druid.pool.DruidDataSource

# 初始化大小,最小,最大

spring.datasource.initialSize=5

spring.datasource.minIdle=5

spring.datasource.maxActive=20

# 配置获取连接等待超时的时间

spring.datasource.maxWait=60000
这里配置druid数据库连接池
在pom.xml中加入druid
 <dependency>

       <groupId>com.alibaba</groupId>

       <artifactId>druid</artifactId>

       <version>1.0.29</version>

 </dependency>
创建对应的结构

UserMapper.xml
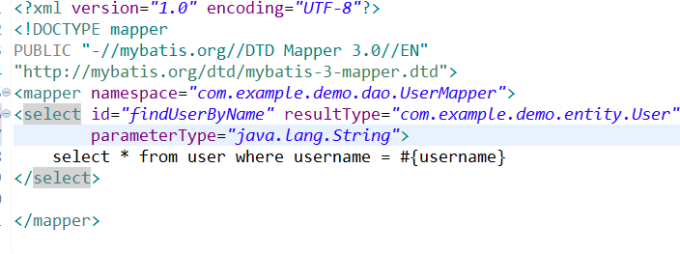
UserMapper.java

还可以通过注解方式进行查询

这样可以不配做mapper.xml
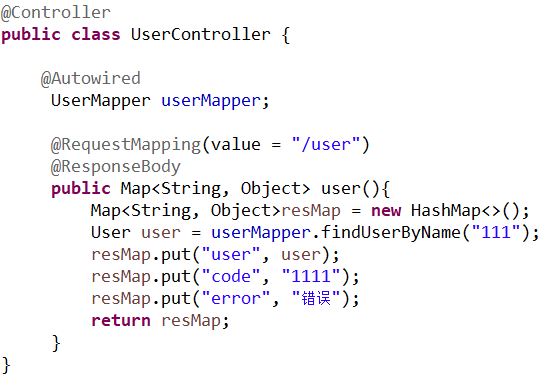
UserController.java
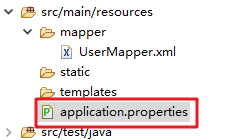
Application.properties文件配置
mybatis.mapper-locations=classpath*:mapper/*Mapper.xml

mybatis.type-aliases-package=com.example.demo.entity
配置热部署,修改代码不需要重启,在pom.xml中
<!-- 热部署模块 -->

        <dependency>

            <groupId>org.springframework.boot</groupId>

            <artifactId>spring-boot-devtools</artifactId>

            <optional>true</optional> <!-- 这个需要为 true 热部署才有效 -->

        </dependency>
如果使用Thymeleaf模板引擎,需要把模板默认缓存设置为false
#禁止thymeleaf缓存(建议:开发环境设置为false,生成环境设置为true)

spring.thymeleaf.cache=false
3、针对devtools的可以指定目录或者排除目录来进行热部署
#添加那个目录的文件需要restart

spring.devtools.restart.additional-paths=src/main/java

#排除那个目录的文件不需要restart

spring.devtools.restart.exclude=static/**,public/**
4、默认情况下,/META-INF/maven,/META-INF/resources,/resources,/static,/templates,/public这些文件夹下的文件修改不会使应用重启,但是会重新加载(devtools内嵌了一个LiveReload Server,当资源发生改变时,浏览器刷新)
5、在application.properties中配置spring.devtools.restart.enabled=false,此时restart类加载器还会初始化,但不会监视文件更新。在SprintApplication.run之前调用System.setProperty(“spring.devtools.restart.enabled”, “false”);可以完全关闭重启支持。
运行结果

Spring Boot 支持 JSP
Spring Boot 的默认视图支持是 Thymeleaf 模板引擎,但是这个我们不熟悉啊,我们还是想要使用 JSP 怎么办呢?
· 第一步:修改 pom.xml 增加对 JSP 文件的支持
<!-- servlet依赖. -->

        <dependency>

            <groupId>javax.servlet</groupId>

            <artifactId>javax.servlet-api</artifactId>

            <scope>provided</scope>

        </dependency>

        <dependency>

            <groupId>javax.servlet</groupId>

            <artifactId>jstl</artifactId>

        </dependency>

        <!-- tomcat的支持.-->

        <dependency>

            <groupId>org.apache.tomcat.embed</groupId>

            <artifactId>tomcat-embed-jasper</artifactId>

            <scope>provided</scope>

        </dependency>
· 第二步:配置试图重定向 JSP 文件的位置
修改 application.properties 文件,将我们的 JSP 文件重定向到 /WEB-INF/views/ 目录下:

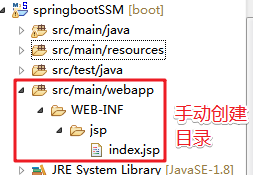
· 第三步:新建 index.jsp 文件
在【src/main】目录下依次创建 webapp、WEB-INF、jsp目录,并创建一个 index.jsp 文件:
Index页面内容
<%@ page language="java" contentType="text/html; charset=UTF-8"

    pageEncoding="UTF-8"%>

<%@ taglib uri="http://java.sun.com/jsp/jstl/core" prefix="c"%>

<!DOCTYPE html PUBLIC "-//W3C//DTD HTML 4.01 Transitional//EN" "http://www.w3.org/TR/html4/loose.dtd">

<html>

<head>

<meta http-equiv="Content-Type" content="text/html; charset=UTF-8">

<title>Insert title here</title>

</head>

<body>

${user.username}

</body>

</html>
· 第四步 修改 HelloController
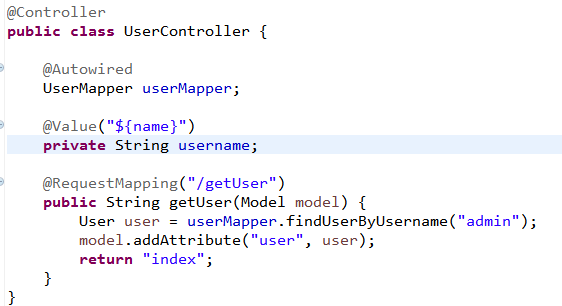
修改 @RestController 注解为 @Controller:

html和templates
静态页面
spring boot项目只有src目录,默认没有webapp目录,会将静态访问(html/图片等)映射到其自动配置的静态目录,如下
/static
/public
/resources
/META-INF/resources
比如,在resources建立一个static目录和index.htm静态文件,访问地址 http://localhost:8080/index.html
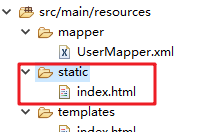
如果要从后台跳转到静态index.html,代码如下。
@Controller

public class HtmlController {

    @GetMapping("/html")

    public String html() {

        return "/index.html";

    }
动态页面
动态页面需要先请求服务器,访问后台应用程序,然后再转向到页面,比如访问JSP。spring boot建议不要使用JSP,默认使用Thymeleaf来做动态页面。
在pom.xml 中添加Thymeleaf组件
<dependency>

            <groupId>org.springframework.boot</groupId>

            <artifactId>spring-boot-starter-thymeleaf</artifactId>

        </dependency>
UserController.java
@Controller

public class UserController {

    @Autowired

     UserMapper userMapper;

     @RequestMapping(value = "/user")

     public String user(HttpServletRequest request){

         User user = userMapper.findUserByName("111");

         request.setAttribute("user", user);

         return "/index";

     }

}
return "/index": 跳转到 templates/index.html动态页面,templates目录为spring boot默认配置的动态页面路径。
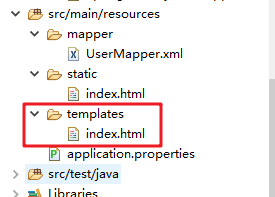
index.html 将后台传递的key参数打印出来
<!DOCTYPE html>

<html>

<head>

<meta charset="UTF-8">

<title>Insert title here</title>

</head>

<body>

<span th:text="${user.username}"></span>

</body>

</html>
访问http://localhost:8080/user

动态和静态区别
静态页面的return默认是跳转到/static/index.html,当在pom.xml中引入了thymeleaf组件,动态跳转会覆盖默认的静态跳转,默认就会跳转到/templates/index.html,注意看两者return代码也有区别,动态没有html后缀。
重定向
如果在使用动态页面时还想跳转到/static/index.html,可以使用重定向return "redirect:/index.html"。
Thymelea模板配置
在application.properties文件中增加Thymeleaf模板的配置。
#thymelea模板配置

spring.thymeleaf.prefix=classpath:/templates/

spring.thymeleaf.suffix=.html

spring.thymeleaf.mode=HTML5

spring.thymeleaf.encoding=UTF-8

spring.thymeleaf.content-type=text/html

spring.thymeleaf.cache=false

spring.resources.chain.strategy.content.enabled=true

spring.resources.chain.strategy.content.paths=/**
在html文件中引用命名空间 。
<html xmlns:th="http://www.thymeleaf.org"> (非必须,建议加上)

输出内容

<p th:text="${user.username}">Welcome to our grocery store!</p>
Spring boot mybatis 逆向工程生成
Pom.xml中添加generator插件 (生成文件之后删除,如果不删除在打包的时候会重复生成)
<plugin>

                <groupId>org.mybatis.generator</groupId>

                <artifactId>mybatis-generator-maven-plugin</artifactId>

                <version>1.3.2</version>

                <dependencies>

                    <dependency>

                        <groupId> mysql</groupId>

                        <artifactId> mysql-connector-java</artifactId>

                        <version>5.1.28</version>

                    </dependency>

                    <dependency>

                        <groupId>org.mybatis.generator</groupId>

                        <artifactId>mybatis-generator-core</artifactId>

                        <version>1.3.2</version>

                    </dependency>

                </dependencies>

                <executions>

                    <execution>

                        <id>Generate MyBatis Artifacts</id>

                        <phase>package</phase>

                        <goals>

                            <goal>generate</goal>

                        </goals>

                    </execution>

                </executions>

                <configuration>

                    <!--允许移动生成的文件 -->

                    <verbose>true</verbose>

                    <!-- 是否覆盖 -->

                    <overwrite>false</overwrite>

                    <!-- 自动生成的配置 -->

                    <configurationFile>

                        src/main/resources/generatorConfig.xml</configurationFile>

                </configuration>

            </plugin>
spring boot 入门及示例的更多相关文章
- 161103、Spring Boot 入门
Spring Boot 入门 spring Boot是Spring社区较新的一个项目.该项目的目的是帮助开发者更容易的创建基于Spring的应用程序和服务,让更多人的人更快的对Spring进行入门体验 ...
- Spring Boot入门教程1、使用Spring Boot构建第一个Web应用程序
一.前言 什么是Spring Boot?Spring Boot就是一个让你使用Spring构建应用时减少配置的一个框架.约定优于配置,一定程度上提高了开发效率.https://zhuanlan.zhi ...
- Spring Boot入门教程2-1、使用Spring Boot+MyBatis访问数据库(CURD)注解版
一.前言 什么是MyBatis?MyBatis是目前Java平台最为流行的ORM框架https://baike.baidu.com/item/MyBatis/2824918 本篇开发环境1.操作系统: ...
- Spring Boot 入门教程
Spring Boot 入门教程,包含且不仅限于使用Spring Boot构建API.使用Thymeleaf模板引擎以及Freemarker模板引擎渲染视图.使用MyBatis操作数据库等等.本教程示 ...
- spring boot入门与进阶
视频课程包含: SpringBoot入门.SpringBoot进阶.Spring Cloud微服务.Spring Ecosystem 微服务相关.Spring Boot 入门 IDEA 版本.Spri ...
- spring boot入门教程——Spring Boot快速入门指南
Spring Boot已成为当今最流行的微服务开发框架,本文是如何使用Spring Boot快速开始Web微服务开发的指南,我们将使创建一个可运行的包含内嵌Web容器(默认使用的是Tomcat)的可运 ...
- Spring Boot 入门之缓存和 NoSQL 篇(四)
原文地址:Spring Boot 入门之缓存和 NoSQL 篇(四) 博客地址:http://www.extlight.com 一.前言 当系统的访问量增大时,相应的数据库的性能就逐渐下降.但是,大多 ...
- spring boot入门与进阶教程
SpringBoot入门.SpringBoot进阶.Spring Cloud微服务.Spring Ecosystem 微服务相关.Spring Boot 入门 IDEA 版本.Spring Boot集 ...
- spring boot 入门操作(二)
spring boot入门操作 使用FastJson解析json数据 pom dependencies里添加fastjson依赖 <dependency> <groupId>c ...
随机推荐
- 100-days: twenty-nine
Title: The promise and perils of synthetic biology promise n.希望成功的前景 peril n.巨大的危险:险情,险境 释义:the peri ...
- [leetcode]66. Plus One加一
Given a non-empty array of digits representing a non-negative integer, plus one to the integer. The ...
- Quartz.Net进阶之七:QuartzNet其他的功能简述
一.介绍 今天是这个系列的最后一篇文章了,主要功能说的差不多了,我们来看看其他相关的内容.话说回来,虽然是这个系列的最后一篇文章,并不代表Quartz的东西就这么点,学习阶段,就这些了,如果以后有了使 ...
- lodash 判断一个数据是否包含另一个数组
if (_.intersection(v.ids, value).length == value.length) { this.groupListExtData.push(v.names); } ...
- sha1 算法源码
原来指望sha1 这种烂大街的算法 不会出什么幺蛾子 结果<linux C编程实战Code>bt章节的sha1 代码 我在linux和windows下的结果不一样 然后用了哈希工具查看了下 ...
- Lucene学习笔记:基础
Lucence是Apache的一个全文检索引擎工具包.可以将采集的数据存储到索引库中,然后在根据查询条件从索引库中取出结果.索引库可以存在内存中或者存在硬盘上. 本文主要是参考了这篇博客进行学习的,原 ...
- ASP.NET Core使用EntityFrameworkCore CodeFrist
1,安装环境: 如果是VS2015,确保已经升级至 update3或以上 .net core sdk (https://www.microsoft.com/net/download/core) vs2 ...
- js几种数组遍历方法.
第一种:普通的for循环 ; i < arr.length; i++) { } 这是最简单的一种遍历方法,也是使用的最多的一种,但是还能优化. 第二种:优化版for循环 ,len=arr.len ...
- 使用git提交项目到码云
1.下载git客户端工具(.exe) 点击安装 2.找到你存放项目的根目录(例如:e:/gittest) 3.在该根目录下,右键,选择“Git Bash Here” 4.出现命令行,输入初始化命令: ...
- Linux任务计划命令 :crontab -e
crond是linux下用来周期性的执行某种任务或等待处理某些事件的一个守护进程,与windows下的计划任务类似,当安装完成操作系统后,默认会安装此服务工具,并且会自动启动crond进程,crond ...
