andriod创建用户界面(1)
一.UI知识Activity
将UI放在一个Activity上面,可以在Activity的onCreate方法中添加UI。
@Override
public void onCreate(Bundle savedInstanceState) {
super.onCreate(savedInstanceState);
setContentView(R.layout.main);
}
如果想得到UI上的控件,可以通过findViewById方法查找,例如:
ListView myListView = (ListView)findViewById(R.id.my_list_view);
二、UI布局
布局是对ViewGroup类的扩展,ViewGroup是对View的扩展。
下面是常见的布局类:
FrameLayout:通常是从左上角开始布局,不过如果多个子视图在同一个FrameLayout时,可能会出现重叠。
LinearLayout:按水平或垂直对齐每个子视图。有些像StackPanel。
RelativeLayout:定义子视图与其他视图或者屏幕边界的相对位置。
GridLayout:行列布局,在4.0引入。
2.1定义布局
实例LinearLayout:
<LinearLayout xmlns:android="http://schemas.android.com/apk/res/android"
android:orientation="vertical"
android:layout_width="match_parent"
android:layout_height="match_parent">
<fragment android:name="com.paad.todolist.NewItemFragment"
android:id="@+id/NewItemFragment"
android:layout_width="match_parent"
android:layout_height="wrap_content"
/>
<fragment android:name="com.paad.todolist.ToDoListFragment"
android:id="@+id/TodoListFragment"
android:layout_width="match_parent"
android:layout_height="wrap_content"
/>
</LinearLayout>
match_parent:显示内容所需最小尺度,如字体的高度。
wrap_content:使其充满,
三.To-Do-List实例
主要代码
//找到ListView以便使用Adapter,
//找到TextView以便监听其事件。
ListView myListView = (ListView)findViewById(R.id.myListView);
final EditText myEditText = (EditText)findViewById(R.id.myEditText);
// Create the Array List of to do items
final ArrayList<String> todoItems = new ArrayList<String>();
// Create the Array Adapter to bind the array to the List View
final ArrayAdapter<String> aa;
//使用系统的list_item作为ArrayAdapter的item项
aa = new ArrayAdapter<String>(this,
android.R.layout.simple_list_item_1,
todoItems);
// Bind the Array Adapter to the List View
myListView.setAdapter(aa);
myEditText.setOnKeyListener(new View.OnKeyListener() {
public boolean onKey(View v, int keyCode, KeyEvent event) {
if (event.getAction() == KeyEvent.ACTION_DOWN)
if ((keyCode == KeyEvent.KEYCODE_DPAD_CENTER) ||
(keyCode == KeyEvent.KEYCODE_ENTER)) {
todoItems.add(0, myEditText.getText().toString());
aa.notifyDataSetChanged();
myEditText.setText("");
return true;
}
return false;
}
});
四、Fragment
其灵活的特点,可以让Fragment达到复用,多个Activity使用同一个Fragment。同时一个Activity可以有多个Fragment组成。
如果想在1.6以下版本,Activity必须继承FragmentActivity。
1.Fragment的生命周期
依赖于Activity。
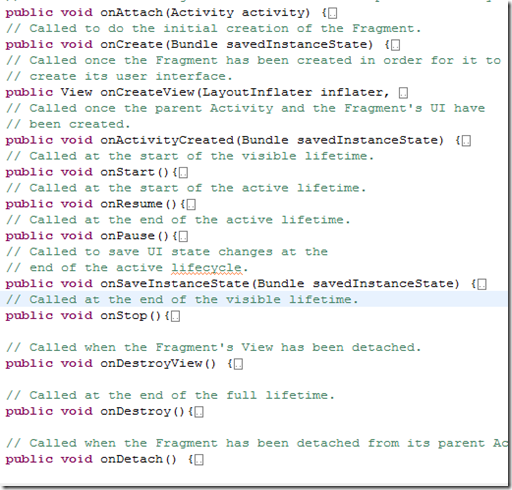
下面给出所有事件

onAttach()方法获取Activity,onCreate()初始化Fragment,onCreateView()设置Fragment的布局。当Activity和Fragment创建完了激发onActivityCreated()方法。onStart()方法生命周期算是正式开始,像小孩子长成大人了一样。onResume()当活动生命周期时触发,比如结婚的时间触发。onPause()方法活动生命周期结束时,像结婚后要度蜜月一样 。onSaveInstanceState()在活动结束后要记录一下状态。以便回来继续处理。
onStop()方法,可见生命周期结束时调用。 onDestroyView()当Fragment的View分离时触发。onDestroy() 在生命周期结束时触发。onDetach是Fragment从Activity分离时发生。

2.FragmentManager
每个Activity都包括一个FragmentManager。用来访问Activity上面的Fragment,可以通过FragmentTransaction来添加替换。删除。
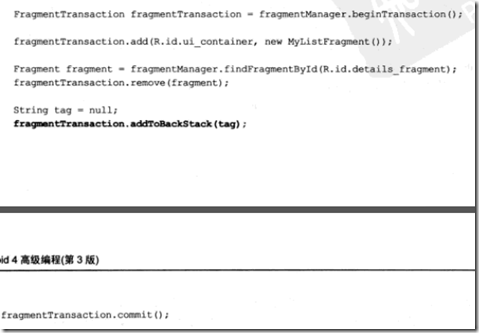
3、FragmentTransaction可通过FragmentManager.BeginTransaction()获取。
然后可以通过Transaction来将Fragment添加到Activity容器中。
xml代码:
<LinearLayout xmlns:android="http://schemas.android.com/apk/res/android"
android:orientation="horizontal"
android:layout_width="match_parent"
android:layout_height="match_parent">
<FrameLayout
android:id="@+id/ui_container"
android:layout_width="match_parent"
android:layout_height="match_parent"
android:layout_weight="1"
/>
<FrameLayout
android:id="@+id/details_container"
android:layout_width="match_parent"
android:layout_height="match_parent"
android:layout_weight="3"
/>
</LinearLayout>
java代码:
public class MyFragmentActivity extends Activity {
public void onCreate(Bundle savedInstanceState) {
super.onCreate(savedInstanceState);
// Inflate the layout containing the Fragment containers
setContentView(R.layout.fragment_container_layout);
FragmentManager fm = getFragmentManager();
// Check to see if the Fragment back stack has been populated
// If not, create and populate the layout.
DetailsFragment detailsFragment =
(DetailsFragment)fm.findFragmentById(R.id.details_container);
if (detailsFragment == null) {
FragmentTransaction ft = fm.beginTransaction();
ft.add(R.id.details_container, new DetailsFragment());
ft.add(R.id.ui_container, new MyListFragment());
ft.commit();
}
}
}
注意以上划红线的部分是先在Activity中添加两个View——FrameLayout。后面通过代码把Fragment放入到View中的。
4、查找Fragment
FragmentManager manager=getFragmentManager();
manager.findFragmentById(id);通常在有UI视图的情况适用
manager.findFragmentByTag(string);,在没哟UI视图的情况适用。
通常是把Fragment添加后有个id,然后才可以通过findFragmentById。
manager.beginTransaction().add(fragment, tag);
通常和后台Fragment使用。
5.添加到BackStack,当按back键时。会回滚操作。

6.设置动画
manager.beginTransaction().setCustomAnimations(enter, exit)();
7.Fragment和Activity之间的接口
可以通过Fragment的onAttach()来获得Activity的引用。也可以getActivity() 来获取Activity。
通常获得Activity是为了让Fragment属性变化时,来调用Activity的一些方法。所以可以在Fragment中定义指定的接口,然后让Activity来调用接口即可。
ListFragment的例子:
public class ToDoListFragment extends ListFragment {
}
FragmentManager fm = getFragmentManager();
ToDoListFragment todoListFragment =
(ToDoListFragment)fm.findFragmentById(R.id.TodoListFragment);
// Create the array list of to do items
todoItems = new ArrayList<String>();
// Create the array adapter to bind the array to the listview
aa = new ArrayAdapter<String>(this,
android.R.layout.simple_list_item_1,
todoItems);
// Bind the array adapter to the listview.
todoListFragment.setListAdapter(aa);
andriod创建用户界面(1)的更多相关文章
- 【翻译】利用Qt设计师窗体在运行时创建用户界面(Creating a user interface from a Qt Designer form at run-time)
利用Qt设计师窗体在运行时创建用户界面 我们利用Calculator窗体例子中创建的窗体(Form)来展示当一个应用(application)已经生成后,是可以在其运行时产生与例子中相同的用户界面. ...
- 腾讯发布 Omix 1.0 - 用 JSX 或 hyperscript 创建用户界面
腾讯发布 Omix 1.0 - 用 JSX 或 hyperscript 创建用户界面 今天,腾讯正式开源发布 Omix 1.0, 让开发者使用 JSX 或 hyperscript 创建用户界面. Gi ...
- Python 创建用户界面之 PyQt5 的使用
之前给大伙介绍了下 tkinter,有朋友希望小帅b对其它的 Python GUI 框架也说道说道,那么今天就来说说 PyQt5 如何创建用户界面. 很多人学习python,不知道从何学起.很多 ...
- matlab中uicontrol创建用户界面控件
来源:https://ww2.mathworks.cn/help/matlab/ref/uicontrol.html?searchHighlight=uicontrol&s_tid=doc_s ...
- Python Django框架笔记(三):django工作方式简单说明和创建用户界面
(一) 说明 简单说明下django的工作方式,并举2个例子. (二) Django工作方式 假定我们有下面这些文件 ,这里在前2篇的基础上增加了 templates目录(存放html文件) 和s ...
- Andriod - 创建自定义控件
控件和布局的继承结构: 可以看到,我们所用的所有控件都是直接或间接继承自 View的,所用的所有布局都是直接或间接继承自 ViewGroup 的.View 是 Android 中一种最基本的 UI 组 ...
- 在 ASP.NET 中创建数据访问和业务逻辑层(转)
.NET Framework 4 当在 ASP.NET 中处理数据时,可从使用通用软件模式中受益.其中一种模式是将数据访问代码与控制数据访问或提供其他业务规则的业务逻辑代码分开.在此模式中,这两个层均 ...
- 十大开源的.NET用户界面框架 让GUI设计不再犯难
选择一款合适的GUI框架是.NET开发中比较重要但又很棘手的问题,因为用户界面相当于一款应用的"门面",直接面向用户.好的UI更能吸引用户,有时甚至成为决定一款应用成败的关键.下面 ...
- [译] 用 Swift 创建自定义的键盘
本文翻译自 How to make a custom keyboard in iOS 8 using Swift 我将讲解一些关于键盘扩展的基本知识,然后使用iOS 8 提供的新应用扩展API来创建一 ...
随机推荐
- 【Spring】Spring之依赖注入(DI)传递参数的方式
DI依赖注入传入参数的方式,这里介绍了基本数据类型,集合,符合数据类型的传递(String类型比较特殊,其传递值和基本数据类型的方法一致) 注入基本数据类型和String类型 通过setter方法注入 ...
- IDEA使用笔记(三)——小齿轮的显示和隐藏(Autoscroll from Source)
在玩快捷键的时候,不清楚自己操作了什么,突然间发现——能直接定位到当前可编辑文件的哪个小齿轮,不见了,找了一会也没弄出来,从网上搜索吧!也没看到对应的方法,后来自己耐下心来复盘自己的操作,终于发现了, ...
- 【struts2】名为redirect的ResultType
1)基本使用 名称为“redirect”的ResultType,在struts-default.xml里的配置如下: <result-type name="redirect" ...
- numpy的常用函数
1 算术平均值 数学运算 样本:[s1, s2, ..., sn] 算术平均值 = (s1 + s2 + ... + sn) / n numpy函数 numpy.mean(样本) -> 算术平均 ...
- 关于less在DW中高亮显示问题
首先, 找到DW 安装目录. Adobe Dreamweaver CS5.5\configuration\DocumentTypes 中的,MMDocumentTypes.xml 这个文件,然后用记事 ...
- linux arm的高端内存映射
linux arm的高端内存映射(1) vmalloc 高端内存映射 与高端映射对立的是低端映射或所谓直接映射,内核中有关变量定义它们的它们的分界点,全局变量high_memory,该变量定义在m ...
- 第二篇:呈现内容_第二节:WebControl呈现
一.WebControl的呈现过程 WebControl派生自Control类,所以WebControl的呈现功能基于Control的呈现逻辑之上,但有了比较大的扩展. 首先,WebControl重写 ...
- 收集一些有意思的ASCII程序注释(持续收集中,希望大家踊跃贡献)
/** * * created by Mr.Simple, Aug 21, 20141:51:40 PM. * Copyright (c) 2014, hehonghui@umeng.com Al ...
- 在windows 上统计git 代码量
1 需要系统安装 git + gawk git 安装自行百度 gawk 到官网下载 http://gnuwin32.sourceforge.net/packages/gawk.htm 1.2 下载好后 ...
- Win8.1开机自启动程序
动机: 开机自启动goagent与锐捷 问题: goagent没有自启动选项;锐捷开启"登录后启动"却一直没有启动 解决方案: 使用计划任务启动goagent+彻底关闭UAC使锐捷 ...
