Android之ProgressBar
今天复习一下以前的知识,补充一下ProgressBar控件
progressBar是进度条组件,通常用于用户展示某个耗时操作完成的进度,而不让用户感觉是程序失去了响应,从而更好地提升用户界面的友好性。
1)制定ProgressBar显示风格
2)ProgressBar的分类
3)标题上ProgressBar的设置
4)ProgressBar的关键属性
5)ProgressBar的关键方法
6)ProgressDialog的基础使用
7)自定义ProgressBar样式
1)制定ProgressBar显示风格
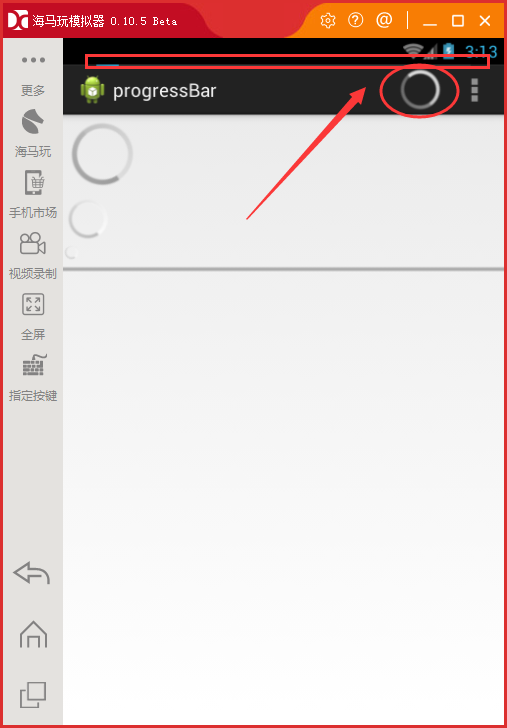
style = "?android:attr/progressBarStyleLarge" 大环形进度条
style = "?android:attr/progressBarStyleSmall" 小环形进度条
style = "?android:attr/progressBarStyleHorizontal" 水平进度条

2)ProgressBar的分类
1.可以精确显示进度(可以显示刻度或者百分比)
2.不可以精确显示精度(一直转啊转,类似于一个过场动画)
3)标题上ProgressBar的设置
4)ProgressBar的关键属性
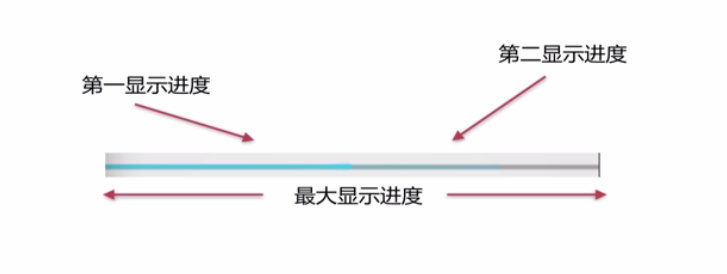
android:max = "100" ——最大显示进度
android:progress = "50" ——第一显示进度
android:secondaryProgress = "80" ——第二显示进度
android:indeterminate = "true" ——设置是否精确显示
(true表示不精确显示进度,false表示精确显示进度)
5)ProgressBar的关键方法
1)setProgress(int) 设置第一进度
2)setSecondaryProgress(int) 设置第二进度
3)getProgress() 获取第一进度
4)getSecondaryProgress() 获取第二进度
5)incrementProgressBy(int) 增加或减少第一进度
6)incrementSecondaryProgressBy(int) 增加或减少第二进度
7)getMax() 获取最大进度
案例:
<LinearLayout xmlns:android="http://schemas.android.com/apk/res/android"
xmlns:tools="http://schemas.android.com/tools"
android:layout_width="match_parent"
android:layout_height="match_parent"
android:orientation="vertical"
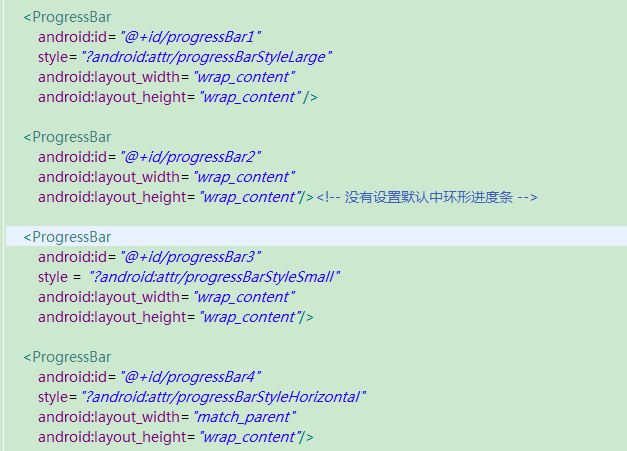
tools:context="com.example.progressbar.MainActivity" > <ProgressBar
android:id="@+id/progressBar1"
style="?android:attr/progressBarStyleLarge"
android:layout_width="wrap_content"
android:layout_height="wrap_content" /> <ProgressBar
android:id="@+id/progressBar2"
android:layout_width="wrap_content"
android:layout_height="wrap_content"/><!-- 没有设置默认中环形进度条 --> <ProgressBar
android:id="@+id/progressBar3"
style = "?android:attr/progressBarStyleSmall"
android:layout_width="wrap_content"
android:layout_height="wrap_content"/> <ProgressBar
android:secondaryProgress="80"
android:progress="50"
android:max="100"
android:id="@+id/horiz"
style="?android:attr/progressBarStyleHorizontal"
android:layout_width="match_parent"
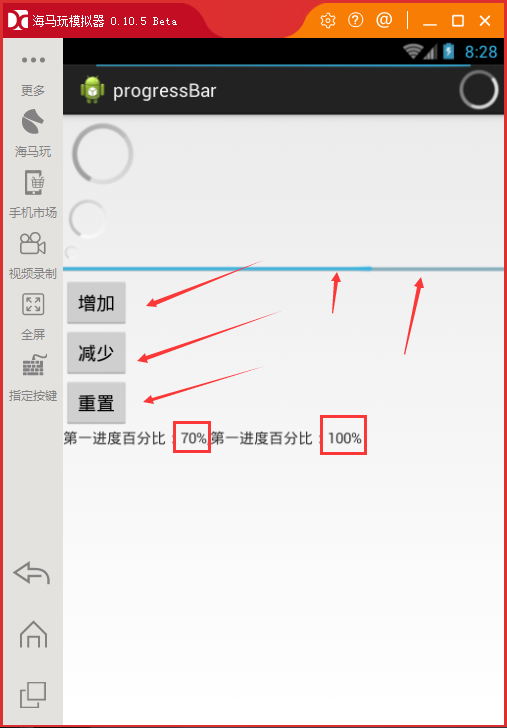
android:layout_height="wrap_content"/> <Button
android:id="@+id/add"
android:layout_width="wrap_content"
android:layout_height="wrap_content"
android:text="增加" /> <Button
android:id="@+id/reduce"
android:layout_width="wrap_content"
android:layout_height="wrap_content"
android:text="减少" /> <Button
android:id="@+id/reset"
android:layout_width="wrap_content"
android:layout_height="wrap_content"
android:text="重置" /> <TextView
android:id="@+id/text"
android:layout_width="wrap_content"
android:layout_height="wrap_content"/> </LinearLayout>
activity_main.xml
 package com.example.progressbar;

 import android.app.Activity;

 import android.os.Bundle;

 import android.view.View;

 import android.view.View.OnClickListener;

 import android.view.Window;

 import android.widget.Button;

 import android.widget.ProgressBar;

 import android.widget.TextView;

 public class MainActivity extends Activity implements OnClickListener {

     private ProgressBar progress ;

     private Button add;

     private Button reduce;

     private Button reset;

     private TextView text;

     @Override

     protected void onCreate(Bundle savedInstanceState) {

         super.onCreate(savedInstanceState);

         //启用窗口特征,启用带进度和不带进度的进度条

         requestWindowFeature(Window.FEATURE_PROGRESS);

         requestWindowFeature(Window.FEATURE_INDETERMINATE_PROGRESS);

         setContentView(R.layout.activity_main);

         //显示两种进度条

         setProgressBarVisibility(true);//水平进度条

         setProgressBarIndeterminateVisibility(true);//环形进度条

         //Max = 10000

         setProgress(9999);

         init();

     }

     private void init() {

         progress = (ProgressBar) findViewById(R.id.horiz);

         add = (Button) findViewById(R.id.add);

         reduce = (Button) findViewById(R.id.reduce);

         reset = (Button) findViewById(R.id.reset);

         text = (TextView) findViewById(R.id.text);

         //getPeogress()获取第一进度

         int first = progress.getProgress();

         //获取第二进度

         int second = progress.getSecondaryProgress();

         //获取最大进度

         int max = progress.getMax();

         text.setText("第一进度百分比:"+(int)(first/(float)max*100)+"%,第一进度百分比:"+(int)(second/(float)max*100)+"%");

         add.setOnClickListener(this);

         reduce.setOnClickListener(this);

         reset.setOnClickListener(this);

     }

     @Override

     public void onClick(View v) {

         switch(v.getId()){

             case R.id.add :{

                 //增加第一进度第二进度10个刻度

                 progress.incrementProgressBy(10);

                 progress.incrementSecondaryProgressBy(10);

                 break ;

             }

             case R.id.reduce :{

                 progress.incrementProgressBy(-10);

                 progress.incrementSecondaryProgressBy(-10);

                 break ;

             }

             case R.id.reset :{

                 progress.setProgress(50);

                 progress.setSecondaryProgress(80);

                 break ;

             }

         }

         text.setText("第一进度百分比:"+(int)(progress.getProgress()/(float)progress.getMax()*100)+"%,第一进度百分比:"+(int)(progress.getSecondaryProgress()/(float)progress.getMax() * 100)+"%");

     }

 }
MainActivity.java
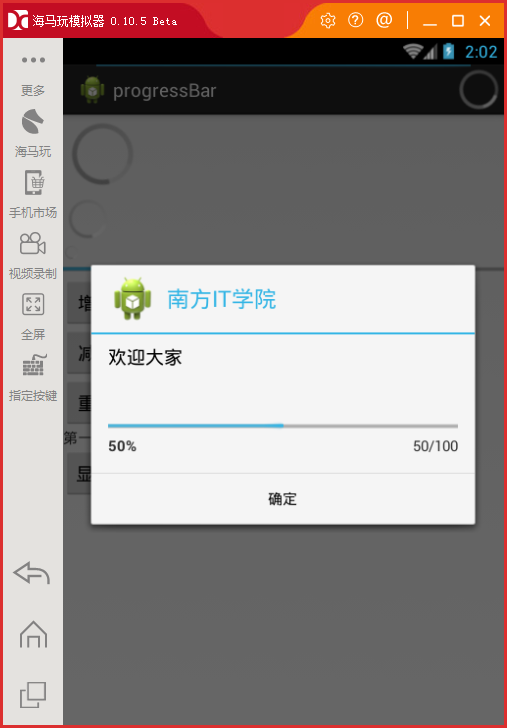
6)ProgressDialog的基础使用
 private ProgressDialog prodialog ;

 private Button show;

 show = (Button) findViewById(R.id.show);

 show.setOnClickListener(this);

 case R.id.show :{

 /**

 * 页面显示风格

 */

 //新建ProgressDialog对象

 prodialog = new ProgressDialog(MainActivity.this);

 //设置显示风格

 prodialog.setProgressStyle(ProgressDialog.STYLE_HORIZONTAL);

 //设置标题

 prodialog.setTitle("南方IT学院");

 //设置对话框文字信息

 prodialog.setMessage("欢迎大家");

 //设置图标

 prodialog.setIcon(R.drawable.ic_launcher);

 /**

 * 设置关于ProgressBar属性

 */

 //设置最大进度

 prodialog.setMax(100);

 //设定初始化已经增长到的进度

 prodialog.incrementProgressBy(50);

 //进度条是明显显示进度的

 prodialog.setIndeterminate(false);

 /**

 * 设定一个确定按钮

 */

 prodialog.setButton(DialogInterface.BUTTON_POSITIVE, "确定", new DialogInterface.OnClickListener() {

 @Override

 public void onClick(DialogInterface dialog, int which) {

 Toast.makeText(MainActivity.this, "欢迎", Toast.LENGTH_LONG).show();

 }

 });

 //是否可以通过返回按钮退出对话框

 prodialog.setCancelable(true);

 //显示ProgressDialog

 prodialog.show();

 break ;

 }
MainActivity
7)自定义ProgressBar样式

style="@android:style/Widget.ProgressBar.Horizontal"
android:progressDrawable="@drawable/progress_bar"
 <?xml version="1.0" encoding="utf-8"?>

 <layer-list xmlns:android="http://schemas.android.com/apk/res/android" >

     <item android:id="@android:id/background">

         <shape>

             <corners android:radius="5dip" />

         <solid android:color="#88000000"/>

         </shape>

     </item>

     <item android:id="@android:id/secondaryProgress">

         <clip>

             <shape>

                 <corners android:radius="5dip" />

                 <gradient

                     android:angle="270"

                     android:centerColor="#C6B7FF"

                     android:centerY="0.75"

                     android:endColor="#C3B2FF"

                     android:startColor="#B9A4FF" />

             </shape>

         </clip>

     </item>

     <item android:id="@android:id/progress">

         <clip>

             <shape>

                 <corners android:radius="5dip" />

             <gradient

                 android:angle="270"

                 android:centerColor="#74EBFF"

                 android:centerY="0.75"

                 android:endColor="#8EEFFF"

                 android:startColor="#57E8FF" />

             </shape>

         </clip>

     </item>

 </layer-list>
progress_bar.xmml
Android之ProgressBar的更多相关文章
- Android之ProgressBar初步应用
这里利用 ProgressBar 即时显示下载进度. 途中碰到的问题: 1.主线程中不能打开 URL,和只能在主线程中使用 Toast 等 2.子线程不能修改 UI 3.允许网络协议 4.暂停下载和继 ...
- java.lang.ClassCastException: android.view.AbsSavedState$1 cannot be cast to android.widget.ProgressBar$SavedState
java.lang.ClassCastException: android.view.AbsSavedState$1 cannot be cast to android.widget.Progress ...
- Android自定义progressBar
通过继承系统ProgressBar实现 效果图 实现 HorizontalProgressBarWithNumber 自定义属性 <?xml version="1.0" en ...
- Android的ProgressBar以及自定义进度条
1.xml文件 activity_main.xml <LinearLayout xmlns:android="http://schemas.android.com/apk/res/an ...
- Android的ProgressBar
注意点: 必须在setContentView 前面设置,否则会报错. 重要的方法: progress.incrementProgressBy(int diff);//参数为进度数,进度满了为100.不 ...
- Android的ProgressBar进度条-android学习之旅(三十一)
ProgressBar 简介 ProgressBar是一种很常用的Ui,用于给复杂的操作显示进度,提供更好的用户相应.使用setProgress()incrementProgressBy()来设置进度 ...
- Android自定义ProgressBar样式
我们使用的进度条多种多样,下面有几种自定义的进度条的样式,下面介绍几个. 进度条的有基本的四种样式: 默认风格的进度条: android:progressBarStyle 水平长型进度条: andro ...
- Android 使用ProgressBar实现进度条
ProgressBar简介ProgressBar是进度条组件,通常用于向用户展示某个耗时操作完成的进度,而不让用户感觉是程序失去了响应,从而更好地提升用户界面的友好型. 课程目标(1)制定Progre ...
- android 自定义progressbar 样式
在res下创建drawable文件夹,新建文件drawable/progressbar_color.xml <layer-list xmlns:android="http://sche ...
随机推荐
- 关于Jquery中的$.each获取各种返回类型数据的使用方法
var arr = [ "one", "two", "three", "four"]; $.each(arr, func ...
- mac上启动和停止mysql
因调试需要,在mac上安装了mysql,安装方法网上大把,此处不赘述.启动和停止命令每次要手工敲,因此写个小脚本方便自己: startmysql.sh(/Applications/Develop/my ...
- mysql数据库常规命令操作
1.MySQL数据库导出命令 1.导出整个数据库 mysqldump -u 用户名 -p 数据库名 > 导出的文件名 mysqldump -u wcnc -p smgp_apps_wcn ...
- 如何让CCLayer创造的地图,左右滑动不出现黑边
在都是scale为1的情况下,效果图如下: , 绿色的是Screen,它的大小和坐标不变,可以理解为CCScene,下面两个就是用CCLayer的地图,有2个Layer,深颜色的就是和Scrren一样 ...
- Linux RPM、TAR包管理
一.RPM软件包命令的使用 RPM主要有5种基本操作模式:安装.卸载.刷新.升级及查询.下面分别介绍. 1.安装软件包 命令语法: rpm -ivh [RPM包文件名称] 命令中各参数的含义如下: - ...
- jsp+servlet+mysql 实现简单的银行登录转账功能
jsp+servlet+mysql 实现简单的银行登录转账功能 [前期的准备] html(登录界面),servlet(处理业务逻辑),jsp(主要实现界面),mysql(实现与数据库的简单的交互)先从 ...
- Docker Day1 & 2
1. Docker Basic 安装docker(在/etc/selinux/config文件中设置selinux=disabled,否则安装时会报错) curl -ssL http://get.do ...
- projecteuler Summation of primes
The sum of the primes below 10 is 2 + 3 + 5 + 7 = 17. Find the sum of all the primes below two milli ...
- 2o_TwoTips
∮Linux 使用的两个小技巧 开启启动脚本 和 环境变量问题 §1.开机启动脚本 && 周期任务 环境 CentOS7:3.10.0-327.el7.x86_64 # head /e ...
- 使用mysql管理meta
第一部分 安装mysql 第二部分 使用mysql管理meta 安装mysql 安装 yum -y install mysql mysql-server yum方法安装需要使用网络:可以自动续传:对于 ...