[转]iOS学习之UINavigationController详解与使用(一)添加UIBarButtonItem
转载地址:http://blog.csdn.net/totogo2010/article/details/7681879
1、UINavigationController导航控制器如何使用
UINavigationController可以翻译为导航控制器,在iOS里经常用到。
我们看看它的如何使用:
下面的图显示了导航控制器的流程。最左侧是根视图,当用户点击其中的General项时 ,General视图会滑入屏幕;当用户继续点击Auto-Lock项时,Auto-Lock视图将滑入屏幕。相应地,在对象管理上,导航控制器使用了导航堆栈。根视图控制器在堆栈最底层,接下来入栈的是General视图控制器和Auto-Lock视图控制器。可以调用pushViewControllerAnimated:方法将视图控制器推入栈顶,也可以调用popViewControllerAnimated:方法将视图控制器弹出堆栈。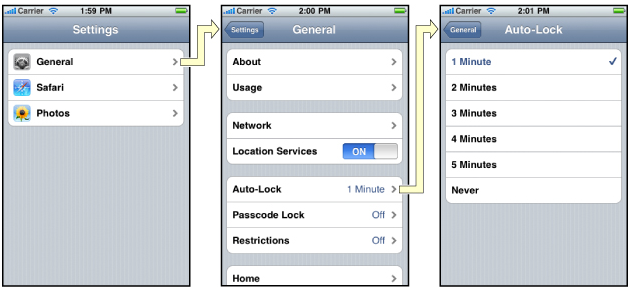
上图来自苹果官网。
2、UINavigationController的结构组成
看下图,UINavigationController有Navigation bar ,Navigation View ,Navigation toobar等组成。

现在我们建立一个例子,看看如何使用UINavigationController
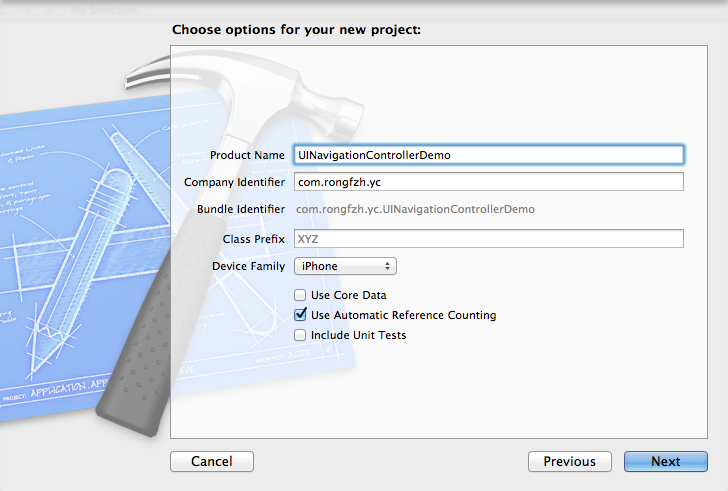
3、新建一个项目
命名为UINavigationControllerDemo,为了更好理解UINavigationController,我们选择Empty Application模板
4、创建一个View Controller,命名为RootViewController:依次选择File——New——New File,默认勾上With XIB for user interface.
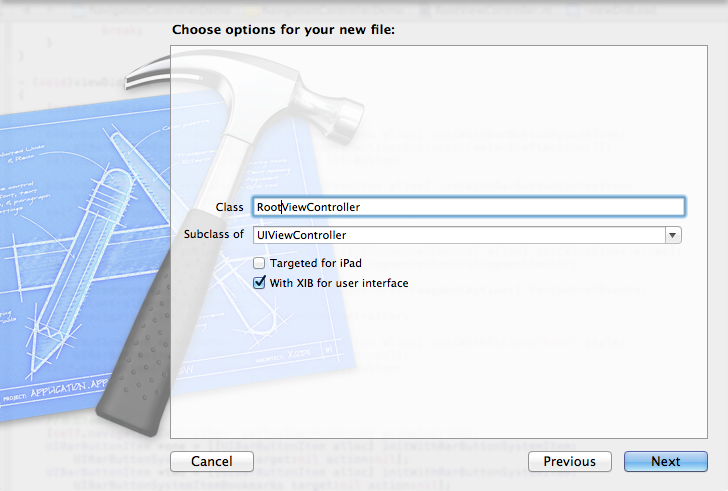
选择正确位置创建完成,这时项目里多了三个文件,分别是RootViewController.h RootViewController.m RootViewController.xib文件。
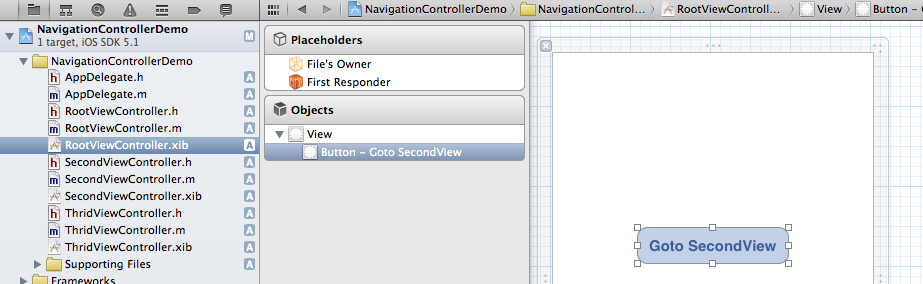
打开RootViewController.xib,添加一个按钮控件,按钮Button改成 :Goto SecondView,为跳转做准备
5、打开AppDelegate.h,向其中添加属性:
- @property (strong, nonatomic) UINavigationController *navController;
添加后AppDelegate.h文件代码如下:
- #import <UIKit/UIKit.h>
- @class ViewController;
- @interface AppDelegate : UIResponder <UIApplicationDelegate>
- @property (strong, nonatomic) UIWindow *window;
- @property (strong, nonatomic) ViewController *viewController;
- @property (strong, nonatomic) UINavigationController *navController;
- @end
6、在AppDelegate.m 文件的didFinishLaunchingWithOptions方法中创建添加navController,RootViewController视图。
- - (BOOL)application:(UIApplication *)application didFinishLaunchingWithOptions:(NSDictionary *)launchOptions
- {
- self.window = [[UIWindow alloc] initWithFrame:[[UIScreen mainScreen] bounds]];
- RootViewController *rootView = [[RootViewController alloc] init];
- rootView.title = @"Root View";
- self.navController = [[UINavigationController alloc] init];
- [self.navController pushViewController:rootView animated:YES];
- [self.window addSubview:self.navController.view];
- [self.window makeKeyAndVisible];
- return YES;
- }
给rootView的titie命名为 Root View,好识别View直接的切换关系。用pushViewController把rootView加入到navController的视图栈中。
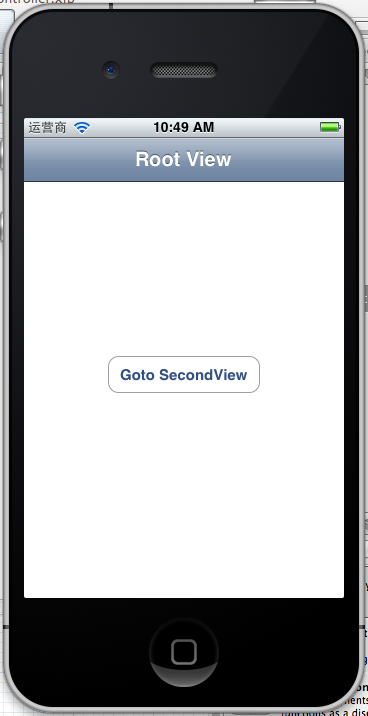
7、现在Root视图添加完成
看看效果:
 '
'
现在还没有Navigation bar 。只有title。
8、添加UIBarButtonItem
bar ButtonItem分左右UIBarButtonItem。我们把左右的都添加上去。
在RootViewController.m中添加代码如下:
- - (void)viewDidLoad
- {
- [super viewDidLoad];
- UIBarButtonItem *leftButton = [[UIBarButtonItem alloc] initWithBarButtonSystemItem:UIBarButtonSystemItemAction target:self action:@selector(selectLeftAction:)];
- self.navigationItem.leftBarButtonItem = leftButton;
- UIBarButtonItem *rightButton = [[UIBarButtonItem alloc] initWithBarButtonSystemItem:UIBarButtonSystemItemAdd target:self action:@selector(selectRightAction:)];
- self.navigationItem.rightBarButtonItem = rightButton;<p class="p1">}</p>
这样添加了UIBarButtonItem了,效果如下:

这里重点介绍下
UIBarButtonItem *leftButton = [[UIBarButtonItemalloc]initWithBarButtonSystemItem:UIBarButtonSystemItemActiontarget:selfaction:@selector(selectLeftAction:)];
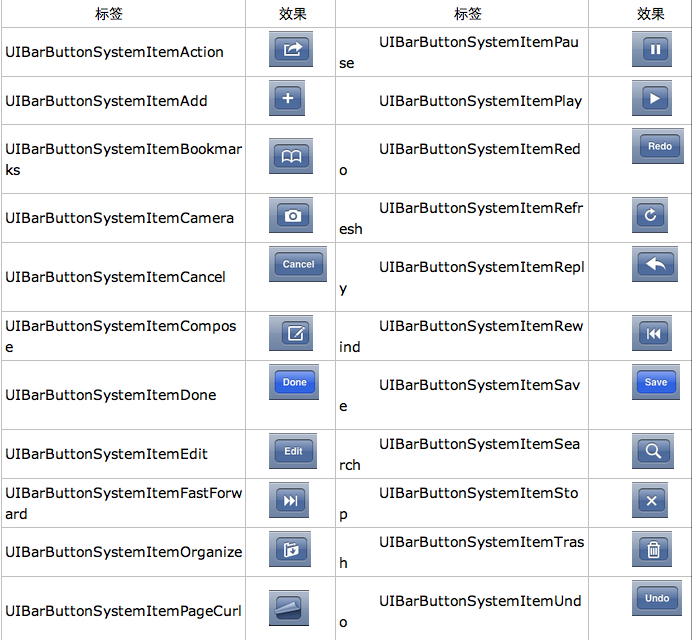
UIBarButtonSystemItemAction的风格,这是系统自带的按钮风格,看下图,你不用一个个试验,你也知道想用那个item,如下图:
9、响应UIBarButtonItem的事件的实现
我们在 action:@selector(selectLeftAction:);
action添加了selectLeftAction和selectRightAction
在RootViewController.m文件中添加代码实现:
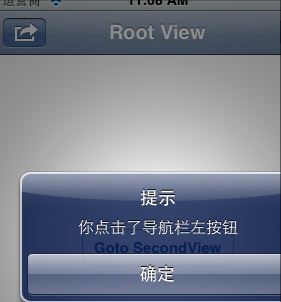
- -(void)selectLeftAction:(id)sender
- {
- UIAlertView *alter = [[UIAlertView alloc] initWithTitle:@"提示" message:@"你点击了导航栏左按钮" delegate:self cancelButtonTitle:@"确定" otherButtonTitles:nil, nil];
- [alter show];
- }
- -(void)selectRightAction:(id)sender
- {
- UIAlertView *alter = [[UIAlertView alloc] initWithTitle:@"提示" message:@"你点击了导航栏右按钮" delegate:self cancelButtonTitle:@"确定" otherButtonTitles:nil, nil];
- [alter show];
- }
这样在点击左右的UIBarButtonItem时,弹出提示:
这篇先讲添加UIBarButtonItem,下篇讲解页面跳转和添加UISegmentedControl
[转]iOS学习之UINavigationController详解与使用(一)添加UIBarButtonItem的更多相关文章
- iOS学习之UINavigationController详解与使用(一)添加UIBarButtonItem
http://blog.csdn.net/totogo2010/article/details/7681879 1.UINavigationController导航控制器如何使用 UINavigati ...
- [转]iOS学习之UINavigationController详解与使用(二)页面切换和segmentedController
转载地址:http://blog.csdn.net/totogo2010/article/details/7682433 iOS学习之UINavigationController详解与使用(一)添加U ...
- iOS学习之UINavigationController详解与使用(三)ToolBar
1.显示Toolbar 在RootViewController.m的- (void)viewDidLoad方法中添加代码,这样Toobar就显示出来了. [cpp] view plaincopy [ ...
- iOS学习之UINavigationController详解与使用(二)页面切换和segmentedController
iOS学习之UINavigationController详解与使用(一)添加UIBarButtonItem是上篇,我们接着讲UINavigationController的重要作用,页面的管理和切换. ...
- [转]iOS学习之UINavigationController详解与使用(三)ToolBar
转载地址:http://blog.csdn.net/totogo2010/article/details/7682641 iOS学习之UINavigationController详解与使用(二)页面切 ...
- UINavigationController详解一(转)UIBarButtonItem
本文出自:http://www.cnblogs.com/smileEvday/archive/2012/05/14/2495153.html 特别感谢. 1.UINavigationControlle ...
- IOS开发之UINavigationController详解
UINavigationController是IOS编程中比较常用的一种容器view controller,很多系统的控件(如UIImagePickerViewController)以及很多有名的AP ...
- IOS 友盟使用详解
IOS 友盟使用详解 这篇博客将会详细介绍友盟的使用,希望对博友们有所帮助. 首先我们在浏览器上搜索友盟. 在这里我们选择官网这个,进去友盟官网后我们按照下图进行选择. 接下来选择如下图 Next 这 ...
- iOS中—触摸事件详解及使用
iOS中--触摸事件详解及使用 (一)初识 要想学好触摸事件,这第一部分的基础理论是必须要学会的,希望大家可以耐心看完. 1.基本概念: 触摸事件 是iOS事件中的一种事件类型,在iOS中按照事件划分 ...
随机推荐
- oracle调整表中列顺序
有一个哥们提出一个问题: 有个表,创建时候的列顺序是a,b,c 如何使用select * 的时候,让列的显示顺序是a,c,b 而且任性地必须使用select *来查询,且不能重建表. 假设有个表tes ...
- python之django 资料
里边有不少比较好的文章. http://www.cnblogs.com/luxiaojun/p/5795070.html
- 使用opencv显示视频的方法
下面对使用opencv显示视频做一个简单的记录.当然,网上这方面的资料已经数不胜数了,我只是将其简单记录,总结一下. 在opencv中显示视频主要有: (1)从本地读取视频和调用摄像头读取视频 (2) ...
- escape()、encodeURI()、encodeURIComponent() difference
escape() 方法: 采用ISO Latin字符集对指定的字符串进行编码.所有的空格符.标点符号.特殊字符以及其他非ASCII字符都将被转化成%xx格式的字符编码(xx等于该字符在字符集表里面的编 ...
- session 和 cookie 的区别与联系
1.创建一个新的Cookie Cookie cookie = new Cookie("username",name); 2.设置cookie在客户端上存活多久 cookie.set ...
- linux env
.Linux的变量种类 按变量的生存周期来划分,Linux变量可分为两类: 1.1 永久的:需要修改配置文件,变量永久生效. 1.2 临时的:使用export命令声明即可,变量在关闭shell时失效. ...
- Android -- 自定义View(一)
1,引言:刚从国庆长假的放荡中醒过来,已经有将近十天没碰电脑了,上午写写代码感觉手还是挺生的,想把自定义view好好的系统的学学,在网上看了看别人出的教程 ,stay4it的自定义view感觉还是挺好 ...
- java web sql注入测试(4)--如何防止该类缺陷发生
检查用户输入的合法性,确信输入的内容只包含合法的数据,数据检查应当在客户端和服务器端都执行之所以要执行服务器端验证,是为了弥补客户端验证机制脆弱的安全性.在客户端,攻击者完全有可能获得网页的源代码,修 ...
- linux主机vps简单性能测试
第一,CPU.内存.硬盘检测 cat /proc/cpuinfo (查看CPU信息) cat /proc/meminfo (查看内存信息) df -lh (查看硬盘信息) 这个命令可以看到我们购买的V ...
- gerrit
https://en.wikibooks.org/wiki/Git/Gerrit_Code_Review http://openwares.net/linux/gerrit2_setup.html 不 ...