vue-cli3.x中使用axios发送请求,配合webpack中的devServer编写本地mock数据接口(get/post/put/delete)
vue-cli3.x中使用axios发送请求,配合webpack中的devServer编写本地mock数据接口(get/post/put/delete)
手把手式笔记
Axios配置
- 安装 axios
npm install axios
- main.js同级目录新建axios配置文件setaxios.js
import axios from 'axios'

// import store from './store' //vuex

// import router from './router' //路由

export default function setAxios() {

    //拦截request请求

    axios.interceptors.request.use(

        config=>{

            console.log(config.data);

            return config;

        }

    )

    //拦截response回调

    axios.interceptors.response.use(

        response=>{

            if(response.status===200){

                const data=response.data

                // if (data.code === 400){

                //     //登录过期,权限不足

                //     console.warn("登陆过期");

                //     //清除token

                //     store.commit('setToken','')

                //     window.localStorage.removeItem('token')

                //     //跳转登录

                //     router.replace({

                //         path:"/login"

                //     })

                // }

                return data;

            }

            return response;

        }

    )

}
- main.js中引入axios与其配置文件
import axios from 'axios'

import setaxios from './setaxios'

//Vue全局挂载axios

Vue.prototype.$http=axios

//设置baseUrl

axios.defaults.baseURL = '/api'
devServer中配置本地mock数据接口(vue.config.js文件中)参考webpack中文文档
module.exports = {

    publicPath: './',

    outputDir: 'dist',

    assetsDir: 'static',

    configureWebpack: {

        devServer: {

            contentBase: './build',//项目基本访问目录

            host: 'localhost',//服务器ip地址

            port: 8088,//端口

            open: true, //自动打开页面

            hot: true,//模块热替换

            hotOnly: true,//只有热更新不会刷新页面

            //mock数据接口部分 关键部分

            before(app) {

                const bodyParser = require('body-parser')

                app.use(bodyParser.json())  //通过bodyParser获取req.body)

                /**

                *   testGet

                */

                app.get('/api/test/get',(req,resp)=>{

                    console.log(req.query);

                    resp.json({

                        "code":111,

                        "msg":"get测试成功"

                    })

                })

                /**

                 * testPost

                 */

                app.post('/api/test/post', (req, resp) => {

                    console.log(req.body);

                    resp.json({

                        "code": 123,

                        "msg": "post测试成功"

                    })

                })

                /**

                 * testPut

                 */

                app.put('/api/test/put', (req, resp) => {

                    console.log(req.body)

                    resp.json({

                        "code": 123,

                        "msg": "put测试成功"

                    })

                })

                /**

                 * testDelete

                 */

                app.delete("/api/test/delete",(req,resp)=>{

                    console.log(req.body);

                    resp.json({

                        "code":666,

                        "msg":"delete测试成功"

                    })

                })

            }

        }

    }

}
通过上述配置操作即可完成本地mock数据接口编写,接下来是axios发送http请求测试示例
restful风格接口axios发送请求示例 参考axios中文文档
  methods: {

    sendGet: function() {

      this.$http

        .get("/test/get", {

          params: {

            param1: "get字符串",

            param2: 13131

          }

        })

        .then(res => {

          console.log(res);

        });

    },

    sendPost: function() {

      this.$http

        .post("/test/post", {

          param1: "post字符串",

          param2: 13131

        })

        .then(res => {

          console.log(res);

        });

    },

    sendPut: function() {

      this.$http

        .put("/test/put", {

          param1: "put字符串",

          param2: 13131

        })

        .then(res => {

          console.log(res);

        })

        .catch(err => {

          console.log(err);

        });

    },

    sendDelete: function() {

      this.$http

        .delete("/test/delete", {

          data: {

            param1: "delete字符串",

            param2: 13131

          }

        })

        .then(res => {

          console.log(res);

        })

        .catch(err => {

          console.log(err);

        });

    }

  }
完整测试demo(Test.vue)
<template>
<div>
<h2>HTTP-Request</h2>
<button @click="sendGet()">GET</button>
<span>  </span>
<button @click="sendPost()">POST</button>
<span>  </span>
<button @click="sendPut()">PUT</button>
<span>  </span>
<button @click="sendDelete()">DELETE</button>
<hr />
</div>
</template>
<script>
export default {
name: "testPage",
data() {
return {};
},
methods: {
sendGet: function() {
this.$http
.get("/test/get", {
params: {
param1: "get字符串",
param2: 13131
}
})
.then(res => {
console.log(res);
});
},
sendPost: function() {
this.$http
.post("/test/post", {
param1: "post字符串",
param2: 13131
})
.then(res => {
console.log(res);
});
},
sendPut: function() {
this.$http
.put("/test/put", {
param1: "put字符串",
param2: 13131
})
.then(res => {
console.log(res);
})
.catch(err => {
console.log(err);
});
},
sendDelete: function() {
this.$http
.delete("/test/delete", {
data: {
param1: "delete字符串",
param2: 13131
}
})
.then(res => {
console.log(res);
})
.catch(err => {
console.log(err);
});
}
}
};
</script>
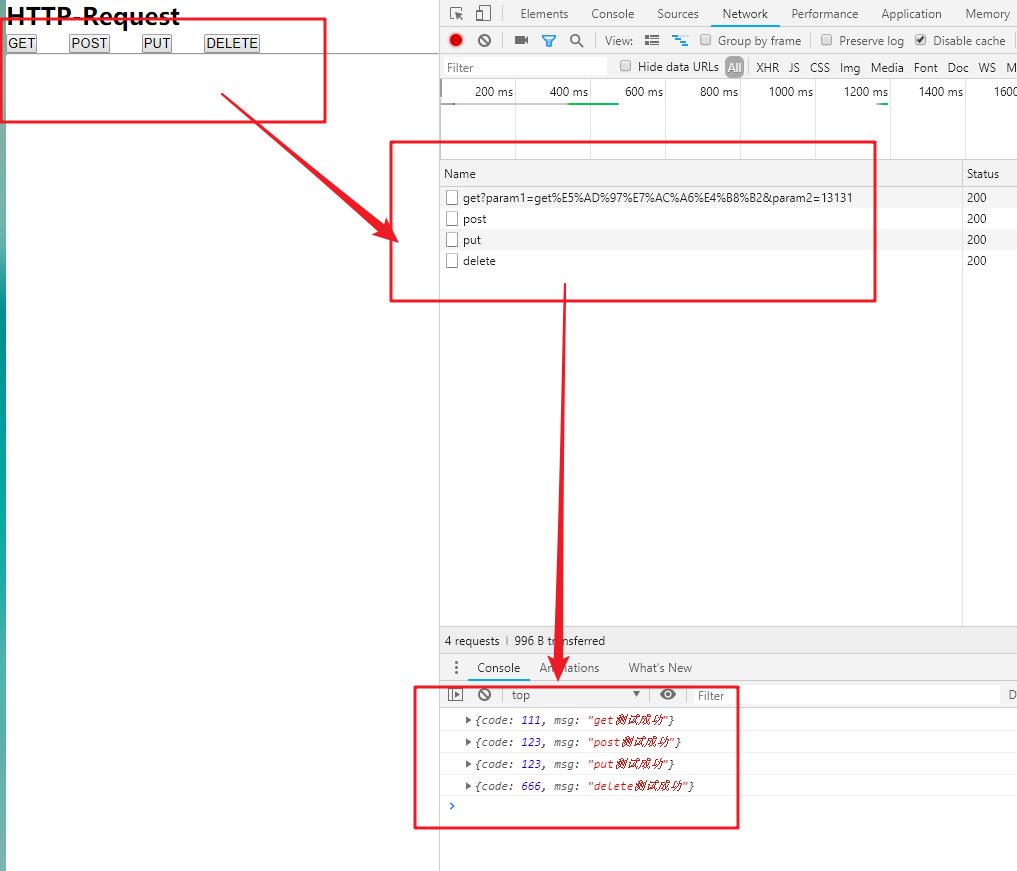
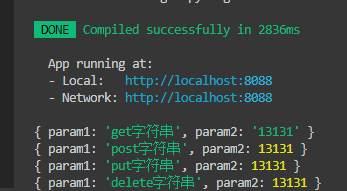
示例效果图
参考文档
如有不妥,不解之处,请滴滴我,或在评论区留言
vue-cli3.x中使用axios发送请求,配合webpack中的devServer编写本地mock数据接口(get/post/put/delete)的更多相关文章
- vue中采用axios发送请求及拦截器
这几天在使用vue中axios发送get请求的时候很顺手,但是在发送post请求的时候老是在成功的回调函数里边返回参数不存在,当时就纳闷了,经过查阅资料,终于得到了解决方案,在此做一总结: 首先我们在 ...
- vue中使用axios发送请求
我们知道,vue2.0以后,vue就不再对vue-resource进行更新,而是推荐axios,而大型项目都会使用 Vuex 来管理数据,所以这篇博客将结合两者来发送请求 1.安装axios cnpm ...
- Vue项目中使用Vuex + axios发送请求
本文是受多篇类似博文的影响写成的,内容也大致相同.无意抄袭,只是为了总结出一份自己的经验. 一直以来,在使用Vue进行开发时,每当涉及到前后端交互都是在每个函数中单独的写代码,这样一来加大了工作量,二 ...
- Vue 爬坑之路(六)—— 使用 Vuex + axios 发送请求
Vue 原本有一个官方推荐的 ajax 插件 vue-resource,但是自从 Vue 更新到 2.0 之后,官方就不再更新 vue-resource 目前主流的 Vue 项目,都选择 axios ...
- Vue笔记:使用 axios 发送请求
在Vue1.0的时候有一个官方推荐的 ajax 插件 vue-resource,但是自从 Vue 更新到 2.0 之后,官方就不再更新 vue-resource. 关于为什么放弃推荐? -> 尤 ...
- Vue 爬坑之路—— 使用 Vuex + axios 发送请求
Vue 原本有一个官方推荐的 ajax 插件 vue-resource,但是自从 Vue 更新到 2.0 之后,官方就不再更新 vue-resource 目前主流的 Vue 项目,都选择 axios ...
- vue项目使用axios发送请求让ajax请求头部携带cookie
最近做vue项目时遇到登录权限问题,登录以后再发送的请求头部并没有携带登录后设置的cookie,导致后台无法校验其是否登录.检查发现是vue项目中使用axios发送ajax请求导致的.查看文档得知ax ...
- vue2.0项目实战(3)使用axios发送请求
在Vue1.0的时候有一个官方推荐的 ajax 插件 vue-resource,但是自从 Vue 更新到 2.0 之后,官方就不再更新 vue-resource. 关于为什么放弃推荐? -> 尤 ...
- vuejs+axios发送请求
Vue 原本有一个官方推荐的 ajax 插件 vue-resource,但是自从 Vue 更新到 2.0 之后,官方就不再更新 vue-resource 目前主流的 Vue 项目,都选择 axios ...
随机推荐
- QT中的各种对话框
大家可以参见QT中各种MessageBox的使用的这篇文章 界面效果图如下,大家可以用代码自己操作 diglog.h #ifndef DIALOG_H #define DIALOG_H #includ ...
- 获取其他进程的命令行(ReadProcessMemory其它进程的PPROCESS_PARAMETERS和PEB结构体)
type UNICODE_STRING = packed record Length: Word; MaximumLength: Word; Buffer: PWideCh ...
- uniConnection断线重联(tag属性颇有深意,这样就可以在某些情况下,不用继承实现新控件就可以达到自己的目的)
群友无法呼吸提供的,谢谢他了. http://blog.sina.com.cn/s/blog_44fa172f0102wb7h.html
- ZooKeeper学习第五期--ZooKeeper管理分布式环境中的数据(转)
转载来源:https://www.cnblogs.com/sunddenly/p/4092654.html 引言 本节本来是要介绍ZooKeeper的实现原理,但是ZooKeeper的原理比较复杂,它 ...
- 安装metasploitable3的经验总结
一个月没有写学习记录了,但是这一个月一直没闲着,抽空写写自己装metasploitable3的经验教训(提示:只要你的环境配置没错,步骤没错,多试几次就会成功了,我总共测试了15次,,短的耗时30分钟 ...
- kubernetes实战篇之windows添加自签ca证书信任
系列目录 由于服务端设置了https访问,因此如果通过浏览器访问时会提示证书不被信任,但是仍然可以通过处理继续访问.但是在自动化环境中,都是通过命令来请求的,这样不受信任的https就会报错误,这样我 ...
- [hdu-6395]Sequence 分块+矩阵快速幂
题目链接:http://acm.hdu.edu.cn/showproblem.php?pid=6395 因为题目数据范围太大,又存在递推关系,用矩阵快速幂来加快递推. 每一项递推时 加的下取整的数随 ...
- tensorflow 离线使用 fashion_mnist 数据集
在tensflow中加载 fashion_mnist 数据集时,由于网络原因.可能会长时间加载不到或报错 此时我们可以通过离线的方式加载 1.首先下载数据集:fashion_mnist (下载后解压) ...
- QT 资料收集 (不定期添加)
Qt之界面实现技巧 http://blog.sina.com.cn/s/blog_a6fb6cc90101dech.html
- React躬行记(6)——事件
React在原生事件的基础上,重新设计了一套跨浏览器的合成事件(SyntheticEvent),在事件传播.注册方式.事件对象等多个方面都做了特别的处理. 一.注册事件 合成事件采用声明式的注册方式, ...