maven搭建webservice apache cxf实现
用 web方式发布 webService 服务端、客户端
一、服务器端搭建
1.首先创建 一个web工程(增加Maven依赖)
2.增加Maven依赖包,如下:
<project xmlns="http://maven.apache.org/POM/4.0.0" xmlns:xsi="http://www.w3.org/2001/XMLSchema-instance" xsi:schemaLocation="http://maven.apache.org/POM/4.0.0 http://maven.apache.org/xsd/maven-4.0.0.xsd">

  <modelVersion>4.0.</modelVersion>

  <groupId>com.jlm</groupId>

  <artifactId>WebserviceTest</artifactId>

  <version>0.0.-SNAPSHOT</version>

  <packaging>war</packaging>

  <dependencies>

      <!-- spring core -->

        <dependency>

            <groupId>org.springframework</groupId>

            <artifactId>spring-core</artifactId>

            <version>2.5.</version>

        </dependency>

        <!-- spring beans -->

        <dependency>

            <groupId>org.springframework</groupId>

            <artifactId>spring-beans</artifactId>

            <version>2.5.</version>

        </dependency>

        <!-- spring context -->

        <dependency>

            <groupId>org.springframework</groupId>

            <artifactId>spring-context</artifactId>

            <version>2.5.</version>

        </dependency>

        <!-- spring web -->

        <dependency>

            <groupId>org.springframework</groupId>

            <artifactId>spring-web</artifactId>

            <version>2.5.</version>

        </dependency>

        <dependency>

            <groupId>commons-logging</groupId>

            <artifactId>commons-logging</artifactId>

            <version>1.1</version>

        </dependency>

        <dependency>

            <groupId>javax.xml</groupId>

            <artifactId>jaxb-api</artifactId>

            <version>2.1</version>

            <type>pom</type>

        </dependency>

        <dependency>

            <groupId>javax.xml</groupId>

            <artifactId>jaxb-impl</artifactId>

            <version>2.1</version>

        </dependency>

        <dependency>

            <groupId>xfire</groupId>

            <artifactId>saaj-api</artifactId>

            <version>1.3</version>

        </dependency>

        <dependency>

            <groupId>xfire</groupId>

            <artifactId>saaj-impl</artifactId>

            <version>1.3</version>

        </dependency>

        <dependency>

            <groupId>wsdl4j</groupId>

            <artifactId>wsdl4j</artifactId>

            <version>1.6.</version>

        </dependency>

        <dependency>

            <groupId>org.apache.cxf</groupId>

            <artifactId>cxf-rt-frontend-jaxws</artifactId>

            <version>2.2.</version>

        </dependency>

        <dependency>

            <groupId>org.apache.cxf</groupId>

            <artifactId>cxf-rt-transports-http</artifactId>

            <version>2.2.</version>

        </dependency>

        <dependency>

            <groupId>org.apache.cxf</groupId>

            <artifactId>cxf-rt-transports-http-jetty</artifactId>

            <version>2.2.</version>

        </dependency>

  </dependencies>

</project>
3. 编写HelloWorld 接口类 代码如下:
package net.cc.service;

import javax.jws.WebParam;

import javax.jws.WebService;

@WebService

public interface HelloWorld {

    String sayHello(@WebParam(name = "userName") String userName);

}
说明:
@webService 说明这是一个webService
@webParam 说明参数名称
4. 编写实现类如下:
package net.cc.service;

import javax.jws.WebParam;

import javax.jws.WebService;

@WebService(serviceName = "HelloWorld")

public class HelloWorldImpl implements HelloWorld {

	@Override

	public String sayHello(@WebParam(name = "userName") String userName) {

        // TODO Auto-generated method stub

        System.out.println("客户端提交信息: " + userName);

        return "say Hello " + userName;

    }

}
说明:
@webService(serviceName = “HelloWorld”) 让Apache cxf知道是哪个接口来创建的WSDL
5. 编写spring xml文件 如下:
<?xml version="1.0" encoding="UTF-8"?>

<beans xmlns="http://www.springframework.org/schema/beans"

    xmlns:xsi="http://www.w3.org/2001/XMLSchema-instance" xmlns:jaxws="http://cxf.apache.org/jaxws"

    xsi:schemaLocation="http://www.springframework.org/schema/beans

        http://www.springframework.org/schema/beans/spring-beans.xsd

        http://cxf.apache.org/jaxws

        http://cxf.apache.org/schemas/jaxws.xsd">

    <jaxws:endpoint id="ProjectManager" implementor="net.cc.service.HelloWorldImpl"

        address="http://127.0.0.1:7890/HelloWorld" />

</beans>
说明:
implementor 表示 实现类 路径
address 表示需要发布的wsdl地址
6.编写 myListener 类 如下:
package net.cc.servlet;

import javax.servlet.ServletContextEvent;

import javax.servlet.ServletContextListener;

import org.springframework.context.support.ClassPathXmlApplicationContext;

public class myListener implements ServletContextListener {

	@Override

    public void contextDestroyed(ServletContextEvent arg0) {

        // TODO Auto-generated method stub

    }

    @Override

    public void contextInitialized(ServletContextEvent arg0) {

        // TODO Auto-generated method stub

        System.out.println("启动Tomcat...");

        ClassPathXmlApplicationContext act = new ClassPathXmlApplicationContext("spring/applicationContext.xml");

    }

}
说明:
实现 ServletContextListener 目的是为了在Tomcat启动时自动加载
使用 ClassPathXmlApplicationContext 去加载刚才写的 spring-beans.xml 文件
7. 在当前项目中web.xml文件 增加如下代码:
<?xml version="1.0" encoding="UTF-8"?>

<web-app xmlns:xsi="http://www.w3.org/2001/XMLSchema-instance" xmlns="http://java.sun.com/xml/ns/javaee" xsi:schemaLocation="http://java.sun.com/xml/ns/javaee http://java.sun.com/xml/ns/javaee/web-app_2_5.xsd" version="2.5">

  <display-name>WebserviceTest</display-name>

  <welcome-file-list>

    <welcome-file>index.html</welcome-file>

    <welcome-file>index.htm</welcome-file>

    <welcome-file>index.jsp</welcome-file>

    <welcome-file>default.html</welcome-file>

    <welcome-file>default.htm</welcome-file>

    <welcome-file>default.jsp</welcome-file>

  </welcome-file-list>

  <listener>

     <listener-class>net.cc.servlet.myListener</listener-class>

  </listener>

</web-app>
说明:
实现 ServletContextListener 接口的类路径
8 tomcat 启动截图:

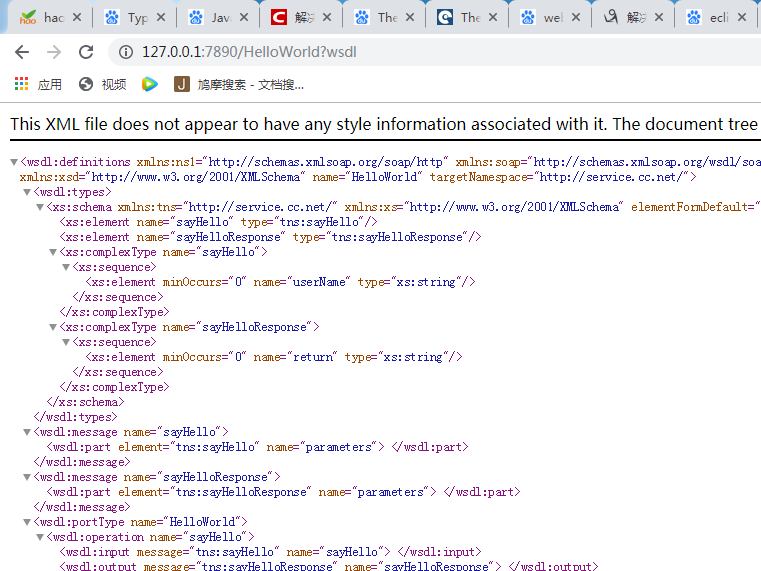
9 访问web界面 截图:
二、客户端搭建
JDK提供的生成客户端的命令。
1、在cmd命令中输入:wsimport -s 指定代码生成目录 -p 包名 -keep webservice访问地址url
示例:wsimport -s E:\\AllWorkSpace\\MyWork\\TheClient\\src -p com.eastcom.ws.client -keep http://localhost:8080/Dom4j_AxisDemo/service/hello?wsdl
同样注意中间的空格!!!
目录地址中不能含有空格,发布地址不要忘了?wsdl
完成后如下图: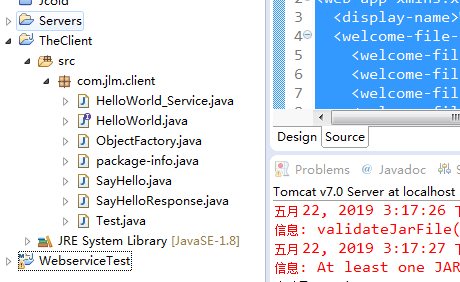
2、编写测试代码
package com.jlm.client;

public class Test {

	public static void main(String[] args) {

		HelloWorld hw = new HelloWorld_Service().getHelloWorldImplPort();

		hw.sayHello("你好!!!");

	}

}
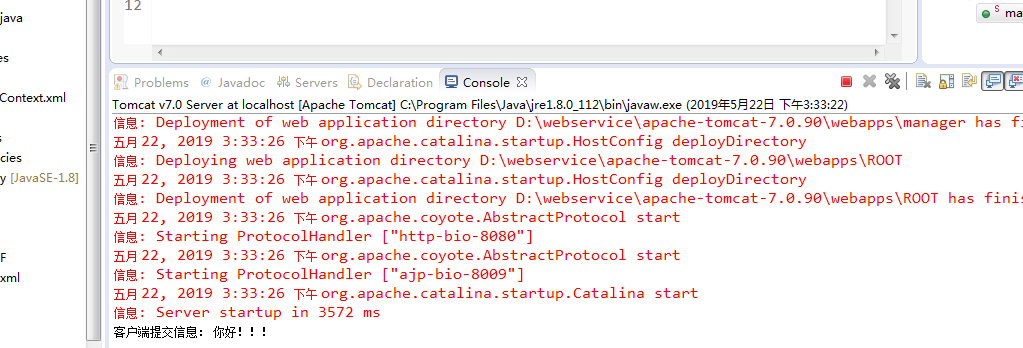
3、测试结果截图
maven搭建webservice apache cxf实现的更多相关文章
- Maven搭建webService (一) 创建服务端---使用main函数发布服务
今天和大家分享下 使用maven 搭建 webService 服务端: 首先需要在你的IDE中集成Maven.集成办法此处略....... 1.创建一个web工程. 2.在pom文件中增加以下依赖: ...
- Maven搭建webService (三) 创建客户端---使用Apache CXF方式实现
package test; import net.cc.web.server.HelloWorld; import org.apache.cxf.jaxws.JaxWsProxyFactoryBean ...
- Maven搭建webService (二) 创建服务端---使用web方式发布服务
今天和大家分享 使用 web方式发布 webService 服务端.客户端 1.首先创建 一个web工程(增加Maven依赖) 2.增加Maven依赖包,如下: <!-- spring core ...
- eclipse+maven搭建cxf webservice 完整例子
开发环境是eclipse , maven. 在开发java webservice时,有两个比较流行的框架:axis2和cxf.cxf可以无缝的和spring集成,而axis2需要打包成aar文件,在t ...
- 使用CXF和spring搭建webService服务
虽然下一个项目需要使用xfire,但是在查资料的过程中还是看到有不少地方都说cxf比xfire更好,cxf继承了xfire,但是不仅仅包含xfire,因此便也一起来尝试尝试.大概是有了xfire的经验 ...
- Spring Boot+CXF搭建WebService(转)
概述 最近项目用到在Spring boot下搭建WebService服务,对Java语言下的WebService了解甚少,而今抽个时间查阅资料整理下Spring Boot结合CXF打架WebServi ...
- Apache CXF实现WebService入门教程(附完整源码)
Apache CXF实现WebService非常简单实用,只需要几步就可以实现一个简单的web service. 首先我们需要新建一个maven项目,在pom中添加依赖和jetty作为测试的web s ...
- JAVAEE——BOS物流项目07:WebService入门、apache CXF入门、基于CXF发布CRM服务
1 学习计划 1.WebService入门 n 什么是WebService n 调用网络上的WebService服务 n SOAP和WSDL概念 n 基于JDK1.7发布一个简单的WebService ...
- 分布式架构探索 - 2. WebService RPC框架之Apache CXF
Apache CXF是一个开源的WebService RPC框架. 例子: 1. 新建一个maven web项目, 添加pom 如下: <?xml version="1.0" ...
随机推荐
- 华为鲁勇:5G+云+AI三大核心引擎将驱动广州数字经济发展
[摘要] 华为云将携手广州政企,全面释放 5G+云+AI新动能,推动广州步入高质量发展新阶段. [中国,广州] 广州是一座多样化的城市,在历史上被誉为千年的商都,现在,广州也在持续的开放.融合.与时俱 ...
- ThinkPHP的视图和模板
简单来说一个控制器对应一个视图,一个方法对应一个模板下面我们直接上图. 二.给模板赋值 给模板赋值在这里用到了assign()这个函数,assign()函数第一个参数为给这个值自定义名称,第二个参数则 ...
- [TimLinux] asciinema Linux终端录制工具嵌入私有web中
yum install asciinema https://github.com/asciinema/asciinema-player # 下载asciinema-player.css, asciin ...
- 2019牛客全国多校训练四 I题 string (SAM+PAM)
链接:https://ac.nowcoder.com/acm/contest/884/I来源:牛客网 题目描述 We call a,ba,ba,b non-equivalent if and only ...
- Mac 配置 PlantUML
PlantUML简介 UML: Unified Modeling Language 统一建模语言,是非专利的第三代建模和规约语言.UML是一种开放的方法,用于说明.可视化.构建和编写一个正在开发的.面 ...
- 【算法】273-每周一练 之 数据结构与算法(Tree)
这是第六周的练习题,最近加班比较多. 下面是之前分享的链接: [算法]200-每周一练 之 数据结构与算法(Stack) [算法]213-每周一练 之 数据结构与算法(LinkedList) [算法] ...
- Python安装pIL包
PIL包名为pillow 使用命令进行安装: pip3 install pillow
- 国内加速git下载速度
主要是配置hosts文件 151.101.72.133 assets-cdn.github.com151.101.73.194 github.global.ssl.fastly.net192.30.2 ...
- 【RabbitMQ】显示耗时处理进度
[RabbitMQ]显示耗时处理进度 通过网页提交一个耗时的请求,然后启动处理线程,请求返回.处理线程每完成一部分就给前台推送完成的数量,前端显示进度. 依赖jar <?xml version= ...
- tomcat session共享
1.版本 redis3.2 nginx tomcat8.5 2.下载jar包 tomcat-cluster-redis-session-manager 解压后大家可以看看 readMe.tx ...