springboot定时任务之旅
springboot定时任务
假设场景:单体应用的定时任务,假设我们已经有了一个搭建好的springboot应用,但是需要添加一个定时执行的部分(比如笔者遇到的是定时去请求一个接口数据来更新某个表),这样作为开发人员,笔者选择了最简单的方法,也就是springboot自带的定时器。
1、使用@Scheduled
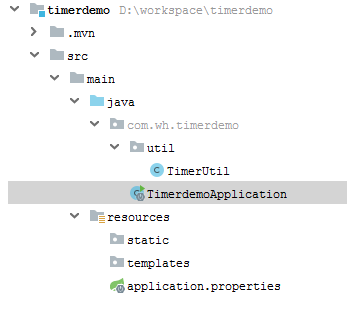
demo的结构如下:

启动器:
package com.wh.timerdemo;
import org.springframework.boot.SpringApplication;
import org.springframework.boot.autoconfigure.SpringBootApplication;
import org.springframework.scheduling.annotation.EnableScheduling;
@SpringBootApplication
@EnableScheduling//开启定时任务
public class TimerdemoApplication {
public static void main(String[] args) {
SpringApplication.run(TimerdemoApplication.class, args);
}
}
定时器工具类:
package com.wh.timerdemo.util;
import org.springframework.scheduling.annotation.Scheduled;
import org.springframework.stereotype.Component;
import java.text.SimpleDateFormat;
import java.util.Date;
/**
* scheduler定时器执行任务的类
*/
@Component
public class TimerUtil {
private static final SimpleDateFormat dateFormat = new SimpleDateFormat("HH:mm:ss");
/**
* 每2s执行一次
*/
@Scheduled(fixedRate = 5000)
public void taskOne(){
System.out.println("定时任务1执行!!!执行时间:" + dateFormat.format(new Date()));
}
/**
* 每天凌晨3:15执行一次
*/
@Scheduled(cron = "0 15 03 ? * *")//cron的格式会在后面贴出
public void taskTwo(){
System.out.println("定时任务2执行!!!执行时间:" + dateFormat.format(new Date()));
}
}
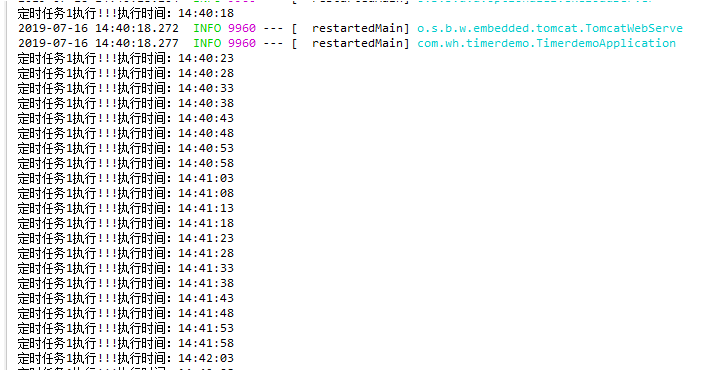
输出结果:

最简单的定时任务就实现啦~
假设场景:分布式应用的定时任务。当这个项目做了一半、第一版即将发布线上时,我司的上云行动也进行到了白热化阶段,于是笔者就遇到了这样一个问题:多个实例的定时任务是会同时执行的,这样不仅会消耗资源,而且可能还会引起数据库锁。这时我就想到了quartz。但是要注意,使用quartz的前提是集群的时间要设置统一。
2、使用分布式定时任务框架quartz
首先quartz本身是支持分布式的,通过表来管理各节点之间的关系。
1、去quartz官网下载最新的包 http://www.quartz-scheduler.org/
2、下载之后解压,进入如下目录,创建数据库表
quartz-2.2.3-distribution\quartz-2.2.3\docs\dbTables并选择对应的数据库SQL(笔者使用的是MySQL数据库)

3、在pom文件中引入依赖
<!--quartz依赖-->
<dependency>
    <groupId>org.quartz-scheduler</groupId>
    <artifactId>quartz</artifactId>
</dependency>
<dependency>
    <groupId>org.quartz-scheduler</groupId>
    <artifactId>quartz-jobs</artifactId>
</dependency>
<dependency>
    <groupId>org.springframework</groupId>
    <artifactId>spring-context-support</artifactId>
</dependency>
4、创建 quartz.proiperties 配置文件
org.quartz.scheduler.instanceId=AUTO
org.quartz.scheduler.makeSchedulerThreadDaemon=true
org.quartz.threadPool.class=org.quartz.simpl.SimpleThreadPool
org.quartz.threadPool.makeThreadsDaemons=true
#线程数量
org.quartz.threadPool.threadCount:20
#线程优先级
org.quartz.threadPool.threadPriority:5
org.quartz.jobStore.class=org.quartz.impl.jdbcjobstore.JobStoreTX
org.quartz.jobStore.driverDelegateClass=org.quartz.impl.jdbcjobstore.StdJDBCDelegate
org.quartz.jobStore.tablePrefix=QRTZ_
#特别注意:此处是quartz的数据源,报错就debug跟踪一下查看dbName
org.quartz.jobStore.dataSource = springTxDataSource.schedulerFactoryBean
#加入集群
org.quartz.jobStore.isClustered=true
#容许的最大作业延
org.quartz.jobStore.misfireThreshold=25000
#调度实例失效的检查时间间隔
org.quartz.jobStore.clusterCheckinInterval: 5000
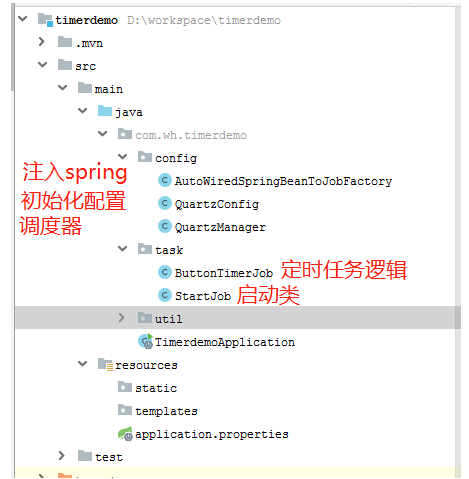
5、quartz的初始化配置,读取配置文件
package com.wh.timerdemo.config;
import org.quartz.spi.JobFactory;
import org.springframework.beans.factory.annotation.Autowired;
import org.springframework.beans.factory.annotation.Qualifier;
import org.springframework.beans.factory.config.PropertiesFactoryBean;
import org.springframework.context.ApplicationContext;
import org.springframework.context.annotation.Bean;
import org.springframework.core.io.ClassPathResource;
import org.springframework.scheduling.quartz.SchedulerFactoryBean;
import javax.sql.DataSource;
import java.io.IOException;
import java.util.Properties;
public class QuartzConfig {
// 配置文件路径
private static final String QUARTZ_CONFIG = "/quartz.properties";
// 按照自己注入的数据源自行修改
@Qualifier("writeDataSource")
@Autowired
private DataSource dataSource;
@Autowired
private AutoWiredSpringBeanToJobFactory autoWiredSpringBeanToJobFactory;
/**
* 从quartz.properties文件中读取Quartz配置属性
* @return
* @throws IOException
*/
@Bean
public Properties quartzProperties() throws IOException {
PropertiesFactoryBean propertiesFactoryBean = new PropertiesFactoryBean();
propertiesFactoryBean.setLocation(new ClassPathResource(QUARTZ_CONFIG));
propertiesFactoryBean.afterPropertiesSet();
return propertiesFactoryBean.getObject();
}
/**
* JobFactory与schedulerFactoryBean中的JobFactory相互依赖,注意bean的名称
* 在这里为JobFactory注入了Spring上下文
*
* @param applicationContext
* @return
*/
@Bean
public JobFactory buttonJobFactory(ApplicationContext applicationContext) {
AutoWiredSpringBeanToJobFactory jobFactory = new AutoWiredSpringBeanToJobFactory();
jobFactory.setApplicationContext(applicationContext);
return jobFactory;
}
@Bean
public SchedulerFactoryBean schedulerFactoryBean() throws IOException {
SchedulerFactoryBean factory = new SchedulerFactoryBean();
factory.setJobFactory(autoWiredSpringBeanToJobFactory);
factory.setOverwriteExistingJobs(true);
factory.setAutoStartup(true); // 设置自行启动
// 延时启动,应用启动1秒后
factory.setStartupDelay(1);
factory.setQuartzProperties(quartzProperties());
factory.setDataSource(dataSource);// 使用应用的dataSource替换quartz的dataSource
return factory;
}
}
6、将任务工厂注入到Spring
package com.wh.timerdemo.config;
import org.quartz.spi.TriggerFiredBundle;
import org.springframework.beans.factory.config.AutowireCapableBeanFactory;
import org.springframework.context.ApplicationContext;
import org.springframework.context.ApplicationContextAware;
import org.springframework.scheduling.quartz.SpringBeanJobFactory;
import org.springframework.stereotype.Component;
/**
* 为JobFactory注入SpringBean,否则Job无法使用Spring创建的bean
*/
@Component
public class AutoWiredSpringBeanToJobFactory extends SpringBeanJobFactory implements ApplicationContextAware {
private transient AutowireCapableBeanFactory beanFactory;
@Override
public void setApplicationContext(final ApplicationContext context) {
beanFactory = context.getAutowireCapableBeanFactory();
}
@Override
protected Object createJobInstance(final TriggerFiredBundle bundle) throws Exception {
final Object job = super.createJobInstance(bundle);
beanFactory.autowireBean(job);
return job;
}
}
7、创建任务调度管理,任务的增删改查,起动停止等。
package com.wh.timerdemo.config;
import org.quartz.*;
import org.quartz.impl.StdSchedulerFactory;
import java.util.List;
/**
* quartz的调度器 包含了任务的增删改查 可以配置在页面上调度任务 这里就省略了
*/
public class QuartzManager {
private static SchedulerFactory schedulerFactory = new StdSchedulerFactory();
private Scheduler scheduler = null;
/**
* @Description: 添加一个定时任务
*
* @param jobName 任务名
* @param jobGroupName 任务组名
* @param triggerName 触发器名
* @param triggerGroupName 触发器组名
* @param jobClass 任务
* @param cron 时间设置,参考quartz说明文档
*/
@SuppressWarnings({ "unchecked", "rawtypes" })
public static void addJob(String jobName, String jobGroupName, String triggerName, String triggerGroupName, Class jobClass, String cron) {
try {
// 任务名,任务组,任务执行类
Scheduler scheduler = schedulerFactory.getScheduler();
JobDetail jobDetail= JobBuilder.newJob(jobClass).withIdentity(jobName, jobGroupName).build();
// 触发器
TriggerBuilder<Trigger> triggerBuilder = TriggerBuilder.newTrigger();
// 触发器名,触发器组
triggerBuilder.withIdentity(triggerName, triggerGroupName);
triggerBuilder.startNow();
// 触发器时间设定
triggerBuilder.withSchedule(CronScheduleBuilder.cronSchedule(cron));
// 创建Trigger对象
CronTrigger trigger = (CronTrigger) triggerBuilder.build();
// 调度容器设置JobDetail和Trigger
scheduler.scheduleJob(jobDetail, trigger);
// 启动
if (!scheduler.isShutdown()) {
scheduler.start();
}
} catch (Exception e) {
throw new RuntimeException(e);
}
}
/**
* @Description: 修改一个任务的触发时间
*
* @param jobName
* @param jobGroupName
* @param triggerName 触发器名
* @param triggerGroupName 触发器组名
* @param cron 时间设置,参考quartz说明文档
*/
public static void modifyJobTime(String jobName,String jobGroupName, String triggerName, String triggerGroupName, String cron) {
try {
Scheduler scheduler = schedulerFactory.getScheduler();
TriggerKey triggerKey = TriggerKey.triggerKey(triggerName, triggerGroupName);
CronTrigger trigger = (CronTrigger) scheduler.getTrigger(triggerKey);
if (trigger == null) {
return;
}
String oldTime = trigger.getCronExpression();
if (!oldTime.equalsIgnoreCase(cron)) {
System.out.println("任务:"+jobName+"被修改");
/** 方式一 :调用 rescheduleJob 开始 */
/* // 触发器
TriggerBuilder<Trigger> triggerBuilder = TriggerBuilder.newTrigger();
// 触发器名,触发器组
triggerBuilder.withIdentity(triggerName, triggerGroupName);
triggerBuilder.startNow();
// 触发器时间设定
triggerBuilder.withSchedule(CronScheduleBuilder.cronSchedule(cron));
// 创建Trigger对象
trigger = (CronTrigger) triggerBuilder.build();
// 方式一 :修改一个任务的触发时间
scheduler.rescheduleJob(triggerKey, trigger);*/
/** 方式一 :调用 rescheduleJob 结束 */
/** 方式二:先删除,然后在创建一个新的Job */
JobDetail jobDetail = scheduler.getJobDetail(JobKey.jobKey(jobName, jobGroupName));
Class<? extends Job> jobClass = jobDetail.getJobClass();
removeJob(jobName, jobGroupName, triggerName, triggerGroupName);
addJob(jobName, jobGroupName, triggerName, triggerGroupName, jobClass,cron);
/** 方式二 :先删除,然后在创建一个新的Job */
}
} catch (Exception e) {
throw new RuntimeException(e);
}
}
/**
* @Description: 移除一个任务
*
* @param jobName
* @param jobGroupName
* @param triggerName
* @param triggerGroupName
*/
public static void removeJob(String jobName, String jobGroupName,String triggerName, String triggerGroupName) {
try {
Scheduler scheduler = schedulerFactory.getScheduler();
TriggerKey triggerKey = TriggerKey.triggerKey(triggerName, triggerGroupName);
scheduler.pauseTrigger(triggerKey);// 停止触发器
scheduler.unscheduleJob(triggerKey);// 移除触发器
scheduler.deleteJob(JobKey.jobKey(jobName, jobGroupName));// 删除任务
} catch (Exception e) {
throw new RuntimeException(e);
}
}
/**
* @Description:启动所有定时任务
*/
public static void startJobs() {
try {
Scheduler scheduler = schedulerFactory.getScheduler();
scheduler.start();
} catch (Exception e) {
throw new RuntimeException(e);
}
}
/**
* @Description:关闭所有定时任务
*/
public static void shutdownJobs() {
try {
Scheduler scheduler = schedulerFactory.getScheduler();
if (!scheduler.isShutdown()) {
scheduler.shutdown();
}
} catch (Exception e) {
throw new RuntimeException(e);
}
}
/**
* 获取当前正在执行的任务
* @return
*/
public static boolean getCurrentJobs(String name){
try {
Scheduler scheduler = schedulerFactory.getScheduler();
List<JobExecutionContext> jobContexts = scheduler.getCurrentlyExecutingJobs();
for (JobExecutionContext context : jobContexts) {
if (name.equals(context.getTrigger().getJobKey().getName())) {
return true;
}
}
} catch (Exception e) {
throw new RuntimeException(e);
}
return false;
}
public Scheduler getScheduler() {
return scheduler;
}
public void setScheduler(Scheduler scheduler) {
this.scheduler = scheduler;
}
}
8、创建一个执行的Job,这里包含定时任务执行的逻辑
package com.wh.timerdemo.task;
import org.quartz.DisallowConcurrentExecution;
import org.quartz.Job;
import org.quartz.JobExecutionContext;
import org.quartz.JobExecutionException;
import org.slf4j.Logger;
import org.slf4j.LoggerFactory;
/**
* @DisallowConcurrentExecution : 此标记用在实现Job的类上面,意思是不允许并发执行.
* 注org.quartz.threadPool.threadCount的数量有多个的情况,@DisallowConcurrentExecution才生效
*/
@DisallowConcurrentExecution
public class ButtonTimerJob implements Job {
private static final Logger logger = LoggerFactory.getLogger(ButtonTimerJob.class);
/**
* 核心方法,Quartz Job真正的执行逻辑。
* @throws JobExecutionException execute()方法只允许抛出JobExecutionException异常
*/
@Override
public void execute(JobExecutionContext jobExecutionContext) throws JobExecutionException {
logger.info("--------------定时任务执行逻辑---------------------");
}
}
9、创建启动Job类:负责任务的创建启动和配置cron等
package com.wh.timerdemo.task;
import com.wh.timerdemo.config.QuartzManager;
import org.slf4j.Logger;
import org.slf4j.LoggerFactory;
import org.springframework.context.ApplicationListener;
import org.springframework.context.annotation.Configuration;
import org.springframework.context.event.ContextRefreshedEvent;
/**
* 定时任务的启动类
*/
@Configuration
public class StartJob implements ApplicationListener<ContextRefreshedEvent> {
private Logger logger = LoggerFactory.getLogger(this.getClass());
public void run() {
logger.info(">> 启动定时任务...");
// QuartzManager.startJobs();
QuartzManager.addJob(
"SpecialPeriodJob",
"SpecialPeriodJobGroup",
"SpecialPeriodTrigger",
"SpecialPeriodTriggerGroup",
ButtonTimerJob.class,
"0/30 * * * * ?");
}
@Override
public void onApplicationEvent(ContextRefreshedEvent contextRefreshedEvent) {
System.out.println("启动定时任务......");
run();
}
}
启动springboot,此时就不需要 @EnableScheduling 注解啦。
执行结果:

虽然IDEA控制台打印的信息显示我们不是集群启动,但是上线后查看日志,定时任务确实实现了三个实例但是只有一个会运行。
需要注意的是:任务第一次启动后就会存入数据库,再次启动的时候任务已经存在,就不需要再添加一个任务了,直接执行启动任务即可。由于quartz的特性,即使集群中有一个服务挂掉了,其他的定时任务仍会接替执行。
4、扩展
附录1:cron语法——引用自https://www.cnblogs.com/linjiqin/archive/2013/07/08/3178452.html
0 0 10,14,16 * * ? 每天上午10点,下午2点,4点
0 0/30 9-17 * * ? 朝九晚五工作时间内每半小时
0 0 12 ? * WED 表示每个星期三中午12点
"0 0 12 * * ?" 每天中午12点触发
"0 15 10 ? * *" 每天上午10:15触发
"0 15 10 * * ?" 每天上午10:15触发
"0 15 10 * * ? *" 每天上午10:15触发
"0 15 10 * * ? 2005" 2005年的每天上午10:15触发
"0 * 14 * * ?" 在每天下午2点到下午2:59期间的每1分钟触发
"0 0/5 14 * * ?" 在每天下午2点到下午2:55期间的每5分钟触发
"0 0/5 14,18 * * ?" 在每天下午2点到2:55期间和下午6点到6:55期间的每5分钟触发
"0 0-5 14 * * ?" 在每天下午2点到下午2:05期间的每1分钟触发
"0 10,44 14 ? 3 WED" 每年三月的星期三的下午2:10和2:44触发
"0 15 10 ? * MON-FRI" 周一至周五的上午10:15触发
"0 15 10 15 * ?" 每月15日上午10:15触发
"0 15 10 L * ?" 每月最后一日的上午10:15触发
"0 15 10 ? * 6L" 每月的最后一个星期五上午10:15触发
"0 15 10 ? * 6L 2002-2005" 2002年至2005年的每月的最后一个星期五上午10:15触发
"0 15 10 ? * 6#3" 每月的第三个星期五上午10:15触发
附录2:quartz各张表的作用——引用自https://blog.csdn.net/yhhyhhyhhyhh/article/details/84235374
qrtz_blob_triggers : 以Blob 类型存储的触发器。
qrtz_calendars:存放日历信息, quartz可配置一个日历来指定一个时间范围。
qrtz_cron_triggers:存放cron类型的触发器。
qrtz_fired_triggers:存放已触发的触发器。
qrtz_job_details:存放一个jobDetail信息。
qrtz_locks: 存储程序的悲观锁的信息(假如使用了悲观锁)。
qrtz_paused_trigger_graps:存放暂停掉的触发器。
qrtz_scheduler_state:调度器状态。
qrtz_simple_triggers:简单触发器的信息。
qrtz_trigger_listeners:触发器监听器。
qrtz_triggers:触发器的基本信息。
cron方式需要用到的4张数据表:
qrtz_triggers,qrtz_cron_triggers,qrtz_fired_triggers,qrtz_job_details
附录3:quartz的工作原理——引用自https://blog.51cto.com/simplelife/2314620?source=drh
Quartz实际并不关心你是在相同还是不同的机器上运行节点。当集群放置在不同的机器上时,称之为水平集群。节点跑在同一台机器上时,称之为垂直集群。对于垂直集群,存在着单点故障的问题。这对高可用性的应用来说是无法接受的,因为一旦机器崩溃了,所有的节点也就被终止了。对于水平集群,存在着时间同步问题。
节点用时间戳来通知其他实例它自己的最后检入时间。假如节点的时钟被设置为将来的时间,那么运行中的Scheduler将再也意识不到那个结点已经宕掉了。另一方面,如果某个节点的时钟被设置为过去的时间,也许另一节点就会认定那个节点已宕掉并试图接过它的Job重运行。最简单的同步计算机时钟的方式是使用某一个Internet时间服务器(Internet Time Server ITS)。
节点争抢Job问题:
因为Quartz使用了一个随机的负载均衡算法, Job以随机的方式由不同的实例执行。Quartz官网上提到当前,还不存在一个方法来指派(钉住) 一个 Job 到集群中特定的节点。
可以看出采用了Quartz集群采用了悲观锁的方式对triggers表进行行加锁, 以保证任务同步的正确性。
当线程使用上述的SQL对表中的数据执行操作时,数据库对该行进行行加锁; 于此同时, 另一个线程对该行数据执行操作前需要获取锁, 而此时已被占用, 那么这个线程就只能等待, 直到该行锁被释放。
写在最后:
本次定时任务之旅算是告一段落了,在趟雷的路上踩了不少雷,可惜当时时间紧迫,没有来得及把很多错误记录下来,只在最后总结出这样一篇文章和demo分享给各位,小弟才疏学浅写的不好,如有写的不对的地方欢迎各位指正。
本文的参考链接如下:
https://blog.csdn.net/d984881239/article/details/86569818
https://blog.csdn.net/yhhyhhyhhyhh/article/details/84235374
springboot定时任务之旅的更多相关文章
- springboot 定时任务部署至linux服务器上后会执行两次问题
springboot定时任务在本地运行时,正常执行且只执行一次,但是在maven打包成war包,部署至linux服务器上之后,定时任务奇怪的执行了两次. 由于未做负载均衡,所以可以先排除是因为多台服务 ...
- Spring boot(三) springboot 定时任务
这个不多说,springboot 定时任务非常简单就可以实现了. 30s运行一次 , @Scheduled(cron="0,30 * * * * ?") 通过这个控制定时时间 cr ...
- SpringBoot定时任务@Scheduled
SpringBoot定时任务主要由两个注解完成. @Scheduled加在方法上面. @EnableScheduling加在类上面.可以是Application类,也可以是@Component类,还可 ...
- 小D课堂 - 零基础入门SpringBoot2.X到实战_第10节 SpringBoot整合定时任务和异步任务处理_41、SpringBoot定时任务schedule讲解
笔记 1.SpringBoot定时任务schedule讲解 简介:讲解什么是定时任务和常见定时任务区别 1.常见定时任务 Java自带的java.util.Timer类 ...
- SpringBoot学习笔记(七):SpringBoot使用AOP统一处理请求日志、SpringBoot定时任务@Scheduled、SpringBoot异步调用Async、自定义参数
SpringBoot使用AOP统一处理请求日志 这里就提到了我们Spring当中的AOP,也就是面向切面编程,今天我们使用AOP去对我们的所有请求进行一个统一处理.首先在pom.xml中引入我们需要的 ...
- SpringBoot定时任务 - 集成quartz实现定时任务(单实例和分布式两种方式)
最为常用定时任务框架是Quartz,并且Spring也集成了Quartz的框架,Quartz不仅支持单实例方式还支持分布式方式.本文主要介绍Quartz,基础的Quartz的集成案例本,以及实现基于数 ...
- SpringBoot定时任务 - 什么是ElasticJob?如何集成ElasticJob实现分布式任务调度?
前文展示quartz实现基于数据库的分布式任务管理和job生命周期的控制,那在分布式场景下如何解决弹性调度.资源管控.以及作业治理等呢?针对这些功能前当当团队开发了ElasticJob,2020 年 ...
- SpringBoot定时任务 - 开箱即用分布式任务框架xxl-job
除了前文介绍的ElasticJob,xxl-job在很多中小公司有着应用(虽然其代码和设计等质量并不太高,License不够开放,有着个人主义色彩,但是其具体开箱使用的便捷性和功能相对完善性,这是中小 ...
- 带着新人学springboot的应用10(springboot+定时任务+发邮件)
接上一节,环境一样,这次来说另外两个任务,一个是定时任务,一个是发邮件. 1.定时任务 定时任务可以设置精确到秒的准确时间去自动执行方法. 我要一个程序每一秒钟说一句:java小新人最帅 于是,我就写 ...
随机推荐
- WPF 简单的绕圈进度条(无cs代码)
方案: 图标位置不变化的情况下设置透明度实现 代码: <Window x:Class="WpfApp1.MainWindow" xmlns="http://sche ...
- vs调试cordova app时 scriptedsandbox64.exe已停止工作的错误处理方法
1.把ie更新到版本11 2.去掉 选项->调试->调试时启动诊断工具 有时候调试会启动失败,提示版本过低,再一次点击调试就可以了.
- WinForm 清空界面控件值的小技巧
原文:WinForm 清空界面控件值的小技巧 在WinForm里面有时候需要清空自己输入内容或是选择的选项,以便重新操作流程,那么一般你是怎么清空界面各个控件值的呢?如果窗体里面控件,尤其是TextB ...
- SQLite Expert Professional 打开加密SQLite数据库
原文 SQLite Expert Professional 打开加密数据库 (已修改) 版本:sqlite expert professional 4.2.0.739 (x86) 目的:用SQLite ...
- C#高性能大容量SOCKET并发(三):接收、发送
原文:C#高性能大容量SOCKET并发(三):接收.发送 异步数据接收有可能收到的数据不是一个完整包,或者接收到的数据超过一个包的大小,因此我们需要把接收的数据进行缓存.异步发送我们也需要把每个发送的 ...
- 记一次ASP.NET MVC4 升级到MVC5的小问题解决
原文:记一次ASP.NET MVC4 升级到MVC5的小问题解决 .NET 4.0 MVC4版本,升级到.NET 4.6.1 MVC5: 1.使用nuget更新所有 与mvc相关的类库; 2.更改~/ ...
- einsum:爱因斯坦求和约定
在Tensorflow.Numpy和PyTorch中都提供了使用einsum的api,einsum是一种能够简洁表示点积.外积.转置.矩阵-向量乘法.矩阵-矩阵乘法等运算的领域特定语言.在Tensor ...
- Android实现简单音乐播放器(startService和bindService后台运行程序)
Android实现简单音乐播放器(MediaPlayer) 开发工具:Andorid Studio 1.3运行环境:Android 4.4 KitKat 工程内容 实现一个简单的音乐播放器,要求功能有 ...
- x64系统的判断和x64下文件和注册表访问的重定向(举例了GetProcAddress后转成函数指针的用法)
判断一个32位应用程序是否运行在x64系统下,可以使用下面的代码: BOOL IsX64System() { BOOL bIsWow64 = FALSE; typedef BOOL (WINAPI * ...
- python常用数据结构(1)
python中有四种最常用的数据结构,分别是列表(list),字典(dict),集合(set)和元组(tuple) 下面简单描述下它们的区别和联系 1.初始化 不得不说,python数据结构的初始化比 ...
