Selenium(十七):unittest单元测试框架(三) 脚本分析、编写Web用例
1. 带unittest的脚本分析
也许你现在心里还有疑问,unittest框架与我们前面所编写的Web自动化测试之间有什么必然联系吗?当然有,既然unittest可以组织、运行测试用例,那么为什么不能组织、运行Web自动化测试用例呢?我们现在就来开始通过一个实例来看看吧。
# -*- coding:utf-8 -*-

from selenium import webdriver

from selenium.webdriver.common.by import By

from selenium.webdriver.common.keys import Keys

from selenium.webdriver.support.ui import Select

from selenium.common.exceptions import NoSuchElementException

from selenium.common.exceptions import NoAlertPresentException

import unittest,time,re

class BaiduTest(unittest.TestCase):

    def setUp(self):

        self.driver = webdriver.Chrome()

        self.driver.implicitly_wait(30)

        self.base_url = "http://www.baidu.com/"

        self.verificationErrors = []

        self.accept_next_alert = True

    def test_baidu(self):

        driver = self.driver

        driver.get(self.base_url + "/")

        driver.find_element_by_id("kw").clear()

        driver.find_element_by_id("kw").send_keys("selenium")

        driver.find_element_by_id("su").click()

    def is_element_present(self,how,what):

        try:

            self.driver.find_element(by=how,value=what)

        except NoSuchElementException:

            return False

        return True

    def is_alert_present(self):

        try:

            self.driver.switch_to.alert()

        except NoAlertPresentException:

            return False

        return True

    def close_alert_and_get_its_text(self):

        try:

            alert = self.driver.switch_to.alert()

            alert_text = alert.text

            if self.accept_next_alert:

                alert.accept()

            else:

                alert.dismiss()

            return alert_text

        finally:

            self.accept_next_alert = True

    def tearDown(self):

        self.driver.quit()

        self.assertEqual([],self.verificationErrors)

if __name__ == "__main__":

    unittest.main()
相信大家现在再看到这个脚本时已经不再感到陌生了,下面我们就来分析一下这些diamante都做了哪些事情。
import unittest
首先引入unittest框架。
class BaiduTest(unittest.TestCase):
BaiduTest类继承unittest框架的TestCase类称为标准的测试类。
def setUp(self):

    self.driver = webdriver.Chrome()

    self.driver.implicitly_wait(30)

    self.base_url = "http://www.baidu.com/"

    self.verificationErrors = []

    self.accept_next_alert = True
setUp用于设置初始化工作,在执行每一个测试用例前先被执行,它与tearDown方法相呼应,后者在每一个测试用例执行后被执行。这里的初始化工作定义了浏览器启动和基础URL地址。
implicitly_wait()在前面已经学过,设置页码上元素的隐性等待时间为30秒。
接下来定义空的verificationErrors数组,脚本运行时的报错信息将被记录到这个数组中。
定义accept_next_alert变量,表示是否继续接受下一个警告,初始状态为True。
def test_baidu(self):

    driver = self.driver

    driver.get(self.base_url + "/")

    driver.find_element_by_id("kw").clear()

    driver.find_element_by_id("kw").send_keys("selenium")

    driver.find_element_by_id("su").click()
test_baidu中放置的就是我们的测试脚本,这部分我们已经很熟悉了,这里就不再解释了。
def is_element_present(self,how,what):

    try:

        self.driver.find_element(by=how,value=what)

    except NoSuchElementException:

        return False

    return True
is_element_present方法用于查找页面元素是否存在,通过find_element()来接受元素的定位方法(how)和定位值(what)。如果定位到元素则返回True,否则抛出异常并返回False。try...except...为Python语言的异常处理。
def is_alert_present(self):

    try:

        self.driver.switch_to.alert()

    except NoAlertPresentException:

        return False

    return True
is_alert_present()方法用于判断当前页面是否存在警告框,利用WebDriver提供的switch_to.alert()方法来捕捉页面上警告框。如果捕捉到警告框则返回True,否则抛出NoAlertPresentException类型异常,并返回False。
def close_alert_and_get_its_text(self):

    try:

        alert = self.driver.switch_to.alert()

        alert_text = alert.text

        if self.accept_next_alert:

            alert.accept()

        else:

            alert.dismiss()

        return alert_text

    finally:

        self.accept_next_alert = True
close_alert_and_get_its_text()关闭警告并获得警告信息。首先通过switch_to_alert()获得警告,通过text获得警告框信息。接着通过if语句判断accept_next_alert的状态,在setUp()中已经初始化状态为True,如果为True,则通过accept()接受警告,否则dismiss()忽略此警告。
def tearDown(self):

    self.driver.quit()

    self.assertEqual([],self.verificationErrors)
tearDown()方法在每个测试方法执行后调用,这个方法用于测试用例执行后的清理工作,如退出浏览器、关闭驱动,恢复用例执行状态等。
在setUp()方法中定义了verificationErrors为空数组,这里通过assertEqual()比较其是否为空,如果为空则说明用例执行的过程中没有出现异常,负责将抛出AssertionError异常。
if __name__ == "__main__":

    unittest.main()
通过unittest.main()方法来运行当前文件中的测试方法,其默认匹配并运行以test开头的方法。
2. 编写Web测试用例
前面用了大量的篇幅详细介绍了unittest单元测试框架,其目的是用它来运行Web自动化测试脚本。在此之前,需要简单规划一下测试目录。
test_project/
test_case/
test_baidu.py
test_youdao.py
report/
login.txt
runtest.py
创建Web测试用例。
test_baidu.py:
from selenium import webdriver

import unittest

import time

class MyTest(unittest.TestCase):

    def setUp(self):

        self.driver = webdriver.Chrome()

        self.driver.maximize_window()

        self.driver.implicitly_wait(10)

        self.base_url = "http://www.baidu.com"

    def test_baidu(self):

        driver = self.driver

        driver.get(self.base_url+"/")

        driver.find_element_by_id("kw").clear()

        driver.find_element_by_id("kw").send_keys("unittest")

        driver.find_element_by_id("su").click()

        time.sleep(2)

        title = driver.title

        self.assertEqual(title,"unittest_百度搜索")

    def tearDown(self):

        self.driver.quit()

if __name__ == "__main__":

    unittest.main()
test_youdao.py:
from selenium import webdriver

import unittest

import time

class MyTest(unittest.TestCase):

    def setUp(self):

        self.driver = webdriver.Chrome()

        self.driver.maximize_window()

        self.driver.implicitly_wait(10)

        self.base_url = "http://www.youdao.com"

    def test_youdao(self):

        driver = self.driver

        driver.get(self.base_url+"/")

        driver.find_element_by_id("translateContent").clear()

        driver.find_element_by_id("translateContent").send_keys("webdriver")

        driver.find_element_by_xpath('//*[@id="form"]/button').click()

        time.sleep(2)

        title = driver.title

        self.assertEqual(title,"【webdriver】什么意思_英语webdriver的翻译_音标_读音_用法_例句_在线翻译_有道词典")

    def tearDown(self):

        self.driver.close()

if __name__ == "__main__":

    unittest.main()
在test_case/目录下分别创建百度搜索test_baidu.py和有道搜索test_youdao.py测试文件,并在测试文件中编写Web自动化测试用例。
runtest.py:
import unittest

#定义测试用例的目录为当前目录

test_dir = '../test_project/test_case'

discover = unittest.defaultTestLoader.discover(test_dir,pattern='test*.py')

if __name__ == "__main__":

    runner = unittest.TextTestRunner()

    runner.run(discover)
你可能有个疑问,report目录是做什么的?也许从命名上你已经猜到它是用来存放测试报告的,那么怎样才能把测试结果生成一个有log.txt的文件呢?这里需要借助dos命令来实现。
首先打开Windows命令提示符,进入到.../test_project/目录下执行目录。

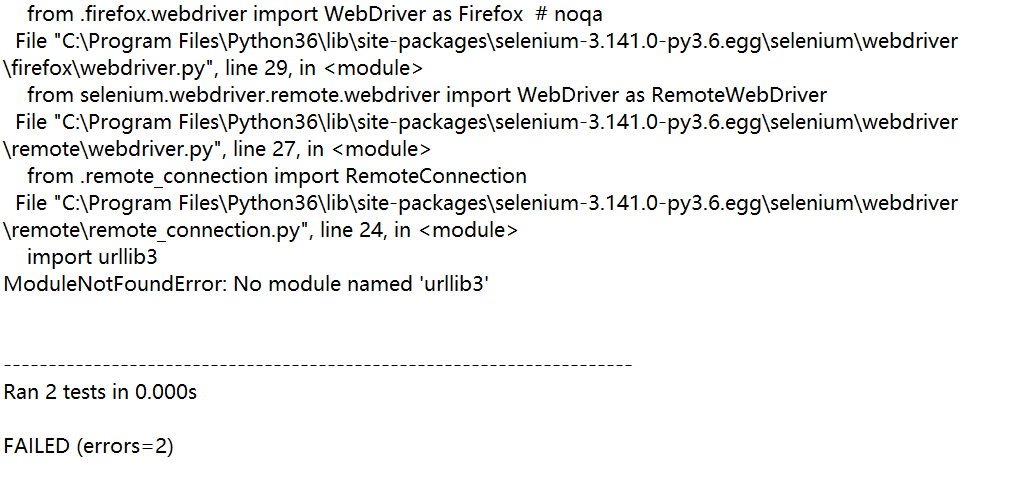
打开log.txt文件,内容如下:

不知道为什么,pycharm运行没问题,使用cmd命令行就出问题了。

Selenium(十七):unittest单元测试框架(三) 脚本分析、编写Web用例的更多相关文章
- Selenium自动化测试-unittest单元测试框架
一.Pyhon工作原理-- 核心概念:test case, testsuite, TestLoder,TextTestRunner,TextTestResult, test fixture TestC ...
- Selenium自动化测试-unittest单元测试框架使用
一.什么是unittest 这里我们将要用的unittest是python的单元测试框架,它的官网是 https://docs.python.org/2/library/unittest.html,在 ...
- unittest单元测试框架中的参数化及每个用例的注释
相信大家和我有相同的经历,在写自动化用例脚本的时候,用例的操作是一样的,但是就是参数不同,比如说要测一个付款的接口,付款有很多种渠道,另外只有部分参数不一样,如果我们一个渠道一个渠道的写,在unitt ...
- 关于unittest单元测试框架中常用的几种用例加载方法
unittest模块是Python自带的一个单元测试模块,我们可以用来做单元测试.unittest模块包含了如下几个子模块: 测试用例:TestCase 测试集:TestSuite 加载用例:Test ...
- Selenium(十八):unittest单元测试框架(四) HTML测试报告
1. HTML测试报告 对测试人员来而言,测试的产出很难衡量.换句话说,测试人员的价值比较难以量化和评估,相信这一点对软件测试人员来说深有体会.我们花费了很多时间与精力所做的自动化测试也是如此.所以, ...
- Selenium+Python ---- 免登录、等待、unittest单元测试框架、PO模型
1.免登录在进行测试的过程中难免会遇到登录的情况,给测试工作添加了工作量,本文仅提供一些思路供参考解决方式:手动请求中添加cookies.火狐的profile文件记录信息实现.人工介入.万能验证码.去 ...
- Python+selenium之简单介绍unittest单元测试框架
Python+selenium之简单介绍unittest单元测试框架 一.unittest简单介绍 unittest支持测试自动化,共享测试用例中的初始化和关闭退出代码,在unittest中最小单元是 ...
- Python+Selenium框架设计篇之-简单介绍unittest单元测试框架
前面文章已经简单介绍了一些关于自动化测试框架的介绍,知道了什么是自动化测试框架,主要有哪些特点,基本组成部分等.在继续介绍框架设计之前,我们先来学习一个工具,叫unittest. unit ...
- Python+Selenium ----unittest单元测试框架
unittest是一个单元测试框架,是Python编程的单元测试框架.有时候,也做叫做“PyUnit”,是Junit的Python语言版本.这里了解下,Junit是Java语言的单元测试框架,Java ...
随机推荐
- Object类和异常
Object类(所有类的顶级父类) 今天说的两个方法: equals: 用于比较两个对象是否相同,它其实是使用两个对象的内存地址进行比较,底层默认使用的是==比较运算符来判断的. ...
- 使用t-SNE做降维可视化
最近在做一个深度学习分类项目,想看看训练集数据的分布情况,但由于数据本身维度接近100,不能直观的可视化展示,所以就对降维可视化做了一些粗略的了解以便能在低维空间中近似展示高维数据的分布情况,以下内容 ...
- 剑指offer题解(Java版)
剑指offer题解(Java版) 从尾到头打印链表 题目描述 输入一个链表,按从尾到头的顺序返回一个ArrayList. 方法1:用一个栈保存从头到尾访问链表的每个结点的值,然后按出栈顺序将各个值存入 ...
- Redis基础知识、命令以及java操作Redis
1 nosql的概念 sql:操作(关系型)数据库的标准查询语言 关系型数据库(rdbms):以关系(由行和列组成的二维表)模型为核心数据库,有表的储存系统.(mysql.oracle.sqlserv ...
- c++-友元函数和友元类
友元函数 友元函数和友元类(破坏类的封装性) 面向对象编程思想 #define _CRT_SECURE_NO_WARNINGS #include <iostream> #include & ...
- 开源资产管理系统Snipe-IT
CentOS7安装IT资产管理系统Snipe-IT介绍资产管理工具Github:https://github.com/snipe/snipe-it官网:https://snipeitapp.com/D ...
- 第01讲 Android开发系列---Activity
一. Android系统版本及详细信息 最新数据 https://developer.android.com/about/dashboards/ 二. Android项目初探 1. 使用a ...
- CSS transition 的默认值
语法 transition: property duration timing-function delay|initial|inherit; 示例: div { width: 100px; ...
- vue element之axios下载文件(后端Python)
axios 接受文件流,需要设置 {responseType:'arraybuffer'} axios.post( apiUrl, formdata, {responseType:'arraybuff ...
- Pluralsight 科技公司公布自己的avaScript 成为最受欢迎的开发技术
根据 SDTimes 报道,Pluralsight 科技公司公布自己的 Technology Index,JavaScript 位居榜首. Pluralsight,是美国的一家面向软件开发者的在线教育 ...
