Android实现apk插件方式换肤
换肤思路:
1.什么时候换肤?
xml加载前换肤,如果xml加载后换肤,用户将会看见换肤之前的色彩,用户体验不好。
2.皮肤是什么?
皮肤就是apk,是一个资源包,包含了颜色、图片等。
3.什么样的控件应该进行换肤?
包含背景图片的控件,例如textView文字颜色。
4.皮肤与已安装的资源如何匹配?
资源名字匹配
效果展示:

步骤:
1.xml加载前换肤,意味着需要将所需要换肤的控件收集起来。因此要监听xml加载的过程。
 public class BaseActivity extends Activity {

     SkinFactory skinFactory;

     @Override

     protected void onCreate(@Nullable Bundle savedInstanceState){

         super.onCreate(savedInstanceState);

         //监听xml生成的过程

         skinFactory = new SkinFactory();

         LayoutInflaterCompat.setFactory(getLayoutInflater(),skinFactory);

     }

 }
2.需要换肤的控件收集到一个容器中并且不更改自己的逻辑直接换肤(例如:不用在每个需要换肤的空间里面加上: “ app:...... ” 自定义控件属性)
思考:
(1)安装的apk的id与皮肤id是否一样?
(2)图片的资源、颜色资源都对应R自动生成的id
(3)皮肤包的资源id、R文件的资源id以及app里R文件的资源的id是否是一样的?——是不一样的
3.一个activity有多个控件(SkinView) 一个控件对应多个换肤属性(SkinItem)

SkinItem来封装这些值:
- attrName-属性名(background)
- attrValue-属性值id 十六进制(@color/colorPrimaryDark)
- attrType--类型(color)
- Id(R文件的id)
 class SkinItem{

         // attrName   background

         String attrName;

         int refId;

         // 资源名字  @color/colorPrimaryDark

         String attrValue;

         //  drawable color

         String attrType;

         public SkinItem(String attrName, int refId, String attrValue, String attrType) {

             this.attrName = attrName;

             this.refId = refId;

             this.attrValue = attrValue;

             this.attrType = attrType;

         }

         public String getAttrName() {

             return attrName;

         }

         public int getRefId() {

             return refId;

         }

         public String getAttrValue() {

             return attrValue;

         }

         public String getAttrType() {

             return attrType;

         }

     }
SkinView:
 class SkinView{

         private View view;

         private List<SkinItem> list;  //收集需要换肤的集合

         public SkinView(View view, List<SkinItem> list) {

             this.view = view;

             this.list = list;

         }

     }
收集控件:
SkinFactory:
 package com.example.apk_demo2;

 import android.content.Context;

 import android.util.AttributeSet;

 import android.util.Log;

 import android.view.View;

 import android.widget.TextView;

 import androidx.core.view.LayoutInflaterFactory;

 import java.lang.reflect.Constructor;

 import java.lang.reflect.InvocationTargetException;

 import java.util.ArrayList;

 import java.util.List;

 // LayoutInflaterFactory接口

 public class SkinFactory implements LayoutInflaterFactory {

     private List<SkinView> cacheList = new ArrayList<>();

     private static final String TAG = "david" ;

     //补充系统控件的包名

     private static final String[] prefixList={"android.widget.","android.view.","android.webkit."};   // 包名,android.webkit为浏览器包,v4、v7包都可以认为是自定义控件

     /**

      * xml生成的时候会回调这个方法,返回值为view

      * @param parent

      * @param name   控件名

      * @param context

      * @param attrs

      * @return

      */

     @Override

     public View onCreateView(View parent, String name, Context context, AttributeSet attrs) {

         Log.i(TAG,"onCreateView:"+name);

         // 需要换肤的控件收集到一个容器中

         View view = null;  //初始化view

         // 判断自定义与非自定义控件(自定义控件打印时是全报名)

         if(name.contains(".")){

             // 自定义控件

             view = createView(context,attrs,name);  // 获得自定义控件的实例化对象

         }else{

             // 系统控件

             for(String pre : prefixList){

                 view = createView(context,attrs,pre + name);

 //                Log.i(TAG,"创建view:"+view);

                 if(view != null){

                     // 找对包名,实例化成功

                     // 解析view

                     //如果不为空则说明实例化成功,找对了包名

                     break;

                     //找对了可以退出循环

                 }

             }

         }

         if(view != null){

             //view不为空则说明已经拿到了这个view,这时候开始解析这个view,判断哪些控件需要换肤

             parseSkinView(context,attrs,view);

             //这个方法用于收集需要换肤的view

         }

         return view;

     }

     /**

      * 收集需要换肤的控件

      * @param context

      * @param attrs

      * @param view

      */

     private void parseSkinView(Context context, AttributeSet attrs, View view) {

         List<SkinItem> list = new ArrayList<>();  //将需要换肤的控件添加到这个集合里面

         for(int i = 0; i < attrs.getAttributeCount(); i++){

             //做一个java bean来封装这些值:

             // attrName-属性名(background)、attrValue-属性值id 十六进制(@color/colorPrimaryDark)、attrType--类型(color)、Id(R文件的id)

             // attrName == background等 时 (属性名)

             String attrName = attrs.getAttributeName(i);

             // 获得控件的id值,eg:@color/colorPrimaryDark  (属性值)

             String attrValue = attrs.getAttributeValue(i);

             if(attrName.equals("background") || attrName.equals("textColor")){

                 // 需要换肤的控件——具备换肤的潜力,并不是一定需要换肤

 //                Log.i(TAG,"parseSkinView:"+attrName);

                 int id = Integer.parseInt(attrValue.substring(1)); //引用类型

                 String entry_name = context.getResources().getResourceEntryName(id);

                 String typeNme = context.getResources().getResourceTypeName(id);

                 SkinItem skinItem = new SkinItem(attrName,id,entry_name,typeNme);

                 list.add(skinItem);

             }

         }

         if(!list.isEmpty()){

             SkinView skinView = new SkinView(view,list);

             cacheList.add(skinView);

             //应用换肤  xml加载过程中换肤

             skinView.apply();

         }

     }

     //点击应用

     public void apply() {

         for(SkinView skinView : cacheList){

             skinView.apply();

         }

     }

     public void remove() {

         for (SkinView skinView : cacheList){

             //清空集合

 //            cacheList.removeAll();

         }

     }

     /**

      * 一个activity有多个控件

      * 一个控件对应多个换肤属性

      */

     class SkinView{

         private View view;

         private List<SkinItem> list;  //收集需要换肤的集合

         public SkinView(View view, List<SkinItem> list) {

             Log.i(TAG,"view123:"+view);

             this.view = view;

             this.list = list;

         }

         //应用换肤

         public void apply(){

             //循环需要换肤的SkinItem,应用所有的换肤

             for(SkinItem skinItem : list){

                 Log.i(TAG,"skinItem:"+skinItem.getAttrName());

                 if("textColor".equals(skinItem.getAttrName())){

                     Log.i(TAG,"view_1:"+view);

                     //if (!SkinManager.getInstance().getSkinPackage().equals("")){

                     //最开始的时候系统没有资源文件,所以当有没有都运行这行代码是,系统没有获得颜色id,因此为灰色。

                     //所以得加一个判断,在没有换肤之前采用系统默认颜色

                     if (!SkinManager.getInstance().getSkinPackage().equals("")) {

                         ((TextView) view).setTextColor(SkinManager.getInstance().getColor(skinItem.getRefId()));

                     }

                 }

                 if("background".equals(skinItem.getAttrName())){

                     if("color".equals(skinItem.getAttrType())){

                         //直接这样设置,没有任何换肤功能,这样加载就是本身默认颜色

 //                        view.setBackgroundColor(skinItem.getRefId());

                         if (!SkinManager.getInstance().getSkinPackage().equals("")){

                             view.setBackgroundColor(SkinManager.getInstance().getColor(skinItem.getRefId()));

                         }

                     }else if("drawable".equals(skinItem.getAttrType())){

                         if(!SkinManager.getInstance().getSkinPackage().equals("")){

                             view.setBackgroundDrawable(SkinManager.getInstance().getDrawable(skinItem.getRefId()));

                         }

                     }

                 }

             }

         }

     }

     /**

      * 封装值

      */

     class SkinItem{

         // attrName   background

         String attrName;

         //R里面的id

         int refId;

         // 资源名字  @color/colorPrimaryDark

         String attrValue;

         //  drawable color

         String attrType;

         public SkinItem(String attrName, int refId, String attrValue, String attrType) {

             this.attrName = attrName;

             this.refId = refId;

             this.attrValue = attrValue;

             this.attrType = attrType;

         }

         public String getAttrName() {

             return attrName;

         }

         public int getRefId() {

             return refId;

         }

         public String getAttrValue() {

             return attrValue;

         }

         public String getAttrType() {

             return attrType;

         }

     }

     /**

      * 加载自定义控件

      * @param context

      * @param attrs

      * @param name

      * @return

      */

     private View createView(Context context, AttributeSet attrs, String name) {

         try{

             //运用反射拿到自定义控件的构造方法,没有性能损耗

             Class viewClazz = context.getClassLoader().loadClass(name);

             Constructor<? extends View> constructor = viewClazz.getConstructor(new Class[]{Context.class,AttributeSet.class});  //通过反射获得自定义控件的构造方法

             return constructor.newInstance(context,attrs);  //通过反射而来的构造函数来实例化对象

         } catch (InstantiationException e) {

             e.printStackTrace();

         } catch (InvocationTargetException e) {

             e.printStackTrace();

         } catch (NoSuchMethodException e) {

             e.printStackTrace();

         } catch (IllegalAccessException e) {

             e.printStackTrace();

         } catch (ClassNotFoundException e) {

             e.printStackTrace();

         }

         return null;

     }

 }
4.收集完毕后,应用换肤 (xml加载过程中换肤)
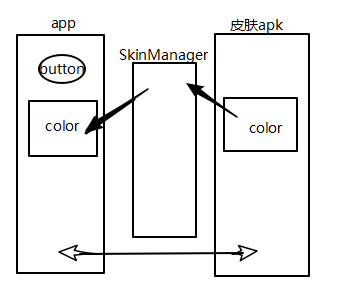
创建SkinManager去获得皮肤apk,app通过SkinManager获取皮肤apk
(1)加载皮肤包(loadSkin):通过反射获得AsserManager的addAssetpath()方法,再通过这个方法获得皮肤apk,从而实例化skinResource;再通过PackageManager.getPackageArchiveInfo(path,PackageManager.GET_ACTIVITIES).packageName;获得皮肤包名
(2)获取颜色(getColor):判断skinResource是否为空;拿到res的名字,eg:通过“colorAccent”去寻找id
SkinManager:
 package com.example.apk_demo2;

 import android.content.Context;

 import android.content.pm.PackageManager;

 import android.content.res.AssetManager;

 import android.content.res.Resources;

 import android.graphics.drawable.Drawable;

 import android.util.Log;

 import androidx.core.content.ContextCompat;

 import java.lang.reflect.InvocationTargetException;

 import java.lang.reflect.Method;

 public class SkinManager {

     private static final String TAG = "yu" ;

     //代表外置卡皮肤app的resource

     private Resources skinResource;

     private Context context;

     //皮肤apk包名

     private String skinPackage;

     // 初始化context

     public void init(Context context){

         // 一定用getApplicationContext()方法获得context,其是一定存在的;(从内存角度上引用全局上下文)

         // 如果是靠参数context,有可能是不存在的(如果activity被销毁了)

         this.context = context.getApplicationContext();

     }

     private static final SkinManager ourInstance = new SkinManager();

     public static SkinManager getInstance(){ return ourInstance; }

     /**

      *加载皮肤包

      * @param path 路径

      */

     public void loadSkin(String path){

         // Resources(AssetManager assets, DisplayMetrics metrics, Configuration config)

         // 实例化AssetManager (@hide)AssetManager()是一个系统保护函数,需要通过反射来调用

         try{

             AssetManager assetManager = AssetManager.class.newInstance();

             //通过assetManager.addAssetPath(""); 方法获得皮肤apk  需反射

             Method addAssetPath = assetManager.getClass().getMethod("addAssetPath",String.class);

             addAssetPath.invoke(assetManager,path);

             skinResource = new Resources(assetManager,context.getResources().getDisplayMetrics(),

                     context.getResources().getConfiguration());// 实例化skonResource

             // skinResource.getColor(R.color.colorAccent);通过这样就可以获得资源文件的皮肤设置

             PackageManager packageManager = context.getPackageManager();  //包管理器

             //获得皮肤包名

             Log.i(TAG,"路径"+path);

 //            Log.i(TAG,"上下文"+context);

             Log.i(TAG,"上下文"+context);

             skinPackage = packageManager.getPackageArchiveInfo(path,PackageManager.GET_ACTIVITIES).packageName;

             Log.i(TAG,"包名"+skinPackage);

         } catch (IllegalAccessException e) {

             e.printStackTrace();

         } catch (InstantiationException e) {

             e.printStackTrace();

         } catch (NoSuchMethodException e) {

             e.printStackTrace();

         } catch (InvocationTargetException e) {

             e.printStackTrace();

        } catch (Exception e){

             Log.i(TAG,"上下文"+context);

             Log.i(TAG,"包名"+skinPackage);

         }

     }

     private SkinManager(){ }

     /**

      *

      * @param resId

      * @return

      */

     public int getColor(int resId){

         //判断有没有皮肤包

         if(skinResource == null){

             return resId;

         }

         //能否通过这个方法获得 int skinId = skinResource.getColor(resId);

         //不能,因为R文件的id与皮肤apk的id不一样

         //eg:获得colorAccent

         String resName = context.getResources().getResourceEntryName(resId);

         // public int getIdentifier(String name, String defType, String defPackage)

         int skinId = skinResource.getIdentifier(resName,"color",skinPackage);

         if(skinId == 0){

             //如果不合法,返回默认xml

             return resId;

         }

 //        Log.i(TAG,"resId:"+resId);

 //        Log.i(TAG,"skinResource:"+skinResource.getColor(skinId));

         return skinResource.getColor(skinId);

     }

     /**

      * 判断有无资源可以加载,如没有就用初始化皮肤

      * @return

      */

     public Object getSkinPackage() {

         if(skinPackage == null){return "";}

         return "ok";

     }

     public Drawable getDrawable(int refId) {

         if(skinResource == null){

             return ContextCompat.getDrawable(context,refId);

         }

         String resName = context.getResources().getResourceEntryName(refId);

         int skinId = skinResource.getIdentifier(resName,"drawable",skinPackage);

         if(skinId == 0){

             //如果不合法,返回默认xml

             return ContextCompat.getDrawable(context,refId);

         }

         return skinResource.getDrawable(refId);

     }

 }
总结:
从学习Android到现在已经过去了一个月,学习最初感觉还好,谁知遇到了换肤这一大难题。
网上资料非常多,却很难找到一个适合我们的。非常幸运的是,虽然这其中不乏走了很多弯路,但对亏朋友们之间的互相帮助,互相共享学习资料,最后终于做了出来。在自己的项目中也遇到过许许多多的bug需要调试,保持头脑清晰是必须的啦~
想要跟深入学习的同学,可以去学习github上的开源框架Android-Skin-Loader。这个框架的换肤机制使用动态加载机制前去加载皮肤内容,无需重启即可实时更换。这个框架也可以直接拿来使用,不过个人认为身为一个人程序员还是需要了解好的项目的基本原理的。
本章涉及知识,想要了解的朋友可以去我的其他博客:Android资源管理利器Resources和AssetManager
Android实现apk插件方式换肤的更多相关文章
- Android App插件式换肤实现方案
背景 目前很多app都具有换肤功能,用户可以根据需要切换不同的皮肤,为使我们的App支持换肤功能,给用户提供更好的体验,在这里对换肤原理进行研究总结,并选择一个合适的换肤解决方案. 换肤介绍 App换 ...
- Android 查看Apk签名方式V1和V2
Android 查看Apk签名方式V1和V2 java -jar apksigner.jar verify -v my.apk -- Verifies Verified using v1 scheme ...
- Android 换肤功能的实现(Apk插件方式)
一.概述 由于Android 没有提供一套统一的换肤机制,我猜可能是因为国外更注重功能和体验的原因 所以国内如果要做一个漂亮的换肤方案,需要自己去实现. 目前换肤的方法大概有三种方案: (1)把皮肤资 ...
- Android APK方式换肤实现原理
现在很多APP都有换肤的功能,例如微博,QQ等应用.这些应用的换肤原理是什么? 在用微博的时候,不难发现,当你要换肤时,先下载并安装一个皮肤apk,然后选择这个皮肤,就可以了. 这种方式就是把皮肤打包 ...
- Android进阶2之APK方式换肤
public class MainActivity extends Activity { private Button defaultbutton = null; @Override public v ...
- Android可更换布局的换肤方案
换肤,顾名思义,就是对应用中的视觉元素进行更新,呈现新的显示效果.一般来说,换肤的时候只是更新UI上使用的资源,如颜色,图片,字体等等.本文介绍一种笔者自己使用的基于布局的Android换肤方案,不仅 ...
- Android通过Apk插件调起微信支付
App对接微信调起微信支付需要在微信平台注册,鉴别的标识就是App的包名,所以将申请的包名单独打包成一个Apk文件,则在其他的App调起此Apk的时候同样可以起到调用微信支付的功能.这样就实现了调起微 ...
- Android 自动分析apk加固方式
本实例只对apk中lib文件夹中的文件进行分析import java.io.File;import java.io.IOException;import java.util.ArrayList;imp ...
- Android应用换肤总结
换肤,我们都很熟悉,像XP的主题,塞班的主题.看过国外的一些技术博客,就会发现国内和国外对软件的,或者说移动开发的软件的需求的不同.国外用户注重社交.邮件等功能,国内用户则重视音乐.小说.皮肤等功能, ...
随机推荐
- 模板汇总——AC自动机
AC自动机 模板题 HDU-2222 Keywords Search #include<bits/stdc++.h> using namespace std; #define LL lon ...
- 【Nginx】四层负载均衡配置
一.概述 二.配置 2.1 环境准备 2.2 安装及配置 1).下载Nginx 2).下载nginx_tcp_proxy_module 插件 3).编译Nginx 4).修改Nginx.conf配置文 ...
- mysql之innodb存储引擎---BTREE索引实现
在阅读本篇文章可能需要一些B树和B+树的基础 一.B树和B+树的区别 1.B树的键值不会出现多次,而B+树的键值一定会出现在叶子节点上,而且在非叶子节点也可能会重复出现2.B数存储真实数据,B+数叶子 ...
- ORM之Dapper运用
一.前言 上一篇[分层架构设计]我们已经有了架构的轮廓,现在我们就在这个轮廓里面造轮子.项目要想开始,肯定先得确定ORM框架,目前市面上的ORM框架有很多,对于.net人员来说很容易就想到以ADO.N ...
- java8新特性使用
一.接口的默认方法(允许接口有非抽象方法)Java 8允许我们给接口添加一个非抽象的方法实现,只需要使用 default关键字即可,这个特征又叫做扩展方法,示例如下: 代码如下: interface ...
- 分别设计点类Point和圆类Circle,点类有两个私有数据纵坐标和横坐标;圆类有也两个私有数据圆心和半径,其中圆心是一个点类对象;要求如下所述: (1) 通过构造方法初始化数据成员,数据成员的初始化通过构造方法的参数传递;(2) 分别编写点和圆的输出函数,其中圆的输出包括圆心和半径的输出;点的输出x,y;
题目相对简单: package naizi; public class Circle { //私有成员及构造方法 private Point center; private int r; Circle ...
- Linux 笔记 - 第十一章 正则表达式
博客地址:http://www.moonxy.com 一.前言 正则表达式(英语为 Regular Expression,在代码中常简写为 regex.regexp 或 RE),是使用单个字符串来描述 ...
- c++异常处理函数
注意: throw 抛出异常,catch 捕获异常,try 尝试捕获异常 catch 中的参数类型要和throw 抛出的数据类型一致 try{ //可能抛出异常的语句}catch (异常类型1) ...
- CentOS升级内核方法
查询现在系统的kernel安装包:rpm -qa |grep kernel 删除不用的内核安装包:rpm -e xxx centos 6升级:https://blog.csdn.net/wh21121 ...
- SpringCloud学习笔记(7):使用Spring Cloud Config配置中心
简介 Spring Cloud Config为分布式系统中的外部化配置提供了服务器端和客户端支持,服务器端统一管理所有配置文件,客户端在启动时从服务端获取配置信息.服务器端有多种配置方式,如将配置文件 ...