|
Today we will be using AngularJS and the great UI Router and the Angular ngAnimate module to create an animated multi-step form. This technique can be used for large forms that you would like to simplify for your users.
We can see this technique used in many places on the web. Places like shopping carts, signup forms, onboarding processes, and more have used the multi-step form to ease users through their online forms.
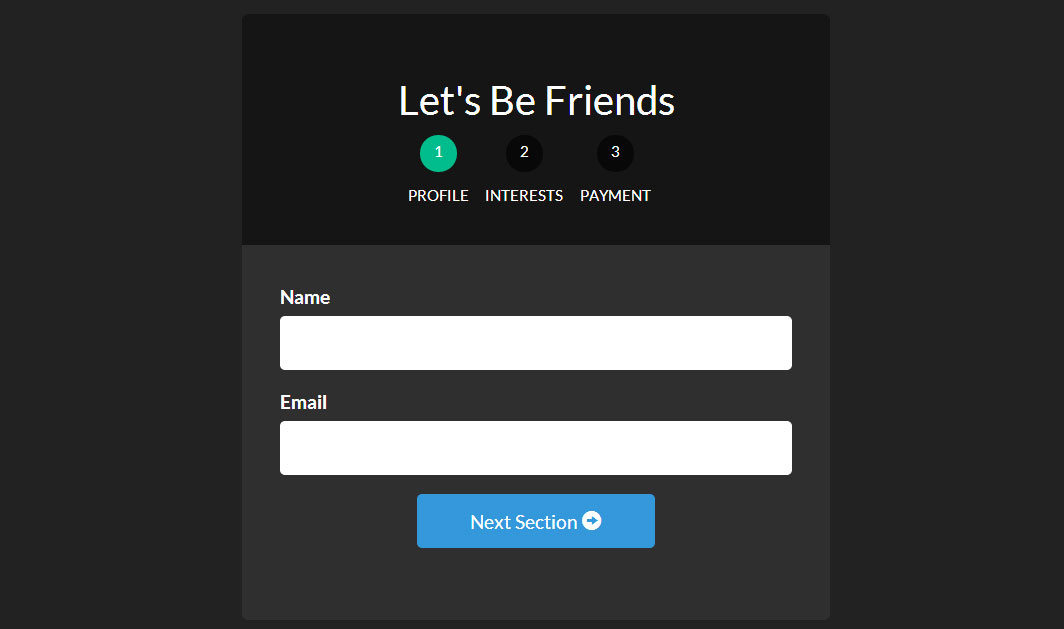
Here’s what we will be building:
Using UI Router and its ability to have nested states and different views per state, we will be able to make a multi-step form fairly easily.
For a quick understanding of the benefits and how UI Router works, check out our other article:AngularJS Routing Using UI-Router
Let’s get down to business and start creating our awesome form!
|
今天我们将使用AngularJs和伟大的UI Router以及Angular ngAnimate module创建一个带动画的多步表单。这项技术可以用在你想要简化用户操作的大表单上。
我们看到这项技术已经应用在了许多的网页上。比如购物车,注册表单,入职流程以及许多多步表单,让用户更容易在线填写表单。
下面我们将构建它:
使用UI Router,它能内嵌状态,为每个状态显示不同的view,我们能让多步表单变得相当的容易。
为了快速的理解UI Router是怎样工作的,看我们的文章:AngularJS使用UI-Router路由
让我们言归正传,开始创建我们的最棒的表单!
|
Setting Up Our Project
We will be using a simple structure for our application. We’ll need a layout file, view files for each part of the form, a stylesheet, and our JavaScript file that will hold all of our Angular code.
Here are the files for our application. Go ahead and create these files and we’ll start filling them in as we go.
- index.html

- form.html

- form-profile.html

- form-interests.html

- form-payment.html

- app.js

- style.css
Each of the form-____.html files will be used as nested views inside of the form. These are what will create each section of our form.
|
译者信息
创建工程
创建工程有个模板结构. 需要个 布局文件 , 每个表单的视图文件, 格式文件, 以及JavaScript 文件.
下面就是文件清单,先创建好它们,接着在填充内容
- index.html

- form.html

- form-profile.html

- form-interests.html

- form-payment.html

- app.js

- style.css
每个表单-____.html表示层级结构中的html文件. 这些结构最终创建我们的表单结构.
|
Our Layout/Template File index.html
Let’s start our project by creating the main file that will bring all of our resources together into one place. We will use our index.html file as our starting base.
Here we will, load all our resources (AngularJS, ngAnimate, UI Router, our script and stylesheet) and place a ui-view so that we know where UI Router should inject our views. We will also be using Bootstrap for quick styling.
<!-- index.html -->

<!DOCTYPE html>

<html>

<head>

    <meta charset="utf-8">

    <!-- CSS -->

    <link rel="stylesheet" href="//netdna.bootstrapcdn.com/bootswatch/3.1.1/darkly/bootstrap.min.css">

    <link rel="stylesheet" href="style.css">


    <!-- JS -->

    <!-- load angular, nganimate, and ui-router -->

    <script src="//ajax.googleapis.com/ajax/libs/angularjs/1.2.16/angular.min.js"></script>

    <script src="//cdnjs.cloudflare.com/ajax/libs/angular-ui-router/0.2.10/angular-ui-router.min.js"></script>

    <script src="//ajax.googleapis.com/ajax/libs/angularjs/1.2.16/angular-animate.min.js"></script>

    <script src="app.js"></script>


</head>

<!-- apply our angular app -->

<body ng-app="formApp">

    <div class="container">

        <!-- views will be injected here -->

        <div ui-view></div>

    </div>

</body>

</html>
With all of our files loaded, let’s go into our app.js to start creating our Angular application and state-based routes. Notice how we applied our Angular app (formApp) to the body of our application.
|
译者信息
我们的布局/模板文件 index.html
我们通过建立一个主文件来引入我们所需要的所有资源以开始我们的项目 ,这里我们使用 index.html 文件作为主文件
现在,我们加载我们所需的资源(AngularJS, ngAnimate, Ui Router, 以及其他脚本和样式表)并且设定一个 ui-view用来告知 UI Router 我们的视图需要显示到哪里。这里我们使用 Bootstrap 来快速应用样式。
<!-- index.html -->

<!DOCTYPE html>

<html>

<head>

    <meta charset="utf-8">

    <!-- CSS -->

    <link rel="stylesheet" href="//netdna.bootstrapcdn.com/bootswatch/3.1.1/darkly/bootstrap.min.css">

    <link rel="stylesheet" href="style.css">


    <!-- JS -->

    <!-- load angular, nganimate, and ui-router -->

    <script src="//ajax.googleapis.com/ajax/libs/angularjs/1.2.16/angular.min.js"></script>

    <script src="//cdnjs.cloudflare.com/ajax/libs/angular-ui-router/0.2.10/angular-ui-router.min.js"></script>

    <script src="//ajax.googleapis.com/ajax/libs/angularjs/1.2.16/angular-animate.min.js"></script>

    <script src="app.js"></script>


</head>

<!-- apply our angular app -->

<body ng-app="formApp">

    <div class="container">

        <!-- views will be injected here -->

        <div ui-view></div>

    </div>

</body>

</html>
完成所有文件的引入后,让我们进入 app.js 开始创建Angular应用和最基本的路由配置。 注意我们是如何把Angular App (formApp) 应用到 body 上面的。
|
Building Our Angular App app.js
We will create our application and routes. For larger applications, you’ll want to separate your Angular application, routes, and controllers into their own separate modules, but for our purposes, we’ll place them all together as a happy family in app.js.
// app.js

// create our angular app and inject ngAnimate and ui-router

// =============================================================================

angular.module('formApp', ['ngAnimate', 'ui.router'])

// configuring our routes

// =============================================================================

.config(function($stateProvider, $urlRouterProvider) {


    $stateProvider


        // route to show our basic form (/form)

        .state('form', {

            url: '/form',

            templateUrl: 'form.html',

            controller: 'formController'

        })


        // nested states

        // each of these sections will have their own view

        // url will be nested (/form/profile)

        .state('form.profile', {

            url: '/profile',

            templateUrl: 'form-profile.html'

        })


        // url will be /form/interests

        .state('form.interests', {

            url: '/interests',

            templateUrl: 'form-interests.html'

        })


        // url will be /form/payment

        .state('form.payment', {

            url: '/payment',

            templateUrl: 'form-payment.html'

        });


    // catch all route

    // send users to the form page

    $urlRouterProvider.otherwise('/form/profile');

})

// our controller for the form

// =============================================================================

.controller('formController', function($scope) {


    // we will store all of our form data in this object

    $scope.formData = {};


    // function to process the form

    $scope.processForm = function() {

        alert('awesome!');

    };


});
We now have our application with ngAnimate and ui.router injected. We also have our routes created. Notice how we can define a url, view file (templateUrl), and controller for each state.
form will be our main state. It will also have child states denoted by the . like in form.profile. The idea behind this is that each nested state will be brought into the main form view as the state of our application changes.
We’ll demonstrate this in our next section. We now have to create the view for our form and each of its nested states.
|
译者信息
创建我们的Angular App app.js
现在我们来创建应用和路由。 在一个大型应用中, 你肯定希望把你的Angular应用、路由、控制器分布到它们各自的模块中,但是为了完成我们的简单用例,我们将把它们都放到app.js这个欢乐的大家庭中。
// app.js

// create our angular app and inject ngAnimate and ui-router

// =============================================================================

angular.module('formApp', ['ngAnimate', 'ui.router'])

// configuring our routes

// =============================================================================

.config(function($stateProvider, $urlRouterProvider) {


    $stateProvider


        // route to show our basic form (/form)

        .state('form', {

            url: '/form',

            templateUrl: 'form.html',

            controller: 'formController'

        })


        // nested states

        // each of these sections will have their own view

        // url will be nested (/form/profile)

        .state('form.profile', {

            url: '/profile',

            templateUrl: 'form-profile.html'

        })


        // url will be /form/interests

        .state('form.interests', {

            url: '/interests',

            templateUrl: 'form-interests.html'

        })


        // url will be /form/payment

        .state('form.payment', {

            url: '/payment',

            templateUrl: 'form-payment.html'

        });


    // catch all route

    // send users to the form page

    $urlRouterProvider.otherwise('/form/profile');

})

// our controller for the form

// =============================================================================

.controller('formController', function($scope) {


    // we will store all of our form data in this object

    $scope.formData = {};


    // function to process the form

    $scope.processForm = function() {

        alert('awesome!');

    };


});
现在我们拥有了一个已经注入了ngAnimate和ui.router的应用。 我们同样也建立了相应的路由。注意我们是如何为每一个视图区域定义 url,视图文件(templateUrl) 和 控制器的。
form 将是我们的主视图区域。它同样有一个以 . 分割的子视图区域 form.profile。这种想法能实现在应用状态发生变化时(译者:可能是路由、queryString等),子视图将会在主视图区域中显示出来。(译者:而且可以作到仅更新子视图区域变化,记录子视图区域状态)。
我们将在下一节中进行演示。 现在我们需要为form以及它的子视图区域创建视图。
|
Form Template View form.html
Let’s start by creating our main form.html file. This will be used as a template file for the rest of our form view files just like our index.html was used as the overall template for our entire project. All we have to do is include a ui-view in this file so that the nested states know where to inject their view.
<!-- form.html -->

<div class="row">

<div class="col-sm-8 col-sm-offset-2">

    <div id="form-container">

        <div class="page-header text-center">

            <h2>Let's Be Friends</h2>


            <!-- the links to our nested states using relative paths -->

            <!-- add the active class if the state matches our ui-sref -->

            <div id="status-buttons" class="text-center">

                <a ui-sref-active="active" ui-sref=".profile"><span>1</span> Profile</a>

                <a ui-sref-active="active" ui-sref=".interests"><span>2</span> Interests</a>

                <a ui-sref-active="active" ui-sref=".payment"><span>3</span> Payment</a>

            </div>

        </div>


        <!-- use ng-submit to catch the form submission and use our Angular function -->

        <form id="signup-form" ng-submit="processForm()">

            <!-- our nested state views will be injected here -->

            <div id="form-views" ui-view></div>

        </form>

    </div>

    <!-- show our formData as it is being typed -->

    <pre>

        {{ formData }}

    </pre>

</div>

</div>
Notice how this is the second time we’ve used ui-view in this project. This is what is so great about UI Router; we are able to nest states and views. This provides us a great deal of flexibility when creating our applications. For more information about UI Router’s views, check out their official docs.
Adding Active Classes Based on State We will want each of our status buttons to be able to show if they are active. In order to do this, we will use ui-sref-active that UI Router provides. This will add the class we specify if the ui-sref matches the current state.
To add validation to your form, also read: AngularJS Form Validation
By now you’re probably wondering what our form looks like. Let’s go into our browser and take a look!

Getting there. Not really everything we had hoped for, but it has the beginnings of something great. Let’s keep pushing forward. Let’s add a bit of stylilng and then we’ll add our nested views and animations.
|
译者信息
表单模板视图 form.html
让我们从新建form.html开始。这个文件将会在我们剩下的表单视图文件中充当模板的作用,正如index.html被用作整个项目的总体模板一样。我们所要作的是在该文件中包含ui-view,这样可以使嵌套声明知道该在何处注入他们的视图。
<!-- form.html -->

<div class="row">

<div class="col-sm-8 col-sm-offset-2">

    <div id="form-container">

        <div class="page-header text-center">

            <h2>Let's Be Friends</h2>


            <!-- the links to our nested states using relative paths -->

            <!-- add the active class if the state matches our ui-sref -->

            <div id="status-buttons" class="text-center">

                <a ui-sref-active="active" ui-sref=".profile"><span>1</span> Profile</a>

                <a ui-sref-active="active" ui-sref=".interests"><span>2</span> Interests</a>

                <a ui-sref-active="active" ui-sref=".payment"><span>3</span> Payment</a>

            </div>

        </div>


        <!-- use ng-submit to catch the form submission and use our Angular function -->

        <form id="signup-form" ng-submit="processForm()">

            <!-- our nested state views will be injected here -->

            <div id="form-views" ui-view></div>

        </form>

    </div>

    <!-- show our formData as it is being typed -->

    <pre>

        {{ formData }}

    </pre>

</div>

</div>
注意我们是如何第二次在项目中使用ui-view的。这就是UI Router伟大的地方:我们可以嵌套声明和视图。这能够在我们开发应用时提供给我们非常多的灵活性。关于UI Router视图的内容,请参见 官方文档。
添加基于状态的激活类
我们希望每一个状态按钮能够在他们被激活时展示。为了达到这个效果,我们将会使用UI Router提供的ui-sref-active。如果ui-sref和当前状态一致,则会添加我们指定的类。
为了给自己的表单添加验证,请参见AngularJS表单验证。
现在,你可能想知道我们的表单究竟看起来是什么样子。让我们打开浏览器看一眼。
目前为止,我们并没有完全按照希望的那样得到所有的内容,但是这是一系列伟大事情的开端。让我们继续前进,添加一点样式,之后会添加一些嵌入视图和注释。
|
Basic Styling style.css
We are going to style our form-container and the status-buttons so that we get a better looking form.
/* style.css */

/* BASIC STYLINGS

============================================================================= */

body                            { padding-top:20px; }

/* form styling */

#form-container                { background:#2f2f2f; margin-bottom:20px;

    border-radius:5px; }

#form-container .page-header   { background:#151515; margin:0; padding:30px;

    border-top-left-radius:5px; border-top-right-radius:5px; }

/* numbered buttons */

#status-buttons                 {  }

#status-buttons a               { color:#FFF; display:inline-block; font-size:12px; margin-right:10px; text-align:center; text-transform:uppercase; }

#status-buttons a:hover         { text-decoration:none; }

/* we will style the span as the circled number */

#status-buttons span            { background:#080808; display:block; height:30px; margin:0 auto 10px; padding-top:5px; width:30px;

    border-radius:50%; }

/* active buttons turn light green-blue*/

#status-buttons a.active span   { background:#00BC8C; }
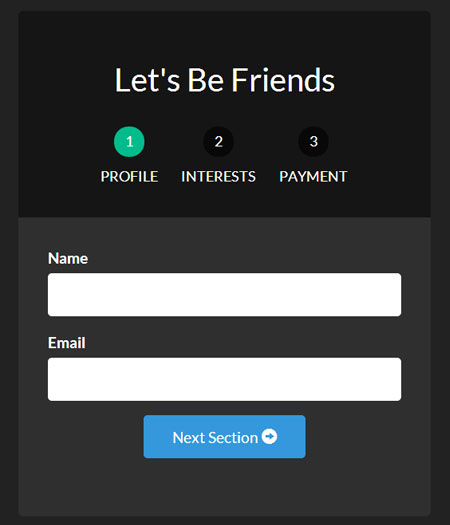
Now our buttons will look better and be more in line with what we want. Let’s move on to the nested views.
Nested Form Views form-profile.html, form-interests.html, form-payment.html
This will be the easy part. We’ll define our different views with the input fields that we need. We’ll also bind them to our formData object so that we can see our data getting built as we type into our form.
Here are our view files that are used in our nested states:
Form Profile View
<!-- form-profile.html -->

<div class="form-group">

    <label for="name">Name</label>

    <input type="text" class="form-control" name="name" ng-model="formData.name">

</div>

<div class="form-group">

    <label for="email">Email</label>

    <input type="text" class="form-control" name="email" ng-model="formData.email">

</div>

<div class="form-group row">

<div class="col-xs-6 col-xs-offset-3">

    <a ui-sref="form.interests" class="btn btn-block btn-info">

    Next Section <span class="glyphicon glyphicon-circle-arrow-right"></span>

    </a>

</div>

</div>
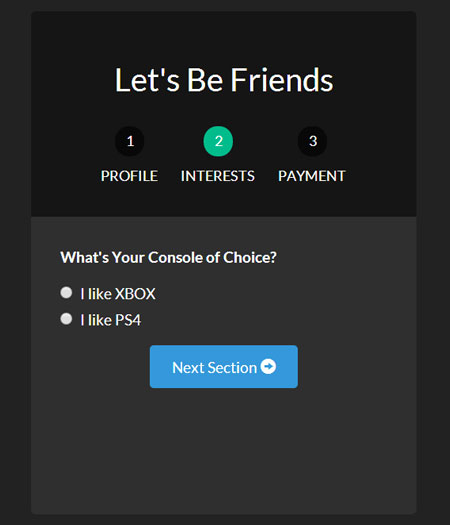
Form Interests View
<!-- form-interests.html -->

<label>What's Your Console of Choice?</label>

<div class="form-group">

    <div class="radio">

        <label>

           <input type="radio" ng-model="formData.type" value="xbox" checked>

           I like XBOX

        </label>

    </div>

    <div class="radio">

        <label>

            <input type="radio" ng-model="formData.type" value="ps">

            I like PS4

        </label>

    </div>

</div>

<div class="form-group row">

<div class="col-xs-6 col-xs-offset-3">

    <a ui-sref="form.payment" class="btn btn-block btn-info">

    Next Section <span class="glyphicon glyphicon-circle-arrow-right"></span>

    </a>

</div>

</div>
Form Payment View
<!-- form-payment.html -->

<div class="text-center">

    <span class="glyphicon glyphicon-heart"></span>

    <h3>Thanks For Your Money!</h3>


    <button type="submit" class="btn btn-danger">Submit</button>

</div>
Now that we have, defined these views, they will show up when we view our form. We also link to the each new state using the next button and ui-sref.
|
译者信息
基础Stylingstyle.css
我们将设计我们的form-container和status-buttons来是我们的表单看起来更好。
/* style.css */

/* BASIC STYLINGS

============================================================================= */

body                            { padding-top:20px; }

/* form styling */

#form-container                { background:#2f2f2f; margin-bottom:20px;

    border-radius:5px; }

#form-container .page-header   { background:#151515; margin:0; padding:30px;

    border-top-left-radius:5px; border-top-right-radius:5px; }

/* numbered buttons */

#status-buttons                 {  }

#status-buttons a               { color:#FFF; display:inline-block; font-size:12px; margin-right:10px; text-align:center; text-transform:uppercase; }

#status-buttons a:hover         { text-decoration:none; }

/* we will style the span as the circled number */

#status-buttons span            { background:#080808; display:block; height:30px; margin:0 auto 10px; padding-top:5px; width:30px;

    border-radius:50%; }

/* active buttons turn light green-blue*/

#status-buttons a.active span   { background:#00BC8C; }
现在我们的按钮更好看了并且更符合我们想要的了,接下来我们看下嵌套视图。
嵌套视图form-profile.html, form-interests.html, form-payment.html
这部分会比较简单。我们将定义不同的带有我们需要的输入框的视图。并且将他们绑定到formData对象以便我们能看到输入的数据。
下面是我们用于嵌套视图的视图文件:
表单概要视图
<!-- form-profile.html -->

<div class="form-group">

    <label for="name">Name</label>

    <input type="text" class="form-control" name="name" ng-model="formData.name">

</div>

<div class="form-group">

    <label for="email">Email</label>

    <input type="text" class="form-control" name="email" ng-model="formData.email">

</div>

<div class="form-group row">

<div class="col-xs-6 col-xs-offset-3">

    <a ui-sref="form.interests" class="btn btn-block btn-info">

    Next Section <span class="glyphicon glyphicon-circle-arrow-right"></span>

    </a>

</div>

</div>
表单兴趣视图
<!-- form-interests.html -->

<label>What's Your Console of Choice?</label>

<div class="form-group">

    <div class="radio">

        <label>

           <input type="radio" ng-model="formData.type" value="xbox" checked>

           I like XBOX

        </label>

    </div>

    <div class="radio">

        <label>

            <input type="radio" ng-model="formData.type" value="ps">

            I like PS4

        </label>

    </div>

</div>

<div class="form-group row">

<div class="col-xs-6 col-xs-offset-3">

    <a ui-sref="form.payment" class="btn btn-block btn-info">

    Next Section <span class="glyphicon glyphicon-circle-arrow-right"></span>

    </a>

</div>

</div>
表单支付视图
<!-- form-payment.html -->

<div class="text-center">

    <span class="glyphicon glyphicon-heart"></span>

    <h3>Thanks For Your Money!</h3>


    <button type="submit" class="btn btn-danger">Submit</button>

</div>
既然我们已经定义了这些视图,那么当我们浏览表单时,他们就会显示出来。同样我们用下一个按钮和ui-sref来连接每一个新视图.
|
|
When using ui-sref, you want to link to the defined state in your routes, not the URL. Angular will then use this to build out your href for you.
Here is each page of our form now.

With our pages out of the way, let’s add in our animations.
|
译者信息
当使用ui-sref时,你要连接到你路由中定义的state而不是URL。然后Angular会使用这个来为你构建href。
下面是我们表单目前的每一个页面。
为了让我们的页面不同寻常,让我们加上动画效果。
|
Animating Our Form
Since we already loaded ngAnimate into our project at the beginning, it has been adding the classes needed for animations as we change states. It automatically adds the classes ng-enter and ng-leave as views come and go.
All we have to do now is style those and we have our finalized form! To understand Angular animations,this article is a good getting started point.
Let’s jump into our CSS file, add our animations, and apply them to our form.
/* style.css */

/* ANIMATION STYLINGS

============================================================================= */

#signup-form            { position:relative; min-height:300px; overflow:hidden; padding:30px; }

#form-views             { width:auto; }

/* basic styling for entering and leaving */

/* left and right added to ensure full width */

#form-views.ng-enter,

#form-views.ng-leave      { position:absolute; left:30px; right:30px;

    transition:0.5s all ease; -moz-transition:0.5s all ease; -webkit-transition:0.5s all ease;

}


/* enter animation */

#form-views.ng-enter            {

    -webkit-animation:slideInRight 0.5s both ease;

    -moz-animation:slideInRight 0.5s both ease;

    animation:slideInRight 0.5s both ease;

}

/* leave animation */

#form-views.ng-leave            {

    -webkit-animation:slideOutLeft 0.5s both ease;

    -moz-animation:slideOutLeft 0.5s both ease;

    animation:slideOutLeft 0.5s both ease;

}

/* ANIMATIONS

============================================================================= */

/* slide out to the left */

@keyframes slideOutLeft {

    to         { transform: translateX(-200%); }

}

@-moz-keyframes slideOutLeft {

    to         { -moz-transform: translateX(-200%); }

}

@-webkit-keyframes slideOutLeft {

    to         { -webkit-transform: translateX(-200%); }

}

/* slide in from the right */

@keyframes slideInRight {

    from     { transform:translateX(200%); }

    to         { transform: translateX(0); }

}

@-moz-keyframes slideInRight {

    from     { -moz-transform:translateX(200%); }

    to         { -moz-transform: translateX(0); }

}

@-webkit-keyframes slideInRight {

    from     { -webkit-transform:translateX(200%); }

    to         { -webkit-transform: translateX(0); }

}
First, we style our form so that when a view leaves or enters, they are positioned absolutely. This ensures that one view doesn’t push the other view down when entering.
Second, we apply our animations to the .ng-enter and .ng-leave classes.
Third, we define the animations using @keyframes. With all those parts working together, we have our full form that has Angular animations, UI Router based states, and Angular data-binding.
|
译者信息
让我们的表单产生动画效果
因为在项目开始的时候,我们已经加载了ngAnimate,它已经添加到需要动画的的类上了。当视图进入或退出的时候,它将自动添加类ng-enter和ng-leave。
现在我们所有做的就是通过样式形成我们最终的表单。为了理解Angular动画,这篇文章是一个很好的起点。
让我们进去css文件,将动画,并应用到我们的表单上
/* style.css */

/* ANIMATION STYLINGS

============================================================================= */

#signup-form            { position:relative; min-height:300px; overflow:hidden; padding:30px; }

#form-views             { width:auto; }

/* basic styling for entering and leaving */

/* left and right added to ensure full width */

#form-views.ng-enter,

#form-views.ng-leave      { position:absolute; left:30px; right:30px;

    transition:0.5s all ease; -moz-transition:0.5s all ease; -webkit-transition:0.5s all ease;

}


/* enter animation */

#form-views.ng-enter            {

    -webkit-animation:slideInRight 0.5s both ease;

    -moz-animation:slideInRight 0.5s both ease;

    animation:slideInRight 0.5s both ease;

}

/* leave animation */

#form-views.ng-leave            {

    -webkit-animation:slideOutLeft 0.5s both ease;

    -moz-animation:slideOutLeft 0.5s both ease;

    animation:slideOutLeft 0.5s both ease;

}

/* ANIMATIONS

============================================================================= */

/* slide out to the left */

@keyframes slideOutLeft {

    to         { transform: translateX(-200%); }

}

@-moz-keyframes slideOutLeft {

    to         { -moz-transform: translateX(-200%); }

}

@-webkit-keyframes slideOutLeft {

    to         { -webkit-transform: translateX(-200%); }

}

/* slide in from the right */

@keyframes slideInRight {

    from     { transform:translateX(200%); }

    to         { transform: translateX(0); }

}

@-moz-keyframes slideInRight {

    from     { -moz-transform:translateX(200%); }

    to         { -moz-transform: translateX(0); }

}

@-webkit-keyframes slideInRight {

    from     { -webkit-transform:translateX(200%); }

    to         { -webkit-transform: translateX(0); }

}
首先,确定视图离开或进去时,表单的样式,他们是绝对定位的。需要确认当视图进入的时候一个视图不会放到另一个视图的下面。
其次,应用我们的动画到.ng-enter和.ng-leave类
第三,用@keyframes定义动画。所有这些部分组合到一起,我们的表单就有了Angular动画,基于状态的UI Router和Angular数据绑定。
|
Conclusion
There are many great ways that UI-Router, ngAnimate, and all the fun stuff in Angular can come together to create great applications. Hopefully this article has shown you how you can take a multi-step form and use many Angular techniques and tools to build it.
These concepts here can be applied to many other user interfaces, especially when being creative and letting your imagination run wild. Thanks for reading and as always, sound off in the comments with any questions.
|
译者信息
结论
UI-Router, ngAnimate, 和其他很多有趣的 Angular功能会创建出很多很棒的应用 希望本文能展示给你一些创建Angular应用的小技巧和编译的工具使用方法 t.
这些概念也能引申到其他用户界面设计方面, 尤其在发挥你的创造性方面提供指引.感谢你花时间阅读本文,如有疑问欢迎指正.
|