In previous articles we have utilized NSUserDefaults and .NET web services to persist iPhone data. NSUserDefaults is idol for storing small amounts of data. Web services are used to store the data on a custom server. In this article we will take a look at how to store iPhone data in SQLite database using FMDB wrapper.
FMDB:
The iOS SDK provides API for persisting data in the SQLite database. Unfortunately, the API is in pure C language which makes it hard for developers to use it.
FMDB is a wrapper on top of the base API and provides easy to use methods to perform database operations using Objective-C language. FMDB is an open source project which can be downloaded using the this link.
Once, FMDB is downloaded you can import the following files in your custom Group in your iOS application.
FMDBDatabase.h
FMDBDatabase.m
FMResultSet.h
FMResetSet.m
Also, make sure to add a link to the "libsqlite3.dylib" library. Compile the app and make sure it builds successfully. In the next section we are going to create our SQLite3 database.
Creating SQLite3 database:
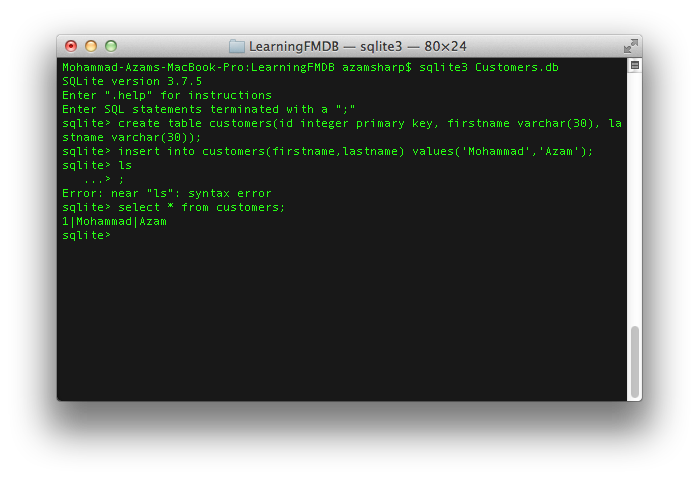
You can easily use the Terminal to create the SQLite3 database. The screenshot below shows how a database named "Customers.db" is created and a single record is inserted into the "customers" table.
There are several plugins that allow to view and edit the information stored in the SQLite3 database. We recommend checking out the SQLite Manager FireFox plugin.
When you are done adding some custom rows to your newly created "Customers.db" database copy it into your "Supporting Files" or "Resources" folder. From there we will transfer the database file to the iPhone "Documents" folder. The advantage of copying the database into Documents folder is that it will be backed up whenever the iPhone is backed up. For iOS5 cloud enabled devices this means your database will be available on the cloud.
In the next section we will copy the SQLite3 database into iPhone "Documents" folder.
Copying Database to iPhone Documents Folder:
The AppDelegate is responsible for copying the database to the iPhone "Documents" folder. This operation is only performed when the database does not exists in the "Documents" folder. The implementation is shown below:
01 |
- (BOOL)application:(UIApplication *)application didFinishLaunchingWithOptions:(NSDictionary *)launchOptions |
03 |
self.databaseName = @"Customers.db"; |
05 |
NSArray *documentPaths = NSSearchPathForDirectoriesInDomains(NSDocumentDirectory, NSUserDomainMask, YES); |
06 |
NSString *documentDir = [documentPaths objectAtIndex:0]; |
07 |
self.databasePath = [documentDir stringByAppendingPathComponent:self.databaseName]; |
09 |
[self createAndCheckDatabase]; |
11 |
// Override point for customization after application launch. |
15 |
-(void) createAndCheckDatabase |
19 |
NSFileManager *fileManager = [NSFileManager defaultManager]; |
20 |
success = [fileManager fileExistsAtPath:databasePath]; |
24 |
NSString *databasePathFromApp = [[[NSBundle mainBundle] resourcePath] stringByAppendingPathComponent:self.databaseName]; |
26 |
[fileManager copyItemAtPath:databasePathFromApp toPath:databasePath error:nil]; |
The NSFileManager is responsible for making sure that the database is not overridden if it already exists.
In the next section we are going to display the data in our view. The views and the application flow is created using Storyboards, new feature in iOS5 SDK.
Displaying Customers on UITableView:
The starting point of the app will be a UINavigationController which will display a UITableViewController. The UITableViewController will display the current customers to the user. We have implemented all the CRUD operations inside our custom file "FMDBDataAccess.m". The "FMDBDataAccess.h" header is implemented below:
01 |
#import <Foundation/Foundation.h> |
02 |
#import "FMDatabase.h" |
03 |
#import "FMResultSet.h" |
07 |
@interface FMDBDataAccess : NSObject |
12 |
-(NSMutableArray *) getCustomers; |
13 |
-(BOOL) insertCustomer:(Customer *) customer; |
14 |
-(BOOL) updateCustomer:(Customer *) customer; |
The getCustomers method is implemented below:
01 |
-(NSMutableArray *) getCustomers |
03 |
NSMutableArray *customers = [[NSMutableArray alloc] init]; |
05 |
FMDatabase *db = [FMDatabase databaseWithPath:[Utility getDatabasePath]]; |
09 |
FMResultSet *results = [db executeQuery:@"SELECT * FROM customers"]; |
13 |
Customer *customer = [[Customer alloc] init]; |
15 |
customer.customerId = [results intForColumn:@"id"]; |
16 |
customer.firstName = [results stringForColumn:@"firstname"]; |
17 |
customer.lastName = [results stringForColumn:@"lastname"]; |
19 |
[customers addObject:customer]; |
The FMDatabase instance is responsible for connecting to the SQLite3 database using the path to the database. The FMResultSet is populated with the result of the SQL query. Finally, we loop through the rows and populate the Customer object and add it to the customers array. The populated customers array is returned to the caller.
NOTE: You should always use @try-@catch-@finally blocks when working with database connections and make sure the database connection is closed in the @finally block. This will ensure that the connection is closed even when an exception is thrown.
The getCustomers method is invoked from our CustomersViewController. The populateCustomers method is implemented below:
1 |
-(void) populateCustomers |
3 |
self.customers = [[NSMutableArray alloc] init]; |
5 |
FMDBDataAccess *db = [[FMDBDataAccess alloc] init]; |
7 |
self.customers = [db getCustomers]; |
The populateCustomers is triggered from inside the viewDidLoad method. Finally, the cellForRowAtIndexPath is triggered which populates the tableView.
01 |
- (UITableViewCell *)tableView:(UITableView *)tableView cellForRowAtIndexPath:(NSIndexPath *)indexPath |
03 |
static NSString *CellIdentifier = @"CustomerCell"; |
05 |
UITableViewCell *cell = [tableView dequeueReusableCellWithIdentifier:CellIdentifier]; |
07 |
Customer *customer = [self.customers objectAtIndex:[indexPath row]]; |
09 |
[[cell textLabel] setText:[NSString stringWithFormat:@"%@ %@",customer.firstName,customer.lastName]]; |
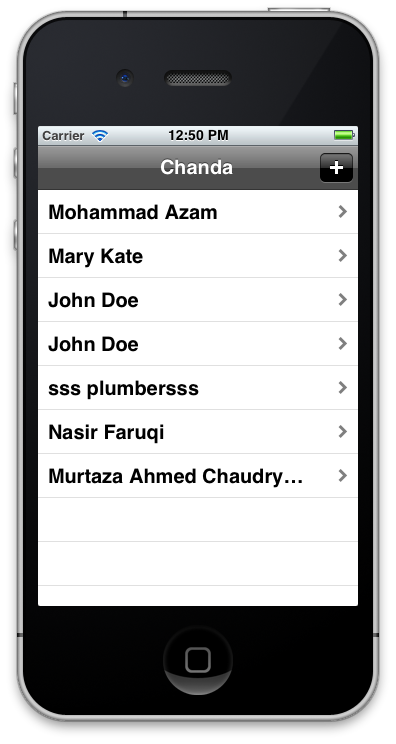
The screenshot below shows the customers populated on the UITableView.
In the next section we are going add new customers to the database.
Adding and Updating New Customers:
Before iOS 5 developers had to manager the flow of their screens using UINavigationController. iOS 5 introduced Storyboards which allows developers to use Storyboard designer to create all the workflows of the iOS application. To learn more about Storyboards check out the following articles on Ray Winderlech website:
1) Begining Storyboards
2) Intermediate Storyboards
The "+" button in the previous screenshot will take you to a different view which is composed of the static UITableView cells. The screenshot below shows the Add Customer screen.
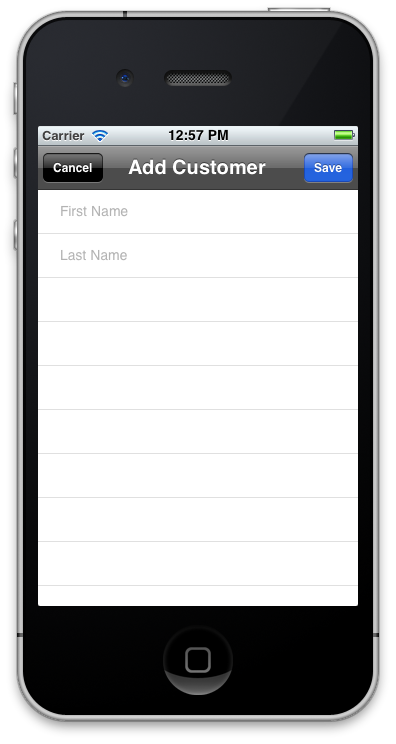
The Add Customer view simply displays two UITextFields for first name and last name respectively. The user enters the required information and save the new customer by using the save button. The save button invokes the done method and triggers a delegate which passes the new customer to the CustomerViewController and then persist in the database.
01 |
-(IBAction) done:(id) sender |
03 |
Customer *customer = [[Customer alloc] init]; |
04 |
customer.firstName = self.firstNameTextField.text; |
05 |
customer.lastName = self.lastNameTextField.text; |
07 |
if(![self validate:customer]) |
09 |
[Utility showAlert:@"Error" message:@"Validation Failed!"]; |
13 |
[self.delegate addCustomerViewController:self didAddCustomer:customer]; |
The protocol declaration for the delegate is shown below:
02 |
@class AddCustomerViewController; |
04 |
@protocol AddCustomerViewControllerDelegate<NSObject> |
06 |
-(void) addCustomerViewController:(AddCustomerViewController *) controller |
07 |
didAddCustomer:(Customer *) customer; |
09 |
-(void) addCustomerViewController:(AddCustomerViewController *)controller didEditCustomer:(Customer *)customer; |
11 |
-(void) addCustomerViewControllerDidCancel:(AddCustomerViewController *) controller; |
The CustomerViewController handles the delegate and persist the new customer into the database. Make sure that the CustomerViewController adheres to the delegate as shown in the code below:
01 |
@interface CustomersViewController : UITableViewController<AddCustomerViewControllerDelegate> |
06 |
@property (nonatomic,strong) NSMutableArray *customers; |
08 |
-(void) populateCustomers; |
The didAddCustomer method is implemented in the CustomerViewController.m file as shown below:
01 |
-(void) addCustomerViewController:(AddCustomerViewController *)controller didAddCustomer:(Customer *)customer |
03 |
FMDBDataAccess *db = [[FMDBDataAccess alloc] init]; |
05 |
[db insertCustomer:customer]; |
07 |
[self populateCustomers]; |
09 |
NSIndexPath *indexPath = [NSIndexPath indexPathForRow:[self.customers count] - 1 inSection:0]; |
11 |
[self.tableView insertRowsAtIndexPaths:[NSArray arrayWithObject:indexPath] withRowAnimation:UITableViewRowAnimationAutomatic]; |
13 |
[self dismissViewControllerAnimated:YES completion:nil]; |
The real persisting of data is performed in the FMDBDataAccess class. The insertCustomer method is responsible for saving a new customer to the database. The insertCustomer method is shown below:
01 |
-(BOOL) insertCustomer:(Customer *) customer |
03 |
// insert customer into database |
05 |
FMDatabase *db = [FMDatabase databaseWithPath:[Utility getDatabasePath]]; |
09 |
BOOL success = [db executeUpdate:@"INSERT INTO customers (firstname,lastname) VALUES (?,?);", |
10 |
customer.firstName,customer.lastName, nil]; |
The executeUpdate method executes the SQL statements which inserts the new customer in the database. The new customer is added to the UITableView inside the didAddCustomer implementation as shown below:
1 |
NSIndexPath *indexPath = [NSIndexPath indexPathForRow:[self.customers count] - 1 inSection:0]; |
3 |
[self.tableView insertRowsAtIndexPaths:[NSArray arrayWithObject:indexPath] withRowAnimation:UITableViewRowAnimationAutomatic]; |
If you run the app you will notice that when you save nothing happens. This is because you need one additional step which is to prepare the segue between the different views. The implementation is shown below:
01 |
-(void) prepareForSegue:(UIStoryboardSegue *)segue sender:(id)sender |
03 |
if([segue.identifier isEqualToString:@"AddCustomer"]) |
05 |
UINavigationController *navigationController = segue.destinationViewController; |
06 |
AddCustomerViewController *addCustomerViewController = [[navigationController viewControllers] objectAtIndex:0]; |
07 |
addCustomerViewController.delegate = self; |
10 |
else if([segue.identifier isEqualToString:@"EditCustomer"]) |
12 |
UINavigationController *navigationController = segue.destinationViewController; |
13 |
AddCustomerViewController *addCustomerViewController = [[navigationController viewControllers] objectAtIndex:0]; |
14 |
addCustomerViewController.delegate = self; |
16 |
NSIndexPath *indexPath = [self.tableView indexPathForCell:sender]; |
17 |
Customer *customer = [self.customers objectAtIndex:[indexPath row]]; |
18 |
addCustomerViewController.customerToEdit = customer; |
The "AddCustomer" and the "EditCustomer" constants are the unique identifiers of the segue. Now, if you run the above code and add a new customer you will notice that it shows up in the customers UITableView control.
The insert customer method was successful but now we need a way to edit/update the customer. The user can edit the customer once they click on the customer row. The customer row is linked to the add customer view we implemented earlier.
The selected customer is assigned to the customerToEdit property of the AddCustomerViewController instance as shown in the segue code below:
01 |
-(void) prepareForSegue:(UIStoryboardSegue *)segue sender:(id)sender |
04 |
else if([segue.identifier isEqualToString:@"EditCustomer"]) |
06 |
UINavigationController *navigationController = segue.destinationViewController; |
07 |
AddCustomerViewController *addCustomerViewController = [[navigationController viewControllers] objectAtIndex:0]; |
08 |
addCustomerViewController.delegate = self; |
10 |
NSIndexPath *indexPath = [self.tableView indexPathForCell:sender]; |
11 |
Customer *customer = [self.customers objectAtIndex:[indexPath row]]; |
12 |
addCustomerViewController.customerToEdit = customer; |
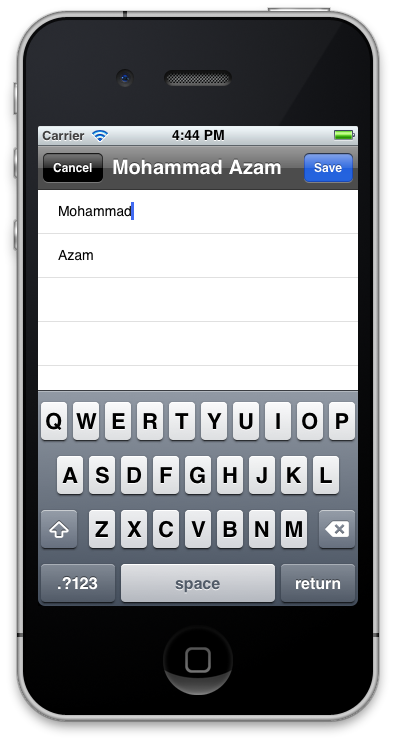
The AddCustomerViewController checks if the customerToEdit is nil or not. If it is not then it populates the first name and last name UITextFields with the information as shown in the code below:
05 |
if(self.customerToEdit != nil) |
07 |
self.title = [NSString stringWithFormat:@"%@ %@",self.customerToEdit.firstName,self.customerToEdit.lastName]; |
08 |
self.firstNameTextField.text = self.customerToEdit.firstName; |
09 |
self.lastNameTextField.text = self.customerToEdit.lastName; |
The screenshot is shown below:
Now, when the user saves the current customer it will not be inserted but updated in the database. The "done" method makes sure not to insert the customer which is in edit state.
01 |
-(IBAction) done:(id) sender |
03 |
if(self.customerToEdit != nil) |
05 |
self.customerToEdit.firstName = self.firstNameTextField.text; |
06 |
self.customerToEdit.lastName = self.lastNameTextField.text; |
08 |
if(![self validate:self.customerToEdit]) |
10 |
[Utility showAlert:@"Error" message:@"Validation Failed!"]; |
14 |
[self.delegate addCustomerViewController:self didEditCustomer:self.customerToEdit]; |
19 |
Customer *customer = [[Customer alloc] init]; |
20 |
customer.firstName = self.firstNameTextField.text; |
21 |
customer.lastName = self.lastNameTextField.text; |
23 |
if(![self validate:customer]) |
25 |
[Utility showAlert:@"Error" message:@"Validation Failed!"]; |
29 |
[self.delegate addCustomerViewController:self didAddCustomer:customer]; |
The didEditCustomer delegate is invoked which triggers the FMDBDataAccess updateCustomer method. The updateCustomer method is implemented below:
01 |
-(BOOL) updateCustomer:(Customer *)customer |
03 |
FMDatabase *db = [FMDatabase databaseWithPath:[Utility getDatabasePath]]; |
07 |
BOOL success = [db executeUpdate:[NSString stringWithFormat:@"UPDATE customers SET firstname = '%@', lastname = '%@' where id = %d",customer.firstName,customer.lastName,customer.customerId]]; |
Try it out and edit a customer. Once, you save the customer you will notice the UITableView now displays the updated customer.
Resources:
1) Learning iOS Development Part 13 (Sqlite3 Using FMDB)
Conclusion:
In this article we demonstrated how to use FMDB API to make CRUD on SQLite3 database very simple for iOS development.
[Download Sample]
- Objective-C ,ios,iphone开发基础:ios数据库(The SQLite Database),使用终端进行简单的数据库操作
SQLite 是一个轻量级的免费关系数据库.SQLite最初的设计目标是用于嵌入式系统,它占用资源非常少,在嵌入式设备中,只需要几百K的内存就够了,可以在(http://www.sqlite.org ...
- [置顶] Objective-C ,ios,iphone开发基础:ios数据库(The SQLite Database),使用终端进行简单的数据库操作
SQLite 是一个轻量级的免费关系数据库.SQLite最初的设计目标是用于嵌入式系统,它占用资源非常少,在嵌入式设备中,只需要几百K的内存就够了,可以在(http://www.sqlite.org ...
- iOS - SQLite Database 操作数据库
iOS - SQLite Database 操作数据库 Sqlite 能被用在ios上做数据处理用,只要你懂得一点sql 就很容易使用sqlite 1:创建一个简单的View based appl ...
- IOS Application Security Testing Cheat Sheet
IOS Application Security Testing Cheat Sheet [hide] 1 DRAFT CHEAT SHEET - WORK IN PROGRESS 2 Int ...
- Using SQLite database in your Windows 10 apps
MVP可以在channel 9上传视频了,所以准备做个英文视频传上去分享给大家,本文做稿子. Hello everyone, As we all know, SQLite is a great and ...
- iOS开发数据库篇—SQLite简单介绍
iOS开发数据库篇—SQLite简单介绍 一.离线缓存 在项目开发中,通常都需要对数据进行离线缓存的处理,如新闻数据的离线缓存等. 说明:离线缓存一般都是把数据保存到项目的沙盒中.有以下几种方式 (1 ...
- 【转】 iOS开发数据库篇—SQLite简单介绍
开始学SQLite啦, 原文: http://www.cnblogs.com/wendingding/p/3868893.html iOS开发数据库篇—SQLite简单介绍 一.离线缓存 在项目开发中 ...
- [转]Android Studio SQLite Database Multiple Tables Example
本文转自:http://instinctcoder.com/android-studio-sqlite-database-multiple-tables-example/ BY TAN WOON HO ...
- Demystifying iOS Application Crash Logs
http://www.raywenderlich.com/23704/demystifying-ios-application-crash-logs This is a blog post by So ...
随机推荐
- A - 最长上升子序列
A - 最长上升子序列 Time Limit: 1000/1000MS (C++/Others) Memory Limit: 65536/65536KB (C++/Others) Problem De ...
- C#如何在keydown事件里判断按下的是左shift还是右shift
public partial class Form1 : Form { [System.Runtime.InteropServices.DllImport("user32.dll" ...
- CPU封装技术介绍
所谓“CPU封装技术”是一种将集成电路用绝缘的塑料或陶瓷材料打包的技术.以CPU为例,我们实际看到的体积和外观并不是真正的CPU内核的大小和面貌,而是CPU内核等元件经过封装后的产品. CPU封装对于 ...
- MyBatis 基本演示
主配置文件 <?xml version="1.0" encoding="UTF-8" ?> <!DOCTYPE configuration P ...
- 关于CPU位数,OS位数以及内存大小关系的一点总结
(这个学期做助教,说来好惭愧啊,虽然我也是考研进来的,但是就在两年前复习的资料居然全部都忘光了.对大二的孩子们提问的问题多半都解决不了!!!越来越觉得自己的学习方法有问题了,总是想着一些知识能够根据自 ...
- 【CZY选讲·黑白染色】
题目描述 给出平面上n 个点,试将他们黑白染色,要求染色后无法用一条直线把黑白完全分开. 随便输出一种方案. 数据范围 n<=100000 题解: ①点数很多,但是可以发现至多需 ...
- 2.1 Python3.5安装以及爬虫需要的环境配置
之所以选用Python,是因为对于网络爬虫来说,Python是最好上手的一种语言.本文讲述的安装配置都是基于Windows的环境. 另外我想说的是,文中用到的下载链接尽量官方网站上的下载链接,这是我比 ...
- CSU 2136 ——湖南多校对抗赛 I
2136: 统帅三军! Submit Page Summary Time Limit: 1 Sec Memory Limit: 128 Mb Submitted: 55 ...
- 使用jdk中的java.sql包中的方法进行jdbc连接
首先说明用 java.sql包进行jdbc连接的步骤: 1.加载数据库的驱动.(一般是oracle和mysql,oracle的数据驱动名是:Oracle.jdbc.driver.OracleDrive ...
- bzoj1396&&2865 识别子串 后缀自动机+线段树
Input 一行,一个由小写字母组成的字符串S,长度不超过10^5 Output L行,每行一个整数,第i行的数据表示关于S的第i个元素的最短识别子串有多长. Sample Input agoodco ...