一文带你深入理解SpringMVC的执行原理
今天大致来看一下Spring MVC的执行流程是什么样的
执行流程:也就是一个请求是怎么到我们Controller的,返回值是怎么给客户端的
本文分析的问题:
文件上传的请求是怎么处理的
跨域是怎么处理的
是怎么找到目标方法的
是怎么执行目标方法的
目标方法的参数是怎么封装的
返回值是怎么处理的
拦截器是怎么执行的
中间出现异常是怎么处理的
整个执行流程涉及到的组件:
文件上传解析器(MultipartResolver)、处理器映射器(HandlerMapping)、
跨域处理器(CorsProcessor)、处理器执行链(HandlerExecutionChain)、处理器适配器(HandlerAdapter)、
参数解析器(HandlerMethodArgumentResolver)、数据绑定器(WebDataBinder)、
类型转换器(Converter)、返回值处理器(HandlerMethodReturnValueHandler)、
内容协商管理器(ContentNegotiationManager)、消息转换器(HttpMessageConverter)、
拦截器(HandlerInterceptor)、视图解析器(ViewResolver)
创建项目
我们都知道 DispatcherServlet(前端控制器) 这样的一个类,是这个类来帮我们执行的,网上的很多图以这个类为核心来画的,那是怎么来到这个类的?(大多数文章并没有说)又是怎么帮我们调用各个组件来执行这个请求的?这些都是问题,我们直接来看源码,看完源码再来画图理解。
首先创建一个最简单的项目:直接使用 Spring Initializer 来帮我们快速创建出一个Web项目,地址使用阿里的(https://start.aliyun.com),依赖就选择一个 starter-web 就行,就最简单的项目。
配置一下跨域,后面要分析这个原理
@Configuration

public class WebMvcConfig implements WebMvcConfigurer {

    @Override

    public void addCorsMappings(CorsRegistry registry) {

        // 添加映射路径,可以是特定路径或所有"/**"

        registry.addMapping("/**")

                // 允许的源(*表示允许任何源)

                .allowedOrigins("*")

                // 允许的请求方法

                .allowedMethods("GET", "POST", "PUT", "DELETE", "OPTIONS")

                // 是否允许请求头携带验证信息(cookies)

                .allowCredentials(true)

                // 允许的请求头

                .allowedHeaders("*")

                // 预检请求的有效期,单位为秒。设置成-1则永久生效,不会再次发起预检请求。

                .maxAge(3600);

    }

}
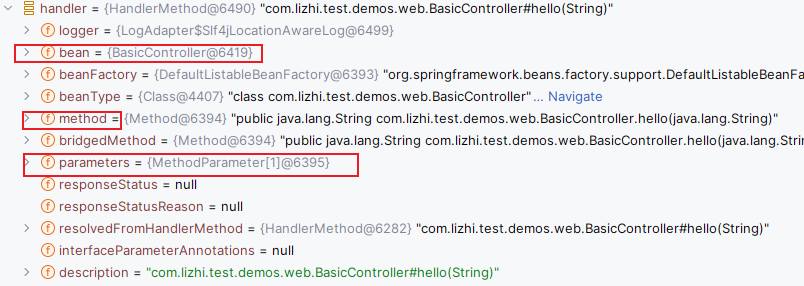
先来到我们创建的这个项目的这个类的 BasicController#hello() 方法,并在这个上面打一个断点,然后启动项目 向这个地址发送一个请求:

还记得我们上篇文章说的怎么看源码的事情吗?直接来看调用栈:
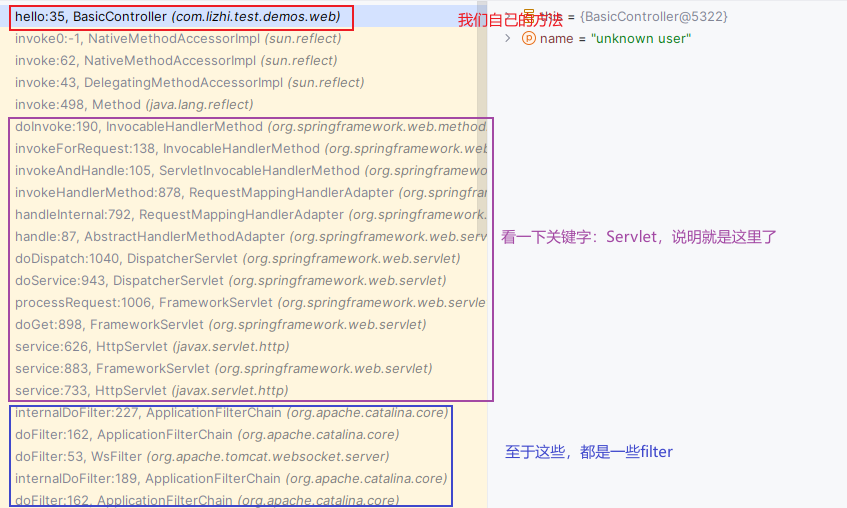
我们通过调用栈又可以发现:
红色框里是我们自己的代码
紫色框里就是执行流程相关的了,SpringMVC 的底层不就是Servlet 吗。Servlet 不就是我们 JavaWeb 学的东西吗?Servlet、Filter、Listener 三大组件。
蓝色框里是一些 filter 过滤器
我们直接在这里(HttpServlet)打一个断点,然后发请求就再次来到了这个方法,然后来看流程:
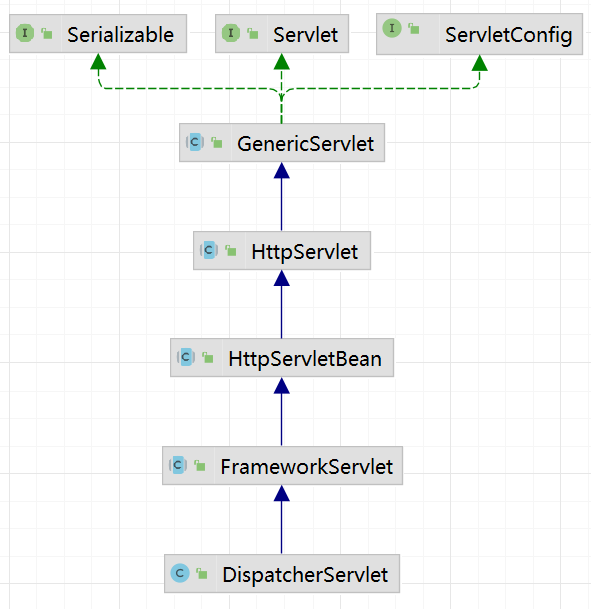
HttpServlet
继承树:
javax.servlet.http.HttpServlet#service(javax.servlet.ServletRequest, javax.servlet.ServletResponse)
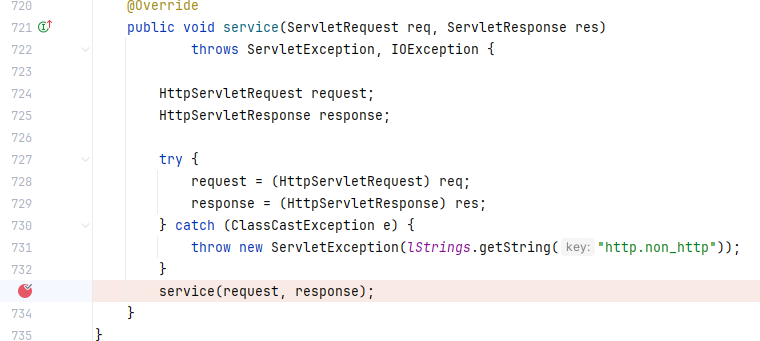
先到 javax.servlet.http.HttpServlet#service(javax.servlet.ServletRequest, javax.servlet.ServletResponse) ,
然后 org.springframework.web.servlet.FrameworkServlet#service,
再到 javax.servlet.http.HttpServlet#service(javax.servlet.http.HttpServletRequest,
javax.servlet.http.HttpServletResponse),我们来看一下这个方法:
    protected void service(HttpServletRequest req, HttpServletResponse resp)

        throws ServletException, IOException {

        String method = req.getMethod();

        if (method.equals(METHOD_GET)) {

            long lastModified = getLastModified(req);

            if (lastModified == -1) {

                // servlet doesn't support if-modified-since, no reason

                // to go through further expensive logic

                doGet(req, resp);

            } else {

                long ifModifiedSince;

                try {

                    ifModifiedSince = req.getDateHeader(HEADER_IFMODSINCE);

                } catch (IllegalArgumentException iae) {

                    // Invalid date header - proceed as if none was set

                    ifModifiedSince = -1;

                }

                if (ifModifiedSince < (lastModified / 1000 * 1000)) {

                    // If the servlet mod time is later, call doGet()

                    // Round down to the nearest second for a proper compare

                    // A ifModifiedSince of -1 will always be less

                    maybeSetLastModified(resp, lastModified);

                    doGet(req, resp);

                } else {

                    resp.setStatus(HttpServletResponse.SC_NOT_MODIFIED);

                }

            }

        } else if (method.equals(METHOD_HEAD)) {

            long lastModified = getLastModified(req);

            maybeSetLastModified(resp, lastModified);

            doHead(req, resp);

        } else if (method.equals(METHOD_POST)) {

            doPost(req, resp);

        } else if (method.equals(METHOD_PUT)) {

            doPut(req, resp);

        } else if (method.equals(METHOD_DELETE)) {

            doDelete(req, resp);

        } else if (method.equals(METHOD_OPTIONS)) {

            doOptions(req,resp);

        } else if (method.equals(METHOD_TRACE)) {

            doTrace(req,resp);

        } else {

            //

            // Note that this means NO servlet supports whatever

            // method was requested, anywhere on this server.

            //

            String errMsg = lStrings.getString("http.method_not_implemented");

            Object[] errArgs = new Object[1];

            errArgs[0] = method;

            errMsg = MessageFormat.format(errMsg, errArgs);

            resp.sendError(HttpServletResponse.SC_NOT_IMPLEMENTED, errMsg);

        }

    }
分析:就是根据不同的请求方式去执行。doGet、doPost、doPut、doDelete、doHead、doTrace。我们总共支持这么多种的请求方式
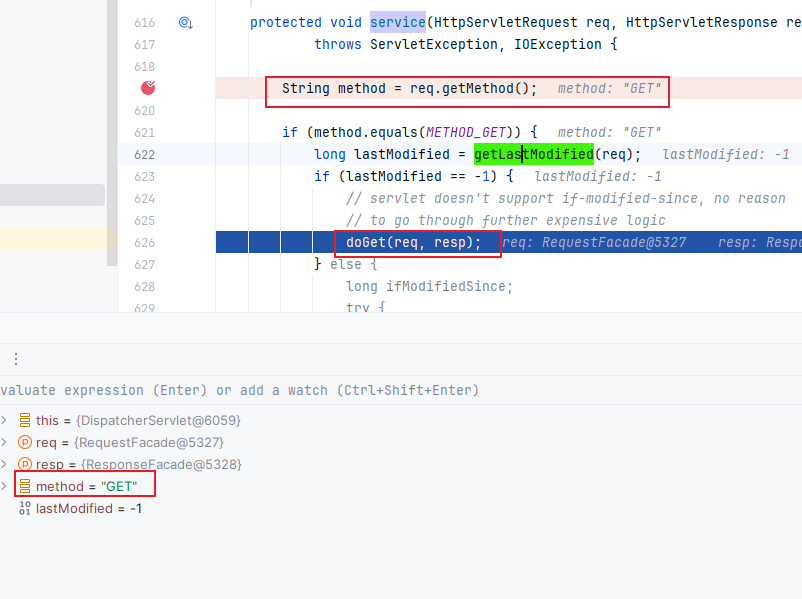
FrameworkServlet
我们这次的请求方式是 Get ,所以就来到了 org.springframework.web.servlet.FrameworkServlet#doGet 方法:
	@Override

	protected final void doGet(HttpServletRequest request, HttpServletResponse response)

			throws ServletException, IOException {

		processRequest(request, response);

	}
这里面又调用了 org.springframework.web.servlet.FrameworkServlet#processRequest 方法:
	protected final void processRequest(HttpServletRequest request, HttpServletResponse response)

			throws ServletException, IOException {

		long startTime = System.currentTimeMillis();

		Throwable failureCause = null;

		LocaleContext previousLocaleContext = LocaleContextHolder.getLocaleContext();

		LocaleContext localeContext = buildLocaleContext(request);

		RequestAttributes previousAttributes = RequestContextHolder.getRequestAttributes();

		ServletRequestAttributes requestAttributes = buildRequestAttributes(request, response, previousAttributes);

		WebAsyncManager asyncManager = WebAsyncUtils.getAsyncManager(request);

		asyncManager.registerCallableInterceptor(FrameworkServlet.class.getName(), new RequestBindingInterceptor());

		initContextHolders(request, localeContext, requestAttributes);

		try {

            // 继续调用执行

			doService(request, response);

		}

		catch (ServletException | IOException ex) {

			failureCause = ex;

			throw ex;

		}

		catch (Throwable ex) {

			failureCause = ex;

			throw new NestedServletException("Request processing failed", ex);

		}

		finally {

			resetContextHolders(request, previousLocaleContext, previousAttributes);

			if (requestAttributes != null) {

				requestAttributes.requestCompleted();

			}

			logResult(request, response, failureCause, asyncManager);

			publishRequestHandledEvent(request, response, startTime, failureCause);

		}

	}
DispatcherServlet
这里面调用了 doService() 方法,这里的 doService() 方法是 **DispatcherServlet **类的:
	protected void doService(HttpServletRequest request, HttpServletResponse response) throws Exception {

		logRequest(request);

		// Keep a snapshot of the request attributes in case of an include,

		// to be able to restore the original attributes after the include.

		Map<String, Object> attributesSnapshot = null;

		if (WebUtils.isIncludeRequest(request)) {

			attributesSnapshot = new HashMap<>();

			Enumeration<?> attrNames = request.getAttributeNames();

			while (attrNames.hasMoreElements()) {

				String attrName = (String) attrNames.nextElement();

				if (this.cleanupAfterInclude || attrName.startsWith(DEFAULT_STRATEGIES_PREFIX)) {

					attributesSnapshot.put(attrName, request.getAttribute(attrName));

				}

			}

		}

		// Make framework objects available to handlers and view objects.

		request.setAttribute(WEB_APPLICATION_CONTEXT_ATTRIBUTE, getWebApplicationContext());

		request.setAttribute(LOCALE_RESOLVER_ATTRIBUTE, this.localeResolver);

		request.setAttribute(THEME_RESOLVER_ATTRIBUTE, this.themeResolver);

		request.setAttribute(THEME_SOURCE_ATTRIBUTE, getThemeSource());

		if (this.flashMapManager != null) {

			FlashMap inputFlashMap = this.flashMapManager.retrieveAndUpdate(request, response);

			if (inputFlashMap != null) {

				request.setAttribute(INPUT_FLASH_MAP_ATTRIBUTE, Collections.unmodifiableMap(inputFlashMap));

			}

			request.setAttribute(OUTPUT_FLASH_MAP_ATTRIBUTE, new FlashMap());

			request.setAttribute(FLASH_MAP_MANAGER_ATTRIBUTE, this.flashMapManager);

		}

		try {

            // 核心方法

			doDispatch(request, response);

		}

		finally {

			if (!WebAsyncUtils.getAsyncManager(request).isConcurrentHandlingStarted()) {

				// Restore the original attribute snapshot, in case of an include.

				if (attributesSnapshot != null) {

					restoreAttributesAfterInclude(request, attributesSnapshot);

				}

			}

		}

	}
经过一层层的调用后,终于来到了最核心的方法 doDispatch():
    // 文件上传解析器

    /** MultipartResolver used by this servlet. */

	@Nullable

	private MultipartResolver multipartResolver;

    // 处理器映射器集合

    /** List of HandlerMappings used by this servlet. */

	@Nullable

	private List<HandlerMapping> handlerMappings;

    // 处理器适配器集合

	/** List of HandlerAdapters used by this servlet. */

	@Nullable

	private List<HandlerAdapter> handlerAdapters;

    // 视图解析器集合

	/** List of ViewResolvers used by this servlet. */

	@Nullable

	private List<ViewResolver> viewResolvers;

	protected void doDispatch(HttpServletRequest request, HttpServletResponse response) throws Exception {

		HttpServletRequest processedRequest = request;

        // 处理器执行器链

		HandlerExecutionChain mappedHandler = null;

		boolean multipartRequestParsed = false;

		WebAsyncManager asyncManager = WebAsyncUtils.getAsyncManager(request);

		try {

			ModelAndView mv = null;

			Exception dispatchException = null;

			try {

                // 处理文件上传的请求

				processedRequest = checkMultipart(request);

				multipartRequestParsed = (processedRequest != request);

				// 通过当前请求拿到对应的 HandlerExecutionChain 对象

                // 这一步是 HandlerMapping

				mappedHandler = getHandler(processedRequest);

				if (mappedHandler == null) {

					noHandlerFound(processedRequest, response);

					return;

				}

				// 通过 HandlerExecutionChain 对象里的 Handler 拿到 HandlerAdapter 对象

                // 这一步是 HandlerAdapter

				HandlerAdapter ha = getHandlerAdapter(mappedHandler.getHandler());

				// Process last-modified header, if supported by the handler.

				String method = request.getMethod();

				boolean isGet = "GET".equals(method);

				if (isGet || "HEAD".equals(method)) {

					long lastModified = ha.getLastModified(request, mappedHandler.getHandler());

					if (new ServletWebRequest(request, response).checkNotModified(lastModified) && isGet) {

						return;

					}

				}

                // 拦截器的前置处理

				if (!mappedHandler.applyPreHandle(processedRequest, response)) {

					return;

				}

				// 通过 HandlerAdapter 来执行我们 Controller 里的方法

				mv = ha.handle(processedRequest, response, mappedHandler.getHandler());

				if (asyncManager.isConcurrentHandlingStarted()) {

					return;

				}

				applyDefaultViewName(processedRequest, mv);

                // 拦截器的后置处理

				mappedHandler.applyPostHandle(processedRequest, response, mv);

			}

			catch (Exception ex) {

				dispatchException = ex;

			}

			catch (Throwable err) {

				// As of 4.3, we're processing Errors thrown from handler methods as well,

				// making them available for @ExceptionHandler methods and other scenarios.

				dispatchException = new NestedServletException("Handler dispatch failed", err);

			}

            // 拦截器的最终处理 还会渲染 ModelAndView 对象

			processDispatchResult(processedRequest, response, mappedHandler, mv, dispatchException);

		}

		catch (Exception ex) {

			triggerAfterCompletion(processedRequest, response, mappedHandler, ex);

		}

		catch (Throwable err) {

			triggerAfterCompletion(processedRequest, response, mappedHandler,

					new NestedServletException("Handler processing failed", err));

		}

		finally {

			if (asyncManager.isConcurrentHandlingStarted()) {

				// Instead of postHandle and afterCompletion

				if (mappedHandler != null) {

					mappedHandler.applyAfterConcurrentHandlingStarted(processedRequest, response);

				}

			}

			else {

				// Clean up any resources used by a multipart request.

				if (multipartRequestParsed) {

					cleanupMultipart(processedRequest);

				}

			}

		}

	}
流程:我们这里把几个核心的方法拿过来,然后一一做拆解
1,checkMultipart():处理文件上传的请求
2,getHandler(): 在这里 HandlerMapping 会根据当前请求拿到 HandlerExecutionChain 对象
3,getHandlerAdapter():会拿到支持处理此 Handler 的 HandlerAdapter 对象
4,mappedHandler.applyPreHandle():拦截器的前置处理
5,ha.handle(): 通过 HandlerAdapter 来处理
6,mappedHandler.applyPostHandle(): 拦截器的后置处理
7,processDispatchResult(): 处理结果、拦截器的最终处理
8,上面的那几个属性在启动的时候会初始化好,在初始化的时候再说
处理文件上传请求-checkMultipart()
所有文件都会被封装为MultipartFile类,通过这个类我们可以很好的操作文件对象
protected HttpServletRequest checkMultipart(HttpServletRequest request) throws MultipartException {

    // 1、文件解析器不为null并且是文件上传的请求

    if (this.multipartResolver != null && this.multipartResolver.isMultipart(request)) {

        // 是否通过MultipartFilter过滤器解析过

        if (WebUtils.getNativeRequest(request, MultipartHttpServletRequest.class) != null) {

            if (DispatcherType.REQUEST.equals(request.getDispatcherType())) {

                logger.trace("Request already resolved to MultipartHttpServletRequest, e.g. by MultipartFilter");

            }

        }

        else if (hasMultipartException(request)) {

            logger.debug("Multipart resolution previously failed for current request - " +

                         "skipping re-resolution for undisturbed error rendering");

        }

        else {

            try {

                // 2、通过文件上传解析器来截器文件上传的请求

                return this.multipartResolver.resolveMultipart(request);

            }

            catch (MultipartException ex) {

                if (request.getAttribute(WebUtils.ERROR_EXCEPTION_ATTRIBUTE) != null) {

                    logger.debug("Multipart resolution failed for error dispatch", ex);

                    // Keep processing error dispatch with regular request handle below

                }

                else {

                    throw ex;

                }

            }

        }

    }

    // If not returned before: return original request.

    return request;

}
流程:
- 利用文件上传解析器来判断是否是文件上传的请求
- 通过文件上传解析器来截器文件上传的请求
1、利用文件上传解析器的isMultipart()来判断是否是文件上传请求
其实就是判断Content-type的值是否是以multipart/或multipart/form-data开头,这也就解释了为什么上传文件要选multipart/form-data类型
    public static final String MULTIPART_FORM_DATA_VALUE = "multipart/form-data";

	public boolean isMultipart(HttpServletRequest request) {

		return StringUtils.startsWithIgnoreCase(request.getContentType(),

				(this.strictServletCompliance ? MediaType.MULTIPART_FORM_DATA_VALUE : "multipart/"));

	}
2、使用文件上传解析器包装当前请求:resolveMultipart()
return new StandardMultipartHttpServletRequest(request, this.resolveLazily);
就是把当前请求包装为StandardMultipartHttpServletRequest类了
在这里会把文件设置到MultiValueMap<String, MultipartFile> multipartFiles属性中,以便后续获取:
// 是否懒加载一样的解析

private boolean resolveLazily = false;

public StandardMultipartHttpServletRequest(HttpServletRequest request, boolean lazyParsing)

    throws MultipartException {

    super(request);

    // 懒加载模式 默认不是懒加载模式

    if (!lazyParsing) {

        parseRequest(request);

    }

}

private void parseRequest(HttpServletRequest request) {

    try {

        // 获取到文件集合

        Collection<Part> parts = request.getParts();

        // 文件参数的名字

        this.multipartParameterNames = new LinkedHashSet<>(parts.size());

        // 封装好的文件集合

        MultiValueMap<String, MultipartFile> files = new LinkedMultiValueMap<>(parts.size());

        for (Part part : parts) {

            String headerValue = part.getHeader(HttpHeaders.CONTENT_DISPOSITION);

            ContentDisposition disposition = ContentDisposition.parse(headerValue);

            String filename = disposition.getFilename();

            if (filename != null) {

                // 添加到文件集合中 k:文件名  v:StandardMultipartFile对象

                files.add(part.getName(), new StandardMultipartFile(part, filename));

            }

            else {

                this.multipartParameterNames.add(part.getName());

            }

        }

        // 设置文件集合,以便后续封装参数时使用

        setMultipartFiles(files);

    }

    catch (Throwable ex) {

        handleParseFailure(ex);

    }

}

protected final void setMultipartFiles(MultiValueMap<String, MultipartFile> multipartFiles) {

    this.multipartFiles =

        new LinkedMultiValueMap<>(Collections.unmodifiableMap(multipartFiles));

}
最后在执行目标方法前一步会有参数解析器来封装参数,把上传的文件封装到方法参数上
获取处理器执行链对象-getHandler()
    private List<HandlerMapping> handlerMappings;

	protected HandlerExecutionChain getHandler(HttpServletRequest request) throws Exception {

		if (this.handlerMappings != null) {

			for (HandlerMapping mapping : this.handlerMappings) {

				HandlerExecutionChain handler = mapping.getHandler(request);

				if (handler != null) {

					return handler;

				}

			}

		}

		return null;

	}
分析:遍历所有的的HandlerMapping调用它的getHandler() 方法来拿到一个 HandlerExecutionChain 对象
就是这个五个 HandlerMapping对象,可自己查询这几个各自的作用
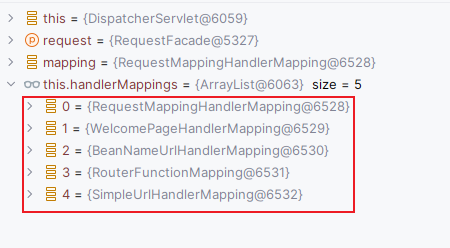
作用:就是根据路径找到对应的HandlerMethod(Handler)、HandlerInterceptor、然后处理跨域,并封装为 HandlerExecutionChain 对象返回。
我们都是在controller接口中然后声明方法来做请求处理的,所以会由这个类处理 RequestMappingHandlerMapping
AbstractHandlerMapping 是它的父类:
    private Object defaultHandler;

	public final HandlerExecutionChain getHandler(HttpServletRequest request) throws Exception {

        // 根据当前请求拿到对应的 Handler

		Object handler = getHandlerInternal(request);

        // 没拿到就给一个默认的 Handler

		if (handler == null) {

			handler = getDefaultHandler();

		}

		if (handler == null) {

			return null;

		}

		// Bean name or resolved handler?

		if (handler instanceof String) {

			String handlerName = (String) handler;

			handler = obtainApplicationContext().getBean(handlerName);

		}

        // 根据拿到的 Handler 和 当前请求得到一个 HandlerExecutionChain

		HandlerExecutionChain executionChain = getHandlerExecutionChain(handler, request);

		if (logger.isTraceEnabled()) {

			logger.trace("Mapped to " + handler);

		}

		else if (logger.isDebugEnabled() && !request.getDispatcherType().equals(DispatcherType.ASYNC)) {

			logger.debug("Mapped to " + executionChain.getHandler());

		}

        // 跨域处理

		if (hasCorsConfigurationSource(handler) || CorsUtils.isPreFlightRequest(request)) {

			CorsConfiguration config = (this.corsConfigurationSource != null ? this.corsConfigurationSource.getCorsConfiguration(request) : null);

			CorsConfiguration handlerConfig = getCorsConfiguration(handler, request);

			config = (config != null ? config.combine(handlerConfig) : handlerConfig);

			executionChain = getCorsHandlerExecutionChain(request, executionChain, config);

		}

		return executionChain;

	}
获取处理器对象-getHandlerInternal()
最终会来到AbstractHandlerMethodMapping#getHandlerInternal
    private UrlPathHelper urlPathHelper = new UrlPathHelper();

	protected HandlerMethod getHandlerInternal(HttpServletRequest request) throws Exception {

        // 1、拿到请求中的请求路径

		String lookupPath = getUrlPathHelper().getLookupPathForRequest(request);

		request.setAttribute(LOOKUP_PATH, lookupPath);

		this.mappingRegistry.acquireReadLock();

		try {

            // 2、通过请求路径拿到 HandlerMethod (核心)

			HandlerMethod handlerMethod = lookupHandlerMethod(lookupPath, request);

			return (handlerMethod != null ? handlerMethod.createWithResolvedBean() : null);

		}

		finally {

			this.mappingRegistry.releaseReadLock();

		}

	}
根据请求得到路径-getLookupPathForRequest()
调用底层api得到请求路径
public String getLookupPathForRequest(HttpServletRequest request) {

    String pathWithinApp = getPathWithinApplication(request);

    // Always use full path within current servlet context?

    if (this.alwaysUseFullPath) {

        return pathWithinApp;

    }

    // Else, use path within current servlet mapping if applicable

    String rest = getPathWithinServletMapping(request, pathWithinApp);

    if (StringUtils.hasLength(rest)) {

        return rest;

    }

    else {

        return pathWithinApp;

    }

}

根据路径找到对应处理器-lookupHandlerMethod()
根据请求路径找到HandlerMethod
org.springframework.web.servlet.handler.AbstractHandlerMethodMapping#lookupHandlerMethod
	protected HandlerMethod lookupHandlerMethod(String lookupPath, HttpServletRequest request) throws Exception {

        // 根据路径匹配到的集合

		List<Match> matches = new ArrayList<>();

        // 1,根据路径找到对应的 RequestMappingInfo 集合

		List<T> directPathMatches = this.mappingRegistry.getMappingsByUrl(lookupPath);

		if (directPathMatches != null) {

            // 2,匹配到的集合  这里面有 HandlerMethod 对象

			addMatchingMappings(directPathMatches, matches, request);

		}

		if (matches.isEmpty()) {

			// No choice but to go through all mappings...

			addMatchingMappings(this.mappingRegistry.getMappings().keySet(), matches, request);

		}

		if (!matches.isEmpty()) {

            // 3,从匹配到的集合中拿到第一个

			Match bestMatch = matches.get(0);

			if (matches.size() > 1) {

				Comparator<Match> comparator = new MatchComparator(getMappingComparator(request));

				matches.sort(comparator);

				bestMatch = matches.get(0);

				if (logger.isTraceEnabled()) {

					logger.trace(matches.size() + " matching mappings: " + matches);

				}

				if (CorsUtils.isPreFlightRequest(request)) {

					return PREFLIGHT_AMBIGUOUS_MATCH;

				}

				Match secondBestMatch = matches.get(1);

				if (comparator.compare(bestMatch, secondBestMatch) == 0) {

					Method m1 = bestMatch.handlerMethod.getMethod();

					Method m2 = secondBestMatch.handlerMethod.getMethod();

					String uri = request.getRequestURI();

					throw new IllegalStateException(

							"Ambiguous handler methods mapped for '" + uri + "': {" + m1 + ", " + m2 + "}");

				}

			}

			request.setAttribute(BEST_MATCHING_HANDLER_ATTRIBUTE, bestMatch.handlerMethod);

			handleMatch(bestMatch.mapping, lookupPath, request);

			return bestMatch.handlerMethod;

		}

		else {

			return handleNoMatch(this.mappingRegistry.getMappings().keySet(), lookupPath, request);

		}

	}
总结:
- 去注册中心中根据路径找到对应的
RequestMappingInfo - 再根据找到的
RequestMappingInfo来找HandlerMethod然后封装为Match对象,添加到matches集合中 - 拿到
matches集合中的第一个元素(最佳匹配),然后通过handleMatch()方法来处理
1,调用getMappingsByUrl来得到对应的RequestMappingInfo集合:
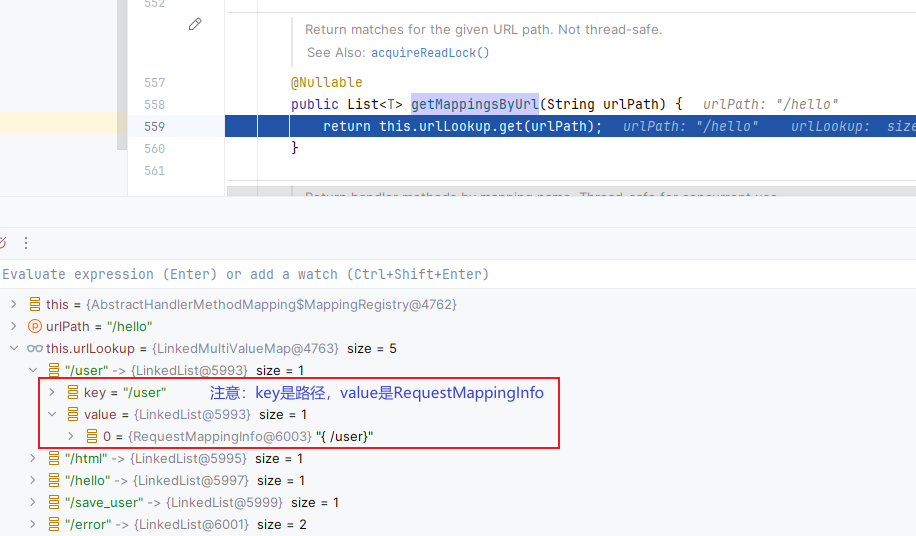
注意:
- PathVariable类型是不会加到这个集合里的,具体逻辑在这里,有兴趣可以去看这两个方法:
org.springframework.web.servlet.handler.AbstractHandlerMethodMapping.MappingRegistry#register()、org.springframework.web.servlet.handler.AbstractHandlerMethodMapping.MappingRegistry#getDirectUrls() - 这里的集合 key 是路径,value 是 RequestMappingInfo
2,得到结果后返回到 lookupHandlerMethod(),继续调用 addMatchingMappings() 方法,来找匹配到的 HandlerMethod:
	private void addMatchingMappings(Collection<T> mappings, List<Match> matches, HttpServletRequest request) {

		for (T mapping : mappings) {

            // 封装一下

			T match = getMatchingMapping(mapping, request);

			if (match != null) {

                // 找到的集合,又会封装为 Match 对象

				matches.add(new Match(match, this.mappingRegistry.getMappings().get(mapping)));

			}

		}

	}
这里的是:key是 RequestMappingInfo,value是 HandlerMethod:
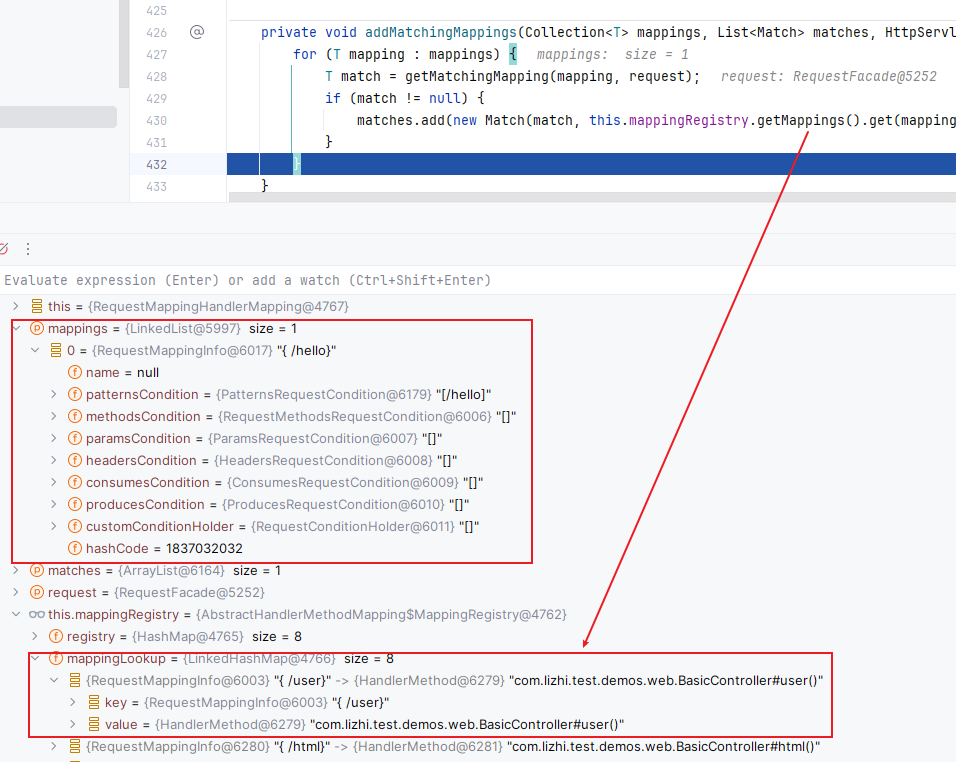
这就是我们找到的 Match 集合:

我们这里就找到了,然后返回到 lookupHandlerMethod() 方法来继续,会先拿到集合中的第一个元素,然后调用 handleMatch() 来处理路径问题,最后返回Match 对象中的 HandlerMethod。到这一步,我们终于拿到了想到的 HandlerMethod对象!
HandlerMethod:
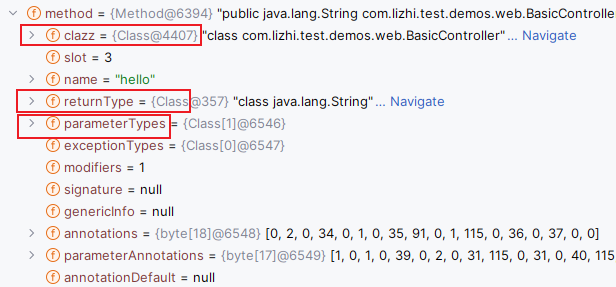
这个对象里面封装了我们的:对应的类、对应的方法、方法的参数类型、方法的返回值类型等等一系列信息
获取处理器执行链对象-getHandlerExecutionChain()
调用其中的 getHandlerExecutionChain() 方法来得到 HandlerExecutionChain 对象:
	protected HandlerExecutionChain getHandlerExecutionChain(Object handler, HttpServletRequest request) {

		HandlerExecutionChain chain = (handler instanceof HandlerExecutionChain ?

				(HandlerExecutionChain) handler : new HandlerExecutionChain(handler));

        // 拿到当前路径

		String lookupPath = this.urlPathHelper.getLookupPathForRequest(request, LOOKUP_PATH);

		for (HandlerInterceptor interceptor : this.adaptedInterceptors) {

			if (interceptor instanceof MappedInterceptor) {

				MappedInterceptor mappedInterceptor = (MappedInterceptor) interceptor;

                // 判断的当前拦截器是否拦截此请求

				if (mappedInterceptor.matches(lookupPath, this.pathMatcher)) {

					chain.addInterceptor(mappedInterceptor.getInterceptor());

				}

			}

			else {

				chain.addInterceptor(interceptor);

			}

		}

		return chain;

	}
流程:
- 先把 HandlerMethod 封装到 HandlerExecutionChain 中
- 拿到当前请求路径,再遍历所有的拦截器并判断当前拦截器是否拦截当前请求,拦截的话就添加到我们的 HandlerExecutionChain 对象中,然后返回
HandlerExecutionChain对象:

这两个拦截器是默认的拦截器,不用管
里面就3个东西:处理器、拦截器集合、当前执行到第几个拦截器的索引
跨域处理-CorsProcessor
原理:通过CorsProcessor类来处理,其实就是通过response对象来添加响应头。
// 1、判断是否有跨域配置或者是否是预检请求

if (hasCorsConfigurationSource(handler) || CorsUtils.isPreFlightRequest(request)) {

    // 2、拿到全局的跨域配置

    CorsConfiguration config = (this.corsConfigurationSource != null ? this.corsConfigurationSource.getCorsConfiguration(request) : null);

    // 3、拿到CrossOrigin级别的

    CorsConfiguration handlerConfig = getCorsConfiguration(handler, request);

    // 4、合并

    config = (config != null ? config.combine(handlerConfig) : handlerConfig);

    // 5、处理 CORS 相关的操作

    executionChain = getCorsHandlerExecutionChain(request, executionChain, config);

}
1、判断是否有跨域配置或者是否是预检请求
// 是否有跨域配置

protected boolean hasCorsConfigurationSource(Object handler) {

    if (handler instanceof HandlerExecutionChain) {

        handler = ((HandlerExecutionChain) handler).getHandler();

    }

    return (handler instanceof CorsConfigurationSource || this.corsConfigurationSource != null);

}

// 是否是预检请求

public static boolean isPreFlightRequest(HttpServletRequest request) {

    return (HttpMethod.OPTIONS.matches(request.getMethod()) &&

            request.getHeader(HttpHeaders.ORIGIN) != null &&

            request.getHeader(HttpHeaders.ACCESS_CONTROL_REQUEST_METHOD) != null);

}
我们的corsConfigurationSource里有值,所以进入跨域的处理

2、处理 CORS 相关的操作
protected HandlerExecutionChain getCorsHandlerExecutionChain(HttpServletRequest request,

                                                             HandlerExecutionChain chain, @Nullable CorsConfiguration config) {

    // 如果是预检请求就会重写构建一个Handler(HttpRequestHandler)和过滤器链返回

    if (CorsUtils.isPreFlightRequest(request)) {

        HandlerInterceptor[] interceptors = chain.getInterceptors();

        return new HandlerExecutionChain(new PreFlightHandler(config), interceptors);

    }

    else {

        // 否则就是添加一个CorsInterceptor来做跨域,并且优先级是0

        chain.addInterceptor(0, new CorsInterceptor(config));

        return chain;

    }

}
- 对于预检请求(Pre-flight requests),会将所选的处理器(handler)替换为一个简单的 HttpRequestHandler, 并由 CorsProcessor 返回空 response。
- 对于实际的请求(actual requests),会给处理器插入一个 CorsInterceptor(HandlerInterceptor),该HandlerInterceptor 会进行 CORS 相关的检查并添加 CORS 头部信息,也是由CorsProcessor处理
其实就是通过response来添加响应头。
经过这一波操作,我们终于拿到了对应的 HandlerExecutionChain对象。
获取支持处理当前处理器的处理器适配器-getHandlerAdapter()
终于到了我们 HandlerAdapter 了
拿到对应的 HandlerExecutionChain 对象后,我们就该调用 getHandlerAdapter() 方法来拿能处理我们 Handler 的 HandlerAdapter:
protected HandlerAdapter getHandlerAdapter(Object handler) throws ServletException {

    if (this.handlerAdapters != null) {

        for (HandlerAdapter adapter : this.handlerAdapters) {

            if (adapter.supports(handler)) {

                return adapter;

            }

        }

    }

    throw new ServletException("No adapter for handler [" + handler +

                               "]: The DispatcherServlet configuration needs to include a HandlerAdapter that supports this handler");

}
分析:还是遍历 HandlerAdapter 集合,来调用每一个的 supports() 方法来判断当前是否支持处理这个 Handler。

其实即使判断当前的这个 Handler 是不是某一个类。我们直接来看看
各个类的 supports() 方法:
//*************AbstractHandlerMethodAdapter 和 RequestMappingHandlerAdapter*********

// 我们默认在controller里声明的接口方法就是用的这个适配器来处理

public final boolean supports(Object handler) {

    return (handler instanceof HandlerMethod && supportsInternal((HandlerMethod) handler));

}

protected boolean supportsInternal(HandlerMethod handlerMethod) {

    return true;

}

// *******************HandlerFunctionAdapter************************

public boolean supports(Object handler) {

    return handler instanceof HandlerFunction;

}

// *******************HttpRequestHandlerAdapter*********************

public boolean supports(Object handler) {

    return (handler instanceof HttpRequestHandler);

}

//*******************SimpleControllerHandlerAdapter*****************

public boolean supports(Object handler) {

    return (handler instanceof Controller);

}
我们这里 RequestMappingHandlerAdapter 就能处理,因为我们之前拿到的就是一个 HandlerMethod。
还有一种继承 AbstractController 类来实现的,就是通过 SimpleControllerHandlerAdapter 来处理的,因为 AbstractController 是 Controller 的子类
到此我们就拿到了对应的 HandlerAdapter,这一步还是比较简单的。
拦截器的前置处理-applyPreHandle()
拦截器的前置处理:
boolean applyPreHandle(HttpServletRequest request, HttpServletResponse response) throws Exception {

    HandlerInterceptor[] interceptors = getInterceptors();

    if (!ObjectUtils.isEmpty(interceptors)) {

        for (int i = 0; i < interceptors.length; i++) {

            HandlerInterceptor interceptor = interceptors[i];

            if (!interceptor.preHandle(request, response, this.handler)) {

                triggerAfterCompletion(request, response, null);

                return false;

            }

            this.interceptorIndex = i;

        }

    }

    return true;

}
分析:就是拿到我们 HandlerExecutionChain 对象里的 HandlerInterceptor 然后遍历调用其前置处理的方法,每处理成功一个就把当前索引赋值给 interceptorIndex 。以便拦截器的最终处理,因为最终处理是一定会执行的。发生错误也会执行。
执行目标方法-ha.handle()
这块逻辑较多和复杂,就不在这里写了,后面写一篇单独文章来
拦截器的后置处理-applyPostHandle()
拦截器的后置处理
	void applyPostHandle(HttpServletRequest request, HttpServletResponse response, @Nullable ModelAndView mv)

			throws Exception {

		HandlerInterceptor[] interceptors = getInterceptors();

		if (!ObjectUtils.isEmpty(interceptors)) {

			for (int i = interceptors.length - 1; i >= 0; i--) {

				HandlerInterceptor interceptor = interceptors[i];

                // 后置处理

				interceptor.postHandle(request, response, this.handler, mv);

			}

		}

	}
这一次就是倒序处理了。
处理最终结果-processDispatchResult()
异常处理逻辑、拦截器的最终处理、还会处理结果 ModelAndView
	private void processDispatchResult(HttpServletRequest request, HttpServletResponse response,

			@Nullable HandlerExecutionChain mappedHandler, @Nullable ModelAndView mv,

			@Nullable Exception exception) throws Exception {

		boolean errorView = false;

        // 异常处理逻辑

		if (exception != null) {

			if (exception instanceof ModelAndViewDefiningException) {

				logger.debug("ModelAndViewDefiningException encountered", exception);

				mv = ((ModelAndViewDefiningException) exception).getModelAndView();

			}

			else {

				Object handler = (mappedHandler != null ? mappedHandler.getHandler() : null);

				mv = processHandlerException(request, response, handler, exception);

				errorView = (mv != null);

			}

		}

		// Did the handler return a view to render?

		if (mv != null && !mv.wasCleared()) {

            // 视图解析器渲染结果

			render(mv, request, response);

			if (errorView) {

				WebUtils.clearErrorRequestAttributes(request);

			}

		}

		else {

			if (logger.isTraceEnabled()) {

				logger.trace("No view rendering, null ModelAndView returned.");

			}

		}

		if (WebAsyncUtils.getAsyncManager(request).isConcurrentHandlingStarted()) {

			// Concurrent handling started during a forward

			return;

		}

		if (mappedHandler != null) {

			// 拦截器的最终处理

			mappedHandler.triggerAfterCompletion(request, response, null);

		}

	}
由于我们这个是json格式,所以没有 ModelAndView,所以来到拦截器的最终处理:
	void triggerAfterCompletion(HttpServletRequest request, HttpServletResponse response, @Nullable Exception ex)

			throws Exception {

		HandlerInterceptor[] interceptors = getInterceptors();

		if (!ObjectUtils.isEmpty(interceptors)) {

			for (int i = this.interceptorIndex; i >= 0; i--) {

				HandlerInterceptor interceptor = interceptors[i];

				try {

					interceptor.afterCompletion(request, response, this.handler, ex);

				}

				catch (Throwable ex2) {

					logger.error("HandlerInterceptor.afterCompletion threw exception", ex2);

				}

			}

		}

	}
执行所有执行过的拦截器的最终处理逻辑
到这里 doDispatch() 方法就执行完毕了。
后记
- 执行目标方法的原理
- 流程图待画
有机会再填坑吧。
一文带你深入理解SpringMVC的执行原理的更多相关文章
- 一文带你深入理解JVM,看完之后你还敢说你懂JVM吗?颠覆you认知
前言 今天带大家深入理解JVM,从入门到精通,希望大家能够喜欢~~~ 概念 JVM是可运行 Java 代码的假想计算机 ,包括一套字节码指令集.一组寄存器.一个栈.一个垃圾回收,堆 和 一个存储方法域 ...
- 通过自己实现接口来加深理解SpringMVC的执行流程
功能介绍 上篇文章[从源码角度了解SpringMVC的执行流程]通过接口源码向大家介绍了SpringMVC的执行流程,主要偏重于源码.这篇文件我们来自己实现那几个关键接口,来真实体验下SpringMV ...
- 深度理解C# 的执行原理
欢迎大家前往腾讯云+社区,获取更多腾讯海量技术实践干货哦~ 本文由鹅厂优文发表于云+社区专栏 从编译原理说起 虚拟机是什么 C# 是什么,IL 又是什么 .Net Framework vs Mono ...
- SpringMVC底层执行原理
一个简单的HelloSpringMVC程序 先在web,xml中注册一个前端控制器(DispatcherServlet) <?xml version="1.0" encodi ...
- 一文带你彻底理解Linux的各种终端类型及概念
每天使用Linux每天都要接触到Bash,使用Bash时似乎永远都让人摸不着头脑的概念就是终端,坐在这台运行着Linux的机器的显示器前面,这个显示器就是终端的输出,而插在机器上的USB键盘或者PS/ ...
- 一文带你彻底理解 JavaScript 原型对象
一.什么是原型 原型是Javascript中的继承的基础,JavaScript的继承就是基于原型的继承. 1.1 函数的原型对象 在JavaScript中,我们创建一个函数A(就是声明一个函数), 那 ...
- 干货,一文带你超详细了解Session的原理及应用
session 简介 session 是我们 jsp 九大隐含对象的一个对象. session 称作域对象,他的作用是保存一些信息,而 session 这个域对象是一次会话期间使用同一个对象.所以这个 ...
- 一文带你弄懂 CDN 技术的原理
对于 CDN 这个东西,相信大家都有耳闻,感觉既陌生但又熟悉.最近深入了解了一下 CDN,这才发现原来 CDN 如此重要!今天就跟大家科普一下 CDN 是什么,以及为啥要有 CDN,最后再讲一下 CD ...
- 一文带你弄懂 Maven 拉包原理
业务需求开发的时候,我们总是会遇到拉不到依赖包的情况.此时如果不清楚 Maven 拉取依赖包的原理,那么很可能找不到问题所在.今天树哥就带大家了解下 Maven 拉包的原理,让你在遇到问题的时候能快速 ...
- 干货,一文带你超详细了解 Filter 的原理及应用
提出问题 1.我们在访问后台很多页面时都需要登录,只有登录的用户才能查看这些页面,我们需要 在每次请求的时候都检查用户是否登陆,这样做很麻烦,有没有一种方法可以在我们请求之 前就帮我们做这些事 ...
随机推荐
- 如何通过前后端交互的方式制作Excel报表
前言 Excel拥有在办公领域最广泛的受众群体,以其强大的数据处理和可视化功能,成了无可替代的工具.它不仅可以呈现数据清晰明了,还能进行数据分析.图表制作和数据透视等操作,为用户提供了全面的数据展示和 ...
- Pytorch param.grad.data. 出现 AttributeError: ‘NoneType‘ object has no attribute ‘data‘
程序中有需要优化的参数未参与前向传播.
- Gem离线包安装
Gem离线包安装 项目环境 以 rest-client 为例 本地如果是rails项目环境: ruby '2.7.0' gem 'rails', '~> 6.0.3', '>= 6.0.3 ...
- layui.js
目录 用法: 1.在base.js里导入layui插件 2.在使用的html页面里引入 base.js lucky.js index.html 用法: 1.在base.js里导入layui插件 2.在 ...
- uniapp中OnShow获取缓存
点击查看代码 function getStorage(key) { return new Promise((resolve, reject) => { uni.getStorage({ key: ...
- pyqt5 子线程如何操作主线程GUI
一.简介 在使用pyqt5编写gui时遇到两个问题,会导致界面崩溃,今天就围绕这两个问题来简单说明和改进. 1.在主线程中使用while无限循环会导致界面崩溃 2.在子线程中操作主线程gui会导致界面 ...
- (1)semantic-kernel入门课程
(1)semantic-kernel入门课程 获取OpenAI在线API 由于在国内的限制,我们并没有办法直接访问OpenAI,所以下面的教程我们会推荐使用https://api.token-ai.c ...
- Django用户认证组件 (auth模块)
1.导入 auth 模块 # 认证模块 from django.contrib import auth # 对应数据库用户表,可以继承扩展 from django.contrib.auth.model ...
- Vue——计算属性和侦听属性
一.计算属性 模板内的表达式非常便利,但是设计它们的初衷是用于简单运算的.在模板中放入太多的逻辑会让模板过重且难以维护.例如,有一个嵌套数组对象:我们想根据 author 是否已经有一些书来显示不同的 ...
- docker 容器镜像加速配置
登录阿里云容器镜像服务即可看到配置加速.

