Vue源码学习(十九):router基本原理
好家伙,
0.什么是路由?
路由就是匹配到对应路径显示对应的组件!
那么我们要如何去实现?
我们来回忆一下这router怎么用的
1. 声明式路由配置:在路由配置对象中,定义路径与组件的映射关系。例如:
import AboutComponent from '../views/AboutComponent.vue'

const routes = [

  { path: '/', component: HomeComponent },

  { path: '/about', component: AboutComponent },

  { path: '/user/:id', component: UserComponent },

];
2. 安装路由插件:在 Vue 根实例中,使用 `Vue.use()` 方法安装 vue-router 插件,
并将路由实例注入到根实例中。
import Vue from 'vue';

import VueRouter from 'vue-router';

Vue.use(VueRouter);
3. 创建 router 实例:根据路由配置对象创建一个 VueRouter 实例。
const router = new VueRouter({

  routes,

  mode: 'history',

  base: '',

});
4. 挂载路由:将创建的 router 实例挂载到 Vue 应用上。
new Vue({

  router,

  render: (h) => h(App),

}).mount('#app');
5. 在组件中使用 `<router-view>`:在需要显示路由组件的页面中,
使用 `<router-view>` 标签。该标签会根据当前路由自动渲染对应的组件。
<template>

  <div>

    <router-link to="/about">about</router-link>

    <router-view></router-view>

  </div>

</template>
6. 导航:通过调用 router 实例的方法(如 `router.push()`)实现页面跳转。当用户访问不同的路径时,vue-router 会根据路由配置自动渲染对应的组件。

图例:
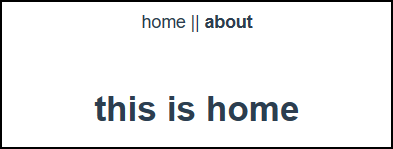
也就是说如果我点击了about,就对应跳到/about,并在下方展示这个路径对应的组件
于是我们目标明确了,事实上,我们只需要解决三个问题
1.router-link的实现
2.router-view的实现
3.路径到组件的映射关系的实现
目录结构如下:
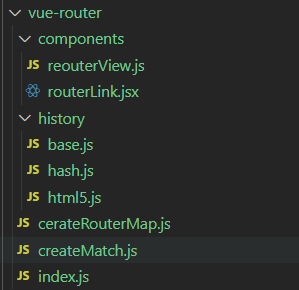
1.router-link的实现
routerLink.jsx
  //组件

  export default{

    props:{ //组件的属性

      to:{

        type:String,

        required:true

      },

      tag:{

        type:String

      }

    },

  //jsx

  render(){

    let tag = this.tag || 'a'

    //跳转

    console.log(tag,666)

    let handler = ()=>{

       this.$router.push(this.to)

    }

      return <tag  onclick={handler}>{this.$slots.default}</tag >//jsx  {变量}

  }

}
2.router-view的实现
routerView.js
export default {

    functional: true,

    // 函数式组件

    render(h, { parent, data }) { // 1 h  2 属性

        //1 获取到组件

        let route = parent.$route // 获取到route

        // this match  component

        // 2问题  嵌套  /about/a :[about, a]  routerView

        data.routerView = true

        let depath = 0

        while (parent) {

            // $vnode 相当于一个 占位符

            if (parent.$vnode && parent.$vnode.data.routerView) {

                depath++

            }

            parent = parent.$parent //一直寻找父亲

        }

        let recode = route.metched[0].metched[depath]

        if (!recode) {

            return h() // 空

        }

        return h(recode.component, data)

    }

}
3.路径到组件的映射关系的实现
index.js
export default class VueRouter {

    constructor(options = {}) {

        //   vue-router 核心 1 match核心  [{},{}]  => {'/':{组件相关信息},'/about':{}}

        console.log(options.routes,'this is options.routes')

        this.match = createMatch(options.routes || [])

        this.beforeHooks= []

        // 核心二:浏览器路由管理

        // 1;获取模式

        options.mode = options.mode || 'hash'

        //进行判断

        switch (options.mode) {

            case 'hash':

                this.history = new HashHistory(this)

                break;

            case 'history':

                this.history = new HtmlHistory(this)

                break

        }

        console.log(this.history)

    }
createMatch.js
export function createMatch(routes) { //匹配器

   //1变成一个路由映射表   [{},{}]  => {'/':{组件相关信息},'/about':{},/about/c:{}}

   const  pathMap  = createRouterMap(routes)

   //2addRoutes 动态添加路由

   // addRoutes(routes)

   function addRoutes(routes) { // 1:用户自己动态的路由  2

      // 注意需要合并在一起

      createRouterMap(routes, pathMap)

   }

/.

.

.

./

}
createRouterMap.js
`createRouterMap` 函数用于创建路径映射对象
export function createRouterMap(routes,routerOptions={}) {

    // console.log(routes,5556)

    let pathMap = routerOptions

    routes.forEach(router => {

        //[{path:'/},{}]  => {'/':{组件相关信息},'/about':{},/about/a:{}}

        console.log(router, pathMap,'||this is router, pathMap')

        addRouterRecode(router, pathMap)

    })

    //  console.log(pathMap)

     //问题 路由嵌套 /about/a

     return pathMap

}

function addRouterRecode(router, pathMap,parent) {

    // 1路径 /  记录

    let path = parent ?`${parent.path}/${router.path}`:router.path

    let recode = {

        path: router.path,

        name: router.name,

        component: router.component,

        parent

    }

    //添加

    if (!pathMap[path]) {

        pathMap[path] = recode

    }

    //有没有儿子

    if(router.children){

        //递归

        router.children.forEach(child=>{

            //注意 parent

            addRouterRecode(child, pathMap,recode)

        })

    }

}
对于以上createRouterMap方法,举个例子
const routes = [

  {

    path: '/',

    name: 'Home',

    component: HomeComponent

  },

  {

    path: '/about',

    name: 'About',

    component: AboutComponent,

    children: [

      {

        path: 'contact',

        name: 'Contact',

        component: ContactComponent

      }

    ]

  }

];

const routerOptions = {

  base: '/'

};

const pathMap = createRouterMap(routes, routerOptions);

得到结果

{

  '/': {

    path: '/',

    name: 'Home',

    component: HomeComponent,

    parent: null

  },

  '/about': {

    path: '/about',

    name: 'About',

    component: AboutComponent,

    parent: '/'

  },

  '/about/contact': {

    path: '/about/contact',

    name: 'Contact',

    component: ContactComponent,

    parent: '/about'

  }

}
Vue源码学习(十九):router基本原理的更多相关文章
- Vue源码学习1——Vue构造函数
Vue源码学习1--Vue构造函数 这是我第一次正式阅读大型框架源码,刚开始的时候完全不知道该如何入手.Vue源码clone下来之后这么多文件夹,Vue的这么多方法和概念都在哪,完全没有头绪.现在也只 ...
- Vue源码学习三 ———— Vue构造函数包装
Vue源码学习二 是对Vue的原型对象的包装,最后从Vue的出生文件导出了 Vue这个构造函数 来到 src/core/index.js 代码是: import Vue from './instanc ...
- Vue源码学习二 ———— Vue原型对象包装
Vue原型对象的包装 在Vue官网直接通过 script 标签导入的 Vue包是 umd模块的形式.在使用前都通过 new Vue({}).记录一下 Vue构造函数的包装. 在 src/core/in ...
- 最新 Vue 源码学习笔记
最新 Vue 源码学习笔记 v2.x.x & v3.x.x 框架架构 核心算法 设计模式 编码风格 项目结构 为什么出现 解决了什么问题 有哪些应用场景 v2.x.x & v3.x.x ...
- 【Vue源码学习】依赖收集
前面我们学习了vue的响应式原理,我们知道了vue2底层是通过Object.defineProperty来实现数据响应式的,但是单有这个还不够,我们在data中定义的数据可能没有用于模版渲染,修改这些 ...
- Vue 源码学习(1)
概述 我在闲暇时间学习了一下 Vue 的源码,有一些心得,现在把它们分享给大家. 这个分享只是 Vue源码系列 的第一篇,主要讲述了如下内容: 寻找入口文件 在打包的过程中 Vue 发生了什么变化 在 ...
- VUE 源码学习01 源码入口
VUE[version:2.4.1] Vue项目做了不少,最近在学习设计模式与Vue源码,记录一下自己的脚印!共勉!注:此处源码学习方式为先了解其大模块,从宏观再去到微观学习,以免一开始就研究细节然后 ...
- Vue源码学习(一):调试环境搭建
最近开始学习Vue源码,第一步就是要把调试环境搭好,这个过程遇到小坑着实费了点功夫,在这里记下来 一.调试环境搭建过程 1.安装node.js,具体不展开 2.下载vue项目源码,git或svn等均可 ...
- 【Vue源码学习】响应式原理探秘
最近准备开启Vue的源码学习,并且每一个Vue的重要知识点都会记录下来.我们知道Vue的核心理念是数据驱动视图,所有操作都只需要在数据层做处理,不必关心视图层的操作.这里先来学习Vue的响应式原理,V ...
- Vue.js 源码分析(十九) 指令篇 v-html和v-text指令详解
双大括号会将数据解释为普通文本,而非 HTML 代码.为了输出真正的 HTML,你需要使用 v-html 指令,例如: <!DOCTYPE html> <html lang=&quo ...
随机推荐
- 揭秘计算机指令执行的神秘过程:CPU内部的绝密操作
计算机指令 从软件工程师的角度来看,CPU是执行计算机指令的逻辑机器.计算机指令可以看作是CPU能够理解的语言,也称为机器语言. 不同的CPU能理解的语言不同.例如,个人电脑使用Intel的CPU,苹 ...
- Vue之属性
Vue中的属性:举例 看一下就明白了 <!DOCTYPE html> <html lang="en"> <head> <meta char ...
- keepalived部署+nginx高可用
nginx+keepalived搞性能web网络架构实战配置: 环境准备: keepalived+nginx-1: 192.168.1.23 keepalived+nginx-2: 192.168.1 ...
- GameFramework摘录 - 3. 使用interface定义对外接口
GameFramework的模块密封性相当好,如果使用unity的assemblydef,其设计可以把框架项目与自己的游戏逻辑分离开来. 除一些常用的基类.枚举等,核心模块设置为internal权限, ...
- 洛谷P1144
最短路计数 题目描述 给出一个 \(N\) 个顶点 \(M\) 条边的无向无权图,顶点编号为 \(1\sim N\).问从顶点 \(1\) 开始,到其他每个点的最短路有几条. 输入格式 第一行包含 \ ...
- QT线程问题
QT线程问题 (一)QThread (二)QMutex和QMutexLocker (end)后面会更新 (一)QThread 文章 (二)QMutex和QMutexLocker 通俗理解 QMutex ...
- mysql insert的特殊用法
1. 正常的insert语句:插入一条数据如下:INSERT INTO `testdb`.`tb_user` (`id`, `userName`) VALUES (3, '张飞'); 2. inser ...
- kali Linux安装pyenv
前言 pyenvpyenv 可让你轻松地在多个 Python 版本之间切换,是一个非常不错的python版本管理工具 安装步骤 安装依赖 apt-get install -y make build-e ...
- VMPFC可以融合既有的片段信息来模拟出将来的情感场景
Ventromedial prefrontal cortex supports affective future simulation by integrating distributed knowl ...
- Altium Designer中'=SheetNumber'和'=SheetTotal'参数无效的解决方法
出现的问题 图纸没有被自动编号 在Altium中该显示区域被称为Title Block.[这里使用了图纸模板]. 当使用层次化的设计方式时,往往一个工程中若干幅原理图.这时我们需要为原理图进行编号. ...