【Android】使用Messenger实现进程间通讯
1 Messenger 简介
Messenger 类实现了 Parcelable 接口,用于进程间传输并处理消息,调用流程如下:

- Client 通过 bindService() 请求绑定 Service
- Service 通过 messenger_s.getBinder() 获取 IBunder 并返回 Client
- Client 通过 messenger_s =new Messenger(service) 获取 Service 的 Messenger
- Client 通过 msg_c2s.replyTo=messenger_c 将自己的 Messenger 绑定到 msg_c2s
- Client 通过 messenger_s.send(msg_c2s) 给 Service 发送消息
- Service 通过 messenger_c=msg_c2s.replyTo 获取 Client 的 Messenger
- Service 通过 messenger_c.send(msg_s2c) 给 Client 发送消息
本文全部代码见→使用Messenger实现进程间通讯
2 项目结构
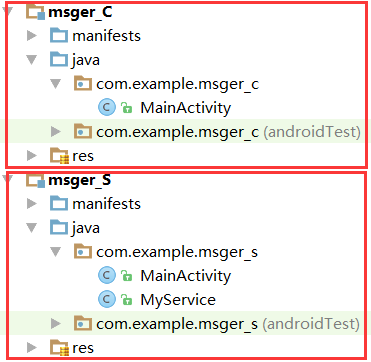
3 服务端 msger_S 代码
(1)创建服务
MyService.java
package com.example.msger_s;import android.app.Service;import android.content.Intent;import android.os.Bundle;import android.os.Handler;import android.os.IBinder;import android.os.Message;import android.os.Messenger;import android.os.RemoteException;import android.util.Log;public class MyService extends Service {Messenger messenger_c; //客户端的Messenger@Overridepublic IBinder onBind(Intent intent) {return messenger_s.getBinder();}private Messenger messenger_s = new Messenger(new Handler() {@Overridepublic void handleMessage(Message msg_c2s) {super.handleMessage(msg_c2s);receive(msg_c2s);messenger_c = msg_c2s.replyTo; //获取客户端的Messengersend();}});private void receive(Message msg) { //接收来自客户端的消息Bundle bundle = (Bundle) msg.obj;String msg_c2s = bundle.getString("msg_c2s");Log.e("MyService", "来自客户端的消息:" + msg_c2s);}private void send() { //给客户端返回消息Message msg = new Message();Bundle bundle1 = new Bundle();bundle1.putString("msg_s2c", "hello client");msg.obj = bundle1;try {messenger_c.send(msg);} catch (RemoteException e) {e.printStackTrace();}}}
(2)注册服务
在 AndroidManifest.xml 文件中 application 节点下注册 service,如下。
<serviceandroid:name=".MyService"android:exported="true"><intent-filter><action android:name="com.xxx.msger_s"/><category android:name="android.intent.category.DEFAULT" /></intent-filter></service>
(3)主 Activity
MainActivity.java
package com.example.msger_s;import android.support.v7.app.AppCompatActivity;import android.os.Bundle;public class MainActivity extends AppCompatActivity {@Overrideprotected void onCreate(Bundle savedInstanceState) {super.onCreate(savedInstanceState);setContentView(R.layout.activity_main);}}
4 客户端 msger_C 代码
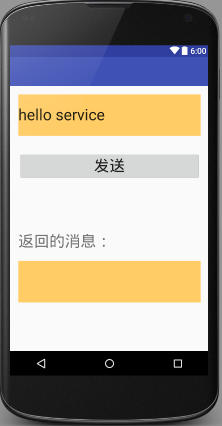
(1)设计布局
activity_main.xml
<?xml version="1.0" encoding="utf-8"?><LinearLayout xmlns:android="http://schemas.android.com/apk/res/android"xmlns:tools="http://schemas.android.com/tools"android:layout_width="match_parent"android:layout_height="match_parent"android:paddingBottom="@dimen/activity_vertical_margin"android:paddingLeft="@dimen/activity_horizontal_margin"android:paddingRight="@dimen/activity_horizontal_margin"android:paddingTop="@dimen/activity_vertical_margin"android:orientation="vertical"tools:context="com.example.msger_c.MainActivity"><EditTextandroid:id="@+id/et_send"android:layout_width="match_parent"android:layout_height="80dp"android:text="hello service"android:textSize="30dp"android:background="#ffcc66"/><Buttonandroid:id="@+id/btn_send"android:layout_width="match_parent"android:layout_height="wrap_content"android:layout_gravity="center_horizontal"android:layout_marginTop="30dp"android:textSize="30sp"android:text="发送"/><TextViewandroid:layout_width="match_parent"android:layout_height="wrap_content"android:text="返回的消息:"android:textSize="30sp"android:layout_marginTop="100dp"/><TextViewandroid:id="@+id/tv_receive"android:layout_width="match_parent"android:layout_height="80dp"android:textSize="30sp"android:background="#ffcc66"android:layout_marginTop="20dp"/></LinearLayout>
界面如下:
(2)主 Activity
MainActivity.java
package com.example.msger_c;import android.app.Activity;import android.content.ComponentName;import android.content.Context;import android.content.Intent;import android.content.ServiceConnection;import android.os.Bundle;import android.os.Handler;import android.os.IBinder;import android.os.Message;import android.os.Messenger;import android.os.RemoteException;import android.support.v7.app.AppCompatActivity;import android.view.View;import android.view.inputmethod.InputMethodManager;import android.widget.Button;import android.widget.EditText;import android.widget.TextView;public class MainActivity extends AppCompatActivity {private Messenger messenger_s; //服务端的Messengerprivate EditText et_send;private Button btn_send;private TextView tv_receive;@Overrideprotected void onCreate(Bundle savedInstanceState) {super.onCreate(savedInstanceState);setContentView(R.layout.activity_main);init();}private void init() {et_send = (EditText) findViewById(R.id.et_send);btn_send = (Button) findViewById(R.id.btn_send);tv_receive = (TextView) findViewById(R.id.tv_receive);btn_send.setOnClickListener(cl);}View.OnClickListener cl = new View.OnClickListener(){@Overridepublic void onClick(View v) {hideInputMethod(MainActivity.this, v); //关闭输入法if (v.getId()==R.id.btn_send) {String msg_c2s = et_send.getText().toString();sendMsg(msg_c2s);}}};private void sendMsg(String msg_c2s){if (messenger_s==null) {attemptToBindService();}Message msg = new Message();Bundle bundle = new Bundle();bundle.putString("msg_c2s",msg_c2s);msg.obj = bundle;msg.replyTo = messenger_c; //将客户端的Messenger传给服务端try {messenger_s.send(msg);} catch (RemoteException e) {e.printStackTrace();}}private Messenger messenger_c = new Messenger(new Handler() { //客户端的Messenger@Overridepublic void handleMessage(Message msg) { //处理服务端返回的消息super.handleMessage(msg);Bundle bundle = (Bundle) msg.obj;String msg_s2c = bundle.getString("msg_s2c");tv_receive.setText(msg_s2c);}});private void attemptToBindService() {Intent intent = new Intent();intent.setAction("com.xxx.msger_s");intent.setPackage("com.example.msger_s");bindService(intent, conn, Context.BIND_AUTO_CREATE);}ServiceConnection conn = new ServiceConnection() {@Overridepublic void onServiceConnected(ComponentName name, IBinder service) {messenger_s = new Messenger(service); //获取服务端的Messenger}@Overridepublic void onServiceDisconnected(ComponentName name) {messenger_s = null;}};private void hideInputMethod(Activity act, View v) { //关闭输入法InputMethodManager imm = (InputMethodManager) act.getSystemService(Context.INPUT_METHOD_SERVICE);imm.hideSoftInputFromWindow(v.getWindowToken(),0);}@Overrideprotected void onStart() {super.onStart();if (messenger_s==null) {attemptToBindService();}}@Overrideprotected void onStop() {super.onStop();if (messenger_s!=null) {unbindService(conn);}}}
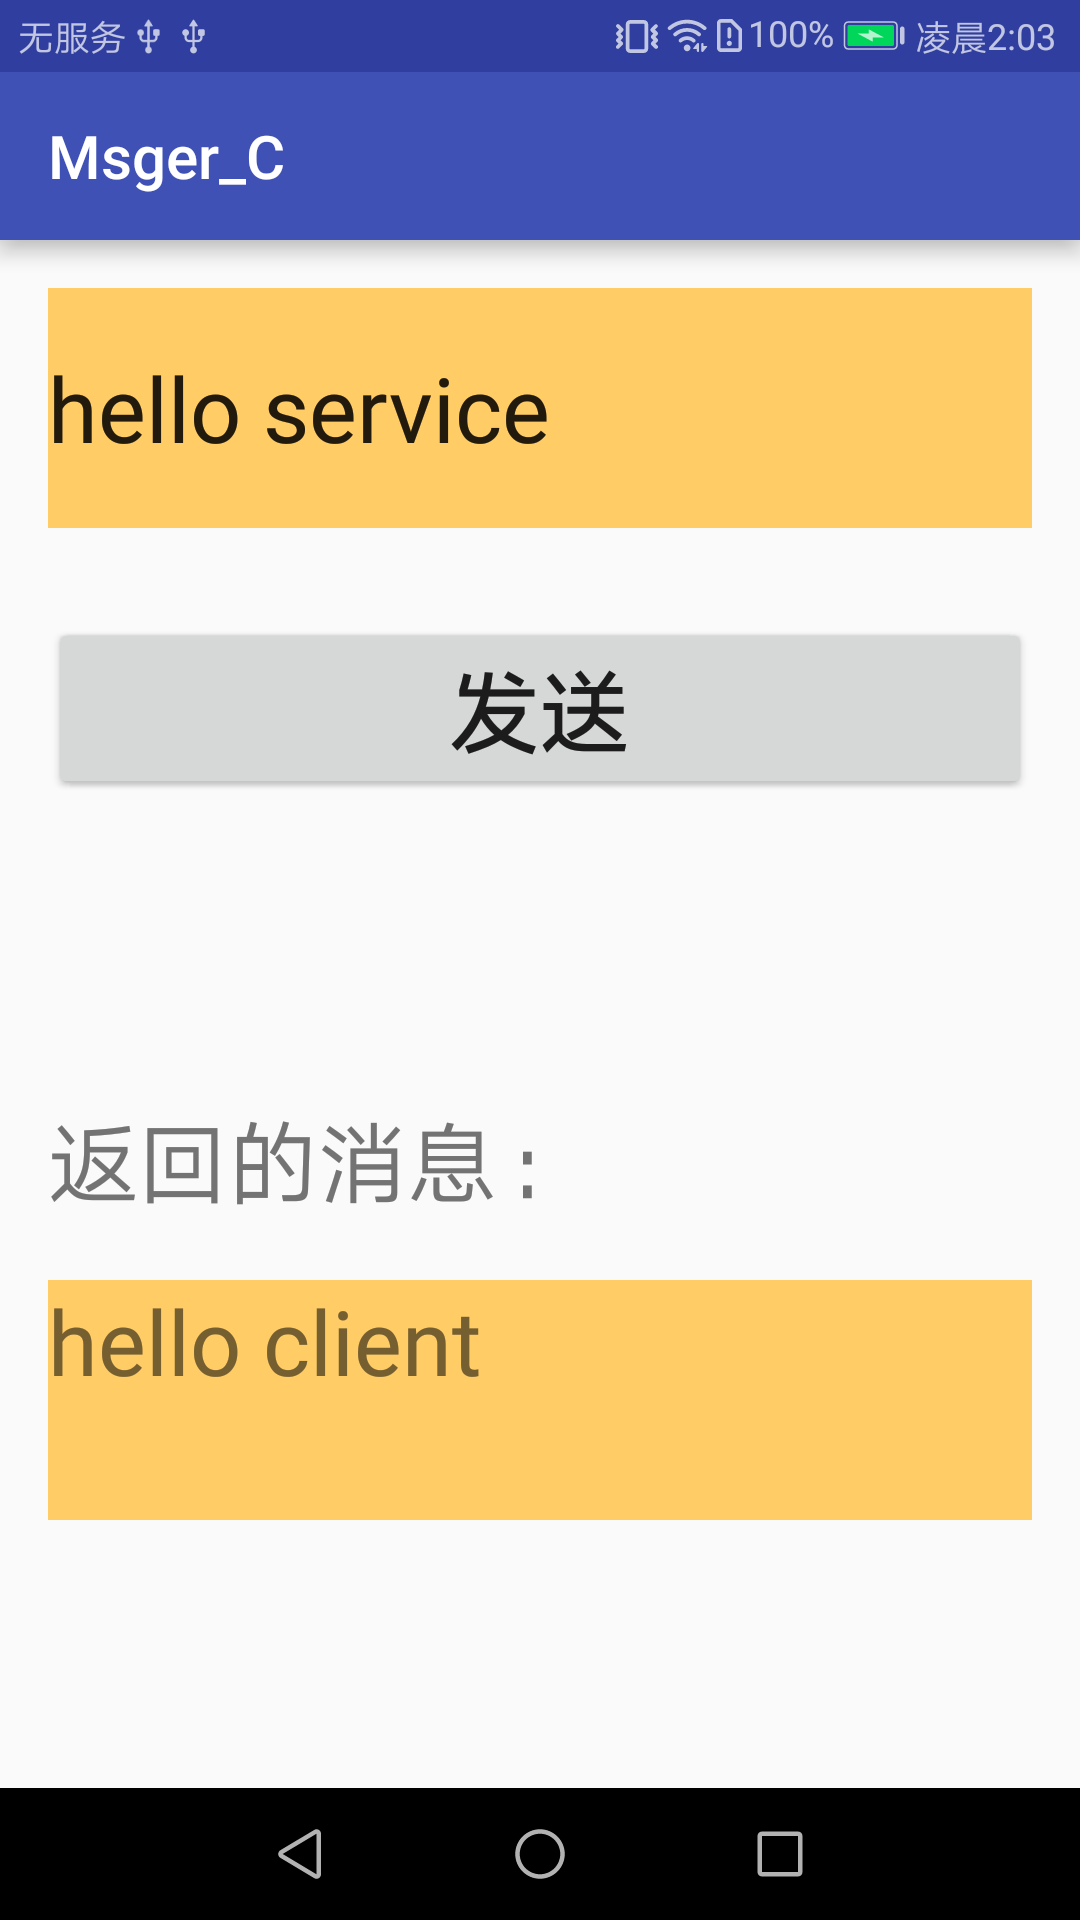
5 效果展示
点击【发送】按钮,在服务端可以收到发送的消息,如下:

在客户端收到回复如下:
声明:本文转自【Android】使用Messenger实现进程间通讯
【Android】使用Messenger实现进程间通讯的更多相关文章
- Android进程间通讯之messenger
这两天在看binder,无意间在文档看到messenger这么个东西,感觉这个东西还挺有意思的,给大家分享一下. 平时一说进程间通讯,大家都会想到AIDL,其实messenger和AIDL作用一样,都 ...
- Android进阶笔记04:Android进程间通讯(IPC)之Messenger
一. Android进程间通讯之Messenger 的引入 (1)引言: 平时一说进程间通讯,大家都会想到AIDL,其实messenger和AIDL作用一样,都可以进行进程间通讯.它是基于消 ...
- Android查缺补漏(IPC篇)-- Bundle、文件共享、ContentProvider、Messenger四种进程间通讯介绍
本文作者:CodingBlock 文章链接:http://www.cnblogs.com/codingblock/p/8387752.html 进程间通讯篇系列文章目录: Android查缺补漏(IP ...
- android 进程间通信 messenger 是什么 binder 跟 aidl 区别 intent 进程间 通讯? android 消息机制 进程间 android 进程间 可以用 handler么 messenger 与 handler 机制 messenger 机制 是不是 就是 handler 机制 或 , 是不是就是 消息机制 android messenge
韩梦飞沙 韩亚飞 313134555@qq.com yue31313 han_meng_fei_sha messenger 是什么 binder 跟 aidl 区别 intent 进程间 通讯 ...
- Android查缺补漏(IPC篇)-- 进程间通讯基础知识热身
本文作者:CodingBlock 文章链接:http://www.cnblogs.com/codingblock/p/8479282.html 在Android中进程间通信是比较难的一部分,同时又非常 ...
- Android查缺补漏(IPC篇)-- 进程间通讯之Socket简介及示例
本文作者:CodingBlock 文章链接:http://www.cnblogs.com/codingblock/p/8425736.html 进程间通讯篇系列文章目录: Android查缺补漏(IP ...
- Android查缺补漏(IPC篇)-- 进程间通讯之AIDL详解
本文作者:CodingBlock 文章链接:http://www.cnblogs.com/codingblock/p/8436529.html 进程间通讯篇系列文章目录: Android查缺补漏(IP ...
- Android-Android进程间通讯之messenger
转自‘https://www.cnblogs.com/makaruila/p/4869912.html 平时一说进程间通讯,大家都会想到AIDL,其实messenger和AIDL作用一样,都可以进行进 ...
- Android进程间通讯
最近研究了一下Android进程间通讯,原来只是会用,但是只是会用是不行滴,就来研究一下. 刚开始看的时候,我的头是这么大,看了一夜的时候,头就变成这样了,,吓得宝宝赶紧上床休息了,. 先喝喝茶讲个故 ...
- Android AIDL 进行进程间通讯(IPC)
编写AIDL文件时,需要注意: 1.接口名和aidl文件名相同. 2.接口和方法前不用加访问权限修饰符 (public.private.protected等,也不能用final.static). 3. ...
随机推荐
- 【SHELL】查找文件并删除
find . -iname file-name |xargs -I % rm -rf %
- javase项目 正常导入jar 包
1,在 java project 目录下新建 lib 文件夹 2,将 mysql 的 jar 包 复制到 新建的 lib 文件夹 3,选中 lib 下的 jar 包 , 右键点击选择 build pa ...
- Laravel - 路由的多层嵌套
Route::group(['prefix'=>'admin'],function(){ Route::get('/',function(){ return view('admin.articl ...
- asp.net core 开启gzip压缩
// 第一步: 配置gzip与br的压缩等级为最优 services.Configure<BrotliCompressionProviderOptions>(options => { ...
- grpc-环境与示例
1. 数据传输基本原理 2. grpc环境安装 代码生成器 go get -u github.com/golang/protobuf/protoc-gen-go // 会自动在 $GOPATH/bin ...
- [转帖]kubernetes(k8s):容器资源限制(内存限制、cpu限制、namespace限制)
文章目录 1. k8s容器资源限制 2. 内存资源限制实例 3. cpu资源限制 4. namespace设置资源限制 5. namespace中pod的配额 6. namespace的创建.使用和删 ...
- [转帖]tidb4.0.4使用tiup扩容TiKV 节点
https://blog.csdn.net/mchdba/article/details/108896766 环境:centos7.tidb4.0.4.tiup-v1.0.8 添加两个tikv节点 ...
- 【转帖】【奇技淫巧】Linux | 统计网络-netstat
theme: condensed-night-purple 小知识,大挑战!本文正在参与"程序员必备小知识"创作活动. 在构建生产服务器时,我们有的时候需要统计网络接口状况,比如T ...
- [转帖]TCP之Nagle、Cork、Delay ACK(延迟确认)
https://www.jianshu.com/p/167ba81206fb 参考资料 TCP协议中的Nagle算法 TCP中的Nagle算法 Linux下TCP延迟确认(Delayed Ack)机制 ...
- Gorm 入门介绍与基本使用
Gorm 入门介绍与基本使用 目录 Gorm 入门介绍与基本使用 一.ORM简介 1.1 什么是ORM 1.2 使用ORM的好处 1.2.1 避免直接操作SQL语句 1.2.2 提高代码的可维护性 1 ...