springboot整合JSP以及发布项目到独立的tomcat中与打成jar包使用
之前研究了springboot整合freemarker与thymeleaf的使用。也研究了springboot发布到独立的tomcat的使用以及使用自带的tomcat打成jar包的使用,下面研究集成JSP之后的使用。
建议还是使用官方提倡的thymeleaf模板。而且thymeleaf与html很好的集成,便于前后端人员开发。
1.集成JSP
pom.xml添加JSP相关依赖:
        <!-- 使用jsp引擎,springboot内置tomcat没有此依赖 -->

        <dependency>

            <groupId>org.apache.tomcat.embed</groupId>

            <artifactId>tomcat-embed-jasper</artifactId>

            <scope>provided</scope>

        </dependency>

        <!-- 添加servlet依赖模块 -->

        <dependency>

            <groupId>javax.servlet</groupId>

            <artifactId>javax.servlet-api</artifactId>

            <scope>provided</scope>

        </dependency>

        <!-- 添加jstl标签库依赖模块 -->

        <dependency>

            <groupId>javax.servlet</groupId>

            <artifactId>jstl</artifactId>

        </dependency>
application.properties文件中配置相关信息:
############################################################

#

# JSP 配置

#

############################################################

spring.mvc.view.suffix=.jsp

spring.mvc.view.prefix=/WEB-INF/jsp/
注意:如果项目中集成了thymeleaf,需要关掉thymeleaf,否则会将jsp作为thymleaf解析,如下:
# 关闭缓存, 即时刷新

spring.thymeleaf.cache=false

#关闭thymeleaf引擎

spring.thymeleaf.enabled=false
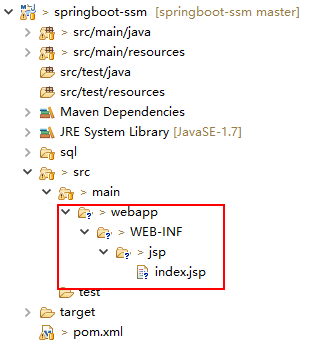
对应的目录结构:
后台Controller测试:
package cn.qlq.action; import org.springframework.stereotype.Controller;
import org.springframework.ui.ModelMap;
import org.springframework.web.bind.annotation.RequestMapping; @RequestMapping("JSP")
@Controller
public class JSPController {
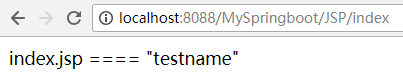
@RequestMapping("index")
public String index(ModelMap map) {
map.addAttribute("name", "testname");
return "index";
}
}
访问测试:
2.测试项目发布到独立的tomcat运行
如果发布到独立的tomcat运行的话,与之前的的一样
(1)继承SpringBootServletInitializer,重写configure方法。
package cn.qlq.config;

import org.springframework.boot.builder.SpringApplicationBuilder;

import org.springframework.boot.web.support.SpringBootServletInitializer;

import org.springframework.context.annotation.ComponentScan;

import org.springframework.context.annotation.Configuration;

// 发布到独立的Tomcat需要继承SpringBootServletInitializer类并重写configure方法

@Configuration // 通过该注解来表明该类是一个Spring的配置,相当于一个xml文件

@ComponentScan(basePackages = "cn.qlq") // 配置扫描包

public class SpringConfig extends SpringBootServletInitializer {

    @Override

    protected SpringApplicationBuilder configure(SpringApplicationBuilder builder) {

        // 设置启动类,用于独立tomcat运行的入口

        return builder.sources(SpringConfig.class);

    }

}
(2)pom.xml打包的方式改为war包,将对应的jsp和servlet的包依赖改为provided即可。
<project xmlns="http://maven.apache.org/POM/4.0.0" xmlns:xsi="http://www.w3.org/2001/XMLSchema-instance"

    xsi:schemaLocation="http://maven.apache.org/POM/4.0.0 http://maven.apache.org/xsd/maven-4.0.0.xsd">

    <modelVersion>4.0.0</modelVersion>

    <groupId>cn.qlq</groupId>

    <artifactId>springboot-ssm</artifactId>

    <version>0.0.1-SNAPSHOT</version>

    <packaging>war</packaging>

    <parent>

        <groupId>org.springframework.boot</groupId>

        <artifactId>spring-boot-starter-parent</artifactId>

        <version>1.5.2.RELEASE</version>

    </parent>

    <dependencies>

        <dependency>

            <groupId>org.springframework.boot</groupId>

            <artifactId>spring-boot-starter-web</artifactId>

        </dependency>

        <!-- 设置Tomcat打包的时候不打包下面配置 -->

        <dependency>

            <groupId>org.springframework.boot</groupId>

            <artifactId>spring-boot-starter-tomcat</artifactId>

            <scope>provided</scope>

        </dependency>

        <!-- 使用jsp引擎,springboot内置tomcat没有此依赖 -->

        <dependency>

            <groupId>org.apache.tomcat.embed</groupId>

            <artifactId>tomcat-embed-jasper</artifactId>

            <scope>provided</scope>

        </dependency>

        <!-- 添加servlet依赖模块 -->

        <dependency>

            <groupId>javax.servlet</groupId>

            <artifactId>javax.servlet-api</artifactId>

            <scope>provided</scope>

        </dependency>

        <!-- 添加jstl标签库依赖模块 -->

        <dependency>

            <groupId>javax.servlet</groupId>

            <artifactId>jstl</artifactId>

        </dependency>

        <dependency>

            <groupId>org.springframework.boot</groupId>

            <artifactId>spring-boot-starter-test</artifactId>

            <scope>test</scope>

        </dependency>

        <dependency>

            <groupId>org.springframework.boot</groupId>

            <artifactId>spring-boot-devtools</artifactId>

        </dependency>

        <!-- spring-boot整合mybatis -->

        <dependency>

            <groupId>org.mybatis.spring.boot</groupId>

            <artifactId>mybatis-spring-boot-starter</artifactId>

            <version>1.1.1</version>

        </dependency>

        <!-- mysql驱动 -->

        <dependency>

            <groupId>mysql</groupId>

            <artifactId>mysql-connector-java</artifactId>

            <version>5.1.6</version>

        </dependency>

        <dependency>

            <groupId>org.springframework</groupId>

            <artifactId>spring-tx</artifactId>

            <version>4.3.7.RELEASE</version>

        </dependency>

        <dependency>

            <groupId>com.github.pagehelper</groupId>

            <artifactId>pagehelper</artifactId>

            <version>5.1.2</version>

        </dependency>

        <!-- 引入 freemarker 模板依赖 -->

        <dependency>

            <groupId>org.springframework.boot</groupId>

            <artifactId>spring-boot-starter-freemarker</artifactId>

        </dependency>

        <!-- 引入 thymeleaf 模板依赖 -->

        <dependency>

            <groupId>org.springframework.boot</groupId>

            <artifactId>spring-boot-starter-thymeleaf</artifactId>

        </dependency>

    </dependencies>

    <build>

        <!-- 配置了很多插件 -->

        <plugins>

            <plugin>

                <groupId>org.apache.maven.plugins</groupId>

                <artifactId>maven-compiler-plugin</artifactId>

                <version>3.5.1</version>

                <configuration>

                    <source>1.7</source>

                    <target>1.7</target>

                    <encoding>UTF-8</encoding>

                </configuration>

            </plugin>

            <plugin>

                <groupId>org.springframework.boot</groupId>

                <artifactId>spring-boot-maven-plugin</artifactId>

            </plugin>

        </plugins>

    </build>

</project>
(3)执行clean package打包即可

(4)将打的war包拷贝到tomcat的webapps目录下运行即可
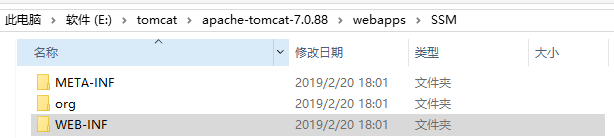
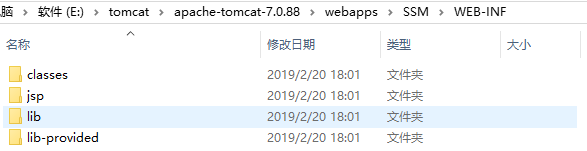
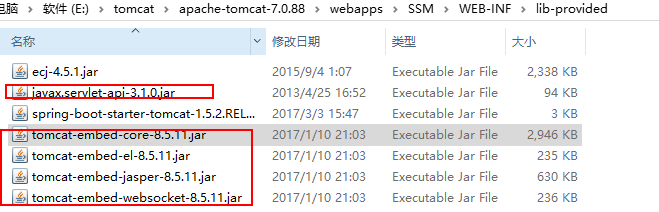
(5)查看tomcat启动解压后的目录结构:(与之前研究的一样,加了springboot的东西,而且provided依赖的jar包也会打到一个目录中)
3.打成war包运行并以java -jar的方式运行war包
(1) pom.xml打包的方式仍然未war包,将对应的jsp和servlet的包依赖改为compile(默认就是)即可。继成SpringBootServletInitializer,与上面一样。这里打包方式仍然是war包的原因是如果打的是jar包不会打WEB-INF目录,也就是没有jsp页面,所以导致访问报错。
(2)pom.xml将jsp与servlet与tomcat的包依赖改为默认的compile
<project xmlns="http://maven.apache.org/POM/4.0.0" xmlns:xsi="http://www.w3.org/2001/XMLSchema-instance"

    xsi:schemaLocation="http://maven.apache.org/POM/4.0.0 http://maven.apache.org/xsd/maven-4.0.0.xsd">

    <modelVersion>4.0.0</modelVersion>

    <groupId>cn.qlq</groupId>

    <artifactId>springboot-ssm</artifactId>

    <version>0.0.1-SNAPSHOT</version>

    <packaging>war</packaging>

    <parent>

        <groupId>org.springframework.boot</groupId>

        <artifactId>spring-boot-starter-parent</artifactId>

        <version>1.5.2.RELEASE</version>

    </parent>

    <dependencies>

        <dependency>

            <groupId>org.springframework.boot</groupId>

            <artifactId>spring-boot-starter-web</artifactId>

        </dependency>

        <!-- 设置Tomcat打包的时候不打包下面配置 -->

        <dependency>

            <groupId>org.springframework.boot</groupId>

            <artifactId>spring-boot-starter-tomcat</artifactId>

            <!-- <scope>provided</scope> -->

        </dependency>

        <!-- 使用jsp引擎,springboot内置tomcat没有此依赖 -->

        <dependency>

            <groupId>org.apache.tomcat.embed</groupId>

            <artifactId>tomcat-embed-jasper</artifactId>

            <!-- <scope>provided</scope> -->

        </dependency>

        <!-- 添加servlet依赖模块 -->

        <dependency>

            <groupId>javax.servlet</groupId>

            <artifactId>javax.servlet-api</artifactId>

            <!-- <scope>provided</scope> -->

        </dependency>

        <!-- 添加jstl标签库依赖模块 -->

        <dependency>

            <groupId>javax.servlet</groupId>

            <artifactId>jstl</artifactId>

        </dependency>

        <dependency>

            <groupId>org.springframework.boot</groupId>

            <artifactId>spring-boot-starter-test</artifactId>

            <scope>test</scope>

        </dependency>

        <dependency>

            <groupId>org.springframework.boot</groupId>

            <artifactId>spring-boot-devtools</artifactId>

        </dependency>

        <!-- spring-boot整合mybatis -->

        <dependency>

            <groupId>org.mybatis.spring.boot</groupId>

            <artifactId>mybatis-spring-boot-starter</artifactId>

            <version>1.1.1</version>

        </dependency>

        <!-- mysql驱动 -->

        <dependency>

            <groupId>mysql</groupId>

            <artifactId>mysql-connector-java</artifactId>

            <version>5.1.6</version>

        </dependency>

        <dependency>

            <groupId>org.springframework</groupId>

            <artifactId>spring-tx</artifactId>

            <version>4.3.7.RELEASE</version>

        </dependency>

        <dependency>

            <groupId>com.github.pagehelper</groupId>

            <artifactId>pagehelper</artifactId>

            <version>5.1.2</version>

        </dependency>

        <!-- 引入 freemarker 模板依赖 -->

        <dependency>

            <groupId>org.springframework.boot</groupId>

            <artifactId>spring-boot-starter-freemarker</artifactId>

        </dependency>

        <!-- 引入 thymeleaf 模板依赖 -->

        <dependency>

            <groupId>org.springframework.boot</groupId>

            <artifactId>spring-boot-starter-thymeleaf</artifactId>

        </dependency>

    </dependencies>

    <distributionManagement>

        <repository>

            <id>releases</id>

            <url>http://192.168.0.133:8081/repository/maven-releases/</url>

        </repository>

        <snapshotRepository>

            <id>snapshots</id>

            <url>http://192.168.0.133:8081/repository/maven-snapshots/</url>

        </snapshotRepository>

    </distributionManagement>

    <build>

        <!-- 配置了很多插件 -->

        <plugins>

            <plugin>

                <groupId>org.apache.maven.plugins</groupId>

                <artifactId>maven-compiler-plugin</artifactId>

                <version>3.5.1</version>

                <configuration>

                    <source>1.7</source>

                    <target>1.7</target>

                    <encoding>UTF-8</encoding>

                </configuration>

            </plugin>

            <plugin>

                <groupId>org.springframework.boot</groupId>

                <artifactId>spring-boot-maven-plugin</artifactId>

            </plugin>

        </plugins>

    </build>

</project>
(3)执行clean package打包即可
(4)运行测试:(以jar包的方式运行war包即可)
$ java -jar ./springboot-ssm-0.0.1-SNAPSHOT.war

 dP"Yb  88      dP"Yb

dP   Yb 88     dP   Yb

Yb b dP 88  .o Yb b dP

 `"YoYo 88ood8  `"YoYo

2019-02-20 18:23:27.212  INFO 16632 --- [           main] cn.qlq.MySpringBootApplication           : Starting MySpringBootApplication v0.0.1-SNAPSHOT on MicroWin10-1535 with PID 16632 (C:\Users\Administrator\Desktop\Springboot\springboot-ssm-0.0.1-SNAPSHOT.war started by Administrator in C:\Users\Administrator\Desktop\Springboot)

2019-02-20 18:23:27.218  INFO 16632 --- [           main] cn.qlq.MySpringBootApplication           : No active profile set, falling back to default profiles: default

2019-02-20 18:23:30.006  INFO 16632 --- [           main] o.apache.catalina.core.StandardService   : Starting service Tomcat

2019-02-20 18:23:30.007  INFO 16632 --- [           main] org.apache.catalina.core.StandardEngine  : Starting Servlet Engine: Apache Tomcat/8.5.11

2019-02-20 18:23:32.746  INFO 16632 --- [ost-startStop-1] org.apache.jasper.servlet.TldScanner     : At least one JAR was scanned for TLDs yet contained no TLDs. Enable debug logging for this logger for a complete list of JARs that were scanned but no TLDs were found in them. Skipping unneeded JARs during scanning can improve startup time and JSP compilation time.

2019-02-20 18:23:33.173  INFO 16632 --- [ost-startStop-1] o.a.c.c.C.[.[localhost].[/MySpringboot]  : Initializing Spring embedded WebApplicationContext

2019-02-20 18:23:35.957  INFO 16632 --- [           main] cn.qlq.MySpringBootApplication           : Started MySpringBootApplication in 9.312 seconds (JVM running for 9.909)

2019-02-20 18:23:42.666  INFO 16632 --- [nio-8088-exec-1] o.a.c.c.C.[.[localhost].[/MySpringboot]  : Initializing Spring FrameworkServlet 'dispatcherServlet'

=========enter filter===========
(5)解压war包查看目录:(与上面的目录一样,只是没有provided的jar包所以没有对应的目录)


也就是发布到独立的tomcat与独立运行war包的区别就是是否将JSP以及tomcat依赖的jar包打包出来,如果打的包里面有tomcat以及jsp相关包就可以独立运行war包,否则依赖tomcat容器。
springboot整合JSP以及发布项目到独立的tomcat中与打成jar包使用的更多相关文章
- springboot项目发布到独立的tomcat中运行&打成jar包运行
springboot的打包方式依赖于插件:(下面插件打出的包与普通的包目录结构有区别) <plugin> <groupId>org.springframework.boot&l ...
- 将springboot项目发布到独立的tomcat中运行
在开发阶段我们推荐使用内嵌的tomcat进行开发,因为这样会方便很多,但是到生成环境,我希望在独立的tomcat容器中运行,因为我们需要对tomcat做额外的优化,这时我们需要将工程打包成war包发进 ...
- SpringBoot整合Jsp和Thymeleaf (附工程)
前言 本篇文章主要讲述SpringBoot整合Jsp以及SpringBoot整合Thymeleaf,实现一个简单的用户增删改查示例工程.事先说明,有三个项目,两个是单独整合的,一个是将它们整合在一起的 ...
- Idea中SpringBoot整合JSP
最近在学习SpringBoot,看到SpringBoot整合jsp,顺带记录一下. 1.创建一个SpringBoot项目 点击Next 注意:packaging选中War,点击Next Webà选中W ...
- springboot整合jsp,完成公交车站路线图
转: springboot整合jsp,完成公交车站路线图 点赞再看,养成习惯 开发环境: jdk 8 intellij idea tomcat 8 mysql 5.7 maven 3.6 所用技术: ...
- 1、SpringBoot整合之SpringBoot整合JSP
SpringBoot整合JSP 一.创建SpringBoot项目,仅选择Web模块即可 二.在POM文件中添加依赖 <!-- 添加servlet依赖模块 --> <dependenc ...
- 03-01:springboot 整合jsp
1.修改pom文件,添加坐标 <!-- jstl --> <dependency> <groupId>javax.servlet ...
- springboot整合jsp模板
springboot整合jsp模板 在使用springboot框架里使用jsp的时候,页面模板使用jsp在pom.xnl中需要引入相关的依赖,否则在controller中无法返回到指定页面 〇.搭建s ...
- SpringBoot整合jsp技术
1.修改pom.xml文件 <?xml version="1.0" encoding="UTF-8"?> <project xmlns=&qu ...
随机推荐
- 原生JS实现全选和不全选
案例演示 源代码 <!DOCTYPE html> <html> <head lang="en"> <meta charset=" ...
- java十进制转三十六进制
import java.util.HashMap; public class Ten2Thirty { private static final String X36 = "01234567 ...
- mysql执行update报错 Err] 1055 - 'information_schema.PROFILING.SEQ' isn't in GROUP BY
mysql执行update报错 Err] 1055 - 'information_schema.PROFILING.SEQ' isn't in GROUP BY 今天开发的同事发来如下错误信息,最最简 ...
- go 实现用户特权判断的例子
需求:实现用户特权,可以满足下面1个或多个条件 红名 达人 vip会员 vip超级会员 蓝钻用户 红钻用户 1.实现方法一:可以根据数据库字段,每个特权用一个字段,进行判断缺点:每增加一个特权,要进行 ...
- Hbase记录-shell脚本嵌入hbase shell命令
第一种方式:hbase shell test.txt test.txt:list 第二种方式:<<EOF重定向输入 我们经常在shell脚本程序中用<<EOF重定向输入,将我们 ...
- HTML第五耍 表格标签
HTML标记语言中可以使用table标签创建表格. 表格由 <table> 标签来定义.每个表格均有若干行(由 <tr> 标签定义),字母 tr 指表格数据(table row ...
- Windows下安装Mysql5.7
版本如下: Windows10 Mysql5.7.18 下载地址:https://dev.mysql.com/downloads/mysql/ 本人解压到了:D:\Program Files (x86 ...
- Lua Doc生成工具
Luadoc http://keplerproject.github.io/luadoc/ Overview LuaDoc is a documentation generator tool for ...
- crosstool-ng编译交叉工具链
一.准备工作 1. 建立工作文件夹 2.下载crosstool-ng git clone https://github.com/crosstool-ng/crosstool-ng crosstool- ...
- ModSecurity SQL注入攻击 – 深度绕过技术挑战
ModSecurity是一个入侵探测与阻止的引擎,它主要是用于Web应用程序所以也可以叫做Web应用程序防火墙.它可以作为Apache Web服务器的一个模块或单独的应用程序来运行.ModSecuri ...