Scrapy框架基本使用
pycharm+Scrapy
距离上次使用Scrapy已经是大半年前的事情了,赶紧把西瓜皮捡回来。。
简单粗暴上爬取目标:
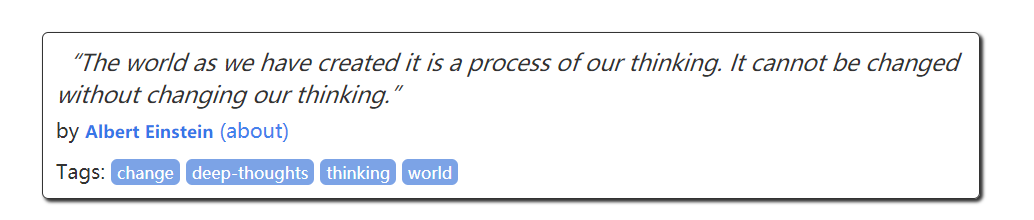
初始URL:http://quotes.toscrape.com/
目标:将每一页中每一栏的语录、作者、标签解析出来,保存到json文件或者MongoDB数据库中
打开命令行,敲
scrapy startproject quotetutorial #在当前目录下生成了一个叫quotetutorial的项目
然后敲cd quotetutorail,然后敲
scrapy genspider quotes quotes.toscrape.com #创建一个目标站点的爬虫
此时项目结构如下:

做一下解释:
iems:定义存储数据的Item类
settings:变量的配置信息
pipeline:负责处理被Spider提取出来的Item,典型应用有:清理HTML数据;验证爬取数据的合法性,检查Item是否包含某些字段;查重并丢弃;将爬取结果保存到文件或者数据库中
middlewares:中间件
spiders > quotes:爬虫模块
接着我们修改quotes.py代码:
# -*- coding: utf-8 -*-

import scrapy

from quotetutorial.items import QuotetutorialItem

from urllib.parse import urljoin

class QuotesSpider(scrapy.Spider):

    name = 'quotes'

    allowed_domains = ['quotes.toscrape.com']

    start_urls = ['http://quotes.toscrape.com/']

    def parse(self, response):

        quotes = response.css('.quote')

        for quote in quotes:

            item = QuotetutorialItem()

            text = quote.css('.text::text').extract_first()

            author = quote.css('.author::text').extract_first()

            tags = quote.css('.tags .tag::text').extract()

            item['text'] = text

            item['author'] = author

            item['tags'] = tags

            yield item

        next = response.css('.pager .next a::attr(href)').extract_first()#提取翻页的url

        url = response.urljoin(next) #作url拼接

        if url:

            yield scrapy.Request(url=url,callback=self.parse)#回调parse函数
然后是pipelines.py文件
# -*- coding: utf-8 -*-

# Define your item pipelines here

#

# Don't forget to add your pipeline to the ITEM_PIPELINES setting

# See: http://doc.scrapy.org/en/latest/topics/item-pipeline.html

from scrapy.exceptions import DropItem

from pymongo import MongoClient

class TextPipeline(object):#对item数据处理,限制字段大小

    def __init__(self):

        self.limit = 50

    def process_item(self, item, spider):

        if item['text']:

            if len(item['text']) > self.limit:

                item['text'] = item['text'][0:self.limit].rstrip() + '...'

            return item

        else:

            return DropItem('Missing Text')

class MongoPipeline(object):#保存到MongoDB数据库

    def __init__(self,mongo_uri,mongo_db):

        self.mongo_uri = mongo_uri

        self.mongo_db = mongo_db

    @classmethod

    def from_crawler(cls,crawler):

        return cls(

            mongo_uri = crawler.settings.get('MONGO_URI'),

            mongo_db = crawler.settings.get('MONGO_DB')

        )

    def open_spider(self,spider):

        self.client = MongoClient(self.mongo_uri)

        self.db = self.client[self.mongo_db]

    def process_item(self,item,spider):

        name = item.__class__.__name__

        self.db[name].insert(dict(item))

        return item

    def close_spider(self,spider):

        self.client.close()
然后是items.py
# -*- coding: utf-8 -*-

# Define here the models for your scraped items

#

# See documentation in:

# http://doc.scrapy.org/en/latest/topics/items.html

import scrapy

class QuotetutorialItem(scrapy.Item):

    # define the fields for your item here like:

    # name = scrapy.Field()

    text = scrapy.Field()

    author = scrapy.Field()

    tags = scrapy.Field()
然后修改settings.py
SPIDER_MODULES = ['quotetutorial.spiders']

NEWSPIDER_MODULE = 'quotetutorial.spiders'

MONGO_URI = 'localhost'

MONGO_DB = 'quotestutorial'

# Configure item pipelines

# See http://scrapy.readthedocs.org/en/latest/topics/item-pipeline.html

ITEM_PIPELINES = {

   'quotetutorial.pipelines.TextPipeline': 300,      #数字越小表示优先级越高,先处理

    'quotetutorial.pipelines.MongoPipeline': 400,

}
这里需要注意的地方是:
Scrapy有自己的一套数据提取机制,成为Selector,通过Xpath或者CSS来解析HTML,用法和普通的选择器一样
把CSS换成XPATH如下:
    def parse(self, response):

        quotes = response.xpath(".//*[@class='quote']")

        for quote in quotes:

            item = QuotetutorialItem()

            # text = quote.css('.text::text').extract_first()

            # author = quote.css('.author::text').extract_first()

            # tags = quote.css('.tags .tag::text').extract()

            text = quote.xpath(".//span[@class='text']/text()").extract()[0]

            author = quote.xpath(".//span/small[@class='author']/text()").extract()[0]

            tags = quote.xpath(".//div[@class='tags']/a/text()").extract()

            item['text'] = text

            item['author'] = author

            item['tags'] = tags

            # item['tags'] = tags

            yield item
Scrapy框架基本使用的更多相关文章
- Python爬虫Scrapy框架入门(2)
本文是跟着大神博客,尝试从网站上爬一堆东西,一堆你懂得的东西 附上原创链接: http://www.cnblogs.com/qiyeboy/p/5428240.html 基本思路是,查看网页元素,填写 ...
- Python爬虫Scrapy框架入门(1)
也许是很少接触python的原因,我觉得是Scrapy框架和以往Java框架很不一样:它真的是个框架. 从表层来看,与Java框架引入jar包.配置xml或.property文件不同,Scrapy的模 ...
- Scrapy框架使用—quotesbot 项目(学习记录一)
一.Scrapy框架的安装及相关理论知识的学习可以参考:http://www.yiibai.com/scrapy/scrapy_environment.html 二.重点记录我学习使用scrapy框架 ...
- Python爬虫从入门到放弃(十一)之 Scrapy框架整体的一个了解
这里是通过爬取伯乐在线的全部文章为例子,让自己先对scrapy进行一个整理的理解 该例子中的详细代码会放到我的github地址:https://github.com/pythonsite/spider ...
- Python爬虫从入门到放弃(十二)之 Scrapy框架的架构和原理
这一篇文章主要是为了对scrapy框架的工作流程以及各个组件功能的介绍 Scrapy目前已经可以很好的在python3上运行Scrapy使用了Twisted作为框架,Twisted有些特殊的地方是它是 ...
- python爬虫scrapy框架——人工识别登录知乎倒立文字验证码和数字英文验证码(2)
操作环境:python3 在上一文中python爬虫scrapy框架--人工识别知乎登录知乎倒立文字验证码和数字英文验证码(1)我们已经介绍了用Requests库来登录知乎,本文如果看不懂可以先看之前 ...
- 一个scrapy框架的爬虫(爬取京东图书)
我们的这个爬虫设计来爬取京东图书(jd.com). scrapy框架相信大家比较了解了.里面有很多复杂的机制,超出本文的范围. 1.爬虫spider tips: 1.xpath的语法比较坑,但是你可以 ...
- 安装scrapy框架的常见问题及其解决方法
下面小编讲一下自己在windows10安装及配置Scrapy中遇到的一些坑及其解决的方法,现在总结如下,希望对大家有所帮助. 常见问题一:pip版本需要升级 如果你的pip版本比较老,可能在安装的过程 ...
- 关于使用scrapy框架编写爬虫以及Ajax动态加载问题、反爬问题解决方案
Python爬虫总结 总的来说,Python爬虫所做的事情分为两个部分,1:将网页的内容全部抓取下来,2:对抓取到的内容和进行解析,得到我们需要的信息. 目前公认比较好用的爬虫框架为Scrapy,而且 ...
- 利用scrapy框架进行爬虫
今天一个网友问爬虫知识,自己把许多小细节都忘了,很惭愧,所以这里写一下大概的步骤,主要是自己巩固一下知识,顺便复习一下.(scrapy框架有一个好处,就是可以爬取https的内容) [爬取的是杨子晚报 ...
随机推荐
- C# ReaderWriterLockSlim 实现
其实ReaderWriterLockSlim的实现前段时间看了,当时不打算记录下来的,因为它的实现实在System.Core项目里面,而不是mscorlib项目.按照惯例我们还是先看看网上的一些说法吧 ...
- OpenCV3 for python3 学习笔记1
1.读/写图像文件 OpenCV的imread()函数和imwrite()函数能支持各种静态图像文件格式.不同系统支持的文件格式不一样,但都支持BMP格式,通常还应该支持PNG.JPEG和TIFF格式 ...
- hadoop ha 读取 activce状态的活动节点
方式一 package com.xxx.hadoop; import com.sun.demo.jvmti.hprof.Tracker; import com.sun.xml.bind.util.Wh ...
- bootstrap-3-fileinput上传案例
效果 导入的js和css <link rel="stylesheet" href="https://cdn.bootcss.com/bootstrap/3.3.7/ ...
- python读取excel(xlrd)
一.安装xlrd模块: 1.mac下打开终端输入命令: pip install xlrd 2.验证安装是否成功: 在mac终端输入 python 进入python环境 然后输入 import xl ...
- grid - 隐式地命名网格区域名称
通常可以将网格线命名成任何你想命名的名称,如果网格线名称添加-start和-end的后缀,其实也隐式的创建一个网格区域,可以用来设置网格项目的位置. 在这个示例中,行和列都具有inner-start和 ...
- Python import其他文件夹的文件
一般情况下,import的文件和被import的文件在同一个路径下面,import也比较方便.如果这两个文件不在一个路径下面,import就比较麻烦了,需要在被import的文件路径下面新建一个__i ...
- android Glide简单使用
版权声明:大家可以转载,请写明转载申明 https://blog.csdn.net/bzlj2912009596/article/details/81702367 今天,简单讲讲Android里Gli ...
- iptables转发技术
NAT 一. 什么是 NAT NAT(Network Address Translation)译为网络地址转换.通常路由器在转发我们的数据包时,仅仅会将源MAC地址换成自己的MAC地址,但是NAT技术 ...
- C++ 函数模板默认的模板参数
函数的默认模板参数 你可以为模板参数定义默认值,它们被称作 default template arguments(默认模板参数). 它们甚至可以指向前一个模板参数. 1. 可以直接使用 operato ...