centos7安装keepalived问题
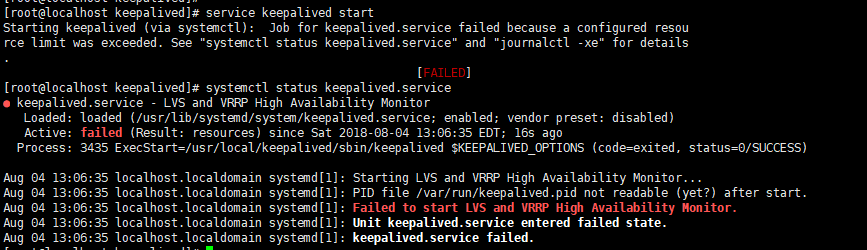
● keepalived.service - LVS and VRRP High Availability Monitor
Loaded: loaded (/usr/lib/systemd/system/keepalived.service; enabled; vendor preset: disabled)
Active: failed (Result: resources) since Sat 2018-08-04 13:06:35 EDT; 16s ago
Process: 3435 ExecStart=/usr/local/keepalived/sbin/keepalived $KEEPALIVED_OPTIONS (code=exited, status=0/SUCCESS)
Aug 04 13:06:35 localhost.localdomain systemd[1]: Starting LVS and VRRP High Availability Monitor...
Aug 04 13:06:35 localhost.localdomain systemd[1]: PID file /var/run/keepalived.pid not readable (yet?) after start.
Aug 04 13:06:35 localhost.localdomain systemd[1]: Failed to start LVS and VRRP High Availability Monitor.
Aug 04 13:06:35 localhost.localdomain systemd[1]: Unit keepalived.service entered failed state.
Aug 04 13:06:35 localhost.localdomain systemd[1]: keepalived.service failed.
搭建keepalived注意事项:
环境
主nginx负载均衡器:192.168.5.129 (通过keepalived配置了VIP:192.168.5.101/0供外使用)
副nginx负载均衡器:192.168.5.130(通过keepalived配置了VIP:192.168.5.101/0供外使用)
1.安装 keepalived-1.4.1
 tar xf keepalived-1.3.4.tar.gz

 cd keepalived-1.3.4

 ./configure --prefix=/usr/local/keepalived

 make && make install
2.配置keepalived文件
复制/sbin/keepalived到/usr/sbin下

> cp /keepalived/sbin/keepalived /usr/sbin/

keepalived默认会读取/etc/keepalived/keepalived.conf配置文件

> mkdir /etc/keepalived

> cp /keepalived/etc/keepalived/keepalived.conf /etc/keepalived/

复制sysconfig文件到/etc/sysconfig下

> cp /keepalived/etc/sysconfig/keepalived /etc/sysconfig/

复制启动脚本到/etc/init.d下

> cd /keepalived-1.3.4

> cp ./keepalived/etc/init.d/keepalived /etc/init.d/

> chmod 755 /etc/init.d/keepalived
3.配置keepalived.conf启动文件
! Configuration File for keepalived

global_defs {

   notification_email {

     acassen@firewall.loc

     failover@firewall.loc

     sysadmin@firewall.loc

   }

   notification_email_from Alexandre.Cassen@firewall.loc

   smtp_server 192.168.200.1

   smtp_connect_timeout 30

   router_id LVS_DEVEL

   vrrp_skip_check_adv_addr

   vrrp_strict

   vrrp_garp_interval 0

   vrrp_gna_interval 0

}

vrrp_instance VI_1 {

    state MASTER(BACKUP)

    interface ens33    -- 注意网卡名字

    virtual_router_id 51

    priority 50

    advert_int 1

    authentication {

        auth_type PASS

        auth_pass 1111

    }

    virtual_ipaddress {

        192.168.5.100

        192.168.5.101

    }

}

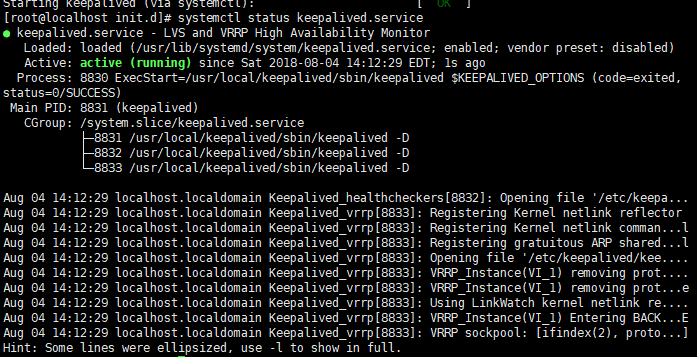
4.启动与验证keepalievd <ip addr list>
service keepalived start
systemctl status keepalived.service
ps -aux|grep keepalived

5. 遗留问题:
当服务启动后一段时间就自动关闭了服务;(大约几分钟后)
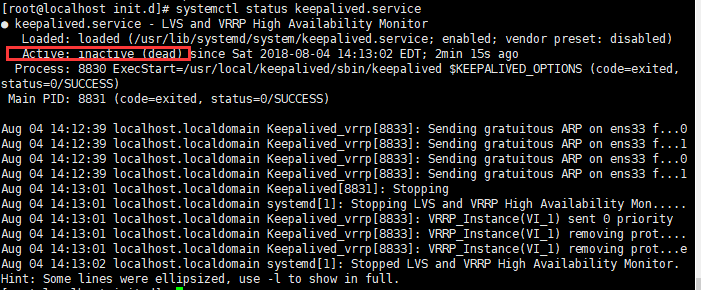
原因:并未设置监听服务,导致自动关闭服务
6. 设置centos7开机自动启动服务
vim /lib/systemd/system/keepalived.service
[Unit]

Description=Keepalived

After=syslog.target network.target remote-fs.target nss-lookup.target

[Service]

Type=forking

PIDFile=/var/run/keepalived.pid

ExecStart=/usr/local/keepalived/sbin/keepalived -D

ExecReload=/bin/kill -s HUP $MAINPID

ExecStop=/bin/kill -s QUIT $MAINPID

PrivateTmp=true

[Install]

WantedBy=multi-user.target
1;systemctl daemon-reload  重新加载

2:systemctl enable keepalived.service  设置开机自动启动

3:systemctl disable keepalived.service 取消开机自动启动

4:systemctl start keepalived.service 启动

5:systemctl stop keepalived.service停止
设置nginx开机自启动
vim /lib/systemd/system/nginx.service

[Unit]

Description=nginx

After=network.target

[Service]

Type=forking

ExecStart=/usr/local/nginx/sbin/nginx

ExecReload=/usr/local/nginx/sbin/nginx reload

ExecStop=/usr/local/nginx/sbin/nginx quit

PrivateTmp=true

[Install]

WantedBy=multi-user.target
systemctl enable nginx.service

systemctl start nginx.service    启动nginx

systemctl stop nginx.service    结束nginx

systemctl restart nginx.service    重启nginx
7.配置监听文件
vi /root/check_nginx.sh
#!/bin/sh
count=`ps aux | grep nginx | grep -v grep | wc -l`
if [ $count -eq 0 ]
then
echo "running....., please starting...."
systemctl start nginx.service
sleep 2
else
echo "running...."
fi
chmod +x /root/check_nginx.sh
加入到作业计划

crontab -e

*/1 * * * * /root/check_nginx.sh >>/root/check_nginx.log
追加keepalived.conf文件
! Configuration File for keepalived
global_defs {
notification_email {
acassen@firewall.loc
failover@firewall.loc
sysadmin@firewall.loc
}
notification_email_from Alexandre.Cassen@firewall.loc
smtp_server 192.168.200.1
smtp_connect_timeout 30
router_id LVS_DEVEL
vrrp_skip_check_adv_addr
vrrp_strict
vrrp_garp_interval 0
vrrp_gna_interval 0
}
vrrp_script check_nginx {
script "/root/check_nginx.sh"
interval 2
weight 2
}
vrrp_instance VI_1 {
state MASTER
interface ens33
virtual_router_id 51
mcast_src_ip 192.168.5.129
priority 100
advert_int 1
authentication {
auth_type PASS
auth_pass 111111
}
track_script { ######执行监控nginx进程的脚本
check_nginx
}
virtual_ipaddress {
192.168.5.100
}
}
8.知识补充:学习shell编程
9. usr/bin 与 usr/local/bin 的区别
usr/bin 是系统自带的应用

usr/local/bin 是自己安装的应用和自己写的全局脚本
centos7安装keepalived问题的更多相关文章
- Centos7 安装keepalived实现高可用
场景:尝试安装keepalived实现高可用,进而在suse环境中部署. 测试过程需要配合Nginx的相关知识:Centos7 Nginx安装 1 安装过程 问题 !!! OpenSSL is not ...
- centos7 安装keepalived
node1 192.168.5.101 node2 192.168.5.102 1.安装 openssl openssl-devel yum install openssl openssl-devel ...
- Centos7安装keepalived(自定义路径安装)-高级篇
0.Keepalived介绍 Keepalived是一个基于VRRP协议来实现的服务高可用方案,可以利用其来避免IP单点故障,类似的工具还有heartbeat.corosync.pacemaker.但 ...
- Centos7 安装 Keepalived
目标: Keeplaived 简单模拟测试一下Nginx 故障切换前言:C7 默认的 1.3.5 似乎有点问题,改装 keepalived-2.0.7 1:安装 Nginx 和确认 (略)2:安装配置 ...
- Centos7+LVS-DR+keepalived实验(包含sorry-server、日志、及HTTP-GET的健康检测)
目录检索 一.简介 1.lvs-dr原理请参考原理篇 2.keepalived原理请参考原理篇 3.基于lvs-dr+keepalived故障切换架构图如下: 二.部署 1.环境 2.准备RS的web ...
- CentOS7.4 Keepalived+LVS 负载均衡 后台节点健康检查
主机信息 VIP 10.10.10.55 LVS01 10.10.10.59 Web01 10.10.10.60 Web02 10.10.10.61 一.apache简单配置 1.(10.10.10. ...
- linux下安装keepalived
keepalived安装文档 1. 安装环境 su - root yum -y install kernel-devel* yum -y install openssl-* yum -y instal ...
- HP服务器 hp 360g5 centos7安装问题
HP服务器 hp 360g5 centos7安装问题 一 :启动盘无法识别硬盘 1.进入安装光盘,用上下键选择安装centos--Install Centos7(注意不可按Enter键),如图: 2 ...
- CentOS7 安装Mono及Jexus
CentOS7安装Mono及Juxes 1 安装Mono 1.1 安装yum-utils 因为安装要用到yum-config-manager,默认是没有安装的,所以要先安装yum-utils包.命令如 ...
随机推荐
- JavaWeb——java.lang.UnsatisfiedLinkError
java.lang.UnsatisfiedLinkError: Native Library sqlite-3.8.6-amd64-sqlitejdbc.dll already loaded in a ...
- Java --Servlet 32个经典问题
Servlet方面 1.说一说Servlet的生命周期? Servlet有良好的生存期的定义,包括加载和实例化.初始化.处理请求以及服务结束.这个生存期由javax.servlet.Servlet接口 ...
- 图灵一代接入V1
现在官方没有一代接入了,但是还是可用,留个方法 $.ajax({ type:"post", url:"http://www.tuling123.com/openapi/a ...
- mezzanine的page_menu tag(二)
dict的特性,key可以是None >>> def f(): a=[2,3] return a #函数返回local变量 >>> a=f() >>&g ...
- Python 多线程、进程
本节内容 操作系统发展史介绍 进程.与线程区别 python GIL全局解释器锁 线程 语法 join 线程锁之Lock\Rlock\信号量 将线程变为守护进程 Event事件 queue队列 生产者 ...
- 前端-toggleClass(效果切换,如果存在移除,如果不存在展示)
<!DOCTYPE html> <html> <head> <meta charset="utf-8" /> <title&g ...
- HashMap理解
HashMap中Capacity为数组长度,默认大小为16,size为元素个数,loadFactor为size/capacity,默认为0.75,当存储的元素个数size大于等于capacity乘以0 ...
- php 处理上百万条的数据库如何提高处理查询速度
1.对查询进行优化,应尽量避免全表扫描,首先应考虑在 where 及 order by 涉及的列上建立索引. 2.应尽量避免在 where 子句中对字段进行 null 值判断,否则将导致引擎放弃使用索 ...
- React.js 学习笔记
React.js React.js 是时下最流行的前端 JavaScript 框架之一. 创建工程 # 安装 CLI $ npm install -g create-react-app # 创建新的应 ...
- 最适合入门的Laravel中级教程(一)
Laravel 是一个全栈框架: 我们使用 Laravel 开发业务常见有 3 个方向: 前端页面和后端逻辑混合的应用 主要是面向对 SEO 有需求的项目: 比如说新闻资讯博客文章等: 一般在控制器中 ...