spring-boot关于spring全注解IOC
什么是IOC容器:
Spring IoC 容器是一个管理Bean 的容器,在S pring 的定义中,它要求所有的IoC 容器都需要实
现接口BeanFactory ,它是一个顶级容器接口
IoC 是一种通过描述来生成或者获取对象的技术,而这个技术不是Spring 甚至不是Java 独有的。

对于Java 初学者更多的时候所熟悉的是使用new 关键字来创建对象,
spring-boot和spring中IOC容器的区别
Spring 中,它是通过描述来创建对象。只是S pring Boot 并不建议使用XML ,而是通过注解的描述生成对象,
所以他的原理还是一样的。
IOC容器的作用:
的班级、同学和老师这3 个对象关系,我们需要一个容器。在S pring 中把每一个
需要管理的对象称为Spring Bean (简称Bean ),而Spring 管理这些Bean 的容器,被我们称为S pring
IoC 容器(或者简称IoC 容器) 。IoC 容器需要具备两个基本的功能:
•@通过描述管理Bean , 包括发布和获取Bean; .
@通过描述完成Bean 之间的依赖关系。
简单的注入Bean
在Spring 中允许我们通过XML 或者Java 配置文件装配Bean , 但是由于Spring Boot 是基于注
解的方式,所以通过注解方式实现
需要加载近IOC容器的累pojo
public class User {

    private String name;

    private int id;

    public User(String name, int id) {

        this.name = name;

        this.id = id;

    }

    public String getName() {

        return name;

    }

    public void setName(String name) {

        this.name = name;

    }

    public int getId() {

        return id;

    }

    public void setId(int id) {

        this.id = id;

    }

}
添加bean配置累:
@ Configuration 代表这是一个Java 配置文件, Sprin g 的容器会根据
它来生成IoC 容器去装配Bean;
@Configuration

public class TestConfig {

    @Bean("user")

    public User userTest(){

        return new User("quan",23);

    }

}
这里@bean注解的类方法,将类方法的返回值加载到ioc容器当中,其中里面的字符串代表注入容器Bean的名字。不写默认是方法名称
可以通过下面的测试方法进行测试:
public class userTest {

//    private Logger logger = LoggerFactory.getLogger(getClass());

    private static Logger logger = LoggerFactory.getLogger(userTest.class);

    public static void main(String[] args) {

        ApplicationContext context = new AnnotationConfigApplicationContext(TestConfig.class);

        User user = (User) context.getBean("user");

        logger.info(user.getName());

    }

}
springboot中更方便的装配Bean:
11通过扫描装配的Bean
如果一个个的Bean 使用注解@Bean 注入Spring loC 容器中,那将是一件很麻烦的事情。
#####################################################################
Spring 还允许我们进行扫描装配Bean 到loC 容器中,对于扫描装配而言使用的注解是
@Component
@ComponentScan 。
@Component 是标明l哪个类被扫描进入Spring IoC 容器,
@ComponentScan则是标明采用何种策略去扫描装配Bean
#########################################################################
User:
/*

这个注解表面这个类被springIOC容器扫描装配

user是作为Bean的名称,如果不配置就按照你的类名第一个小写,其他不变

 */

@Component("user")

public class User {

//    指定具体的值,

    @Value("quan")

    private String name;

    @Value("12")

    private int id;

    public User() {

    }

    public User(String name, int id) {

        this.name = name;

        this.id = id;

    }

    public String getName() {

        return name;

    }

    public void setName(String name) {

        this.name = name;

    }

    public int getId() {

        return id;

    }

    public void setId(int id) {

        this.id = id;

    }

}
注意:这里需要加入无参构造函数!!!!!!!!!!!!注入bean需要一个无参构造函数
配置累:,后面可以不用了。
@Configuration

//默认只会扫描这个类所在的包或子包

@ComponentScan

public class TestConfig {

}
测试结果也是一样的
@ComponentScan允许自定义扫描包的:
将User放到com.quan.learning.DAO下之后:
@Configuration

//默认只会扫描这个类所在的包或子包

@ComponentScan("com.quan.learning.DAO")

public class TestConfig {

}
也是可以扫秒到的
可以使用正则表达式匹配;
@Configuration

//默认只会扫描这个类所在的包或子包

@ComponentScan("com.quan.learning.*")

public class TestConfig {

}
不想加载服务类的bean
@Configuration

//默认只会扫描这个类所在的包或子包

@ComponentScan(value = "com.quan.learning.*",excludeFilters = {@Filter(classes = {Service.class})})

public class TestConfig {

}
@Filter的源码;
 @Retention(RetentionPolicy.RUNTIME)

    @Target({})

    public @interface Filter {

        FilterType type() default FilterType.ANNOTATION;

        @AliasFor("classes")

        Class<?>[] value() default {};

        @AliasFor("value")

        Class<?>[] classes() default {};

        String[] pattern() default {};

    }
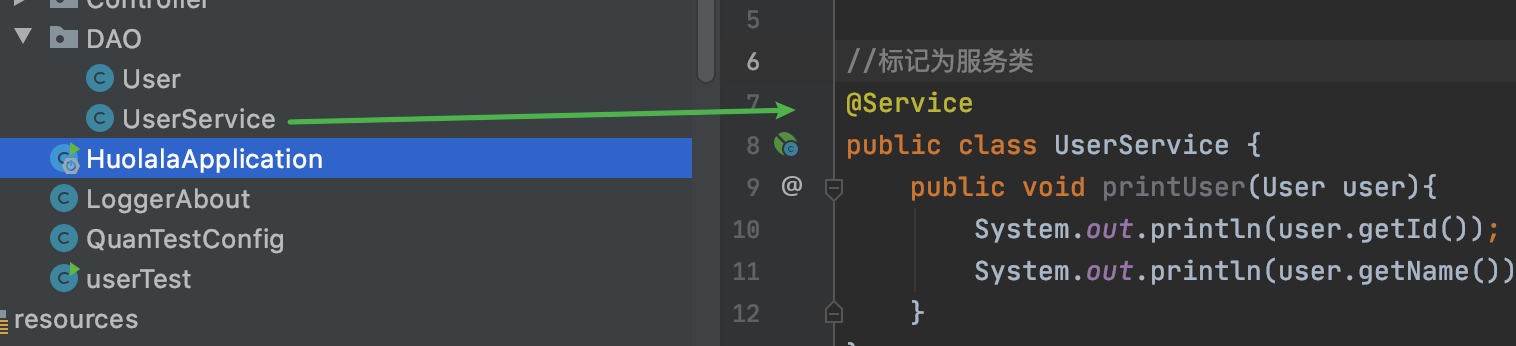
测试累加上:
UserService service = (UserService) context.getBean("userService");

自定义第三方bean“
加入第三方依赖:
<!--        自定义第三方bean-->

        <!-- https://mvnrepository.com/artifact/org.apache.commons/commons-dbcp2 -->

        <dependency>

            <groupId>org.apache.commons</groupId>

            <artifactId>commons-dbcp2</artifactId>

            <version>2.7.0</version>

        </dependency>

        <!-- https://mvnrepository.com/artifact/mysql/mysql-connector-java -->

        <dependency>

            <groupId>mysql</groupId>

            <artifactId>mysql-connector-java</artifactId>

            <version>8.0.21</version>

        </dependency>
自定义BEan
@Configuration

//默认只会扫描这个类所在的包或子包

@ComponentScan(value = "com.quan.learning.*",excludeFilters = {@Filter(classes = {Service.class})})

public class TestConfig {

    @Bean("datasource")

    public DataSource getDataSource(){

        Properties  properties = new Properties();

        properties.setProperty("driver","com.mysql.jdbc.Driver");

        properties.setProperty("url","jdbc:mysql://localhost:3306/ApolloConfigDB");

        properties.setProperty("username","root");

        properties.setProperty("password","1997");

        DataSource dataSource = null;

        try {

            dataSource = BasicDataSourceFactory.createDataSource(properties);

        } catch (Exception e) {

            e.printStackTrace();

        }

        return dataSource;

    }

}
依赖的注入:
装配bean之后就是要获取bean,那么获取bean的过程就是依赖的注入Dependence injection DI

/*
编程思路:定义动物和人的接口层,分别去实现这两个接口
在实现人的接口的时候,需要加入animal的属性,所以需要引入依赖
*/
//动物接口
public interface Animal {
public void use();
} ################
//人的接口
public interface Person {
public void service(); } ###############
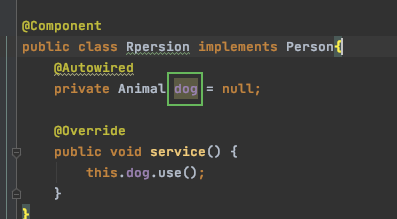
@Component
public class Dog implements Animal{
@Override
public void use() {
System.out.println(Dog.class.getSimpleName()+"kanmen");
}
} ##############
@Component
public class Rpersion implements Person{
@Autowired
private Animal animal = null; @Override
public void service() {
this.animal.use();
}
}
test一下:
    public static void main(String[] args) {

        ApplicationContext context = new AnnotationConfigApplicationContext(TestConfig.class);

        Person person = context.getBean(Rpersion.class);

        person.service();

    }

//根据属性的类型找到对应的Bean进行注入,Dog是动物的一个实现类,
//所以将Dog的实例注入到Rpersion中,这样使用Rpersion的时候就能够使用Dog实例来服务
@Autowired 注解
如果我们加入多一个animal的实现类,继续单单使用@Autowired的话,
@Component

public class Cat implements Animal{

    @Override

    public void use() {

        System.out.println("catcat");

    }

}

找到两个实例,springboot并不能判断我们要注入的是cat还是dog
通过修改属性的名字即可,类型不变:
这鸭子就可以注入成功了,因为如果有两个同样类型的实例,@Autowired会根据属性名称去匹配
如果允许所加载的bean可以为null,一是使用上面的直接等于的方法,
另一种推荐用法为
   @Autowired(required = false)

    private Animal dog ;
不修改属性名消除歧义的方法:
@Primary:一般在装配的bean上,解决如果有多个同一个类型的实例,优先注入给这个标注的bean
@Component

@Primary

public class Cat implements Animal{

    @Override

    public void use() {

        System.out.println("catcat");

    }

}
这样子不会产生奇异,想使用那个就往那个类加上@Primary
如果cat已经使用了@Primary,那我们需要用dog,这时候就要使用
@Qualify
和@Autowired一起实现 IOC容器里面bean名字的查询,不再需要修改属性名字

带有参数的构造方法的装配
他的构造方法带有参数,需要注入其他bean依赖
因为默认
@Component

public class Rpersion implements Person{

    private Animal animal ;

    public Rpersion(@Autowired @Qualifier("dog") Animal animal) {

        this.animal = animal;

    }

    @Override

    public void service() {

        this.animal.use();

    }

}
Bean的生命周期:
@Component

public class Rpersion implements Person , BeanNameAware, BeanFactoryAware,

        ApplicationContextAware, InitializingBean, DisposableBean {

    private Animal animal = null;

    @Override

    public void service() {

        this.animal.use();

    }

    @Autowired(required = false)

    @Qualifier("dog")

    public void setAnimal(Animal animal) {

        System.out.println("依赖注入!!!!");

        this.animal = animal;

    }

    //接口;BeanNameAware

    @Override

    public void setBeanName(String s) {

        System.out.println(this.getClass().getSimpleName()+"  接口;BeanNameAware=setBeanName");

    }

    //接口:BeanFactoryAware

    @Override

    public void setBeanFactory(BeanFactory beanFactory) throws BeansException {

        System.out.println(this.getClass().getSimpleName()+"  接口;BeanFactoryAware=setBeanFactory");

    }

    //接口:ApplicationContextAware

     @Override

        public void setApplicationContext(ApplicationContext applicationContext) throws BeansException {

         System.out.println(this.getClass().getSimpleName()+"  接口;ApplicationContextAware=setApplicationContext");

        }

    //接口:InitializingBean

    @Override

    public void afterPropertiesSet() throws Exception {

        System.out.println(this.getClass().getSimpleName()+"  接口;InitializingBean=afterPropertiesSet");

    }

    //接口:DisposableBean

    @Override

    public void destroy() throws Exception {

        System.out.println(this.getClass().getSimpleName()+"  接口;DisposableBean=destroy");

    }

    //定义初始化方法

    @PostConstruct

    public void init(){

        System.out.println(this.getClass().getSimpleName()+"  注解;@PostConstruct=init");

    }

    //定义销毁方法

    @PreDestroy

    public void predestory(){

        System.out.println(this.getClass().getSimpleName()+"  注解; @PreDestroy=predestory");

    }

}
测试结果:
Rpersion  接口;BeanNameAware=setBeanName

Rpersion  接口;BeanFactoryAware=setBeanFactory

Rpersion  接口;ApplicationContextAware=setApplicationContext

Rpersion  注解;@PostConstruct=init

Rpersion  接口;InitializingBean=afterPropertiesSet

Dogkanmen

16:42:20.949 [main] DEBUG org.springframework.context.annotation.AnnotationConfigApplicationContext - Closing org.springframework.context.annotation.AnnotationConfigApplicationContext@6073f712, started on Fri Aug 07 16:42:20 CST 2020

Rpersion  注解; @PreDestroy=predestory

Rpersion  接口;DisposableBean=destroy
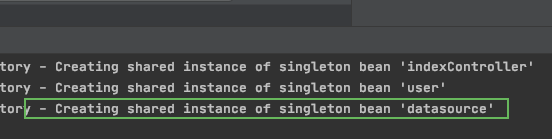
当我们使用第三方bean的时候,可能会使用到@bean注解,可以通过注解去自定义初始化或销毁的方法:
@Bean(value = "datasource",initMethod = "init",destroyMethod = "destory")
条件装载bean:
场景:当用户没有配置数据库的四个变量,或者不完整的时候,不对bean进行装配,因为装配之后用的时候回有错误
这时候可以使用@Conditional注解完成
先编写装配条件类:
public class DatabaseConditional implements Condition {

    /**

     *

     * @param conditionContext   条件上下文

     * @param annotatedTypeMetadata 注释的类型的元数据

     * @return ture装配,false不装配

     */

    @Override

    public boolean matches(ConditionContext conditionContext, AnnotatedTypeMetadata annotatedTypeMetadata) {

        Environment environment = conditionContext.getEnvironment();//获取环境配置

        return environment.containsProperty("driver")

                &&environment.containsProperty("url")

                &&environment.containsProperty("username")

                &&environment.containsProperty("password");

    }

}
注意:条件类必须实现接口Condition
在需要加入条件注解的类上加入,并且需要设置条件类属性@Conditional(DatabaseConditional.class)
@Configuration

@PropertySource(value = {"classpath:jdbc.properties"},ignoreResourceNotFound = true)

@ComponentScan(value = "com.quan.learning.*",excludeFilters = {@Filter(classes = {Service.class})} )

public class TestConfig {

    @Bean(value = "datasource")

    @Conditional(DatabaseConditional.class)

    public DataSource getDataSource(

            @Value("${driver}") String driver,

            @Value("${url}") String url,

            @Value("${username}") String username,

            @Value("${password}") String password

    ){

        Properties  properties = new Properties();

        properties.setProperty("driver",driver);

        properties.setProperty("url",url);

        properties.setProperty("username",username);

        properties.setProperty("password",password);

        DataSource dataSource = null;

        try {

            dataSource = BasicDataSourceFactory.createDataSource(properties);

        } catch (Exception e) {

            e.printStackTrace();

        }

        return dataSource;

    }

}
如果配置文件里面的值不存在的话,这时候就不会再装配这个类,
注解源码集合########################
@Bean
@Target({ElementType.METHOD, ElementType.ANNOTATION_TYPE})

@Retention(RetentionPolicy.RUNTIME)

@Documented

public @interface Bean {

    @AliasFor("name")
注解在方法上,和注解上
ElementType.ANNOTATION_TYPE 只可以标记注解类型
@Con
spring-boot关于spring全注解IOC的更多相关文章
- spring boot(7)-mybatis全注解化
关于配置数据库可以参考上一篇文章,这里只讲mybatis pom.xml <!-- 引入mybatis --> <dependency> <groupId>org. ...
- Spring Boot (9) mybatis全注解化
ORM对比图 框架对比 Spring JDBC Spring Data Jpa Mybatis 性能 性能最好 性能最差 居中 代码量 多 少 多 学习成本 低 高 居中 推荐指数 ❤❤❤ ❤❤❤❤❤ ...
- spring boot + vue + element-ui全栈开发入门——开篇
最近经常看到很多java程序员朋友还在使用Spring 3.x,Spring MVC(struts),JSP.jQuery等这样传统技术.其实,我并不认为这些传统技术不好,而我想表达的是,技术的新旧程 ...
- spring boot + vue + element-ui全栈开发入门——基于Electron桌面应用开发
前言 Electron是由Github开发,用HTML,CSS和JavaScript来构建跨平台桌面应用程序的一个开源库. Electron通过将Chromium和Node.js合并到同一个运行时环 ...
- Jhipster 一个Spring Boot + Angular/React 全栈框架
Jhipster 一个Spring Boot + Angular/React 全栈框架: https://www.jhipster.tech/
- spring boot + vue + element-ui全栈开发入门
今天想弄弄element-ui 然后就在网上找了个例子 感觉还是可以用的 第一步是完成了 果断 拿过来 放到我这里这 下面直接是连接 点进去 就可以用啊 本想着不用vue 直接导入连接 ...
- Spring Boot整合MyBatis(非注解版)
Spring Boot整合MyBatis(非注解版),开发时采用的时IDEA,JDK1.8 直接上图: 文件夹不存在,创建一个新的路径文件夹 创建完成目录结构如下: 本人第一步习惯先把需要的包结构创建 ...
- Spring Boot 实战 —— MyBatis(注解版)使用方法
原文链接: Spring Boot 实战 -- MyBatis(注解版)使用方法 简介 MyBatis 官网 是这么介绍它自己的: MyBatis 是一款优秀的持久层框架,它支持定制化 SQL.存储过 ...
- spring boot的一些常用注解
spring boot的一些常用注解: 使用@SpringBootApplication注释: 许多Spring Boot开发人员喜欢他们的应用程序使用自动配置,组件扫描,并能够在其“应用程序类”上定 ...
- Spring Boot的27个注解【核心】
导读[约定大于配置] Spring Boot方式的项目开发已经逐步成为Java应用开发领域的主流框架,它不仅可以方便地创建生产级的Spring应用程序,还能轻松地通过一些注解配置与目前比较火热的微服务 ...
随机推荐
- 录毛线脚本,直接手写接口最简洁的LoadRunner性能测试脚本(含jmeter脚本)
近日翻看了下招聘信息,很多都要求loadrunner和jmeter这两款工具,毕竟是性能测试的主流客户端并发工具. 录制的问题 做性能脚本是性能测试的基本功,loadrunner和jmeter这两款工 ...
- [题解]UVA10801 Lift Hopping
链接:http://vjudge.net/problem/viewProblem.action?id=22172 描述:有n部电梯,每部电梯都有不能停下的楼层,要求搭乘电梯从第0层到第k层. 思路:单 ...
- 数据分析六个步骤,一款BI工具即可全部搞定
数据分析是将大量的数据转化为有价值的信息,以求最大化地利用数据的功能,发挥数据的作用.数据分析的类型可以分为现状分析.原因分析.预测分析,按流程分为以下6个步骤: (1) 明确数据分析目的和思路 明确 ...
- 商业智能BI工具为什么这么火?
近年来,随着大数据.数据分析技术的兴起,商业智能BI工具应运而生,其中BI工具已成为众多企业商务决策的重要工具.也许有人会问,为什么企业需要商业智能BI工具?商业智能BI工具可以为企业带来什么? 首 ...
- Excel真的是三维地图可视化制作最好的选择吗?
随着数据在当下互联网快速发展下变的维度更广,数量更大.结构越来越复杂,人们想要更加清晰,快速的认知和理解一份数据,传统的二维平面图表已经不能满足需求,三维可视化技术越结合多媒体技术.网络技术以及三维镜 ...
- 细述kubernetes开发流程
本文介绍如何对kubernetes进行二次开发,仓库如何管理,git分支如何管理,怎样利用CI去编译与发布以及如何给社区贡献代码等,结合实际例子,望对大家有所帮助. 开发环境构建 Fork 把gith ...
- 【windows 操作系统】进程间通信(IPC)简述|无名管道和命名管道 消息队列、信号量、共享存储、Socket、Streams等
一.进程间通信简述 每个进程各自有不同的用户地址空间,任何一个进程的全局变量在另一个进程中都看不到,所以进程之间要交换数据必须通过内核,在内核中开辟一块缓冲区,进程1把数据从用户空间拷到内核缓冲区,进 ...
- Windows命令(ping、telnet、netstat详解)
转至:https://www.cnblogs.com/lisuyun/articles/5864744.html netstat详解转自http://wsmajunfeng.iteye.com/blo ...
- 在shell中变量的赋值有五种方法!
转至:https://blog.csdn.net/weibo1230123/article/details/82085226 在shell中变量的赋值有五种 :使用 read 命令,直接赋值,使用命令 ...
- JavaBean , EJB , spring , POJO
1996年 , 发布了java bean 1.00-A 当时的java bean有什么用呢 javaBean最初是为Java GUI的可视化编程实现的.你拖动IDE构建工具创建一个GUI 组件(如多 ...