pytest测试实战和练习
开头
经过前面几章的学习,这时候要来个测试实战会比较好巩固一下学过的知识
任务要求
1、实现计算器(加法,除法)的测试用例
2、使用数据驱动完成测试用例的自动生成
3、在调用测试方法之前打印【开始计算】,在调用测试方法之后打印【计算结束】
目录结构
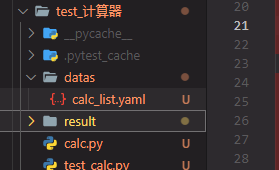
目录解析
datas/calc_list.yaml yaml文件用来保存相关的测试用例 要使用yaml先得安装yaml相关的包 pyyaml
result目录为pytest生成的来存放测试报告的目录
calc.py 为 计算器通用函数的一个类
test_cala.py 执行pytest测试用例的文件
calc_list.yaml
# 计算器的测试用例合集

calc_case:

  add_list:

      - [1,2,3]

      - [100,200,300]

      - [0.1,0.2,0.3]

      - [-1,-2,-3]

      - [-0.1, 0.2, 0.3]

  sub_list:

      - [2,1,1]

      - [300,200,100]

      - [0.1,0.2,-0.1]

      - [-1,-2, 1]

      - [-0.1, -0.2, 0.3]

  mul_list:

      - [1,2,2]

      - [100,200,20000]

      - [0.1,0.2,0.02]

      - [-1,-2,2]

      - [-0.1, 0.2, 0.2]

  div_list:

      - [1,2,0.5]

      - [100,200,0.5]

      - [0.1,0.2,0.5]

      - [-1,-2,0.5]

      - [-0.1, 0, 0]

  all_ids:

      - 'int'

      - 'bigint'

      - 'float'

      - 'negative'

      - 'fail'
calc.py
# 计算器

class Calculator:

    def add(self, a, b):

        return a + b

    def sub(self, a, b):

        return a - b

    def mul(self, a, b):

        return a * b

    def division(self, a, b):

        return a / b
test_calc.py
from calc import Calculator

import yaml

import pytest

import allure

with open('./datas/calc_list.yaml', 'r', encoding='utf-8') as f:

    datas = yaml.safe_load(f)['calc_case']

    add_list = datas['add_list']  # 加法测试用例

    sub_list = datas['sub_list']  # 减法测试用例

    mul_list = datas['mul_list']  # 乘法测试用例

    div_list = datas['div_list']  # 除法测试用例

    ids = datas['all_ids']  # 全部的标签

    print(datas)

@allure.feature("计算器模块")

class TestCalc:

    def setup_class(self):

        print("计算器开始计算")

        self.calc = Calculator()

    def teardown_class(self):

        print("计算器结束计算")

    @allure.story("加法运算")

    @pytest.mark.parametrize("a, b, expect", add_list, ids=ids)

    def test_add(self, a, b, expect):

        with allure.step(f"输入测试用例{a}, {b}, 预期结果为{expect}"):

            result = self.calc.add(a, b)

            if isinstance(result, float):  # 判断浮点数

                result = round(result, 2)

        assert expect == result

    @allure.story("减法运算")

    @pytest.mark.parametrize("a, b, expect", sub_list, ids=ids)

    def test_sub(self, a, b, expect):

        with allure.step(f"输入测试用例{a}, {b}, 预期结果为{expect}"):

            result = self.calc.sub(a, b)

            if isinstance(result, float):  # 判断浮点数

                result = round(result, 2)

        assert expect == result

    @allure.story("乘法运算")

    @pytest.mark.parametrize("a, b, expect", mul_list, ids=ids)

    def test_mul(self, a, b, expect):

        with allure.step(f"输入测试用例{a}, {b}, 预期结果为{expect}"):

            result = self.calc.mul(a, b)

            if isinstance(result, float):  # 判断浮点数

                result = round(result, 2)

        assert expect == result

    @allure.story("除法运算")

    @pytest.mark.parametrize("a, b, expect", div_list, ids=ids)

    def test_div(self, a, b, expect):

        with allure.step(f"输入测试用例{a}, {b}, 预期结果为{expect}"):

            result = self.calc.division(a, b)

            if isinstance(result, float):  # 判断浮点数

                result = round(result, 2)

        assert expect == result

if __name__ == '__main__':

    # pytest.main(["-vs", "test_calc.py::TestCalc::test_div"])  # 不需要allure的时候执行, 指定某个测试用例

    pytest.main(["--alluredir=result/2", "test_calc.py"])  # 生成allure

    # 查看allure用例 allure serve .\result\2\
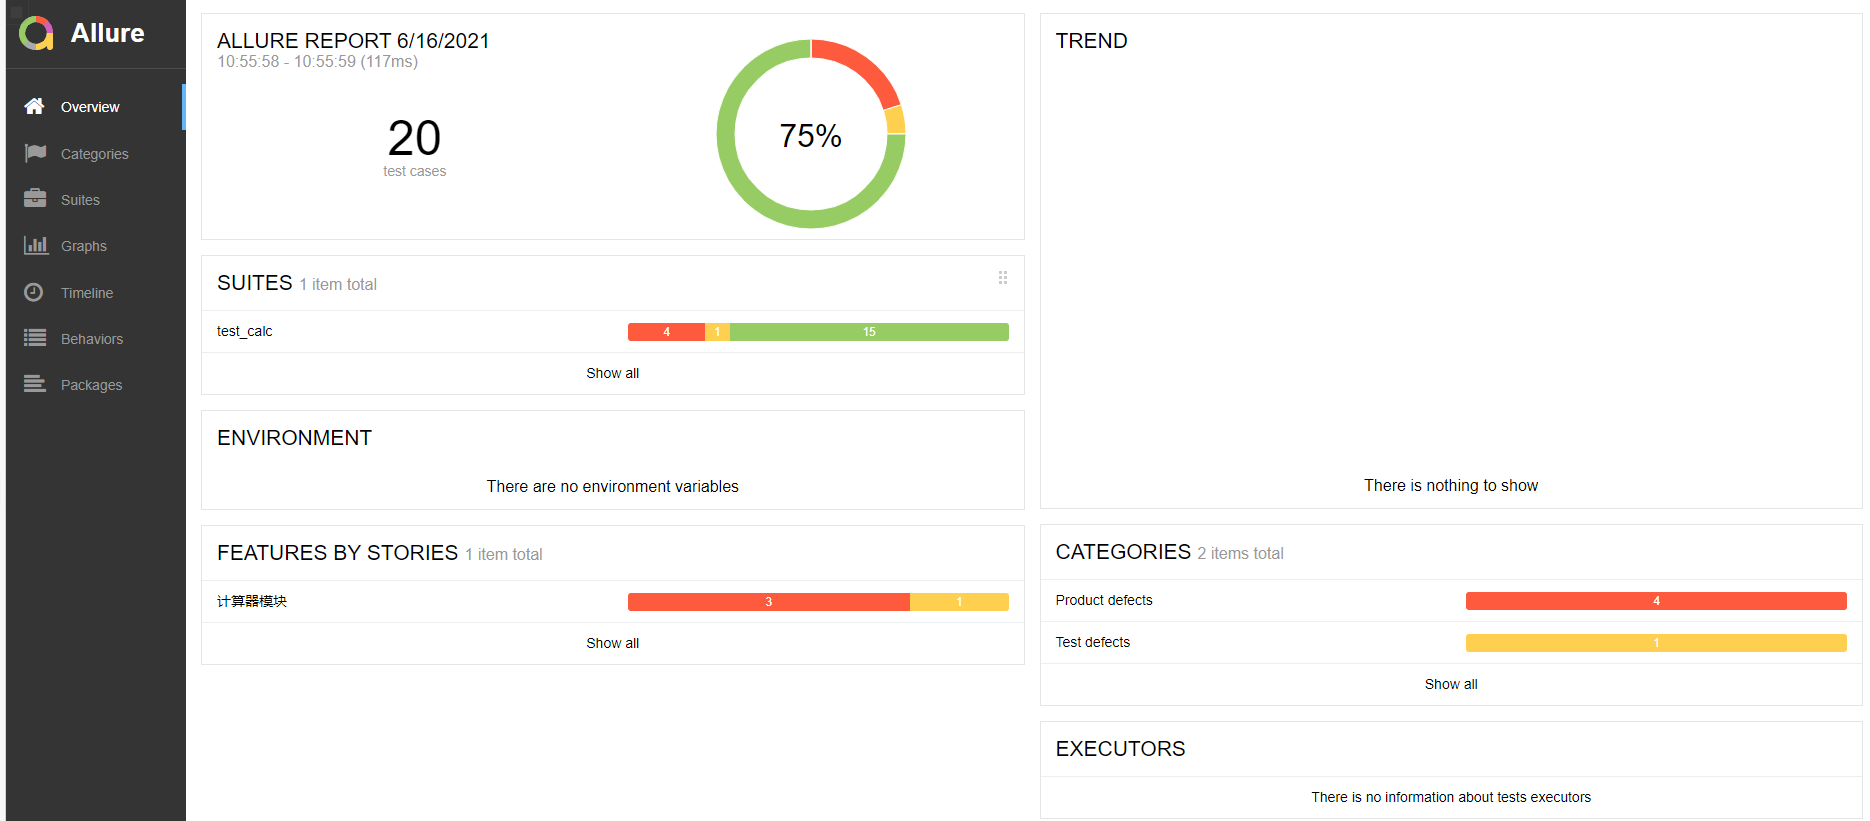
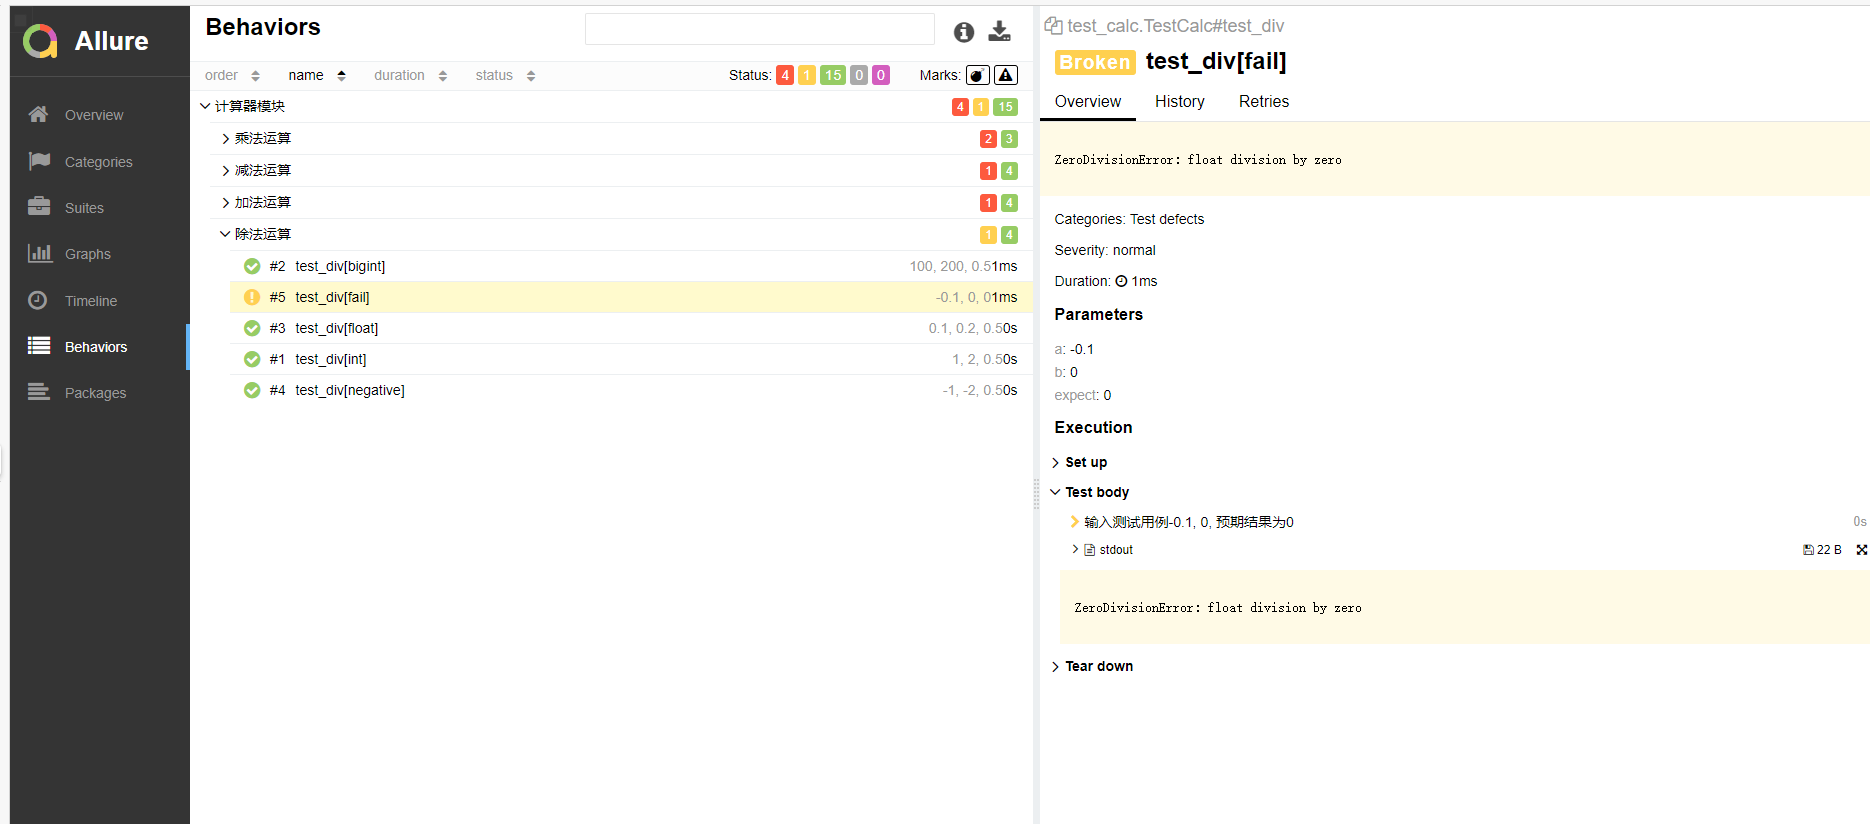
生成的allure如图所示
任务改写2
1、改造 计算器 测试用例,使用fixture函数获取计算器的实例
2、计算之前打印开始计算,计算之后打印结束计算
3、添加用例日志,并将日志保存到日志文件目录下
4、生成测试报告,展示测试用例的标题,用例步骤,与测试日志,截图附到课程贴下
目录结构

目录解析
datas/calc_list.yaml yaml文件用来保存相关的测试用例 要使用yaml先得安装yaml相关的包 pyyaml
result目录为pytest生成的来存放测试报告的目录
calc.py 为 计算器通用函数的一个类
test_cala2.py 执行pytest测试用例的文件
conftest.py 为所有测试用例执行前都会执行到这个的文件,要有__init__.py文件跟在同目录下
pytest.ini pytest框架的一个设置, 可以设置开启日志
conftest.py 用fixture改写:
import pytest

from .calc import Calculator

@pytest.fixture(scope="class")

def get_cal():

    print("====实例化计算器, 开始计算===")

    cal = Calculator()

    yield cal

    print("====计算完成====")
pytest.ini 增加保存的日志
[pytest]

log_cli=true

log_level=NOTSET

log_format = %(asctime)s %(levelname)s %(message)s

log_date_format = %Y-%m-%d %H:%M:%S

addopts = -vs

log_file = ./test.log

log_file_level = info

log_file_format = %(asctime)s %(levelname)s %(message)s

log_file_date_format = %Y-%m-%d %H:%M:%S
test_cala2.py 改写第一部分
import yaml

import allure

import pytest

import logging

logging.basicConfig(level=logging.info)

logger = logging.getLogger()

with open('./datas/calc_list.yaml', 'r', encoding='utf-8') as f:

    datas = yaml.safe_load(f)['calc_case']

    add_list = datas['add_list']  # 加法测试用例

    sub_list = datas['sub_list']  # 减法测试用例

    mul_list = datas['mul_list']  # 乘法测试用例

    div_list = datas['div_list']  # 除法测试用例

    ids = datas['all_ids']  # 全部的标签

    print(datas)

@allure.feature("计算器模块")

class TestCalc2:

    @allure.story("加法运算")

    @pytest.mark.parametrize("a, b, expect", add_list, ids=ids)

    def test_add(self, a, b, expect, get_cal):

        logger.info('增加加法日志')

        with allure.step(f"输入测试用例{a}, {b}, 预期结果为{expect}"):

            result = get_cal.add(a, b)

            if isinstance(result, float):  # 判断浮点数

                result = round(result, 2)

        assert expect == result

    @allure.story("减法运算")

    @pytest.mark.parametrize("a, b, expect", sub_list, ids=ids)

    def test_sub(self, a, b, expect, get_cal):

        with allure.step(f"输入测试用例{a}, {b}, 预期结果为{expect}"):

            result = get_cal.sub(a, b)

            if isinstance(result, float):  # 判断浮点数

                result = round(result, 2)

        assert expect == result

    @allure.story("乘法运算")

    @pytest.mark.parametrize("a, b, expect", mul_list, ids=ids)

    def test_mul(self, a, b, expect, get_cal):

        with allure.step(f"输入测试用例{a}, {b}, 预期结果为{expect}"):

            result = get_cal.mul(a, b)

            if isinstance(result, float):  # 判断浮点数

                result = round(result, 2)

        assert expect == result

    @allure.story("除法运算")

    @pytest.mark.parametrize("a, b, expect", div_list, ids=ids)

    def test_div(self, a, b, expect, get_cal):

        with allure.step(f"输入测试用例{a}, {b}, 预期结果为{expect}"):

            result = get_cal.division(a, b)

            if isinstance(result, float):  # 判断浮点数

                result = round(result, 2)

                print(result)

        assert expect == result

if __name__ == '__main__':

    # pytest.main(["-vs", "test_calc2.py::TestCalc2::test_add"])  # 不需要allure的时候执行, 指定某个测试用例

    pytest.main(["--alluredir=result/3", "test_calc2.py"])  # 生成allure

    # 查看allure用例 allure serve .\result\2\
最后完结。
pytest测试实战和练习的更多相关文章
- 关于《精通移动App测试实战:技术、工具和案例》图书勘误信息
首先,对由于我们工作的疏忽向<精通移动App测试实战:技术.工具和案例>读者朋友们表示歉意,同时已将这些问题反馈给了出版社编辑同志,再版时将会统一修正: 其次,勘误信息请参看附件pdf文档 ...
- Jmeter分布式测试实战
一.Jmeter分布式测试基础 1.Jmeter分布式测试原因: 在使用Jmeter进行接口的性能测试时,由于Jmeter 是JAVA应用,对负载机的CPU和内存消耗比较大.所以当需要模拟数以万计的并 ...
- Pytest 测试框架
一 . Pytest 简介 Pytest是python的一种单元测试框架. 1. pytest 特点 入门简单,文档丰富 支持单元测试,功能测试 支持参数化,重复执行,部分执行,测试跳过 兼容其他测试 ...
- 《Web安全攻防 渗透测试实战指南 》 学习笔记 (五)
Web安全攻防 渗透测试实战指南 学习笔记 (五) 第四章 Web安全原理解析 (一) (一)SQL注入的原理 1.web应用程序对用户输入数据的合法性没有判断. 2.参数用户可控:前端传给 ...
- 《Web安全攻防 渗透测试实战指南》 学习笔记 (四)
Web安全攻防 渗透测试实战指南 学习笔记 (四) Nmap Network Mapper 是一款开放源代码的网 ...
- 《Web安全攻防 渗透测试实战指南 》 学习笔记 (三)
Web安全攻防 渗透测试实战指南 学习笔记 (三) burp suite详解 是一款集成化渗透测试工 ...
- 《Web安全攻防 渗透测试实战指南》 学习笔记 (二)
Web安全攻防 渗透测试实战指南 学习笔记 (二) 第二章 漏洞环境及实践
- 《Web安全攻防 渗透测试实战指南》 学习笔记(一)
Web安全攻防 渗透测试实战指南 学习笔记 (一) 第一章 信息收集 在信息收集中,最重要是收集服务器的配置信息和网站敏感信息(域名及子域名信息目标网站系统.CMS指纹.目标网站真实I ...
- pytest测试框架 -- 简介
一.pytest测试框架简介: (1)pytest是python的第三方测试框架,是基于unittest的扩展框架,比unittest更简洁,更高效. (2)pytest框架可以兼容unittest用 ...
- pytest测试框架入门
安装pytest 命令行输入: pip install -U pytest 检查是否安装了正确的版本: λ pytest --version This is pytest version 5.3.5, ...
随机推荐
- idea开发使用外置tomcat配置
1. 添加依赖 <dependency> <groupId>org.apache.tomcat.embed</groupId> <artifactId> ...
- svn备份迁移
参考链接: SVN版本库的迁移 dump的详细使用 https://www.iteye.com/blog/tdcq-1684344 svn备份与还原_脚本_(dump命令)
- 有时候用uniapp写项目时发现,Map组件在安卓真机可以缩放和移动,但是在ios真机就不行
如果你的地图组件是放到popup组件里,是用弹框打开的,如何ios端不能缩放, 那你一定要看下这个弹框的层级是否比地图层级要高 z-index. 如果高于地图层级,那地图肯定是不能移动和缩放的
- 第七章ssh sftp scp
第七章ssh sftp scp 对数据进行了加密和压缩 版本号协商,可能客户端和服务端的版本号不一致,服务端向客户端发送一个ssh协商,告诉客户端使用的ssh协议的版本号是多少,客户端在接收到了这个协 ...
- 在Vim编辑器中查找选定文本
按照任意选定文本查找: 1. 进入visiual模式选定文本, 按 y 键复制: 2. 按 / 键进入查找模式: 3. 按 Ctrl + r 打开vim寄存器: 4. 按 " 键将寄存器内容 ...
- 关于jsp页面中的小细节们
细节一:利用jsp判断文本框的输入格式是否正确 也就是主要利用script标签进行判断,主要用到的是正则表达式(判断是否为整数): 再加上if语句的配合,就能够在文本框的格式不正确时,发出错误警告啦! ...
- Java8 Optional使用方式
参考博客:https://blog.csdn.net/zjhred/article/details/84976734
- 如何针对海外不同地区进行音视频自动化测试?丨Dev for Dev 专栏
近年来由于全球性的新冠疫情,世界各地对实时音视频的需求猛增.不同国家和地区由于经济发展.国家政策等原因,网络环境有很大不同,如果要做好音视频体验,就需要分地域进行音视频指标测试.但是不论是外包,还是云 ...
- 制作微软原版Windows11 PE(含Powershell)
1.adksetup下载链接:https://download.microsoft.com/download/1/f/d/1fd2291e-c0e9-4ae0-beae-fbbe0fe41a5a/ad ...
- 微软开源了一个 助力开发LLM 加持的应用的 工具包 semantic-kernel
在首席执行官萨蒂亚·纳德拉(Satya Nadella)的支持下,微软似乎正在迅速转变为一家以人工智能为中心的公司.最近微软的众多产品线都采用GPT-4加持,从Microsoft 365等商业产品到& ...