微信小程序文件上传至七牛云(laravel7)
1 wxml:
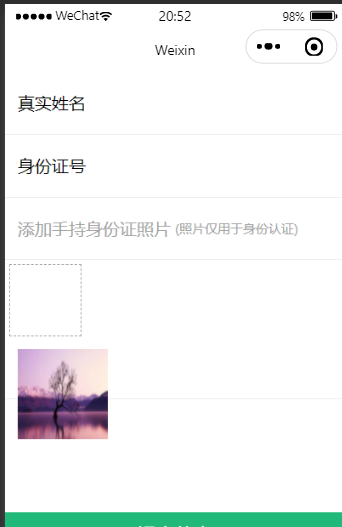
<view>

  <form bindsubmit="dopost">

    <view>

      <label>真实姓名</label>

      <input name="truename" value="{{ userinfo.truename }}" />

    </view>

    <view>

      <label>身份证号</label>

      <input name="card" type="idcard" value="{{ userinfo.card }}" />

    </view>

    <view class="tip-msg">

      添加手持身份证照片

      <text>(照片仅用于身份认证)</text>

    </view>

    <view class="uppic" bind:tap="upfile">

      <text class="iconfont icon-jiahao"></text>

    </view>

    <view class="imglist">

      <block wx:for="{{upfile}}" wx:key="upfile">

        <image src="{{item}}" />

      </block>

    </view>

    <view class="sendbtn">

      提交信息

      <button type="primary" form-type="submit">提交信息</button>

    </view>

  </form>

</view>
2 wx.js:
    // pages/page/page.js

    Page({

        /**

         * 页面的初始数据

         */

        data: {

            upfile:[]

        },

    //图片上传

    upfile:function(res){

        let that = this

        let file = []

        // 本地图片

        wx.chooseImage({

        count: 3,

        sizeType: ['original', 'compressed'],

        sourceType: ['album', 'camera'],

        success (res) {

            // tempFilePath可以作为img标签的src属性显示图片

            let tempFilePaths = res.tempFilePaths;

            tempFilePaths.map(filepath=>{

            wx.uploadFile({

                //   发送的网址

                url: 'http://www.yan.com/api/xcx/xcxImg',

                filePath: filepath,

                // 发送的文件

                name: 'file',

                success (ret){

                let json = JSON.parse(ret.data)

                //   console.log(json)

                // 将返回的文件追加至file空数组

                file.push(json.data)

                //   设置data数据中的file

                that.setData({

                    upfile:file

                })

                },fail(res){

                wx.showToast({

                    title: '请求失败',

                    icon:"error"

                })

                }

            })

            })

        }

        })

    },

    })
wxss
/* pages/page/page.wxss */

page {

    background-color: #fff;

  }

  .imglist image{

    width: 200rpx;

    height: 200rpx;

  }

  .tip {

    background-color: #fff3cd;

    height: 60rpx;

    line-height: 60rpx;

    font-size: 14px;

    color: #fb6951;

    padding-left: 10rpx;

  }

  .tip text:nth-of-type(1) {

    margin-right: 10rpx;

  }

  form view {

    padding: 30rpx;

    display: flex;

    height: 80rpx;

    line-height: 80rpx;

    border-bottom: 1px solid #eeeeee;

  }

  form view:nth-last-of-type(1){

    border: none;

  }

  form view label {

    margin-right: 30rpx;

  }

  form view input {

    height: 80rpx;

    line-height: 80rpx;

  }

  .tip-msg{

    color: #a4a4a4;

  }

  .tip-msg text{

    margin-left: 10rpx;

    font-size: 12px;

  }

  .uppic{

    margin-left: 10rpx;

    margin-top: 10rpx;

    width: 100rpx;

    height: 100rpx;

    border: 1px dashed #a4a4a4;

    display: flex;

    justify-content: center;

    align-items: center;

  }

  .sendbtn{

    position: fixed;

    bottom: 0px;

    width: 750rpx;

    height: 100rpx;

    background: #21b97a;

    padding: 0;

    margin: 0;

    text-align: center;

    color: #fff;

    display: flex;

    justify-content: center;

    align-items: center;

    font-size: 18px;

  }

  .sendbtn button {

    width: 100%;

    height: 100rpx;

    opacity: 0;

    position: absolute;

    top: 0;

  }
3 laravel7 api.php书写路由
Route::group(['namespace'=>'xcx'],function (){

//图片

    Route::post('xcx/xcxImg','LoginController@xcxImg');

});
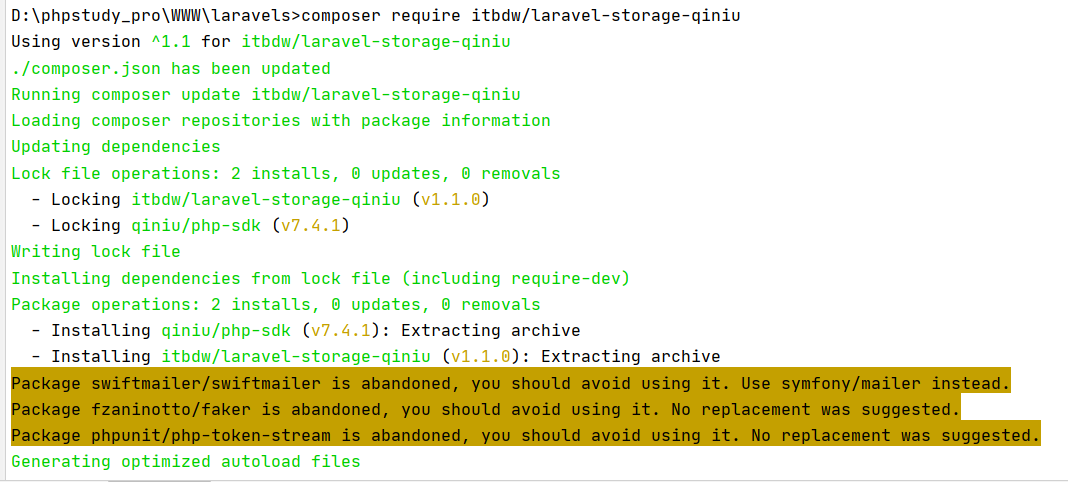
4 然后composer下载七牛云
composer require itbdw/laravel-storage-qiniu
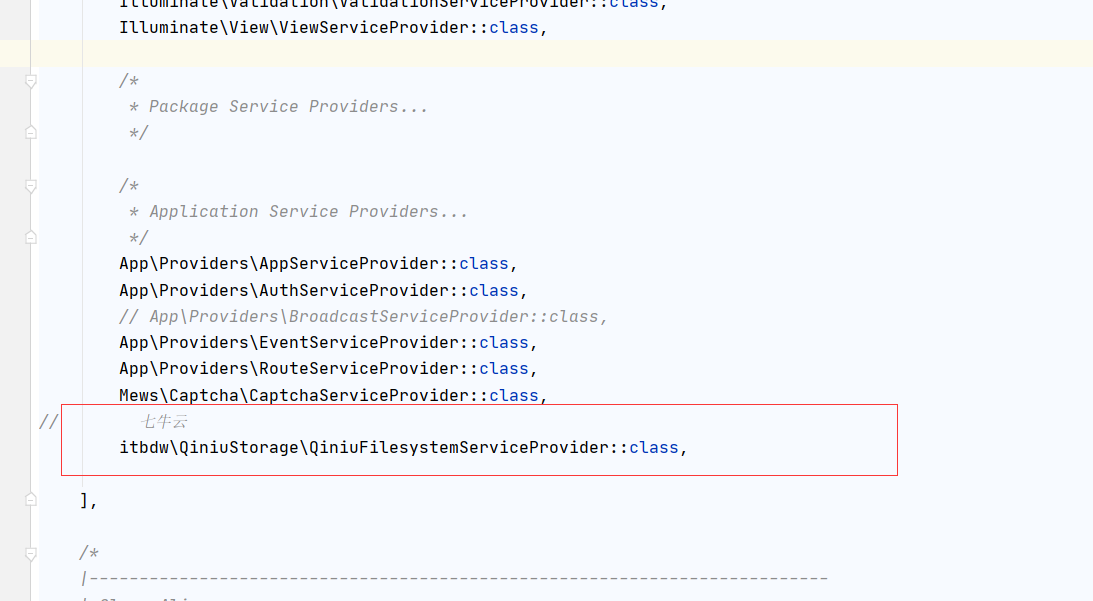
5 .打开 config 文件夹下的 app.php 文件,在 providers 中加入一下代码
itbdw\QiniuStorage\QiniuFilesystemServiceProvider::class,
6 .打开 config 文件夹下的 filesystems.php 文件,在 disks中加入一下代码,注意位置
'qiniu' => [

            'driver'    => 'qiniu',

            'domain'    => '',  //你的七牛域名

            'access_key'=> '',    //AccessKey

            'secret_key'=> '',   //SecretKey

            'bucket'    => '',    //Bucket名字,即七牛云存储空间名称

        ],


'qiniu' => [
'driver' => 'qiniu',
'domain' => 'r3y7oifgb.hn-bkt.clouddn.com', //你的七牛域名
'access_key'=> '7Gu_5HzqSHJB3nLBz51pQN8oJBfqeGwd3kQ-vCNX', //AccessKey
'secret_key'=> 'frzqcOjOhL55eIMXQSLIfO_apMHrs0fr8jjklKDt', //SecretKey
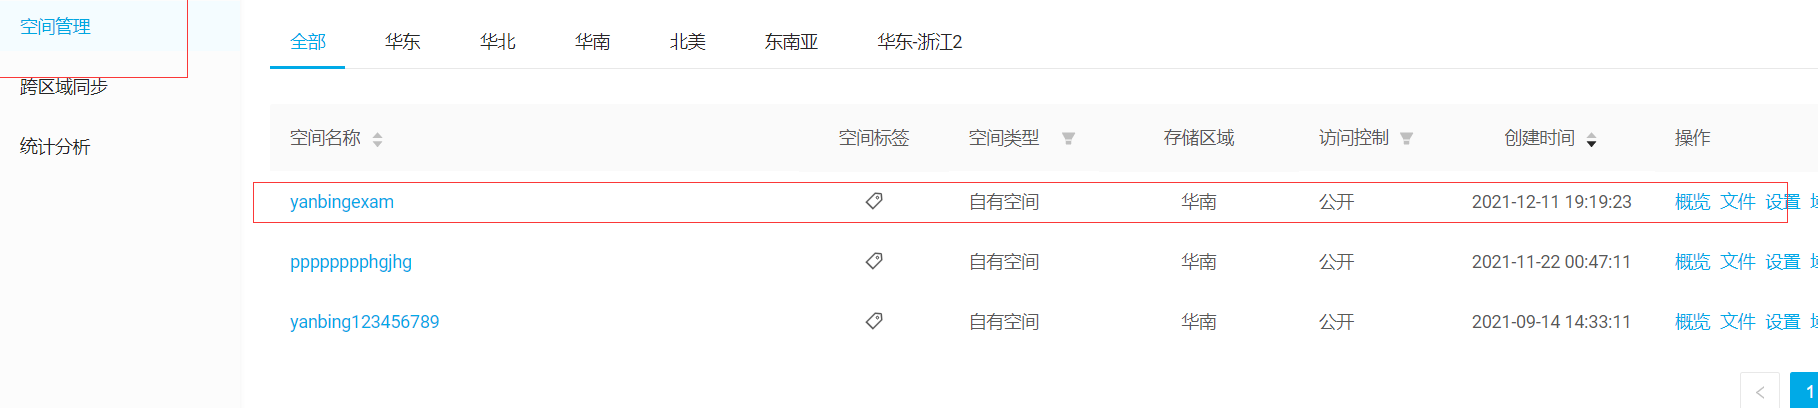
'bucket' => 'yanbingexam', //Bucket名字,即七牛云存储空间名称
],
7 :控制器进行调用
  public function xcxImg(){

        $disk = \Storage::disk('qiniu'); //使用七牛云上传

        $time = date('Y-m-d');//文件上传时间

        $filename = $disk->put($time, request()->file('file'));//上传 这里的image是前端的name值,自己来定

        if(!$filename) {

            return ['code' => 500, 'meg' => 'error', 'data' => []];

        }

        $img_url = $disk->getDriver()->downloadUrl($filename); //获取下载链接

        return ['code' => 200, 'meg' => '上传成功', 'data' => $img_url];

    }
8:七牛云进行查看,切记桶空间必须是公开的,要不上传不上去

参考:
(1)如果上传至本地图片参考以下代码:
 public function xcxImg(Request $request)

   {

        if ($request->hasFile('file')){

            // 上传

         $ret = $request->file('file')->store('', 'img');

           $pic = '/uploads/img/' . $ret;

           $disk =\Storage::disk('qiniu'); //使用七牛云上传

            $time = date('Y-m-d');

            $filename = $disk->put($time, request()->file('file'));//上传 这里的image是前端的name值,自己来定

            if(!$filename) {

                return ['code' => 500, 'meg' => 'error', 'data' => []];

            }

            $img_url = $disk->getDriver()->downloadUrl($filename); //获取下载链接

          return ['code' => 200, 'meg' => '上传成功', 'data' => $img_url];

       }

   }
(2) 如需将图片保存至本地参考以下博客
https://www.cnblogs.com/xiaoyantongxue/p/15679469.html
   public function store(Request $request)

    {

        //

        $data = $request->post();

//        将文件上传至本地

        $img = $request->file('img');

        if (!empty($img)){

            $img = "/".$request->file('img')->store(date('y/m/d')."/".'img');

            $data['img'] = $img;

        }

//        文件上传至七牛云

        $disk = \Storage::disk('qiniu'); //使用七牛云上传

        $time = date('Y-m-d');//文件上传时间

        $filename = $disk->put($time, request()->file('img'));//上传 这里的image是前端的name值,自己来定

//        验证

        $this->validate($request, ['name' => 'required', 'zhicheng' => 'required', 'img' => 'required'],

            ['name.required' => '医生姓名不可以为空', 'zhicheng.required' => '医生职称不可以为空', 'img.required' => '图片不可以为空']);

//添加入库

       $res = Doctor::create($data);

        if ($res) {

            return redirect(route('doctor.index'))->with(['success' => '添加成功']);

        }

        return redirect(route('doctor.create'))->withErrors(['error' => '添加失败']);

    }
微信小程序文件上传至七牛云(laravel7)的更多相关文章
- 微信小程序文件上传结合lin ul
html <l-form name="goods" l-form-btn-class="l-form-btn-class" bind:linsubmit= ...
- .Net Core实现将文件上传到七牛云存储
功能:将图片上传到七牛云存储 准备工作 注册七牛账号,提交实名认证(基本上1天内内审核通过) 登录七牛后台->对象存储->新建空间 (基本概念:https://developer.qini ...
- laravel7文件上传至七牛云并保存在本地图片
HTML代码: <form class="layui-form" action="{{route('doctor.store')}}" method=&q ...
- 5行代码实现微信小程序图片上传与腾讯免费5G存储空间的使用
本文介绍了如何在微信小程序开发中使用腾讯官方提供的云开发功能快速实现图片的上传与存储,以及介绍云开发的 5G 存储空间的基本使用方法,这将大大提高微信小程序的开发效率,同时也是微信小程序系列教程的视频 ...
- 快速高效实现微信小程序图片上传与腾讯免费5G存储空间的使用
本文介绍了如何在微信小程序开发中使用腾讯官方提供的云开发功能快速实现图片的上传与存储,以及介绍云开发的 5G 存储空间的基本使用方法,这将大大提高微信小程序的开发效率 对于一般的图片上传功能开发,我们 ...
- 微信小程序图片上传并展示
1.首先编写微信小程序的页面和样式: index.js var total = []; Page({ data: { perImgSrc: [] }, onLoad: function (option ...
- 小程序文件上传uploadFile
前台代码: bindPhoto(e) { var that = this; wx.chooseImage({ count: 1, sizeType: ['original','compressed'] ...
- 微信小程序---图片上传+服务端接受
原文地址:http://blog.csdn.net/sk719887916/article/details/54312573 微信小程序,图片上传,应用地方-修改用户信息的头像. 详细代码: 小程序的 ...
- 微信小程序图片上传和裁剪
本篇博客用于解决微信小程序图片裁剪问题 图片裁剪常用于头像选择和图片合成等. 图片裁剪解决方案: 目前网络上知名的微信小程序图片裁剪插件是we-cropper(文末有链接) 操作步骤:下载好we-cr ...
随机推荐
- 理解java线程的中断(interrupt)
一个线程在未正常结束之前, 被强制终止是很危险的事情. 因为它可能带来完全预料不到的严重后果比如会带着自己所持有的锁而永远的休眠,迟迟不归还锁等. 所以你看到Thread.suspend, Threa ...
- CentOS 7下iptables配置添加修改规则端口方法(转)
简介: Linux CentOS 7默认没有安装iptables,默认的防火墙是firewalld,云吞铺子分享CentOS 7系统下iptables安装.iptables规则配置(放行或者禁用端口) ...
- 关于Java多线程-interrupt()、interrupted()、isInterrupted()解释
多线程先明白一个术语"中断状态",中断状态为true,线程中断. interrupt():就是通知中止线程的,使"中断状态"为true. isInterrupt ...
- java中最简单的计算执行时长的方式
日常在做一些性能测试的时候会通过执行时间来判断执行时长,java中最简单的方式如下: //开始时间 long startL= new Date().getTime(); //这里需要导入 java.u ...
- MyBatis加强(4)~mybatis 插件开发
一.插件介绍[动态代理] 1.插件[动态代理]:mybatis 允许在已经映射的语句的执行过程的某个时机进行拦截增强的机制. 2.mybatis中的组件动态代理的运用: MyBatis 在四大组件对象 ...
- 10、Linux基础--find、正则、文本过滤器grep
笔记 1.晨考 1.每个月的3号.5号和15号,而且这天是星期六时执行 00 00 3,5,15 * 6 2.每天的3点到15点,每隔3分钟执行一次 */3 3-15 * * * 3.每周六早上2点半 ...
- Involuting Bunny! (2021.9)
文化课就很掉头发,文科都能学好我还怕竞赛?( 大概从"刷的题的题解"推广为"所有做的题的题解"吧,兔子比较懒,这样写题解轻松一些. Gym10305 ...
- SonarQube之采购选型参考
SonarQube是DevOps实践中主流的一款质量内建工具,过插件机制,Sonar 可以集成不同的测试工具,代码分析工具,以及持续集成工具,比如pmd-cpd.checkstyle.findbugs ...
- 前端提升生产力系列三(vant3 vue3 移动端H5下拉刷新,上拉加载组件的封装)
| 在日常的移动端开发中,经常会遇到列表的展示,以及数据量变多的情况下还会有上拉和下拉的操作.进入新公司后发现移动端好多列表,但是在看代码的时候发现,每个列表都是单独的代码,没有任何的封装,都是通过v ...
- 【windows 操作系统】进程
前言 Windows的内部实现也近似于"一切皆文件"的思想,当然,这一切都只在内核里才有,下载一个WinObj这软件就可以看到,Windows上各种设备.分区.虚拟对象都是挂载到根 ...