springcloud的服务提供者与服务消费者
1、说明
springcloud中由服务消费者调用服务提供者一共有两种方法rest和feign
2、feign
(1)使用feign的方式进行服务调,搭建服务提供者。
- 创建一个web项目(服务提供者)
- 修改pom文件
<dependency>

    <groupId>org.springframework.cloud</groupId>

    <artifactId>spring-cloud-starter-eureka</artifactId>

    <version>1.4.4.RELEASE</version>

</dependency>

<dependency>

    <groupId>org.springframework.boot</groupId>

    <artifactId>spring-boot-starter-web</artifactId>

</dependency> - 在项目启动类上加@EnableDiscoveryClient注解
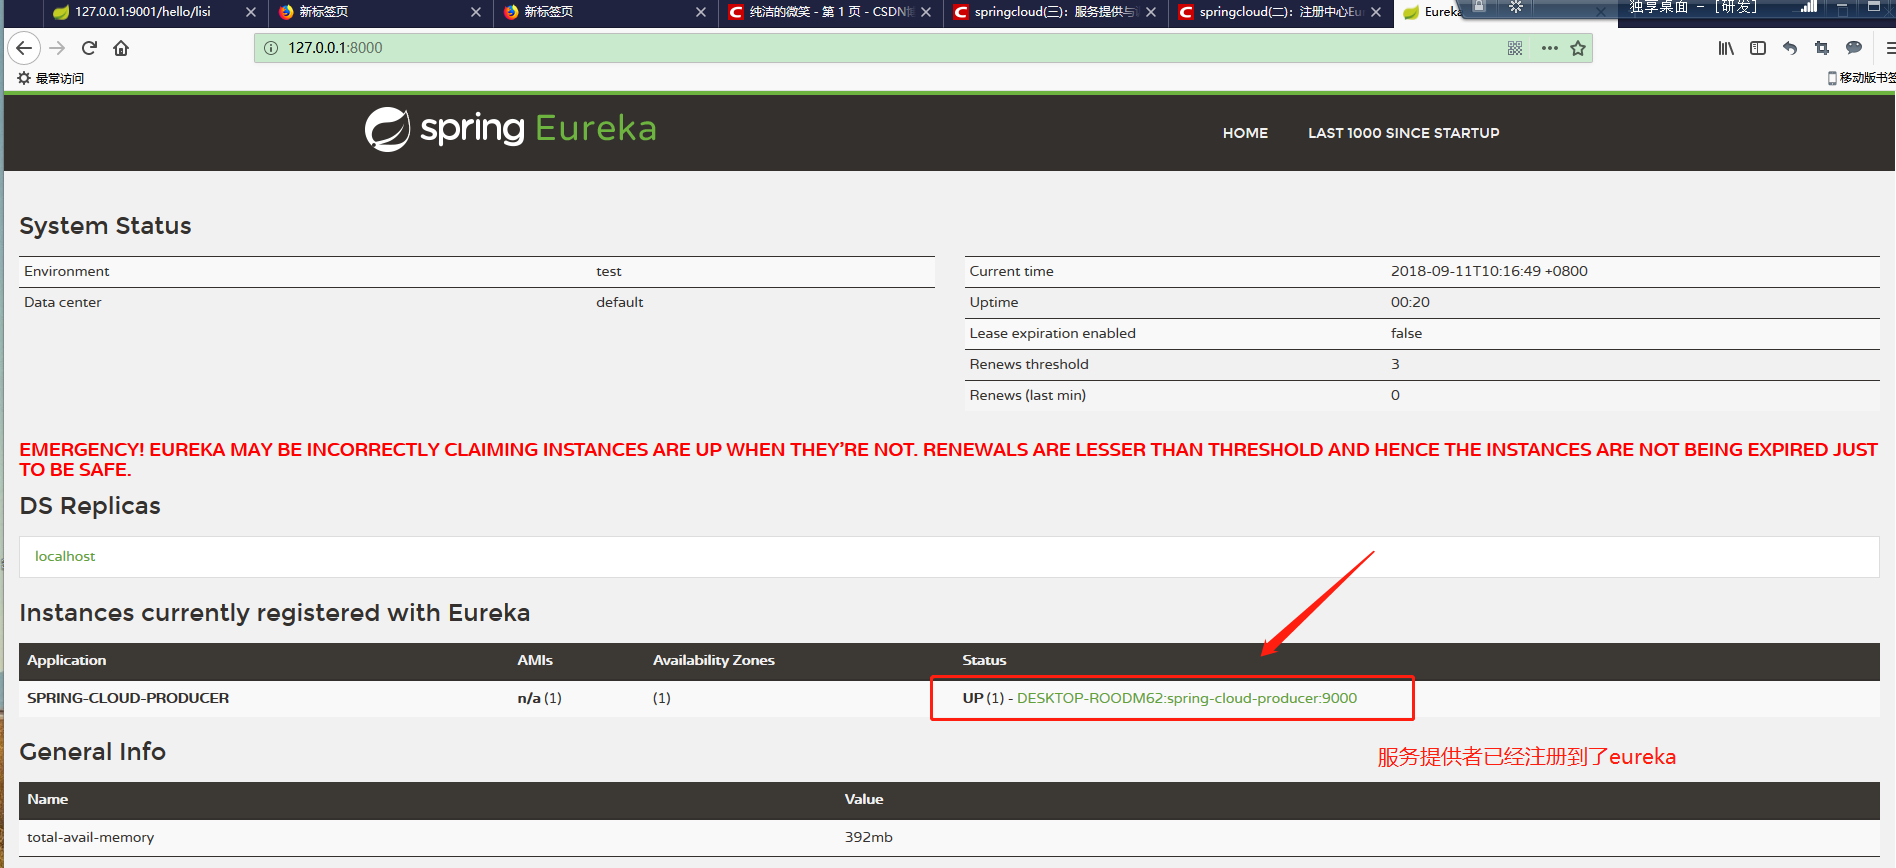
- 添加配置文件
spring.application.name=spring-cloud-producer

server.port=9000

#将服务注册的地址

eureka.client.serviceUrl.defaultZone=http://localhost:8000/eureka/ - 编写测试代码
import org.springframework.web.bind.annotation.RequestMapping;

import org.springframework.web.bind.annotation.RequestParam;

import org.springframework.web.bind.annotation.RestController;

@RestController

public class HelloController {

    @RequestMapping("/hello")

    public String index(@RequestParam String name) {

        return "这是服务提供者,参数:"+name;

    }

}
6、效果
(2)使用feign的方式进行服务调,搭建服务消费者。
- 创建一个web项目(服务消费者)
- 修改pom文件
<dependency>

     <groupId>org.springframework.boot</groupId>

     <artifactId>spring-boot-starter</artifactId>

</dependency>

 <dependency>

     <groupId>org.springframework.cloud</groupId>

     <artifactId>spring-cloud-starter-feign</artifactId>

     <version>1.4.4.RELEASE</version>

</dependency>

<dependency>

     <groupId>org.springframework.cloud</groupId>

     <artifactId>spring-cloud-starter-eureka</artifactId>

     <version>1.4.4.RELEASE</version>

</dependency> - 在项目启动类上加@EnableDiscoveryClient 启动服务注册和发现 @EnableFeignClients 启用feign进行远程调用 注解
- 添加配置文件
spring.application.name=spring-cloud-consumer

server.port=9001

eureka.client.serviceUrl.defaultZone=http://localhost:8000/eureka/ - 编写测试代码
5.1编写调用接口
import org.springframework.cloud.netflix.feign.FeignClient;

import org.springframework.web.bind.annotation.RequestMapping;

import org.springframework.web.bind.annotation.RequestParam;

// name的值是服务提供者的配置文件中的spring.application.name

@FeignClient(name= "spring-cloud-producer")

public interface HelloRemote {

    @RequestMapping(value = "/hello")

    String hello(@RequestParam(value = "name") String name);

}
5.2编写调用类
import com.comsuer.comsuer.Service.HelloRemote;
import org.springframework.beans.factory.annotation.Autowired;
import org.springframework.web.bind.annotation.PathVariable;
import org.springframework.web.bind.annotation.RequestMapping;
import org.springframework.web.bind.annotation.RestController; @RestController
public class helloController {
@Autowired
private HelloRemote helloRemote; @RequestMapping("/hello/{name}")
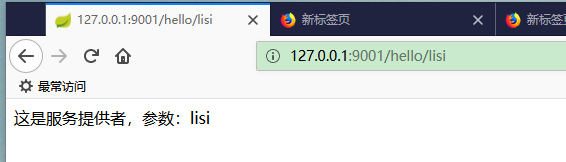
public String index(@PathVariable("name") String name) {
return helloRemote.hello(name);
} }
6. 效果
3、rest
springcloud使用rest+ribbon实现服务调用和服务提供者的负载均衡
(1)搭建服务提供者
- 创建一个web项目
- 修改pom文件
<dependency>

    <groupId>org.springframework.cloud</groupId>

    <artifactId>spring-cloud-starter-netflix-eureka-client</artifactId>

</dependency>

<dependency>

    <groupId>org.springframework.boot</groupId>

    <artifactId>spring-boot-starter-web</artifactId>

</dependency> - 在启动类上加@EnableDiscoveryClient 注解
- 添加配置文件
spring.application.name=spring-cloud-producer

server.port=9000

eureka.client.serviceUrl.defaultZone=http://localhost:8000/eureka/ - 编写测试代码
import org.springframework.web.bind.annotation.PostMapping;
import org.springframework.web.bind.annotation.RequestBody;
import org.springframework.web.bind.annotation.ResponseBody;
import org.springframework.web.bind.annotation.RestController; @RestController
public class HelloController {
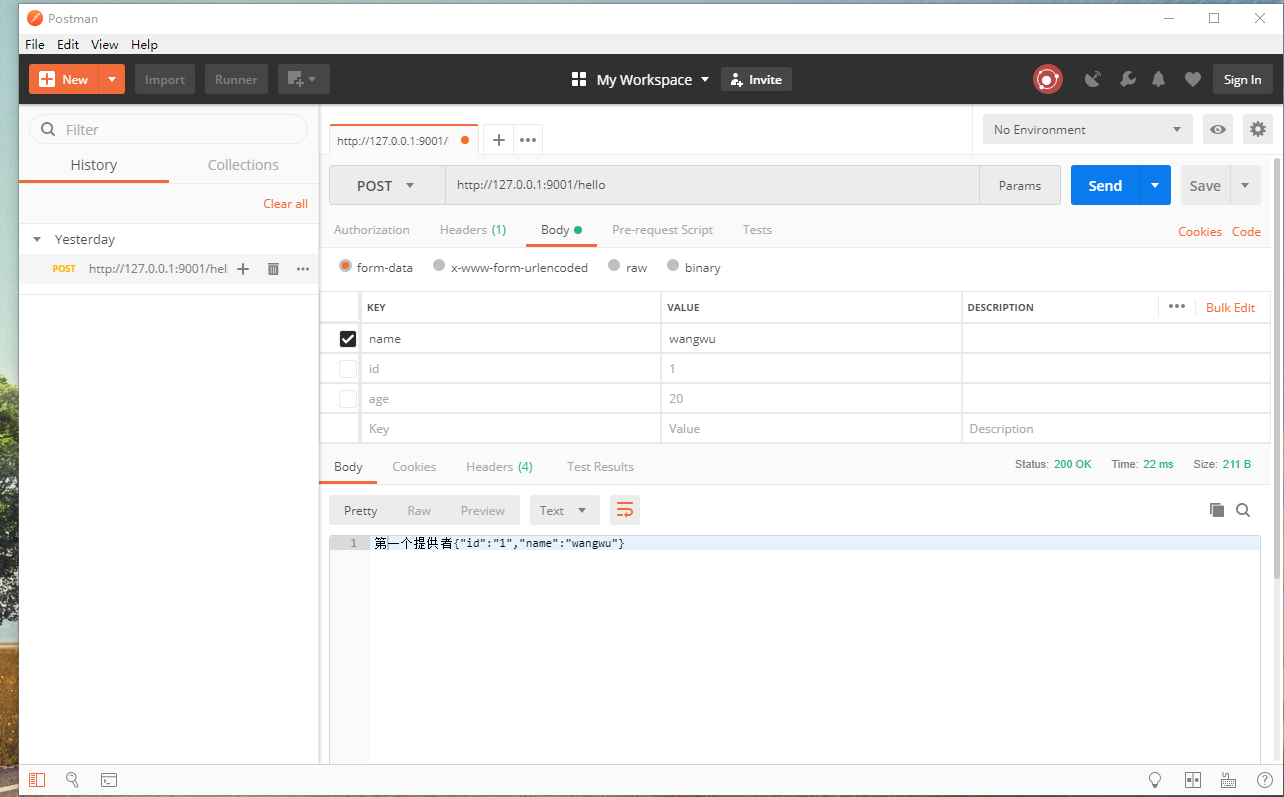
@PostMapping("/hello")
@ResponseBody
public String index(@RequestBody String name) {
return "第一个提供者"+name;
}
} - 按照上面的五个步骤再构建一个服务提供者
(2)搭建服务消费者
- 创建一个web项目
- 修改配置文件
<dependency>

   <groupId>org.springframework.boot</groupId>

   <artifactId>spring-boot-starter-web</artifactId>

</dependency>

<dependency>

   <groupId>org.springframework.cloud</groupId>

   <artifactId>spring-cloud-starter-ribbon</artifactId>

   <version>1.4.4.RELEASE</version>

</dependency>

<dependency>

  <groupId>org.springframework.cloud</groupId>

  <artifactId>spring-cloud-starter-eureka-server</artifactId>

  <version>1.4.4.RELEASE</version>

</dependency>

<dependency>

<groupId>com.alibaba</groupId>

   <artifactId>fastjson</artifactId>

   <version>1.2.49</version>

</dependency> - 在启动类上添加@EnableDiscoveryClient 注解,并修改启动类的代码,修改如下
import org.springframework.boot.SpringApplication;

import org.springframework.boot.autoconfigure.SpringBootApplication;

import org.springframework.cloud.client.discovery.EnableDiscoveryClient;

import org.springframework.cloud.client.loadbalancer.LoadBalanced;

import org.springframework.context.annotation.Bean;

import org.springframework.web.client.RestTemplate;

@SpringBootApplication

@EnableDiscoveryClient

public class ComsuerApplication {

    public static void main(String[] args) {

        SpringApplication.run(ComsuerApplication.class, args);

    }

    // 实现负载均衡

    @Bean

    @LoadBalanced

    RestTemplate restTemplate(){

        return new RestTemplate();

    }

} - 添加配置文件
spring.application.name=spring-cloud-consumer

server.port=9001

eureka.client.serviceUrl.defaultZone=http://localhost:8000/eureka/ - 编写测试代码
import com.alibaba.fastjson.JSON;

import org.springframework.beans.factory.annotation.Autowired;

import org.springframework.web.bind.annotation.PostMapping;

import org.springframework.web.bind.annotation.ResponseBody;

import org.springframework.web.bind.annotation.RestController;

import org.springframework.web.client.RestTemplate;

@RestController

public class helloController {

    @Autowired

    private RestTemplate rest;

    @PostMapping("/hello")

    @ResponseBody

    public String hello(String name){

        System.err.println(name);

        String url = "http://spring-cloud-producer/hello";

        User user = new User();

        user.setName(name);

        user.setId("1");

        String s1 = JSON.toJSONString(user);

        String s = rest.postForObject(url, s1, String.class);

        return s;

    }

}
rest调用效果,会调一次一,调一次二
4.总结
feign方式的负载均衡和rest步骤基本一样。
springcloud的服务提供者与服务消费者的更多相关文章
- 为什么Eureca Client要分成服务提供者和服务消费者呢?
[学习笔记]转载 6)为什么Eureca Client要分成服务提供者和服务消费者呢? 通 常来讲,服务提供方是重量的耗时的,所以可能在n台机器上.而服务消费方是轻量的,通过配置ribbon和@Loa ...
- spring cloud微服务架构 服务提供者和服务消费者
服务提供者和服务消费者 下面这张表格,简单描述了服务提供者/消费者是什么: | 名词 | 概念 | | ----- | ----------------------- | | 服务提供者 | 服务 ...
- Dubbo搭建HelloWorld-搭建服务提供者与服务消费者并完成远程调用(附代码下载)
场景 Dubbo简介与基本概念: https://blog.csdn.net/BADAO_LIUMANG_QIZHI/article/details/103555224 Dubbo环境搭建-ZooKe ...
- SpringCloud系列二:硬编码实现简单的服务提供者与服务消费者
从本文开始,以一个电影售票系统为例讲解Spring Cloud 1. 版本 jdk:1.8 SpringBoot:2.0.0.RELEASE SpringCloud:Finchley.M8 2. 系统 ...
- 《springcloud 一》搭建注册中心,服务提供者,服务消费者
注册中心环境搭建 Maven依赖信息 <parent> <groupId>org.springframework.boot</groupId> <artifa ...
- SpringCloud(2)服务消费者(rest+ribbon)
1.准备工作 这一篇文章基于上一篇文章的工程.启动eureka-server 工程,端口为 8761.分别以端口 8762 和 8763 启动 service-hi 工程.访问 localhost:8 ...
- SpringCloud教程 | 第二篇: 服务消费者(rest+ribbon)
在上一篇文章,讲了服务的注册和发现.在微服务架构中,业务都会被拆分成一个独立的服务,服务与服务的通讯是基于http restful的.Spring cloud有两种服务调用方式,一种是ribbon+r ...
- SpringCloud教程 | 第二篇: 服务消费者(rest+ribbon)(Finchley版本)
在上一篇文章,讲了服务的注册和发现.在微服务架构中,业务都会被拆分成一个独立的服务,服务与服务的通讯是基于http restful的.Spring cloud有两种服务调用方式,一种是ribbon+r ...
- 史上最简单的SpringCloud教程 | 第二篇: 服务消费者(rest+ribbon)(Finchley版本)
转载请标明出处: 原文首发于:https://www.fangzhipeng.com/springcloud/2018/08/30/sc-f2-ribbon/ 本文出自方志朋的博客 在上一篇文章,讲了 ...
随机推荐
- shell脚本练习04
######################################################################### # File Name: -.sh # Author ...
- ASP.NET WEB API 特性路由
一.什么是特性路由? 特性路由是指将RouteAttribute或自定义继承自RouteAttribute的特性类标记在控制器或ACTION上,同时指定路由Url字符串,从而实现路由映射,相比之前的通 ...
- Java开发系列-MySQL
概述 数据库 公司 特点 Mysql Oracle 开源的数据库 社区版免费 商业版是收费的 Oracle Oracle 大型的 收费的数据库 DB2 IBM 大型的 收费的数据库 一般用于银行系统 ...
- python3 使用aria2下载的一个脚本
import requests import time ariaurl="http://localhost:6800/jsonrpc" dlurl="http://xxx ...
- Android开发 获取View的尺寸的2个方法
前言 总所周知,在activity启动的onCreate或者其他生命周期里去获取View的尺寸是错误的,因为很有可能View并没有初始化测量绘制完成.你这个时候获取的宽或的高不出意外就是0.所以,我们 ...
- 如何做一个标记为安全的ACTIVEX控件
1.添加辅助函数控件的基本结构中含有xxApp,xxCtrl,xxPropPage三个类.找到xxApp的头文件,添加三个辅助函数.// Helper functionto create a comp ...
- springboot与分布式(zookeeper+dubbo)
docker安装zookeeper命令: docker pull zookeeper:3.4.14 docker启动zookeeper命令: docker run --name zk01 -p 218 ...
- iOS之UIBezierPath贝塞尔曲线属性简介
#import <Foundation/Foundation.h> #import <CoreGraphics/CoreGraphics.h> #import <UIKi ...
- 2006-2007 ACM-ICPC | POJ3380 POJ3384 POJ3385 水题题解
// CF比赛链接:http://codeforces.com/gym/101650 // POJ链接:http://poj.org/searchproblem?field=source&ke ...
- varStatus实现<c:forEach获取元素的下标 集合长度
有时候需要获取元素的下标,来实现一个编号的效果 那么使用 varStatus可以实现 代码 效果 如果需要把序号倒着数 那就用集合的长度减去当前下标 首先引入 <%@ taglib prefix ...