Windows下永久解决数据库乱码 utf8 转 gbk
产生乱码原因
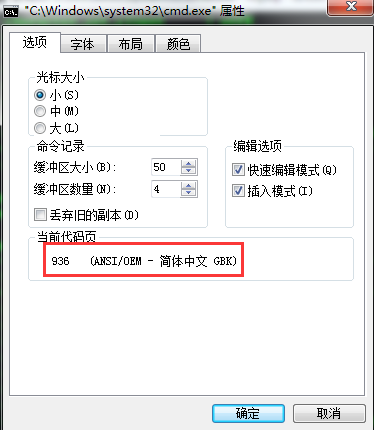
因为windows终端的默认字符集是gbk编码,而mysql数据库是utf8的编码,所以会产生乱码问题
解决乱码问题(临时修改)
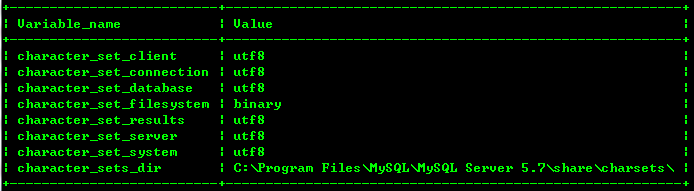
询当前数据库默认编码:
mysql> show variables like 'character%';
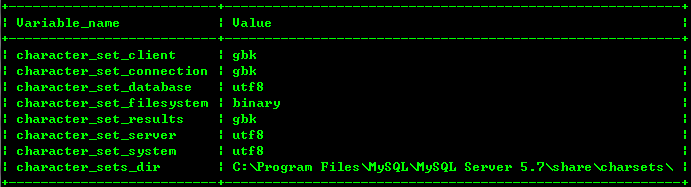
修改为gbk编码:
mysql> set names gbk;
但是这只是临时修改,对新开启的终端无效。
解决乱码问题(永久)
修改MySQL的配置文件:my-default.ini
配置文件位于MySQL的安装目录
例如我的:C:\Program Files\MySQL\MySQL Server 5.7
[mysqld]character-set-server=gbk
# For advice on how to change settings please see

# http://dev.mysql.com/doc/refman/5.7/en/server-configuration-defaults.html

# *** DO NOT EDIT THIS FILE. It's a template which will be copied to the

# *** default location during install, and will be replaced if you

# *** upgrade to a newer version of MySQL.

[mysqld]character-set-server=gbk

# Remove leading # and set to the amount of RAM for the most important data

# cache in MySQL. Start at 70% of total RAM for dedicated server, else 10%.

# innodb_buffer_pool_size = 128M

# Remove leading # to turn on a very important data integrity option: logging

# changes to the binary log between backups.

# log_bin

# These are commonly set, remove the # and set as required.

# basedir = .....

# datadir = .....

# port = .....

# server_id = .....

# Remove leading # to set options mainly useful for reporting servers.

# The server defaults are faster for transactions and fast SELECTs.

# Adjust sizes as needed, experiment to find the optimal values.

# join_buffer_size = 128M

# sort_buffer_size = 2M

# read_rnd_buffer_size = 2M

sql_mode=NO_ENGINE_SUBSTITUTION,STRICT_TRANS_TABLES
my-default.ini
Windows下永久解决数据库乱码 utf8 转 gbk的更多相关文章
- [转]Git for windows 下vim解决中文乱码的有关问题
Git for windows 下vim解决中文乱码的问题 原文链接:Git for windows 下vim解决中文乱码的有关问题 1.右键打开Git bash: 2.cd ~ 3.vim .vim ...
- windows下git bash中文乱码解决办法
一.解决办法1:(直接上图) 1.在git bash下,右键 出现下图,选择options: 2.选择“Text” 3.将“Character set”设置为 UTF-8 转:windows下git ...
- Windows下更改MySQL数据库的存储位置
在MySQL安装完成后,要修改数据库存储的位置,比如从安装目录下的C:\Program Files\MySQL\MySQL Server 5.0\Data文件夹转移到D:\mySQLData文件夹. ...
- windows下cmd命令行显示UTF8字符设置(CHCP命令)
本文由 www.169it.com 收集整理 在中文Windows系统中,如果一个文本文件是UTF-8编码的,那么在CMD.exe命令行窗口(所谓的DOS窗口)中不能正确显示文件中的内容.在默认情况下 ...
- Windows下如何解决git bash的默认home目录路径问题
转自:http://blog.csdn.net/lucien_zhou/article/details/62069246 为了解决这个问题,我在网上找了好久,尝试过按网上其他人所述,修改 git 安装 ...
- 基于Windows下永久破解jetbrains公司的系列产品(Idea, pycharm,clion,phpstorm)
基于Windows下永久破解jetbrains公司的系列产品(Idea, pycharm,clion,phpstorm): PS : 有能力的建议购买正版,好吧. PS:均针对其对应的2018.3.1 ...
- 解决windows下nginx中文文件名乱码
我的根目录文件夹放在d盘work文件夹下,一般这样配置 nginx\conf\nginx.conf location / { root D:/work; index index_bak.html; a ...
- 记一次windows下物理迁移数据库的过程
背景: 最近因为一次设备故障,导致一台运行windows环境下的机器无法启动,里面有一个正在使用的财务数据库,该数据库也只是每月使用一次,需要把物理数据迁移出来,于是拔出了故障机器的硬盘,通 ...
- windows下安装 sphinx 数据库全文搜索引擎
此次演示的环境是:win7系统,64位,php5.4.x,apache sphinx,斯芬克斯(英语不好的同学可以直接读这个音),意狮身人面像 特点:创建索引速度快,3分钟左右能创建100万条记录的索 ...
随机推荐
- Double H6.0
Double H 博客链接 成员 学号 姓名 211606379 王熙航(队长) 211606364 李冠锐 211606350 曾磊鑫 211606457 郑沐榕 211606342 杨艺勇 211 ...
- 量身打造自己的MyEclipse(多图)
迎新年 贺元旦MyEclipse推新版 在线订购低至 7.5 折!截止1月31号(活动期间在线下单的客户才可享受此优惠,过期恢复原价) 立即抢购 1.量身打造你自己的MyEclipse MyEclip ...
- iOS8 对开发者来说意味着什么?
今天凌晨,Apple WWDC2014 iOS8 正式推出! 也许,对于广大iOS用户来说,iOS8的创新并不是特别多. 但对于开发者来说,影响却将会是无比巨大的! 正如Apple官网上的广告:Hug ...
- fork调用实验-缓冲区相关
先看下面一段代码: #include <unistd.h> #include <stdio.h> ; char buf[] = "a write to stdout\ ...
- 【error】scripts/basic/fixdep: Syntax error: "(" unexpected
前言 第一次安装PCIE驱动的时候容易出现各种问题,总结一下下.. 原因分析 一般情况下,直接make的时候会出现问题. scripts/basic/fixdep: : scripts/basic/f ...
- Word Embeddings
能够充分意识到W的这些属性不过是副产品而已是很重要的.我们没有尝试着让相似的词离得近.我们没想把类比编码进不同的向量里.我们想做的不过是一个简单的任务,比如预测一个句子是不是成立的.这些属性大概也就是 ...
- 一定要记住这20种PS技术,让你的照片美的不行! - imsoft.cnblogs
照片名称:调出照片柔和的蓝黄色-简单方法, 1.打开原图素材,按Ctrl + J把背景图层复制一层,点通道面板,选择蓝色通道,图像 > 应用图像,图层为背景,混合为正片叠底,不透明度50%,反相 ...
- dubbo监控工具
现在企业使用dubbo技术太普遍,所以dubbo的监控工具也应运而生,而且还很稳定,他就是一个web项目, 部署起来非常简单,下载个项目war包(dubbo-admin-2.5.4-SNAPSHOT. ...
- 【BZOJ1703】【usaco2007margold】ranking the cows 奶牛的魅力排名
想的时间比较长所以看题解了= = 原题: Fj有N(N<=1000)头牛,每头牛都有独一无二的正整数 魅力值,Fj想让他们按 魅力值排序. Fj已经知道M(1<=M<=10000)对 ...
- RPC好,还是RESTful好?
看到知乎上有这样一个问题 WEB开发中,使用JSON-RPC好,还是RESTful API好? 还有其他优秀的推荐方案吗? -------------------------------------- ...