Pyqt QListWidget 展示系统环境变量
今天学习了下Pyqt的 QListWidget 控件
我们先看下这个图片

这张图片就是典型的listWidget效果,我们今天就仿这样布局新建个ListWidget
在网上找了个关于QListWidget的基础关系图:
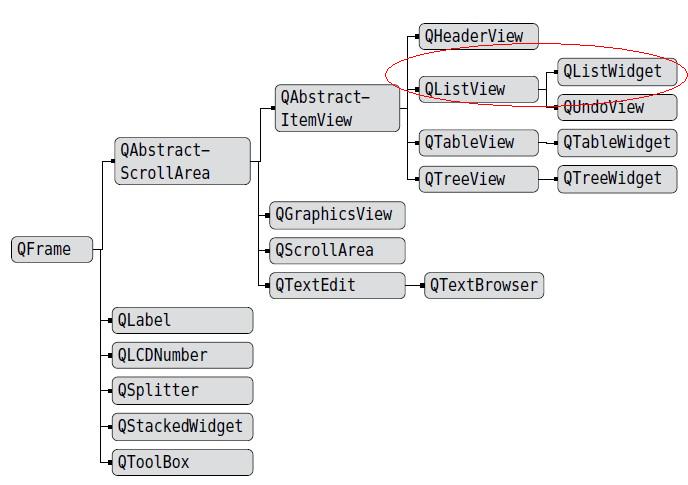
官网对QListWidget的描述:
|
The QListWidget class provides an item-based list widget. QListWidget is a convenience class that provides a list view similar to the one supplied by QListView, but with a classic item-based interface for adding and removing items. QListWidget uses an internal model to manage each QListWidgetItem in the list. For a more flexible list view widget, use the QListView class with a standard model. List widgets are constructed in the same way as other widgets: QListWidget *listWidget = new QListWidget(this);The selectionMode() of a list widget determines how many of the items in the list can be selected at the same time, and whether complex selections of items can be created. This can be set with the setSelectionMode() function. There are two ways to add items to the list: they can be constructed with the list widget as their parent widget, or they can be constructed with no parent widget and added to the list later. If a list widget already exists when the items are constructed, the first method is easier to use: new QListWidgetItem(tr("Oak"), listWidget); QListWidgetItem *newItem = new QListWidgetItem; The current item in the list can be found with currentItem(), and changed with setCurrentItem(). The user can also change the current item by navigating with the keyboard or clicking on a different item. When the current item changes, the currentItemChanged() signal is emitted with the new current item and the item that was previously current. |
QListWidget继承自QListView, 所以ListWidget继承了QListView的所有方法
下面我们就用QListWidget做一个查看系统环境变量的小例子
一. 创建Ui
listwidget.ui
<?xml version="1.0" encoding="UTF-8"?>
<ui version="4.0">
<class>PyPath</class>
<widget class="QWidget" name="PyPath">
<property name="geometry">
<rect>
<x>0</x>
<y>0</y>
<width>735</width>
<height>401</height>
</rect>
</property>
<property name="windowTitle">
<string>Form</string>
</property>
<widget class="QGroupBox" name="groupBox">
<property name="geometry">
<rect>
<x>40</x>
<y>20</y>
<width>651</width>
<height>301</height>
</rect>
</property>
<property name="title">
<string>系统环境变量</string>
</property>
<widget class="QWidget" name="verticalLayoutWidget_2">
<property name="geometry">
<rect>
<x>20</x>
<y>20</y>
<width>621</width>
<height>261</height>
</rect>
</property>
<layout class="QVBoxLayout" name="verticalLayout_2">
<item>
<layout class="QHBoxLayout" name="horizontalLayout">
<item>
<widget class="QListWidget" name="listWidgetPath"/>
</item>
<item>
<layout class="QVBoxLayout" name="verticalLayout">
<item>
<widget class="QPushButton" name="btnAdd">
<property name="text">
<string>Add(&A)</string>
</property>
</widget>
</item>
<item>
<widget class="QPushButton" name="btnRemove">
<property name="text">
<string>Remove(&R)</string>
</property>
</widget>
</item>
<item>
<widget class="QPushButton" name="btnUp">
<property name="text">
<string>Move Up(&U)</string>
</property>
</widget>
</item>
<item>
<widget class="QPushButton" name="btnMovedown">
<property name="text">
<string>Move Down(&D)</string>
</property>
</widget>
</item>
<item>
<spacer name="verticalSpacer">
<property name="orientation">
<enum>Qt::Vertical</enum>
</property>
<property name="sizeHint" stdset="0">
<size>
<width>20</width>
<height>180</height>
</size>
</property>
</spacer>
</item>
</layout>
</item>
</layout>
</item>
<item>
<layout class="QHBoxLayout" name="horizontalLayout_2">
<item>
<widget class="QLabel" name="label">
<property name="text">
<string>说明:</string>
</property>
</widget>
</item>
<item>
<widget class="QTextEdit" name="textEditExplain"/>
</item>
<item>
<spacer name="horizontalSpacer">
<property name="orientation">
<enum>Qt::Horizontal</enum>
</property>
<property name="sizeHint" stdset="0">
<size>
<width>10</width>
<height>20</height>
</size>
</property>
</spacer>
</item>
</layout>
</item>
</layout>
</widget>
</widget>
<widget class="QPushButton" name="btnClose">
<property name="geometry">
<rect>
<x>500</x>
<y>350</y>
<width>75</width>
<height>23</height>
</rect>
</property>
<property name="text">
<string>Close</string>
</property>
</widget>
<widget class="QPushButton" name="btnHelp">
<property name="geometry">
<rect>
<x>600</x>
<y>350</y>
<width>75</width>
<height>23</height>
</rect>
</property>
<property name="text">
<string>Help(&H)</string>
</property>
</widget>
<widget class="QLabel" name="labelURL">
<property name="geometry">
<rect>
<x>20</x>
<y>380</y>
<width>81</width>
<height>16</height>
</rect>
</property>
<property name="text">
<string>by dcb3688</string>
</property>
</widget>
</widget>
<resources/>
<connections>
<connection>
<sender>btnClose</sender>
<signal>clicked()</signal>
<receiver>PyPath</receiver>
<slot>close()</slot>
<hints>
<hint type="sourcelabel">
<x>546</x>
<y>358</y>
</hint>
<hint type="destinationlabel">
<x>449</x>
<y>362</y>
</hint>
</hints>
</connection>
</connections>
</ui>
Ctrl+R 查看效果图

转换为py文件:
 # -*- coding: utf-8 -*-

 # Form implementation generated from reading ui file 'listwidget.ui'

 #

 # Created: Wed Feb 04 15:21:06 2015

 #      by: PyQt4 UI code generator 4.10.3

 #

 # WARNING! All changes made in this file will be lost!

 from PyQt4 import QtCore, QtGui

 try:

     _fromUtf8 = QtCore.QString.fromUtf8

 except AttributeError:

     def _fromUtf8(s):

         return s

 try:

     _encoding = QtGui.QApplication.UnicodeUTF8

     def _translate(context, text, disambig):

         return QtGui.QApplication.translate(context, text, disambig, _encoding)

 except AttributeError:

     def _translate(context, text, disambig):

         return QtGui.QApplication.translate(context, text, disambig)

 class Ui_PyPath(object):

     def setupUi(self, PyPath):

         PyPath.setObjectName(_fromUtf8("PyPath"))

         PyPath.resize(735, 401)

         self.groupBox = QtGui.QGroupBox(PyPath)

         self.groupBox.setGeometry(QtCore.QRect(40, 20, 651, 301))

         self.groupBox.setObjectName(_fromUtf8("groupBox"))

         self.verticalLayoutWidget_2 = QtGui.QWidget(self.groupBox)

         self.verticalLayoutWidget_2.setGeometry(QtCore.QRect(20, 20, 621, 261))

         self.verticalLayoutWidget_2.setObjectName(_fromUtf8("verticalLayoutWidget_2"))

         self.verticalLayout_2 = QtGui.QVBoxLayout(self.verticalLayoutWidget_2)

         self.verticalLayout_2.setMargin(0)

         self.verticalLayout_2.setObjectName(_fromUtf8("verticalLayout_2"))

         self.horizontalLayout = QtGui.QHBoxLayout()

         self.horizontalLayout.setObjectName(_fromUtf8("horizontalLayout"))

         self.listWidgetPath = QtGui.QListWidget(self.verticalLayoutWidget_2)

         self.listWidgetPath.setObjectName(_fromUtf8("listWidgetPath"))

         self.horizontalLayout.addWidget(self.listWidgetPath)

         self.verticalLayout = QtGui.QVBoxLayout()

         self.verticalLayout.setObjectName(_fromUtf8("verticalLayout"))

         self.btnAdd = QtGui.QPushButton(self.verticalLayoutWidget_2)

         self.btnAdd.setObjectName(_fromUtf8("btnAdd"))

         self.verticalLayout.addWidget(self.btnAdd)

         self.btnRemove = QtGui.QPushButton(self.verticalLayoutWidget_2)

         self.btnRemove.setObjectName(_fromUtf8("btnRemove"))

         self.verticalLayout.addWidget(self.btnRemove)

         self.btnUp = QtGui.QPushButton(self.verticalLayoutWidget_2)

         self.btnUp.setObjectName(_fromUtf8("btnUp"))

         self.verticalLayout.addWidget(self.btnUp)

         self.btnMovedown = QtGui.QPushButton(self.verticalLayoutWidget_2)

         self.btnMovedown.setObjectName(_fromUtf8("btnMovedown"))

         self.verticalLayout.addWidget(self.btnMovedown)

         spacerItem = QtGui.QSpacerItem(20, 180, QtGui.QSizePolicy.Minimum, QtGui.QSizePolicy.Expanding)

         self.verticalLayout.addItem(spacerItem)

         self.horizontalLayout.addLayout(self.verticalLayout)

         self.verticalLayout_2.addLayout(self.horizontalLayout)

         self.horizontalLayout_2 = QtGui.QHBoxLayout()

         self.horizontalLayout_2.setObjectName(_fromUtf8("horizontalLayout_2"))

         self.label = QtGui.QLabel(self.verticalLayoutWidget_2)

         self.label.setObjectName(_fromUtf8("label"))

         self.horizontalLayout_2.addWidget(self.label)

         self.textEditExplain = QtGui.QTextEdit(self.verticalLayoutWidget_2)

         self.textEditExplain.setObjectName(_fromUtf8("textEditExplain"))

         self.horizontalLayout_2.addWidget(self.textEditExplain)

         spacerItem1 = QtGui.QSpacerItem(10, 20, QtGui.QSizePolicy.Expanding, QtGui.QSizePolicy.Minimum)

         self.horizontalLayout_2.addItem(spacerItem1)

         self.verticalLayout_2.addLayout(self.horizontalLayout_2)

         self.btnClose = QtGui.QPushButton(PyPath)

         self.btnClose.setGeometry(QtCore.QRect(500, 350, 75, 23))

         self.btnClose.setObjectName(_fromUtf8("btnClose"))

         self.btnHelp = QtGui.QPushButton(PyPath)

         self.btnHelp.setGeometry(QtCore.QRect(600, 350, 75, 23))

         self.btnHelp.setObjectName(_fromUtf8("btnHelp"))

         self.labelURL = QtGui.QLabel(PyPath)

         self.labelURL.setGeometry(QtCore.QRect(20, 380, 81, 16))

         self.labelURL.setObjectName(_fromUtf8("labelURL"))

         self.retranslateUi(PyPath)

         QtCore.QObject.connect(self.btnClose, QtCore.SIGNAL(_fromUtf8("clicked()")), PyPath.close)

         QtCore.QMetaObject.connectSlotsByName(PyPath)

     def retranslateUi(self, PyPath):

         PyPath.setWindowTitle(_translate("PyPath", "Form", None))

         self.groupBox.setTitle(_translate("PyPath", "系统环境变量", None))

         self.btnAdd.setText(_translate("PyPath", "Add(&A)", None))

         self.btnRemove.setText(_translate("PyPath", "Remove(&R)", None))

         self.btnUp.setText(_translate("PyPath", "Move Up(&U)", None))

         self.btnMovedown.setText(_translate("PyPath", "Move Down(&D)", None))

         self.label.setText(_translate("PyPath", "说明:", None))

         self.btnClose.setText(_translate("PyPath", "Close", None))

         self.btnHelp.setText(_translate("PyPath", "Help(&H)", None))

         self.labelURL.setText(_translate("PyPath", "by dcb3688", None))

 if __name__ == "__main__":

     import sys

     app = QtGui.QApplication(sys.argv)

     PyPath = QtGui.QWidget()

     ui = Ui_PyPath()

     ui.setupUi(PyPath)

     PyPath.show()

     sys.exit(app.exec_())
二. 新建逻辑页面
新建逻辑页面为 mainlist.py
引入ui
from listwidget import Ui_PyPath
通过Python的内置函数获取系统的环境变量
os.environ["PATH"]
拆分PATH字符串生成列表
通过ListWidget的 addItems方法添加到列表中
 pathV = os.environ["PATH"]

 splitPath = pathV.split(';')

 self.UI.listWidgetPath.addItems(splitPath)  # 添加列表框项
通过 itemClicked(QListWidgetItem *) 信号触发meit 事件
self.connect(self.UI.listWidgetPath, SIGNAL('itemClicked(QListWidgetItem *)'), self.itemClicked) # 点击事件
逻辑页面完整代码:
 # -*- coding: utf-8 -*-

 import sys

 from PyQt4.QtCore import *

 from PyQt4.QtGui import *

 from listwidget import Ui_PyPath

 import icoqrc

 import os

 class mainlist(QWidget):

     def __init__(self, parent=None):

         super(mainlist, self).__init__(parent)

         self.UI = Ui_PyPath()

         self.UI.setupUi(self)

         self.setWindowTitle('ListWidget')

         self.setWindowIcon(QIcon(':qq.ico'))

         self.setFixedSize(self.width(), self.height())

         self.setWindowFlags(Qt.WindowMinimizeButtonHint)

         pathV = os.environ["PATH"]

         splitPath = pathV.split(';')

         self.UI.listWidgetPath.addItems(splitPath)  # 添加列表框项

         self.connect(self.UI.listWidgetPath, SIGNAL('itemClicked(QListWidgetItem *)'), self.itemClicked)  # 点击事件

         self.connect(self.UI.listWidgetPath, SIGNAL('itemDoubleClicked (QListWidgetItem *)'), self.itemDoubleClicked)  #  双击事件

         self.connect(self.UI.btnAdd, SIGNAL('clicked()'), self.btnAdd)  # 新建

         self.connect(self.UI.btnRemove, SIGNAL('clicked()'), self.btnRemove)  # 移除

         self.connect(self.UI.btnUp, SIGNAL('clicked()'), self.btnMoveup)  # 上移

         self.connect(self.UI.btnMovedown, SIGNAL('clicked()'), self.btnMovedown)  # 下移

         self.UI.labelURL.setOpenExternalLinks(True)

         self.UI.labelURL.setText('<a href="http://dcb3688.cnblogs.com/"><b style="color:#0000ff;">by dcb3688</b></a></body></html>')

         self.connect(self.UI.btnHelp, SIGNAL('clicked()'), self.cnblog)  # 跳转到cnblogs

     # 列表单击事件

     def itemClicked(self):

         acurrent=str(self.UI.listWidgetPath.currentItem().text())  # 获取当前item的文本

         if acurrent.find('System32') >= 0:

             self.UI.textEditExplain.setText(u'系统目录:'+acurrent)

         elif acurrent.find('SVN') >= 0:

             self.UI.textEditExplain.setText(u'版本控制器Svn:'+acurrent)

         elif acurrent.find('Git') >= 0:

             self.UI.textEditExplain.setText(u'版本控制器Git:'+acurrent)

         elif acurrent.find('Windows') >= 0:

             self.UI.textEditExplain.setText(u'系统目录:'+acurrent)

         elif acurrent.find('Python') >= 0:

             self.UI.textEditExplain.setText(u'Python安装目录:'+acurrent)

         else:

             self.UI.textEditExplain.setText(u'未识别')

     # 列表双击事件

     def itemDoubleClicked(self):

         QMessageBox.question(self, (u'提示'),(u'item的双击事件!'),QMessageBox.Yes)

     # 新建操作

     def btnAdd(self):

         # 预定义对话框

         DialogText, Ok = QInputDialog.getText(self, u'新建环境变量', u'请输入环境变量路径:')

         if Ok:

             # 获取当前的列, 判断在新建之前是否选中过list

             GetCurrentRow = self.UI.listWidgetPath.currentRow()

             if GetCurrentRow:

                 self.UI.listWidgetPath.insertItem(GetCurrentRow, DialogText)

             else:

                 self.UI.listWidgetPath.insertItem(0, DialogText)

     # 移除操作

     def btnRemove(self):

         GetCurrentRow = self.UI.listWidgetPath.currentRow()

         if not GetCurrentRow:

             QMessageBox.warning(self, (u'提示'),(u'请先选择移除的List!'), QMessageBox.Yes)

         else:

             Ok= QMessageBox.warning(self, (u'提示'),(u'确定要移除该List吗?'), QMessageBox.Yes, QMessageBox.No)

             if Ok==QMessageBox.Yes:

                 self.UI.listWidgetPath.takeItem(GetCurrentRow)  # 移除

     # 上移

     def btnMoveup(self):

         GetCurrentRow = self.UI.listWidgetPath.currentRow()

         if GetCurrentRow > 0:

             newRow = GetCurrentRow-1  # 索引号减1

             takeSelf=self.UI.listWidgetPath.takeItem(GetCurrentRow)  # 取元素值,并在新索引位置插入

             self.UI.listWidgetPath.insertItem(newRow, takeSelf)

             #设置当前元素索引为新插入位置,可以使得元素连续上移

             self.UI.listWidgetPath.setCurrentRow(newRow)

     # 下移

     def btnMovedown(self):

         GetCurrentRow = self.UI.listWidgetPath.currentRow()

         if GetCurrentRow < self.UI.listWidgetPath.count():

             newRow = GetCurrentRow+1

             self.UI.listWidgetPath.insertItem(newRow, self.UI.listWidgetPath.takeItem(GetCurrentRow))

             self.UI.listWidgetPath.setCurrentRow(newRow)

     # 打开cnblogs

     def cnblog(self):

         QDesktopServices.openUrl(QUrl('http://dcb3688.cnblogs.com/p/4273444.html'))

     def keyPressEvent(self, event):

         if event.key() == Qt.Key_Escape:

             self.close()

 if __name__ == '__main__':

     app = QApplication(sys.argv)

     mainclass = mainlist()

     mainclass.show()

     app.exec_()
三. 运行效果

四. 问题
这个问题是关于Python获取系统环境变量问题,既然能获取系统环境变量相应的应该也可修改或新增环境变量,本例子中仅获取环境变量,新增只是ListWidget的例子,没有真正修改系统的环境变量,所以下次在编辑本片文章就是新增修改系统环境变量的问题!
Pyqt QListWidget 展示系统环境变量的更多相关文章
- 使用VBScript实现设置系统环境变量的小程序
本人有点桌面洁癖,桌面上只放很少的东西,很多软件都用快捷键调出.最近频繁用到一个软件,我又不想放个快捷方式在桌面,也不想附到开始菜单,于是乎想将其所在目录附加到系统环境变量Path上,以后直接在运行中 ...
- 配置windows 系统PHP系统环境变量
1. 首先到php官网下载php-5.3.6-nts-Win32-VC9-x86.ZIP 解压到电脑硬盘.将文件解压到文件夹php5.3.6下载地址:http://www.php.net/downlo ...
- Mac 系统环境变量配置
Mac 系统环境变量配置 例如这里要配置一下 QUICK_V3_ROOT 的环境变量 1.打开终端 输入 vim ~/.bash_profile 2.一直回车 知道出现以下选项 按 E 编辑 ...
- Visual Studio 2012系统环境变量设置(命令行)
方法1.运行脚本vsvars32.bat:D:\Program Files (x86)\Microsoft Visual Studio 11.0\Common7\Tools\vsvars32.bat ...
- bat批处理设置Java JDK系统环境变量文件
自己修改第3行的Java安装目录就可以设置JAVA_HOME, classPath,追加到PATH的最前面 JAVA_HOME=C:\Program Files\Java\jdk1.6.0_10 cl ...
- [Java] JDK 系统环境变量设置 bat
@echo off set regpath=HKEY_LOCAL_MACHINE\SYSTEM\CurrentControlSet\Control\Session Manager\Environmen ...
- OpenCV的安装与系统环境变量
OpenCV的安装与系统环境变量 安装OpenCV本来是很简单的一件事,但配置却很麻烦.而且在配置过程中尤为重要的步骤就是系统环境变量的配置.我使用的是CodeBlick13.12与OpenCV1.0 ...
- DOS永久设置系统环境变量-WMIC
wmic Windows Management Instrumentation Command-line(Windows管理规范命令行) WMIC扩展WMI(Windows Management In ...
- linux系统环境变量.bash_profile/bashrc文件
系统环境变量的查看: [root@localhost ~]# envHOSTNAME=localhost.localdomainSELINUX_ROLE_REQUESTED=TERM=xtermSHE ...
随机推荐
- Triangle
动态规划 int minimumTotal (vector<vector<int>>& triangle) { ; i >= ; --i) ; j < i ...
- ubuntu 出现g++ : Depends: g++-4.8 (>= 4.8.2-5~) but it is not going to be installed
Ubuntu 你可以安装搜狗输入法也可以使用sunpingyin,看个人爱好. 唯一要注意的是,不能把系统的更新关了,否则会出现一大堆的问题,连g++都无法安装. 在设置里面: 我以前有一个很不好的习 ...
- linux kernel i2c底层代码跟踪
其实跟上次跟的平台总线有关 在arch/arm/mach-mx6/board-mx6q_sabresd.c 文件中 static void __init mx6_sabresd_board_init( ...
- Codeforces 727 F. Polycarp's problems
Description 有一个长度为 \(n\) 有正负权值的序列,你一开始有一个值,每次到一个权值就加上,最少需要删掉多少数值才能到序列末尾.\(n \leqslant 750,m \leqslan ...
- ubuntu下配置apache2多域名(apache2.4.6)
Ubuntu 在 Linux 各发行版中, 个人用户数量最多的. 很多人在本机和虚拟机中使用. 但 Ubuntu 和 Redhat 的 VirtualHost 设置方法不相同. 1. 打开目录 /et ...
- CentOS完美搭建Redis3.0集群并附测试
线上的统一聊天和推送项目使用的是redis主从,redis版本2.8.6 redis主从和mysql主从目的差不多,但redis主从配置很简单,主要在从节点配置文件指定主节点ip和端口:slaveof ...
- nginx泛域名解析实现二级域名多域名
利用nginx泛域名解析配置二级域名和多域名 网站的目录结构为html├── bbs└── www html为nginx的安装目录下默认的存放源代码的路径. bbs为论坛程序源代码路径www为主页程序 ...
- SQL 执行计划(二)
最近总想整理下对MSSQL的一些理解与感悟,却一直没有心思和时间写,晚上无事便写了一篇探索MSSQL执行计划,本文讲执行计划但不仅限于讲执行计划. 网上的SQL优化的文章实在是很多,说实在的,我也曾经 ...
- 如何准确高效的获取数据库新插入数据的主键id
例如我们新建了一张表UserInformation,字段如下Id,为主键,自增,其它字段Name,Pwd,Email 然后我们来执行一个新增插入操作: insert into UserInformat ...
- WPF页面 全球化和本地化
传统的 新建.resx类型的文件中,然后利用ResourceManager来得到相应资源并根据当地的CultureInfo来给界面文本赋值. WPF 新建一个文件夹 Language 新建2个资源字典 ...