[转]ASP.NET MVC 2: Model Validation
[In addition to blogging, I am also now using Twitter for quick updates and to share links. Follow me at: twitter.com/scottgu]
This is the second in a series of blog posts I’m doing on the upcoming ASP.NET MVC 2 release. This blog post covers some of the validation improvements coming with ASP.NET MVC 2.
ASP.NET MVC 2 Validation
Validating user-input and enforcing business rules/logic is a core requirement of most web applications. ASP.NET MVC 2 includes a bunch of new features that make validating user input and enforcing validation logic on models/viewmodels significantly easier. These features are designed so that the validation logic is always enforced on the server, and can optionally also be enforced on the client via JavaScript. The validation infrastructure and features in ASP.NET MVC 2 are designed so that:
1) Developers can easily take advantage of the DataAnnotation validation support built-into the .NET Framework. DataAnnotations provide a really easy way to declaratively add validation rules to objects and properties with minimal code.
2) Developers can optionally integrate either their own validation engine, or take advantage of existing validation frameworks like Castle Validator or the EntLib Validation Library. ASP.NET MVC 2’s validation features are designed to make it easy to plug-in any type of validation architecture – while still taking advantage of the new ASP.NET MVC 2 validation infrastructure (including client-side validation, model binding validation, etc).
This means that enabling validation is really easy for common application scenarios, while at the same time still remaining very flexible for more advanced ones.
Enabling Validation with ASP.NET MVC 2 and DataAnnotations
Let’s walkthrough a simple CRUD scenario with ASP.NET MVC 2 that takes advantage of the new built-in DataAnnotation validation support. Specifically, let’s implement a “Create” form that enables a user to enter friend data:
We want to ensure that the information entered is valid before saving it in a database – and display appropriate error messages if it isn’t:
We want to enable this validation to occur on both the server and on the client (via JavaScript). We also want to ensure that our code maintains the DRY principle (“don’t repeat yourself”) – meaning that we should only apply the validation rules in one place, and then have all our controllers, actions and views honor it.
Below I’m going to be using VS 2010 to implement the above scenario using ASP.NET MVC 2. You could also implement the exact same scenario using VS 2008 and ASP.NET MVC 2 as well.
Step 1: Implementing a FriendsController (with no validation to begin with)
We’ll begin by adding a simple “Person” class to a new ASP.NET MVC 2 project that looks like below:
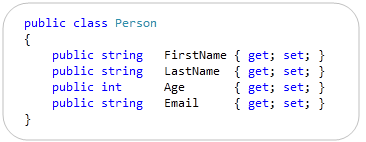
It has four properties (implemented using C#’s automatic property support, which VB in VS 2010 now supports too – woot!).
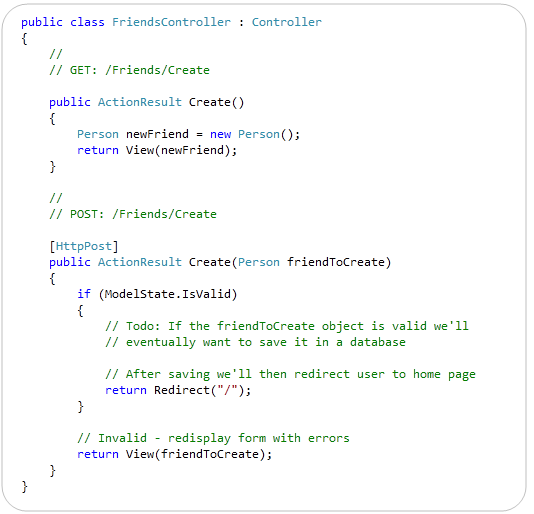
We’ll then add a “FriendsController” controller class to our project that exposes two “Create” action methods. The first action method is called when an HTTP-GET request comes for the /Friends/Create URL. It will display a blank form for entering person data. The second action method is called when an HTTP-POST request comes for the /Friends/Create URL. It maps the posted form input to a Person object, verifies that no binding errors occurred, and if it is valid will eventually save it to a database (we’ll implement the DB work later in this tutorial). If the posted form input is invalid, the action method redisplays the form with errors:
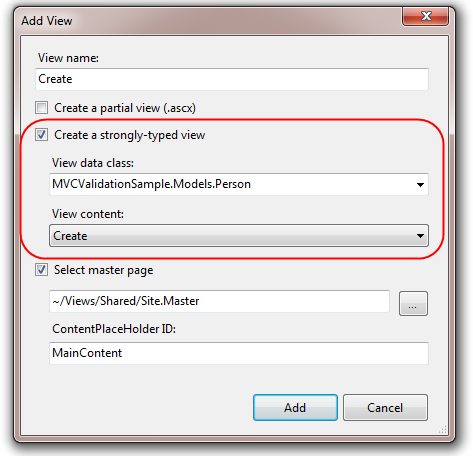
After we’ve implemented our controller, we can right-click within one of its action methods and choose the “Add View” command within Visual Studio – which will bring up the “Add View” dialog. We’ll choose to scaffold a “Create” view that is passed a Person object:
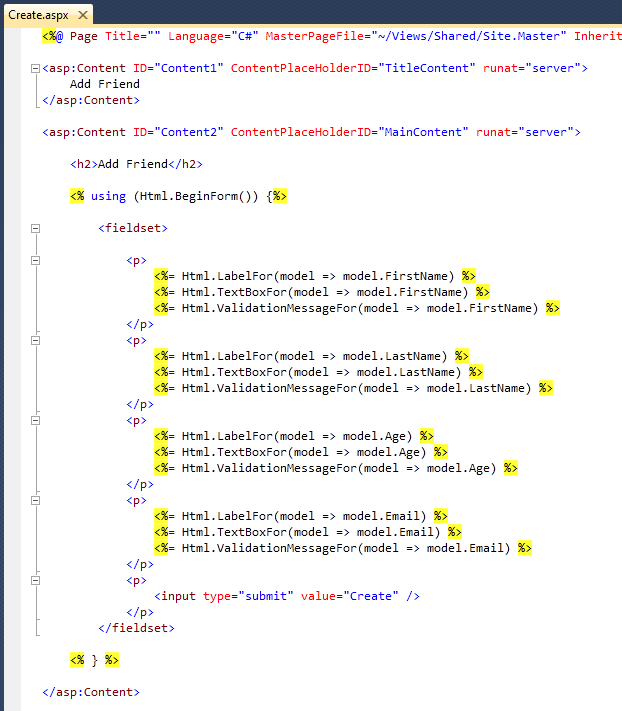
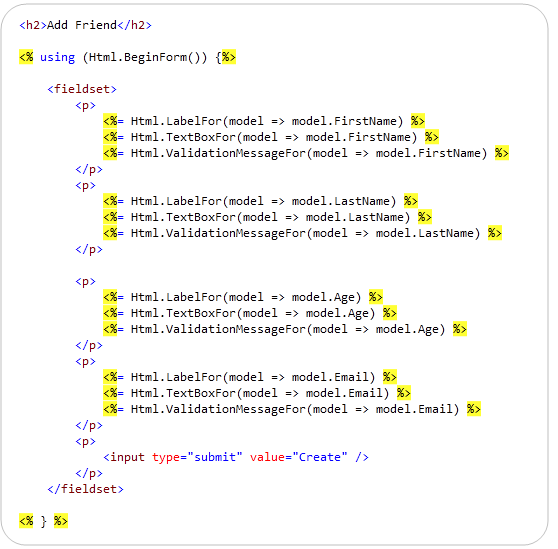
Visual Studio will then generate a scaffolded Create.aspx view file for us under the \Views\Friends\ directory of our project. Notice below how it takes advantage of the new strongly-typed HTML helpers in ASP.NET MVC 2 (enabling better intellisense and compile time checking support):
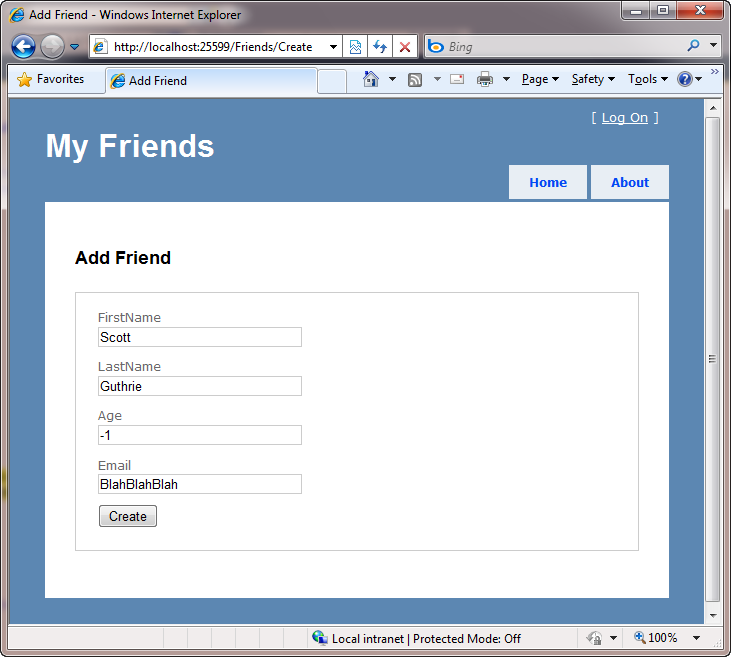
And now when we run the application and hit the /Friends/Create URL we’ll get a blank form that we can enter data into:
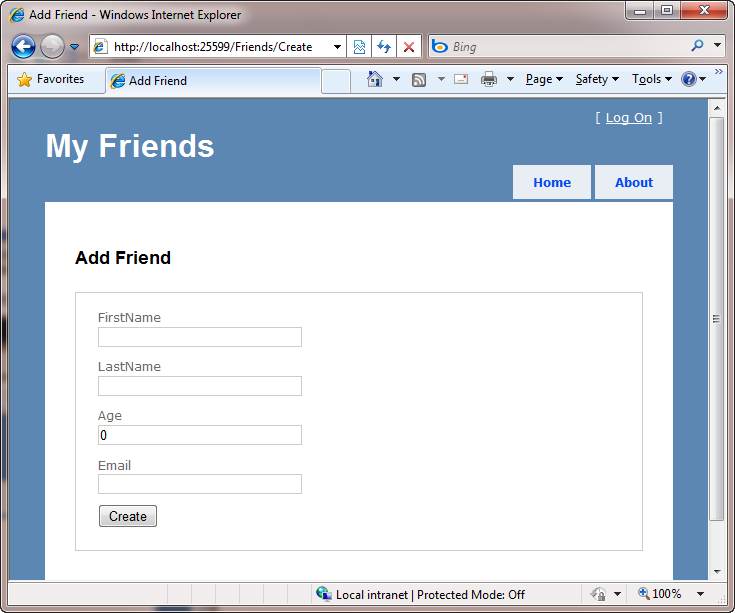
Because we have not implemented any validation within the application, though, nothing prevents us from entering bogus input within the form and posting it to the server.
Step 2: Enabling Validation using DataAnnotations
Let’s now update our application to enforce some basic input validation rules. We’ll implement these rules on our Person model object – and not within our Controller or our View. The benefit of implementing the rules within our Person object is that this will ensure that the validation will be enforced via any scenario within our application that uses the Person object (for example: if we later added an edit scenario). This will help ensure that we keep our code DRY and avoid repeating rules in multiple places.
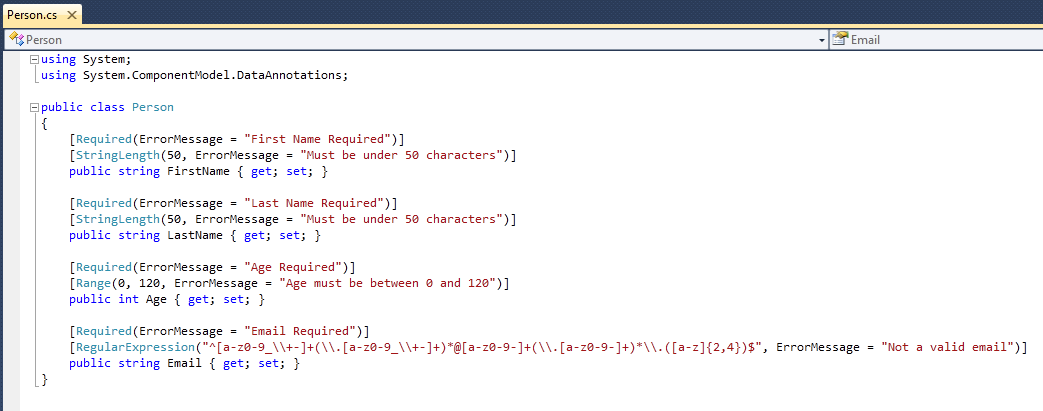
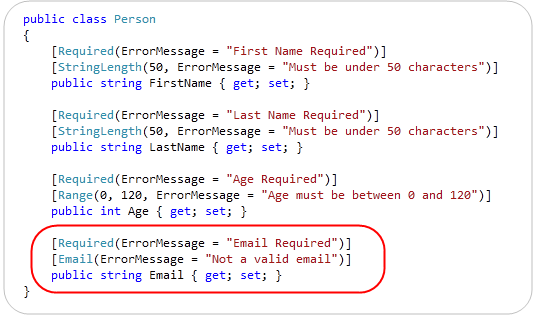
ASP.NET MVC 2 enables developers to easily add declarative validation attributes to model or viewmodel classes, and then have those validation rules automatically be enforced whenever ASP.NET MVC performs model binding operations within an application. To see this in action, let’s update our Person class to have a few validation attributes on it. To do this we’ll add a “using” statement for the “System.ComponentModel.DataAnnotations” namespace to the top of the file – and then decorate the Person properties with [Required], [StringLength], [Range], and [RegularExpression] validation attributes (which are all implemented within that namespace):
Note: Above we are explicitly specifying error messages as strings. Alternatively you can define them within resource files and optionally localize them depending on the language/culture of the incoming user. You can learn more about how to localize validation error messages here.
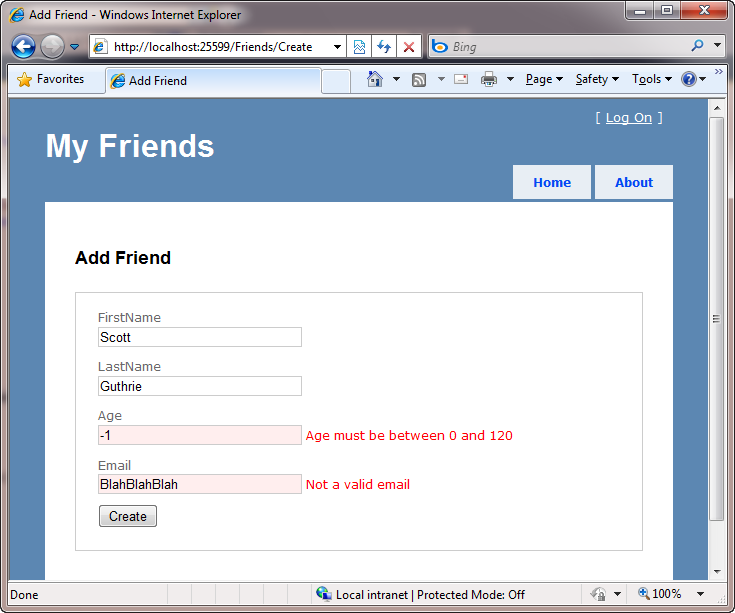
Now that we’ve added the validation attributes to our Person class, let’s re-run our application and see what happens when we enter bogus values and post them back to the server:
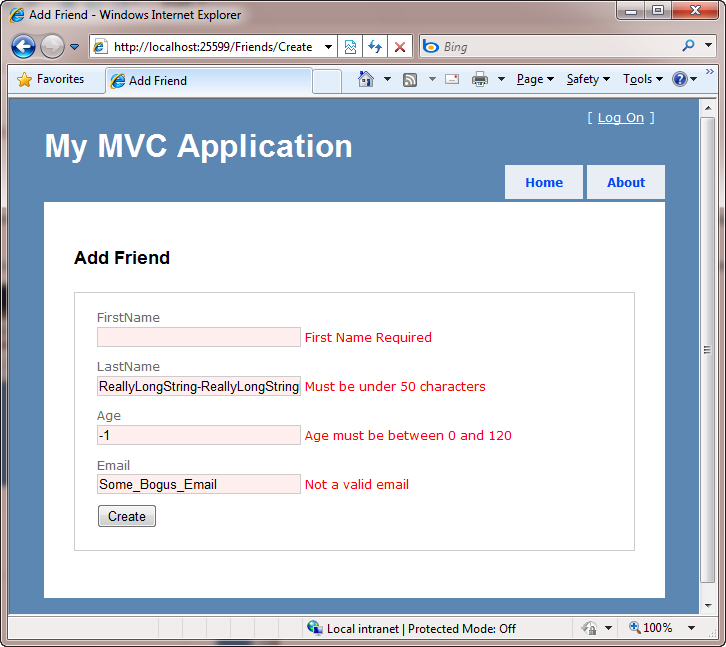
Notice above how our application now has a decent error experience. The text elements with the invalid input are highlighted in red, and the validation error messages we specified are displayed to the end user about them. The form is also preserving the input data the user originally entered – so that they don't have to refill anything. How though, you might ask, did this happen?
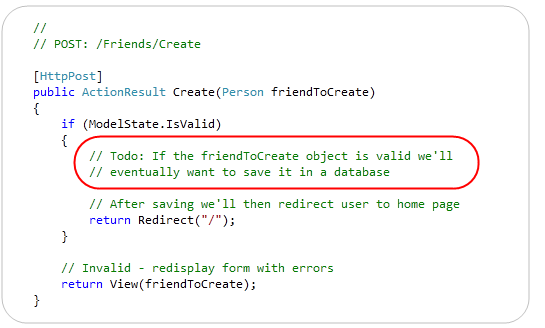
To understand this behavior, let’s look at the Create action method that handles the POST scenario for our form:
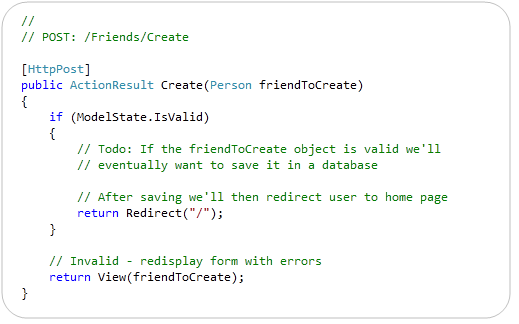
When our HTML form is posted back to the server, the above method will be called. Because the action method accepts a “Person” object as a parameter, ASP.NET MVC will create a Person object and automatically map the incoming form input values to it. As part of this process, it will also check to see whether the DataAnnotation validation attributes for the Person object are valid. If everything is valid, then the ModelState.IsValid check within our code will return true – in which case we will (eventually) save the Person to a database and then redirect back to the home-page.
If there are any validation errors on the Person object, though, our action method redisplays the form with the invalid Person. This is done via the last line of code in the code snippet above.
The error messages are then displayed within our view because our Create form has <%= Html.ValidationMessageFor() %> helper method calls next to each <%= Html.TextBoxFor() %> helper. The Html.ValidationMessageFor() helper will output the appropriate error message for any invalid model property passed to the view:
The nice thing about this pattern/approach is that it is pretty easy to setup – and it then allows us to easily add or change validation rules on our Person class without having to change any code within our controllers or views. This ability to specify the validation rules one place and have it be honored and respected everywhere allows us to rapidly evolve our application and rules with a minimum amount of effort and keep our code very DRY.
Step 3: Enabling Client-side Validation
Our application currently only performs server-side validation – which means that our end users will need to perform a form submit to the server before they’ll see any validation error messages.
One of the cool things about ASP.NET MVC 2’s validation architecture is that it supports both server-side and client-side validation. To enable this, all we need to do is to add two JavaScript references to our view, and write one line of code:
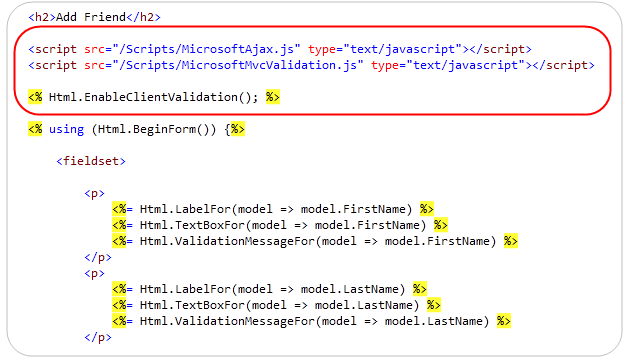
When we add these three lines, ASP.NET MVC 2 will use the validation meta-data we’ve added to our Person class and wire-up client-side JavaScript validation logic for us. This means that users will get immediate validation errors when they tab out of an input element that is invalid.
To see the client-side JavaScript support in action for our friends application, let’s rerun the application and fill in the first three textboxes with legal values – and then try and click “Create”. Notice how we’ll get an immediate error message for our missing value without having to hit the server:
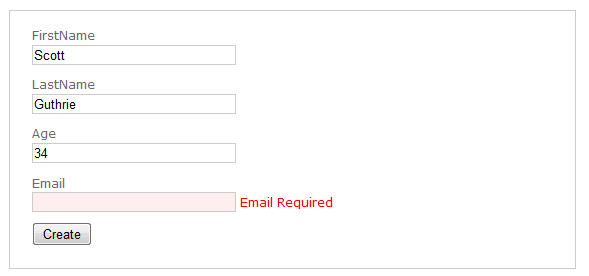
If we enter some text that is not a legal email the error message will immediately change from “Email Required” to “Not a valid email” (which are the error messages we specified when we added the rules to our Person class):

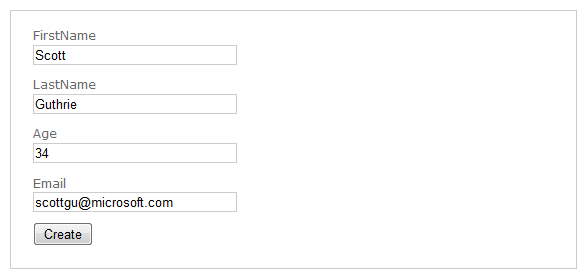
When we enter a legal email the error message will immediately disappear and the textbox background color will go back to its normal state:
The nice thing is that we did not have to write any custom JavaScript of our own to enable the above validation logic. Our validation code is also still very DRY- we can specify the rules in one place and have them be enforced across all across the application – and on both the client and server.
Note that for security reasons the server-side validation rules always execute even if you have the client-side support enabled. This prevents hackers from trying to spoof your server and circumvent the client-side rules.
The client-side JavaScript validation support in ASP.NET MVC 2 can work with any validation framework/engine you use with ASP.NET MVC. It does not require that you use the DataAnnotation validation approach – all of the infrastructure works independent of DataAnnotations and can work with Castle Validator, the EntLib Validation Block, or any custom validation solution you choose to use.
If you don’t want to use our client-side JavaScript files, you can also substitute in the jQuery validation plugin and use that library instead. The ASP.NET MVC Futures download will include support for enable jQuery validation against the ASP.NET MVC 2 server-side validation framework as well.
Step 4: Creating a Custom [Email] Validation Attribute
The System.ComponentModel.DataAnnotations namespace within the .NET Framework includes a number of built-in validation attributes that you can use. We’ve used 4 different ones in the sample above - [Required], [StringLength], [Range], and [RegularExpression].
You can also optionally define your own custom validation attributes and use them as well. You can define completely custom attributes by deriving from the ValidationAttribute base class within the System.ComponentModel.DataAnnotations namespace. Alternatively, you can choose to derive from any of the existing validation attributes if you want to simply extend their base functionality.
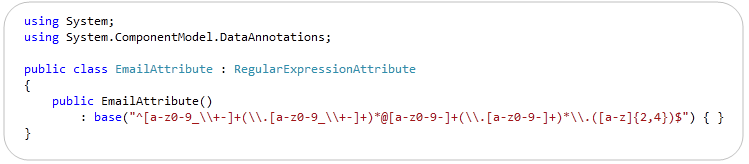
For example, to help clean up the code within our Person class we might want to create a new [Email] validation attribute that encapsulates the regular expression to check for valid emails. To do this we can simply derive it from the RegularExpression base class like so, and call the RegularExpression’s base constructor with the appropriate email regex:
We can then update our Person class to use our new [Email] validation attribute in place of the previous regular expression we used before – which makes the code more clean and encapsulated:
When creating custom validation attributes you can specify validation logic that runs both on the server and on the client via JavaScript.
In addition to creating validation attributes that apply to individual properties on an object, you can also apply validation attributes at the class level – which allows you to perform validation logic across multiple properties within an object. For an example of this in action, you can review the “PropertiesMustMatchAttribute” custom attribute that is included in the AccountModels.cs/vb file within the default ASP.NET MVC 2 application project template (just do a File->New ASP.NET MVC 2 Web Project within VS 2010 and look for this class).
Step 5: Persisting to a Database
Let’s now implement the logic necessary to save our friends to a database.
Right now we are simply working against a plain-old C# class (sometimes referred to as a “POCO” class - “plain old CLR (or C#) object”). One approach we could use would be to write some separate persistence code that maps this existing class we’ve already written to a database. Object relational mapping (ORM) solutions like NHibernate support this POCO / PI style of mapping today very well. The ADO.NET Entity Framework (EF) that ships with .NET 4 will also support POCO / PI mapping, and like NHibernate will also optionally enable the ability to define persistence mappings in a “code only” way (no mapping file or designers required).
If our Person object was mapped to a database in this way then we wouldn’t need to make any changes to our Person class or to any of our validation rules – it would continue to work just fine.
But what if we are using a graphical tool for our ORM mappings?
Many developers using Visual Studio today don’t write their own ORM mapping/persistence logic – and instead use the built-in designers within Visual Studio to help manage this.
One question that often comes up when using DataAnnotations (or any other form of attribute based validation) is “how do you apply them when the model object you are working with is created/maintained by a GUI designer”. For example, what if instead of having a POCO style Person class like we’ve been using so far, we instead defined/maintained our Person class within Visual Studio via a GUI mapping tool like the LINQ to SQL or ADO.NET EF designer:
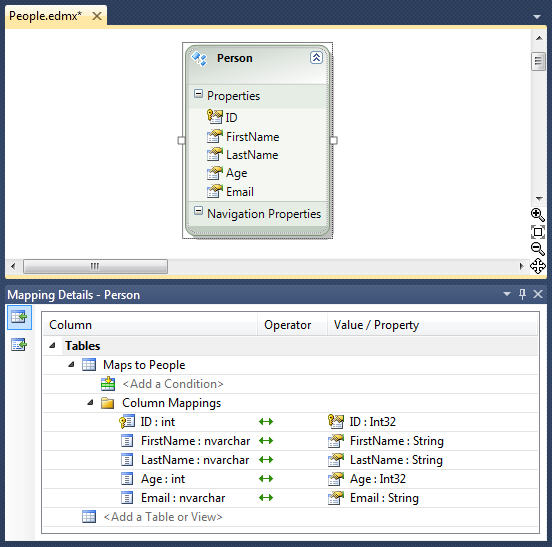
Above is a screen-shot that shows a Person class defined using the ADO.NET EF designer in VS 2010. The window at the top defines the Person class, the window at the bottom shows the mapping editor for how its properties map to/from a “People” table within a database. When you click save on the designer it automatically generates a Person class for you within your project. This is great, except that every time you make a change and hit save it will re-generate the Person class – which would cause any validation attribute declarations you make on it to be lost.
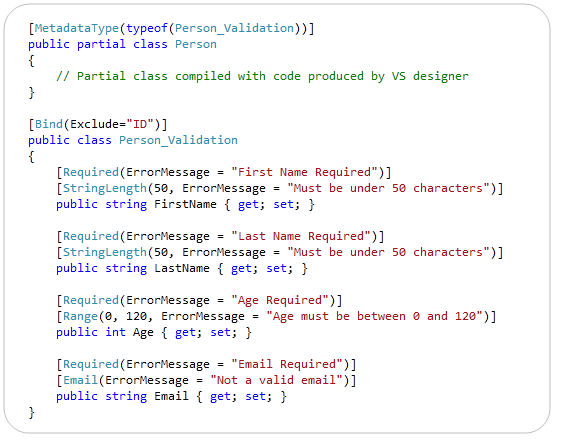
One way you can apply additional attribute-based meta-data (like validation attributes) to a class that is auto-generated/maintained by a VS designer is to employ a technique we call “buddy classes”. Basically you create a separate class that contains your validation attributes and meta-data, and then link it to the class generated by the designer by applying a “MetadataType” attribute to a partial class that is compiled with the tool-generated class. For example, if we wanted to apply the validation rules we used earlier to a Person class maintained by a LINQ to SQL or ADO.NET EF designer we could update our validation code to instead live in a separate “Person_Validation” class that is linked to the “Person” class created by VS using the code below:
The above approach is not as elegant as a pure POCO approach – but has the benefit of working with pretty much any tool or designer-generated code within Visual Studio.
Last Step – Saving the Friend to the Database
Our last step – regardless of whether we use a POCO or tool-generated Person class – will be to save our valid friends into the database.
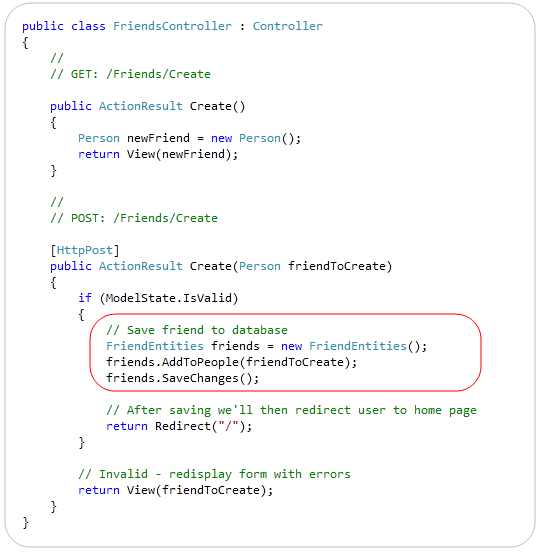
Doing that simply requires us to replace the “Todo” placeholder statement within our FriendsController class with 3 lines of code that saves the new friend to a database. Below is the complete code for the entire FriendsController class - when using ADO.NET EF to do the database persistence for us:
And now when we visit the /Friends/Create URL we can easily add new People to our friends database:
Validation for all the data is enforced on both the client and server. We can easily add/modify/delete validation rules in one place, and have those rules be enforced by all controllers and views across our application.
Summary
ASP.NET MVC 2 makes it much easier to integrate validation into web applications. It promotes a model-based validation approach that enables you to keep your applications very DRY, and helps ensure that validation rules are enforced consistently throughout an application. The built-in DataAnnotations support within ASP.NET MVC 2 makes supporting common validation scenarios really easy out of the box. The extensibility support within the ASP.NET MVC 2 validation infrastructure then enables you to support a wide variety of more advanced validation scenarios – and plugin any existing or custom validation framework/engine.
Hope this helps,
Scott
[转]ASP.NET MVC 2: Model Validation的更多相关文章
- 区别:ASP.NET MVC的Model、DTO、Command
最近在用CQRS架构模式做项目,有些感悟,记录下来. 问题的描述(大家是否也存在过类似的情况呢?): 从刚开始时项目中没有区分这3种对象,所以导致了很多职责公用,然后就乱了,比如Command一部分职 ...
- Asp.net MVC的Model Binder工作流程以及扩展方法(2) - Binder Attribute
上篇文章中分析了Custom Binder的弊端: 由于Custom Binder是和具体的类型相关,比如指定类型A由我们的Custom Binder解析,那么导致系统运行中的所有Action的访问参 ...
- Asp.net MVC的Model Binder工作流程以及扩展方法(1) - Custom Model Binder
在Asp.net MVC中, Model Binder是生命周期中的一个非常重要的部分.搞清楚Model Binder的流程,能够帮助理解Model Binder的背后发生了什么.同时该系列文章会列举 ...
- ASP.NET MVC 3 Model【通过一简单实例一步一步的介绍】
今天主要讲Model的两个方面: 1. ASP.Net MVC 3 Model 简介 通过一简单的事例一步一步的介绍 2. ASP.Net MVC 3 Model 的一些验证 MVC 中 Model ...
- Asp.net MVC的Model Binder工作流程以及扩展方法(1)
Asp.net MVC的Model Binder工作流程以及扩展方法(1)2014-03-19 08:02 by JustRun, 523 阅读, 4 评论, 收藏, 编辑 在Asp.net MVC中 ...
- ASP.NET MVC 之Model的呈现
ASP.NET MVC 之Model的呈现(仅此一文系列三) 本文目的 我们来看一个小例子,在一个ASP.NET MVC项目中创建一个控制器Home,只有一个Index: public class H ...
- ASP.NET MVC传递Model到视图的多种方式总结
ASP.NET MVC传递Model到视图的多种方式总结 有多种方式可以将数据传递到视图,如下所示: ViewData ViewBag PartialView TempData ViewModel T ...
- ASP.NET MVC传递Model到视图的多种方式之通用方式的使用
ASP.NET MVC传递Model到视图的多种方式总结——通用方式的使用 有多种方式可以将数据传递到视图,如下所示: ViewData ViewBag PartialView TempData Vi ...
- 仅此一文让你明白ASP.NET MVC 之Model的呈现(仅此一文系列三)
本文目的 我们来看一个小例子,在一个ASP.NET MVC项目中创建一个控制器Home,只有一个Index: public class HomeController : Controller { pu ...
随机推荐
- e2e 自动化集成测试 环境搭建 Node.js Selenium WebDriverIO Mocha Node-Inspector
Node.js已经出来了许多年载,至今才开始接触.周未在家闲来无事,一时心血来潮,Google了大量的文章,经过实验,终于可以把整个环境给搭起来, 废话不多话,请看步骤. 特别注意, 本文章是针对Wi ...
- [2015更新]用Word2007写CSDN博客
搞了半天终于可以用word2007发布CSDN博客了,特分享出来,以方便其他用户. 所示的界面. 图1 office按钮 所示的管理账号,然后点击"新建"也可以进入图3所示 ...
- CCF 认证4
题意:求强联通分量 Tarjan算法 #include<iostream> #include<stdio.h> #include<stdlib.h> #includ ...
- 关于win10安装VisualSVN遇到的一个问题及解决办法
问题:在win10系统中安装VisaulSVN遇到问题,错误提示:There is problem with this Windows Installer package. A DLL require ...
- c++拼接字符串效率比较(+=、append、stringstream、sprintf)
转自:http://www.cnblogs.com/james6176/p/3222671.html c++拼接字符串效率比较(+=.append.stringstream.sprintf) 最近写的 ...
- HW6.24
public class Solution { public static void main(String[] args) { int count = 0; int color; int numbe ...
- leetcode@ [129] Sum Root to Leaf Numbers (DFS)
https://leetcode.com/problems/sum-root-to-leaf-numbers/ Given a binary tree containing digits from 0 ...
- C语言的格式控制符
1. 格式控制符 格式输出printf 作用是向终端输出若干个类型任意的数据. 格式:printf (格式控制符,输出列表) 1) 格式控制符 l % ...
- 重新学习struts
这就是所谓的一边工作一边学习. 今天准备把给公司写个管理页面,按照之前的路数,写起来应该挺快,但是不太规范.也就沉下心来学习一下了. 第一个学习的是,之前,在学校,听师兄说过,对页面编码可用inter ...
- 如果将synthesize省略,语义特性声明为assign retain copy时,自己实现setter和getter方法
如果将synthesize省略,并且我们自己实现setter和getter方法时,系统就不会生成对应的setter和getter方法,还有实例变量 1,当把语义特性声明为assign时,setter和 ...