Vue.js—组件快速入门及Vue路由实例应用
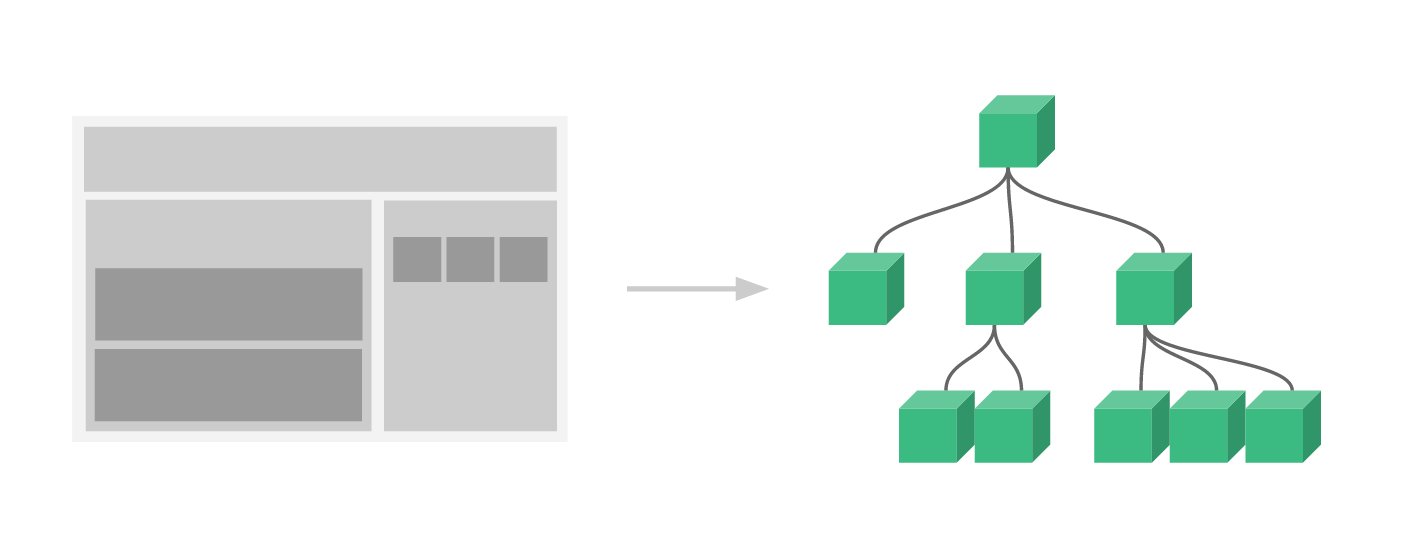
上次我们学习了Vue.js的基础,并且通过综合的小实例进一步的熟悉了Vue.js的基础应用。今天我们就继续讲讲Vue.js的组件,更加深入的了解Vue,js的使用。首先我们先了解一下什么是Vue.js的组件,组件其实就是页面组成的一部分,它是一个具有独立的逻辑和功能或页面,组件可以扩展 HTML 元素,封装可重用的代码。组件系统让我们可以用独立可复用的小组件来构建大型应用,几乎任意类型的应用的界面都可以抽象为一个组件树,如下图:
接下来我们就仔细讲讲组件的使用吧。
| 1 全局组件 |
以下就是我们注册的第一个简单的全局组件my-Com。所有实例都能用全局组件,组件在注册之后,便可以作为自定义元素 <my-Com></my-Com> 在一个实例的模板中使用。但是要注意全局组件必须写在vue实例之前,才会在跟元素 下面生效,模板里面第一级只能有一个标签,不能并行。
 <!DOCTYPE html>

 <html>

     <head>

         <meta charset="UTF-8">

         <title></title>

     </head>

     <body>

     <div id="app">

           <my-Com></my-Com>

     </div>

     </body>

     <script type="text/javascript" src="js/vue.js" ></script>

     <script type="text/javascript">

         // 注册

         Vue.component('myCom', {

           template: '<h1>自定义组件!</h1>'

         })

         // 创建根实例

         new Vue({

           el: '#app'

         })

     </script>

 </html>

| 2 局部组件 |
以下就是我们注册的第一个简单的局部组件。其实可以不必把每个组件都注册到全局的,局部组件可以直接在vue实例里,使用components注册,这种封装也适用于其它可注册的 Vue 功能,比如指令。我们建议将模板定义在全局变量。
 <!DOCTYPE html>

 <html>

     <head>

         <meta charset="UTF-8">

         <title></title>

     </head>

     <body>

     <div id="app">

           <mycom></mycom>

     </div>

     </body>

     <script type="text/javascript" src="js/vue.js" ></script>

     <script type="text/javascript">

         var Child = {

           template: '<h1>自定义组件!</h1>'

         }

         // 创建根实例

         new Vue({

           el: '#app',

           components: {

             // mycom  将只在父模板可用

             'mycom': Child

           }

         })

     </script>

 </html>

| 3 使用Prop传递数据 |
组件设计初衷就是要配合使用的,最常见的就是形成父子组件的关系:组件 A 在它的模板中使用了组件 B。在 Vue 中,父子组件的关系可以总结为 prop 向下传递,事件向上传递。父组件通过 prop 给子组件下发数据,子组件通过事件给父组件发送消息。组件实例的作用域是孤立的。这意味着不可以 在子组件的模板内直接引用父组件的数据。prop 是父组件用来传递数据的一个自定义属性。父组件的数据需要通过 props 把数据传给子组件,子组件需要显式地用 props 选项声明 "prop"。
 <!DOCTYPE html>

 <html>

     <head>

         <meta charset="UTF-8">

         <title></title>

     </head>

     <body>

     <div id="app">

           <com message="hello!"></com>

     </div>

     </body>

     <script type="text/javascript" src="js/vue.js" ></script>

     <script type="text/javascript">

         // 注册

         Vue.component('com', {

           // 声明 props

           props: ['message'],

           template: '<span>{{ message }}</span>'

         })

         // 创建根实例

         new Vue({

           el: '#app'

         })

     </script>

 </html>

| 4 动态Prop |
动态Prop 类似于用 v-bind 绑定 HTML 特性到一个表达式,也可以用 v-bind 动态绑定 props 的值到父组件的数据中。每当父组件的数据变化时,该变化也会传导给子组件。
 <!DOCTYPE html>

 <html>

     <head>

         <meta charset="UTF-8">

         <title></title>

     </head>

     <body>

     <div id="app">

         <div>

           <input v-model="parent">

           <br>

           <child v-bind:message="parent"></child>

         </div>

     </div>

     </body>

     <script type="text/javascript" src="js/vue.js" ></script>

     <script type="text/javascript">

         // 注册

         Vue.component('child', {

           // 声明 props

           props: ['message'],

           template: '<span>{{ message }}</span>'

         })

         // 创建根实例

         new Vue({

           el: '#app',

           data: {

             parent: '父组件内容'

           }

         })

     </script>

 </html>

当然我们也能可以使用 v-bind 的缩写语法:
<child :my-message="parentMsg"></child>
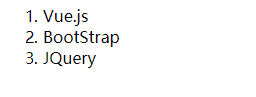
以下实例中将 v-bind 指令将com传到每一个重复的组件中。
 <!DOCTYPE html>

 <html>

     <head>

         <meta charset="UTF-8">

         <title></title>

     </head>

     <body>

     <div id="app">

         <ol>

         <item v-for="item in sites" v-bind:com="item"></item>

           </ol>

     </div>

     </body>

     <script type="text/javascript" src="js/vue.js" ></script>

     <script type="text/javascript">

         Vue.component('item', {

           props: ['com'],

           template: '<li>{{ com.text }}</li>'

         })

         new Vue({

           el: '#app',

           data: {

             sites: [

               { text: 'Vue.js' },

               { text: 'BootStrap' },

               { text: 'JQuery' }

             ]

           }

         })

     </script>

 </html>
注意: prop 是单向绑定的:当父组件的属性变化时,将传导给子组件,但是不会反过来。这是为了防止子组件无意间修改了父组件的状态,来避免应用的数据流变得难以理解。但是,每次父组件更新时,子组件的所有 prop 都会更新为最新值。这意味着不可以在子组件内部改变 prop。如果这么做了的话,Vue 会在控制台出现警告。
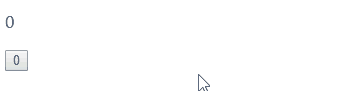
| 5 使用 v-on 绑定自定义事件 |
父组件是使用 props 传递数据给子组件,但如果子组件要把数据传递回去,就需要使用自定义事件,父组件可以在使用子组件的地方直接用 v-on 来监听子组件触发的事件。
我们可以使用 v-on 绑定自定义事件, 每个 Vue 实例都实现了事件接口,即:
- 使用
$on(eventName)监听事件 - 使用
$emit(eventName)触发事件
 <!DOCTYPE html>

 <html>

     <head>

         <meta charset="UTF-8">

         <title></title>

     </head>

     <body>

     <div id="app">

         <div id="example">

           <p>{{ num }}</p>

           <button-counter v-on:vue="com"></button-counter>

         </div>

     </div>

     </body>

     <script type="text/javascript" src="js/vue.js" ></script>

     <script type="text/javascript">

         Vue.component('button-counter', {

           template: '<button v-on:click="vue">{{ counter }}</button>',

           data: function () {

             return {

               counter: 0

             }

           },

           methods: {

             vue: function () {

               this.counter += 1

               this.$emit('vue')

             }

           },

         })

         new Vue({

           el: '#example',

           data: {

             num: 0

           },

           methods: {

             com: function () {

               this.num += 1

             }

           }

         })

     </script>

 </html>
| 6 给组件绑定原生事件 |
如果想在某个组件的根元素上监听一个原生事件。可以使用 v-on 的修饰符 .native。
<comv-on:click.native="something"></com>
| 7 自定义指令 |
默认情况下,一个组件的 v-model 会使用 value prop 和 input 事件。Vue 也允许注册自定义指令。
以下例子就是我们注册的一个全局指令 v-focus, 该指令的功能就是在页面加载时,元素会自动获得焦点。
 <!DOCTYPE html>

 <html>

     <head>

         <meta charset="UTF-8">

         <title></title>

     </head>

     <body>

     <div id="app">

         <p>页面载入时,input 元素会自动获取焦点:</p>

         <input v-focus>

     </div>

     </body>

     <script type="text/javascript" src="js/vue.js" ></script>

     <script type="text/javascript">

         Vue.directive('focus', {

           inserted: function (el) {

             // 聚焦元素

             el.focus()

           }

         })

         // 创建根实例

         new Vue({

           el: '#app'

         })

     </script>

 </html>
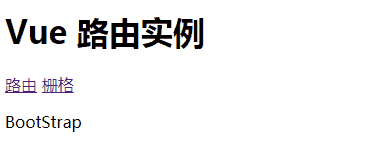
| 8 Vue 路由实例应用 |
Vue框架的兼容性非常好,可以很好的跟其他第三方的路由框架进行结合。Vue官方给出了路由的方案 --- vue-router。下面我们就使用Vue的路由实现简单的单页应用。
8.1引入vue和vue-router
 <script type="text/javascript" src="js/vue.js" ></script>

 <script src="https://unpkg.com/vue-router/dist/vue-router.js"></script>
8.2定义路由跳转的组件
使用 router-link 组件来导航.,通过传入 `to` 属性指定链接,<router-link> 默认会被渲染成一个 `<a>` 标签。
 <router-link to="/Vue">路由</router-link>

 <router-link to="/BootStrap">栅格</router-link>
8.3定义(路由)组件
定义(路由)组件,可以从其他文件 import 进来。
 const Foo = {

             template: '<div>Vue</div>'

         }

         const Bar = {

             template: '<div>BootStrap</div>'

         }
8.4定义路由
定义路由,每个路由应该映射一个组件。 其中"component" 可以是通过 Vue.extend() 创建的组件构造器,或者只是一个组件配置对象。
 const routes = [{

                 path: '/Vue',

                 component: Foo

             },

             {

                 path: '/BootStrap',

                 component: Bar

             }

         ]
8.5创建 router 实例
 const router = new VueRouter({

             routes

         })
8.6 创建和挂载根实例。
要通过 router 配置参数注入路由,从而让整个应用都有路由功能。
 const app = new Vue({

             router

         }).$mount('#app')
8.7具体代码
 <!DOCTYPE html>

 <html>

     <head>

         <meta charset="UTF-8">

         <title></title>

     </head>

     <body>

     <div id="app">

           <h1>Vue 路由实例</h1>

           <p>

             <router-link to="/Vue">路由</router-link>

             <router-link to="/BootStrap">栅格</router-link>

           </p>

           <!-- 路由出口 -->

             <!-- 路由匹配到的组件将渲染在这里 -->

           <router-view></router-view>

     </div>

     </body>

     <script type="text/javascript" src="js/vue.js" ></script>

     <script src="https://unpkg.com/vue-router/dist/vue-router.js"></script>

     <script type="text/javascript">

         const Foo = {

             template: '<div>Vue</div>'

         }

         const Bar = {

             template: '<div>BootStrap</div>'

         }

         const routes = [{

                 path: '/Vue',

                 component: Foo

             },

             {

                 path: '/BootStrap',

                 component: Bar

             }

         ]

         const router = new VueRouter({

             routes

         })

         const app = new Vue({

             router

         }).$mount('#app')

     </script>

 </html>
| 9 综合实例应用 |
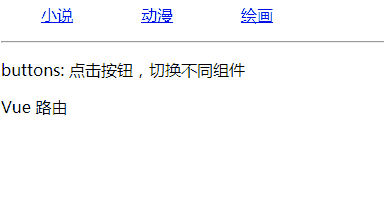
上边已经了解了Vue路由,下边就是一个小小的综合实例,通过点击按钮,在当前页面切换不同的组件。
 <!DOCTYPE html>

 <html lang="en">

     <head>

         <meta charset="UTF-8">

         <title>综合实例</title>

         <script src="https://unpkg.com/vue/dist/vue.js"></script>

         <script src="https://unpkg.com/vue-router/dist/vue-router.js"></script>

         <style>

             ul,

             li {

                 list-style: none;

             }

             ul {

                 overflow: hidden;

             }

             li {

                 float: left;

                 width: 100px;

             }

             h1 {

                 background-color: #98D361;

             }

             h2 {

                 background-color: #FF9209;

             }

             h3 {

                 background-color: #D84C29;

             }

         </style>

     </head>

     <body>

         <div id="app">

             <bar> </bar>

             <hr>

             <p>buttons: {{ buttons }}</p>

             <router-view class="items"></router-view>

             <footer-bar></footer-bar>

         </div>

         <script>

             var topbarTemp = `

       <nav>

         <ul>

           <li v-for="item in list">

             <router-link :to="item.url">{{ item.name }}</router-link>

           </li>

         </ul>

       </nav>

     `;

             // 定义组件:topbar

             Vue.component('bar', {

                 template: topbarTemp,

                 data: function() {

                     return {

                         list: [{

                                 name: '小说',

                                 url: '/story'

                             },

                             {

                                 name: '动漫',

                                 url: '/carton'

                             },

                             {

                                 name: '绘画',

                                 url: '/draw'

                             },

                         ]

                     }

                 }

             });

             Vue.component('footer-bar', {

                 template: `

         <footer>

           <p>Vue 路由<p>

         </footer>

       `

             });

             var story = {

                 template: `<div> <h1>{{ msg }}<h1></div>`,

                 data: function() {

                     return {

                         msg: 'Vue 基础'

                     }

                 }

             };

             var carton = {

                 template: `<div> <h2>{{ msg }}<h2></div>`,

                 data: function() {

                     return {

                         msg: 'Vue 组件'

                     }

                 }

             }

             var draw = {

                 template: `<div> <h3>{{ msg }}<h3></div>`,

                 data: function() {

                     return {

                         msg: 'Vue 路由实例'

                     }

                 }

             }

             // 定义路由对象

             var router = new VueRouter({

                 routes: [{

                         path: '/story',

                         component: story

                     },

                     {

                         path: '/carton',

                         component: carton

                     },

                     {

                         path: '/draw',

                         component: draw

                     }

                 ]

             });

             // 初始化一个Vue实例

             var app = new Vue({

                 el: '#app',

                 data: {

                     buttons: '点击按钮,切换不同组件'

                 },

                 router: router

             });

         </script>

     </body>

 </html>
编者按
Vue知识还有很多,希望通过对Vue一些基础知识的学习,对于正在学习前端的知识的你可以有所帮助。
Vue.js—组件快速入门及Vue路由实例应用的更多相关文章
- Vue.js—组件快速入门以及实例应用
上次我们学习了Vue.js的基础,并且通过综合的小实例进一步的熟悉了Vue.js的基础应用.今天我们就继续讲讲Vue.js的组件,更加深入的了解Vue,js的使用.首先我们先了解一下什么是Vue.js ...
- Vue (一) --- vue.js的快速入门使用
=-----------------------------------把现在的工作做好,才能幻想将来的事情,专注于眼前的事情,对于尚未发生的事情而陷入无休止的忧虑之中,对事情毫无帮助,反而为自己凭添 ...
- Vue.js 基础快速入门
Vue.js是一个JavaScript MVVM库,它是以数据驱动和组件化的思想构建的.Vue.js提供了简洁.易于理解的API,使得我们能够快速地上手并使用Vue.js 如果之前已经习惯了用jQue ...
- Vue.js——60分钟组件快速入门(上篇)
组件简介 组件系统是Vue.js其中一个重要的概念,它提供了一种抽象,让我们可以使用独立可复用的小组件来构建大型应用,任意类型的应用界面都可以抽象为一个组件树: 那么什么是组件呢?组件可以扩展HTML ...
- 转: Vue.js——60分钟组件快速入门(上篇)
转自: http://www.cnblogs.com/keepfool/p/5625583.html Vue.js——60分钟组件快速入门(上篇) 组件简介 组件系统是Vue.js其中一个重要的概 ...
- Vue.js——60分钟组件快速入门
一.组件简介 组件系统是Vue.js其中一个重要的概念,它提供了一种抽象,让我们可以使用独立可复用的小组件来构建大型应用,任意类型的应用界面都可以抽象为一个组件树: 那么什么是组件呢?组件可以扩展HT ...
- 【转】Vue.js——60分钟组件快速入门(上篇)
文章作者:keepfool 文章出处:http://www.cnblogs.com/keepfool/ 组件简介 组件系统是Vue.js其中一个重要的概念,它提供了一种抽象,让我们可以使用独立可复用的 ...
- Vue.js——60分钟组件快速入门(上篇)二
来源:https://www.cnblogs.com/keepfool/p/5625583.html 组件简介 组件系统是Vue.js其中一个重要的概念,它提供了一种抽象,让我们可以使用独立可复用的小 ...
- Vue.js——60分钟组件快速入门(下篇)
概述 上一篇我们重点介绍了组件的创建.注册和使用,熟练这几个步骤将有助于深入组件的开发.另外,在子组件中定义props,可以让父组件的数据传递下来,这就好比子组件告诉父组件:"嘿,老哥,我开 ...
随机推荐
- snmp实用篇
简单网络管理协议(SNMP)是 TCP/IP协议簇的一个应用层协议.在1988年被制定,并被Internet体系结构委员会(IAB)采纳作为一个短期的网络管理解决方案:由于 SNMP的简单性,在Int ...
- rand、randi和randn的区别?
1,rand 生成均匀分布的伪随机数.分布在(0~1)之间 主要语法:rand(m,n)生成m行n列的均匀分布的伪随机数 rand(m,n,'double')生成指定精度的均匀分布的伪随机数,参数还可 ...
- linux内核的配置
以2.6.35.7版本的内核为例 总结:.config决定了Make时的条件编译与连接..config文件由两次配置第一次make XX_defconfig 第二次menuconfig. 1.分析源码 ...
- uboot下的命令行
1.典型嵌入式linux系统启动过程: 嵌入式系统上电后先执行uboot.然后uboot负责初始化DDR,初始化Flash,然后将OS从Flash中读取到DDR中,然后启动OS(OS启动后uboot就 ...
- 正确理解WPF中的TemplatedParent
(注:Logical Tree中文称为逻辑树,Visual Tree中文称为可视化树或者视觉树,由于名称不是很统一,文中统一用英文名称代表两个概念,况且VisualTreeHelper和Logical ...
- a标签nest问题,即a标签里面嵌套a标签
方法一:使用div模拟a,监听click事件 方法二:使用<object>标签包裹内部a标签 <div style="width: 200px;height: 200px; ...
- 洛谷2115 [USACO14MAR]破坏Sabotage
https://www.luogu.org/problem/show?pid=2115 题目描述 Farmer John's arch-nemesis, Farmer Paul, has decide ...
- CentOS安装JDK环境
一:查看当前系统的java环境 [elsearch@localhost data]$ rpm -qa | grep jdk 二:卸载原有的jdk [elsearch@localhost /]$ yum ...
- 【BZOJ4373】算术天才⑨与等差数列 [线段树]
算术天才⑨与等差数列 Time Limit: 10 Sec Memory Limit: 128 MB[Submit][Status][Discuss] Description 算术天才⑨非常喜欢和等 ...
- bzoj 2669 状压DP
因为最多有8个'X',所以我们可以用w[i][s]来表示现在我们填了前i个数,填的X的为S,因为每次新加进来的数都不影响前面的最小值,所以我们可以随便添加,这样就有了剩下所有位置的方案,每次都这样转移 ...