初始scrapy,简单项目创建和CSS选择器,xpath选择器(1)
一 安装
  #Linux:

      pip3 install scrapy

  #Windows:

      a. pip3 install wheel

      b. 下载twisted http://www.lfd.uci.edu/~gohlke/pythonlibs/#twisted

      c. 进入下载目录,执行 pip3 install Twisted‑17.1.0‑cp35‑cp35m‑win_amd64.whl

      d. pip3 install pywin32

      e. pip3 install scrapy
二 实验要求
目标网站: http://quotes.toscrape.com/tag/humor/
任务:保存网页信息到本地
二 创建爬虫项目
scrapy startproject tutorial
生成项目的结构
tutorial/

    scrapy.cfg            # 部署配置文件

    tutorial/             # 项目的Python模块,你将从这里导入你的代码

        __init__.py

        items.py          # 项目项目定义文件,用于规定存储的字段

        middlewares.py    # 项目中间件文件

        pipelines.py      # 项目持久化存储文件

        settings.py       # 项目配置文件

        spiders/          # 这里可以创建爬虫文件

       .        # 若干个爬虫文件
       .
       .

            __init__.py
三 创建爬虫文件
scrapy genspider QuotesSpider #爬虫文件名为QuotesSpider
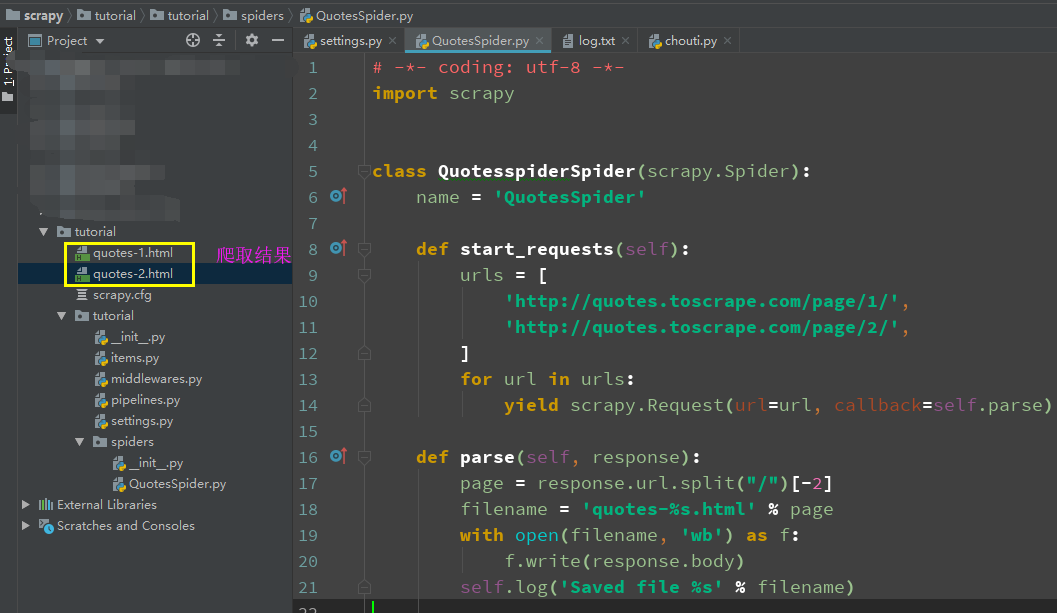
使用pycharm打开项目,修改QuotesSpider .py 文件改为
# -*- coding: utf-8 -*-

import scrapy

class QuotesspiderSpider(scrapy.Spider):

    name = 'QuotesSpider' #爬虫名字

    def start_requests(self):

        #待爬取的url列表

        urls = [

            'http://quotes.toscrape.com/page/1/',

            'http://quotes.toscrape.com/page/2/',

        ]

        for url in urls:

            #提交请求,并制定回调函数为self.parse

            yield scrapy.Request(url=url, callback=self.parse)

    def parse(self, response):

       '解析页面,response是网页返回的数据(源码)'

        page = response.url.split("/")[-2]

        filename = 'quotes-%s.html' % page

        # 网页保存

        with open(filename, 'wb') as f:

            f.write(response.body)

        self.log('Saved file %s' % filename)
其中
name: 爬虫名字,项目中名字是唯一的.
start_requests():必须返回一个可迭代的对象.爬取起始url网页.指定回调函数.
parse():解析页面数据,
四 启动爬虫文件
scrapy crawl QuotesSpider
效果展示
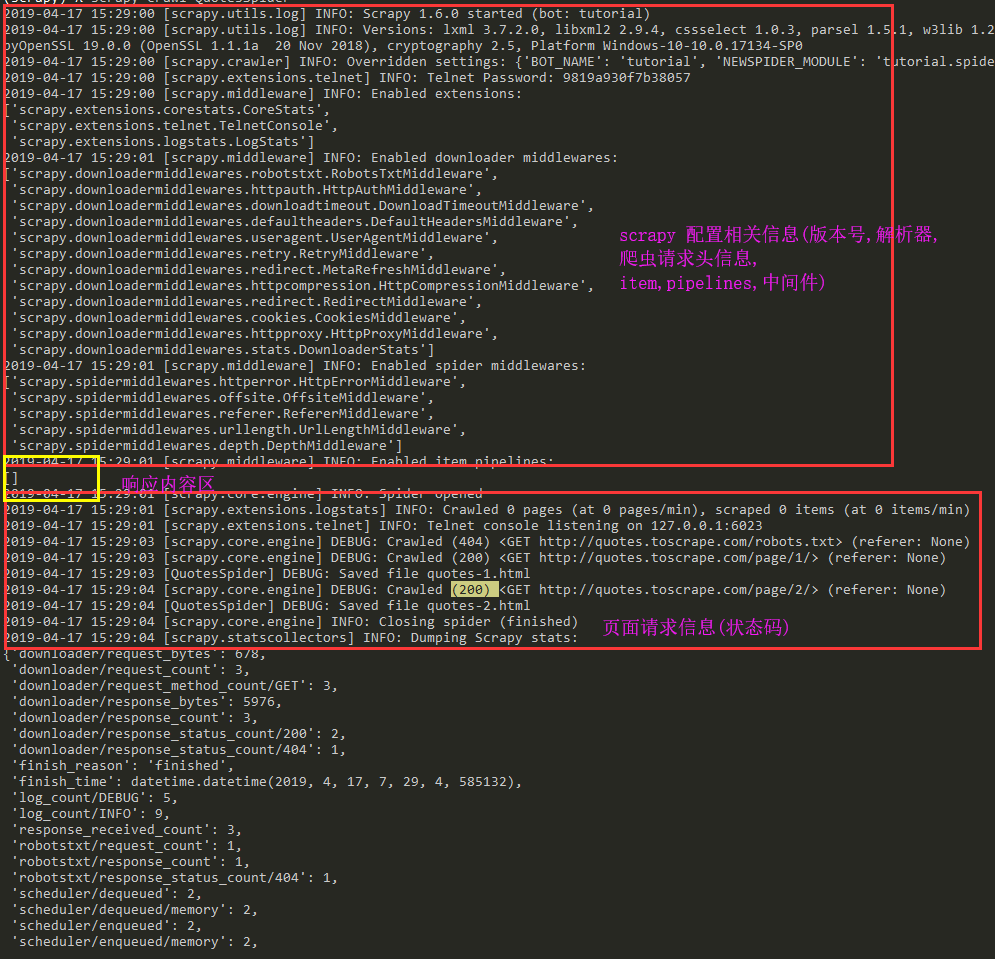
五 项目执行流程
Scrapy 执行的时候,首先会调用start_requests方法,然后执行方法中的scrapy.Request方法获取url对应网站的数据,得到Response相应对象,转而把Response对象交给Scrapy.Request的回调函数,在回调函数中解析response对象中的网页源码数据,保存到当前目录下.
六 Scrapy shell
使用Scrapy提取数据的最佳方法时使用scrapy shell 常识选择器.
scrapy shell "http://quotes.toscrape.com/page/1/"
执行此命令后可以进入交互模式(如下):

解析可选参数
[s] Available Scrapy objects:

[s]   scrapy     # 可以使用scrapy中的模块,如contains scrapy.Request, scrapy.Selector...


[s]   crawler    # 当前爬虫对象

[s]   item       {}

[s]   request    #当前的请求页面

[s]   response   #当前请求的响应

[s]   settings   # 当前的配置文件

[s]   spider     <DefaultSpider 'default' at 0x7fa91c8af990>

[s] Useful shortcuts:

[s]   shelp()           Shell help (print this help)

[s]   fetch(req_or_url) # 爬取url或者request获取新的response

[s]   view(response)    # 使用网页打开response
使用栗子:

>>> response.css('title::text').getall() #获取标题中提取文本

['Quotes to Scrape']
七 scrapy 中的数据解析
Scrapy带有自己的提取数据机制。它们被称为选择器,因为它们“选择”由XPath或CSS表达式指定的HTML文档的某些部分。
测试代码
'''
<html>

 <head>

  <base href='http://example.com/' />

  <title>Example website</title>

 </head>

 <body>

  <div id='images'>

   <a href='image1.html'>Name: My image 1 <br /><img src='image1_thumb.jpg' /></a>

   <a href='image2.html'>Name: My image 2 <br /><img src='image2_thumb.jpg' /></a>

   <a href='image3.html'>Name: My image 3 <br /><img src='image3_thumb.jpg' /></a>

   <a href='image4.html'>Name: My image 4 <br /><img src='image4_thumb.jpg' /></a>

   <a href='image5.html'>Name: My image 5 <br /><img src='image5_thumb.jpg' /></a>

  </div>

 </body>

</html>
'''
1 css解析器
>>> response.css('title').getall() #获取所有的匹配结果

['<title>Quotes to Scrape</title>']
>>> response.css('title::text')[0].get() #获取第一个匹配结果

'Quotes to Scrape'
使用正则匹配结果
>>> response.css('title::text').re(r'Quotes.*')

['Quotes to Scrape']

>>> response.css('title::text').re(r'Q\w+')

['Quotes']

>>> response.css('title::text').re(r'(\w+) to (\w+)')

['Quotes', 'Scrape']
2 xpath 解析数据
>>> response.xpath('//title')

[<Selector xpath='//title' data='<title>Quotes to Scrape</title>'>]

>>> response.xpath('//title/text()').get()

'Quotes to Scrape'
注意:scrapy使用xpath解析出来的数据返回的是select对象,一般提取数据信息的方法如下
# 获取第一个元素

author = div.xpath('./div[1]/a[2]/h2/text()')[0].extract()

# 获取第一个元素

author = div.xpath('./div[1]/a[2]/h2/text()').extract_first()

#获取所有元素,结果为一个列表

content = div.xpath('./a[1]/div/span//text()').extract()
现在我们将获得基本URL和一些图像链接:
>>> response.xpath('//base/@href').get()

'http://example.com/'

>>> response.css('base::attr(href)').get()

'http://example.com/'

>>> response.css('base').attrib['href']

'http://example.com/'

>>> response.xpath('//a[contains(@href, "image")]/@href').getall()

['image1.html',

 'image2.html',

 'image3.html',

 'image4.html',

 'image5.html']

>>> response.css('a[href*=image]::attr(href)').getall()

['image1.html',

 'image2.html',

 'image3.html',

 'image4.html',

 'image5.html']

>>> response.xpath('//a[contains(@href, "image")]/img/@src').getall()

['image1_thumb.jpg',

 'image2_thumb.jpg',

 'image3_thumb.jpg',

 'image4_thumb.jpg',

 'image5_thumb.jpg']

>>> response.css('a[href*=image] img::attr(src)').getall()

['image1_thumb.jpg',

 'image2_thumb.jpg',

 'image3_thumb.jpg',

 'image4_thumb.jpg',

 'image5_thumb.jpg']
最后归纳:
获取元素中的文本推荐使用
- get( ) #获取第一个值
- getall( ) #获取所有,返回列表
八 调整代码进行所有页面数据爬取
# -*- coding: utf-8 -*-

import scrapy

class QuotesspiderSpider(scrapy.Spider):

    name = 'QuotesSpider'

    start_urls = [

        'http://quotes.toscrape.com/page/1/',

    ]

    def parse(self, response):

        for quote in response.css('div.quote'):

            yield {

                'text': quote.css('span.text::text').get(),

                'author': quote.css('small.author::text').get(),

                'tags': quote.css('div.tags a.tag::text').getall(),

            }

        #获取下一页的url

        next_page = response.css('li.next a::attr(href)').get()

        if next_page is not None:

            #urljoin用于构建下一页的绝对路径url

            next_page = response.urljoin(next_page)

            yield scrapy.Request(next_page, callback=self.parse)
使用css选择器获取下一页的url(相对路径),在使用response.urljoin()获取绝对路径,再次回调self.parse()实现所有页面数据爬取.
九 scrapy 文件输出参数
scrapy crawl quotes -o quotes-humor.json
'''
  - o  把详情页返回结果,输入到文件
'''
初始scrapy,简单项目创建和CSS选择器,xpath选择器(1)的更多相关文章
- 王立平--java se的简单项目创建以及具体解释
创建项目的简单步骤: watermark/2/text/aHR0cDovL2Jsb2cuY3Nkbi5uZXQvdTAxMzQyNTUyNw==/font/5a6L5L2T/fontsize/400/ ...
- cube.js 学习(一)简单项目创建
cube.js 是一个很不错的模块化分析框架,基于schema生成sql 同时内置可代码生成,可以快速的搞定 web 分析应用的开发 安装cli 工具 npm install -g cubejs-cl ...
- Spring Cloud简单项目创建
一.Zuul 原文链接 Zuul的主要功能是路由转发和过滤器.路由功能是微服务的一部分,比如/api/user转发到到user服务,/api/shop转发到到shop服务.zuul默认和Ribbon结 ...
- 从0开始,手把手教你用Vue开发一个答题App01之项目创建及答题设置页面开发
项目演示 项目演示 项目源码 项目源码 教程说明 本教程适合对Vue基础知识有一点了解,但不懂得综合运用,还未曾使用Vue从头开发过一个小型App的读者.本教程不对所有的Vue知识点进行讲解,而是手把 ...
- scrapy简单入门及选择器(xpath\css)
简介 scrapy被认为是比较简单的爬虫框架,资料比较齐全,网上也有很多教程.官网上介绍了它的四种安装方法,PyPI.Conda.APT.Source,我们只介绍最简单的安装方法. 安装 Window ...
- Python -- Scrapy 框架简单介绍(Scrapy 安装及项目创建)
Python -- Scrapy 框架简单介绍 最近在学习python 爬虫,先后了解学习urllib.urllib2.requests等,后来发现爬虫也有很多框架,而推荐学习最多就是Scrapy框架 ...
- Windows 8.1 应用再出发 (WinJS) - 创建一个简单项目
前面几篇我们介绍了如何利用 C# + XAML 完成Windows Store App 功能的实现,接下来的几篇我们来看看如何利用 Html + WinJS 来完成这些功能. 本篇我们使用WinJS ...
- python爬虫框架—Scrapy安装及创建项目
linux版本安装 pip3 install scrapy 安装完成 windows版本安装 pip install wheel 下载twisted,网址:http://www.lfd.uci.edu ...
- m2eclipse简单使用,创建Maven项目 ,运行mvn命令(转)
前面介绍了如何安装m2eclipse,现在,我们使用m2ecilpse导入Hello World项目. 选择菜单项File,然后选择Import,我们会看到一个Import对话框,在该对话框中选择Ge ...
随机推荐
- centos6 安装配置ss笔记
2018-05-17 centos6 安装配置ss笔记 操作环境:Centos 6 x86_64 bbr 服务器地址:美国 1.准备VPS 在https://www.bwh1.net可购买,购买时已默 ...
- mfc动态演示排序算法
实现的排序算法 冒泡排序.选择排序.快速排序 具体实现 选用mfc中的单文档框架 ①SetTimer函数的用法. ②使用画笔画直线. ③使用FillSolidRect()函数覆盖某一矩形区域内的内容: ...
- ansj构造最短路径
一.前言 上节介绍了ansj的原子切分和全切分.切分完成之后,就要构建最短路径,得到分词结果. 以"商品和服务"为例,调用ansj的标准分词: String str = " ...
- 解决_CRT_SECURE_NO_WARNINGS警告
VS中: 工程属性->属性->配置属性->C/C++->命令行 在命令行中添加一行: /D _CRT_SECURE_NO_WARNINGS OK!
- IE下获取XPATH小工具,支持32/64位
背景是曾经友情支持了测试组一小段时间,发现他们使用selenium做页面的自动化测试,需要用到XPath,但IE下没有获取XPath的工具,只能在Firefox和chrome下获取,步骤还比较麻烦.而 ...
- golang string和[]byte的对比
golang string和[]byte的对比 为啥string和[]byte类型转换需要一定的代价?为啥内置函数copy会有一种特殊情况copy(dst []byte, src string) in ...
- golang实现权重轮询调度算法
package main import ( "fmt" "time" ) var slaveDns = map[int]map[string]interface ...
- Python数据结构应用3——链表
linked list(链表) 建立 Node 链表的基本组成就是一个个Node,每个Node都需要包括两部分内容,一部分是自身的data,另一部分是下一个Node的reference. class ...
- Docker系列之swarm集群搭建
学习Docker很久了,今天分享一下Docker的swarm集群的搭建过程很简单 首先第一步是 每台机器上面都要安装docker 本人使用的是centos7操作系统,使用3太虚拟机,3太虚拟机必须网络 ...
- Uiautomator--出现报错“urllib3.exceptions.ProtocolError:<'Connection aborted.',error<10054,''>>”的解决方式!
在运行uiautomator时,出现报错"urllib3.exceptions.ProtocolError:<'Connection aborted.',error<10054, ...