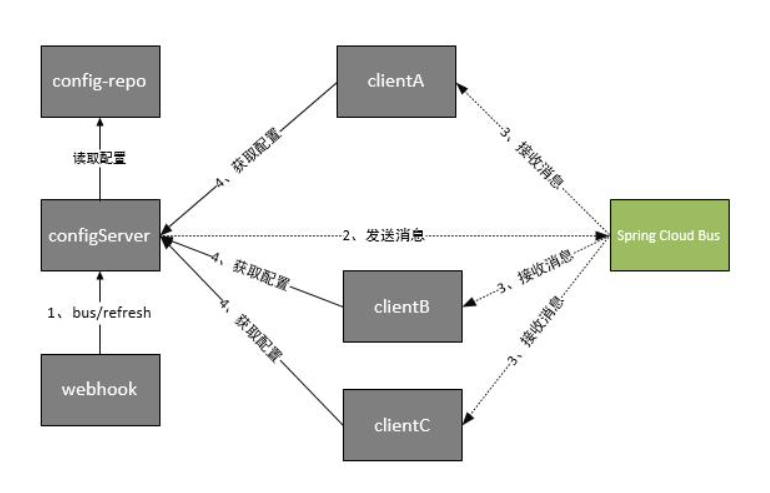
spring cloud bus 消息总线 动态刷新配置文件 【actuator 与 RabbitMQ配合完成】
1.前言
单机刷新配置文件,使用actuator就足够了 ,但是 分布式微服务 不可能是单机 ,将会有很多很多的工程 ,无法手动一个一个的发送刷新请求,
因此引入了消息中间件 ,常用的 消息中间件 是 RabbitMQ ,但是开始流行使用Kafka ,Kafka的使用以后再讲解,这里使用RabbitMQ 。
学习工程我放在GitHub仓库 ,地址 https://github.com/cen-xi/test
2.配置环境
spring boot : 2.1.6.RELEASE
spring cloud : Greenwich.SR2
RabbitMQ 3.8.4
Erlang 23.0
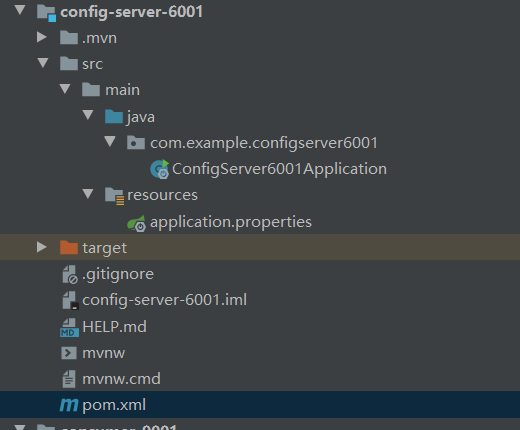
3.配置 配置中心服务端 ,端口6001
(1)目录结构
(2)pom.xml文件
<?xml version="1.0" encoding="UTF-8"?>
<project xmlns="http://maven.apache.org/POM/4.0.0" xmlns:xsi="http://www.w3.org/2001/XMLSchema-instance"
xsi:schemaLocation="http://maven.apache.org/POM/4.0.0 https://maven.apache.org/xsd/maven-4.0.0.xsd">
<modelVersion>4.0.0</modelVersion>
<parent>
<groupId>cen.cloud</groupId>
<artifactId>cen-mycloud</artifactId>
<version>0.0.1-SNAPSHOT</version>
<relativePath/> <!-- lookup parent from repository -->
</parent>
<groupId>com.example</groupId>
<artifactId>config-server-6001</artifactId>
<version>0.0.1-SNAPSHOT</version>
<name>config-server-6001</name>
<description>Demo project for Spring Boot</description> <properties>
<java.version>1.8</java.version>
</properties> <dependencies>
<dependency>
<groupId>org.springframework.boot</groupId>
<artifactId>spring-boot-starter</artifactId>
</dependency> <dependency>
<groupId>org.springframework.boot</groupId>
<artifactId>spring-boot-starter-test</artifactId>
<scope>test</scope>
<exclusions>
<exclusion>
<groupId>org.junit.vintage</groupId>
<artifactId>junit-vintage-engine</artifactId>
</exclusion>
</exclusions>
</dependency> <!--eureka 注册中心依赖包 -->
<dependency>
<groupId>org.springframework.cloud</groupId>
<artifactId>spring-cloud-starter-netflix-eureka-server</artifactId>
</dependency> <!--配置中心依赖包-->
<dependency>
<groupId>org.springframework.cloud</groupId>
<artifactId>spring-cloud-config-server</artifactId>
</dependency>
<!-- <!–配置中心-客户端依赖包–>-->
<!-- <dependency>-->
<!-- <groupId>org.springframework.cloud</groupId>-->
<!-- <artifactId>spring-cloud-starter-config</artifactId>-->
<!-- </dependency>--> <!--健康检测管理中心 ,可刷新配置文件-->
<dependency>
<groupId>org.springframework.boot</groupId>
<artifactId>spring-boot-starter-actuator</artifactId>
</dependency> <!--spring cloud bus,消息总线-->
<dependency>
<groupId>org.springframework.cloud</groupId>
<artifactId>spring-cloud-starter-bus-amqp</artifactId>
</dependency> </dependencies> <build>
<plugins>
<plugin>
<groupId>org.springframework.boot</groupId>
<artifactId>spring-boot-maven-plugin</artifactId>
</plugin>
</plugins>
</build> </project>
(3)application.properties文件
# 设置本机服务名称

spring.application.name=config-server-6001

# 设置本机服务端口

server.port=6001

#注册中心地址

eureka.client.serviceUrl.defaultZone=http://localhost:7001/eureka/

#

#

##本地配置文件,默认获取在resources路径下的文件

#spring.profiles.active=native

#指定本地文件路径

#spring.cloud.config.server.native.search-locations=classpath:properties/   或者写 D:/common/ 都是文件夹路径,只获取改文件夹内的文件

#

#

#配置的Git仓库的地址

spring.cloud.config.server.git.uri=https://github.com/cen-xi/test

#分支

spring.cloud.config.label=master

#git仓库地址下的相对地址 多个用逗号","分割。

spring.cloud.config.server.git.search-paths=/blob/master/gittest.properties,/blob/master/README.md,/blob/master/gittest2.yml

#git仓库的账户

spring.cloud.config.server.git.username=

#git仓库的密码

spring.cloud.config.server.git.password=

#http://localhost:100/master/gittest-1.properties

#http://localhost:100/master/README-1.md

#http://localhost:100/master/gittest2-1.yml

#

#健康检测管理中心配置

#springboot 1.5.X 以上默认开通了安全认证,这里可加可不加,不影响

#management.security.enabled=false

#springboot 2.x 默认只开启了info、health的访问接口,*代表开启所有访问接口

management.endpoints.web.exposure.include=*

#

#

## spring cloud bus 刷新配置

##rabbitmq 服务所在ip

#使用 localhost 会出错 ,使用 127.0.0.1 则没问题

spring.rabbitmq.host=127.0.0.1

#默认端口 5672

spring.rabbitmq.port=5672

#默认账户

spring.rabbitmq.password=guest

#默认密码

spring.rabbitmq.username=guest

##post请求消息中间件通知其他客户端刷新

# http://localhost:6001/actuator/bus-refresh
(4) 启动类
package com.example.configserver6001;

import org.springframework.boot.SpringApplication;

import org.springframework.boot.autoconfigure.SpringBootApplication;

import org.springframework.cloud.client.discovery.EnableDiscoveryClient;

import org.springframework.cloud.config.server.EnableConfigServer;

@SpringBootApplication

//开启发现服务  ,,也可以使用 EnableEurekaClient

@EnableDiscoveryClient

//开启配置中心服务端

@EnableConfigServer

public class ConfigServer6001Application {

    public static void main(String[] args) {

        SpringApplication.run(ConfigServer6001Application.class, args);

    }

}
4.配置 配置中心客户端 ,端口6080
(1)目录结构

(2)pom.xml文件
<?xml version="1.0" encoding="UTF-8"?>

<project xmlns="http://maven.apache.org/POM/4.0.0" xmlns:xsi="http://www.w3.org/2001/XMLSchema-instance"

         xsi:schemaLocation="http://maven.apache.org/POM/4.0.0 https://maven.apache.org/xsd/maven-4.0.0.xsd">

    <modelVersion>4.0.0</modelVersion>

    <parent>

        <groupId>cen.cloud</groupId>

        <artifactId>cen-mycloud</artifactId>

        <version>0.0.1-SNAPSHOT</version>

        <relativePath/> <!-- lookup parent from repository -->

    </parent>

    <groupId>com.example</groupId>

    <artifactId>config-client-6080</artifactId>

    <version>0.0.1-SNAPSHOT</version>

    <name>config-client-6080</name>

    <description>Demo project for Spring Boot</description>

    <properties>

        <java.version>1.8</java.version>

    </properties>

    <dependencies>

        <dependency>

            <groupId>org.springframework.boot</groupId>

            <artifactId>spring-boot-starter-web</artifactId>

        </dependency>

        <dependency>

            <groupId>org.springframework.boot</groupId>

            <artifactId>spring-boot-starter-test</artifactId>

            <scope>test</scope>

            <exclusions>

                <exclusion>

                    <groupId>org.junit.vintage</groupId>

                    <artifactId>junit-vintage-engine</artifactId>

                </exclusion>

            </exclusions>

        </dependency>

        <!--eureka 注册中心依赖包 -->

        <dependency>

            <groupId>org.springframework.cloud</groupId>

            <artifactId>spring-cloud-starter-netflix-eureka-server</artifactId>

        </dependency>

        <!--配置中心-客户端依赖包-->

        <dependency>

            <groupId>org.springframework.cloud</groupId>

            <artifactId>spring-cloud-starter-config</artifactId>

        </dependency>

        <!--健康检测管理中心 ,可刷新配置文件-->

        <dependency>

            <groupId>org.springframework.boot</groupId>

            <artifactId>spring-boot-starter-actuator</artifactId>

        </dependency>

        <!--spring cloud bus,消息总线-->

        <dependency>

            <groupId>org.springframework.cloud</groupId>

            <artifactId>spring-cloud-starter-bus-amqp</artifactId>

        </dependency>

    </dependencies>

    <build>

        <plugins>

            <plugin>

                <groupId>org.springframework.boot</groupId>

                <artifactId>spring-boot-maven-plugin</artifactId>

            </plugin>

        </plugins>

    </build>

</project>
(3)bootstrap.properties文件 【application.properties是文件空的】
#心得:

#需要提前知道远程配置中心的服务名称 和 远程配置文件名

#

#

#

#工程名/项目名/应用名/服务名

spring.application.name=config-client-6080

#端口号

server.port=6080

#获取指定配置文件名称 ,多个则以英文符号 , 隔开,不可有空格

spring.cloud.config.name=gittest

#  ,configText ,gittest2

#经过测试发现,在不同文件【可能是properties或者yml】,如果其中有相同的字段,那么左边的文件的这个字段的值会被右边文件的覆盖,不区分properties和yml优先级

#

#

#获取配置信息,客户端不需要管这个文件是从git来的还是在服务端的本地文件

#

#获取配置的策略 , 读取文件:dev开发环境、test测试、pro生产

spring.cloud.config.profile=dev

#获取配置文件的分支,默认是master。如果是是本地获取的话,则无用,

spring.cloud.config.label=master

#开启配置信息发现

spring.cloud.config.discovery.enabled=true

#指定配置中心服务端的service-id,便于扩展为高可用配置集群,不区分大小写

spring.cloud.config.discovery.serviceId=config-server-6001

#使用这个写法也一样,至于为啥有两种写法,还不清除

#spring.cloud.config.discovery.service-id=config-service

#

#是否启动快速失败功能,功能开启则优先判断config server是否正常,可开可不开

#spring.cloud.config.fail-fast=true

#

#

#这个是设置与Eureka Server交互的地址,客户端的查询服务和注册服务都需要依赖这个地址。

eureka.client.serviceUrl.defaultZone=http://localhost:7001/eureka/

## rabbitmq 心跳检查

eureka.client.healthcheck.enabled=true

#actuator设置

#springboot 1.5.X 以上默认开通了安全认证,这里可加可不加,不影响

#management.security.enabled=false

#springboot 2.x 默认只开启了info、health的访问接口,*代表开启所有访问接口

management.endpoints.web.exposure.include=*

#

#可以使用 window指令框 发送post请求 刷新配置文件  ,curl -X POST http://localhost:6080/actuator/refresh

#

#

##

## spring cloud bus 刷新配置

##rabbitmq 服务所在ip

#使用 localhost 会出错 ,使用 127.0.0.1 则没问题

spring.rabbitmq.host=127.0.0.1

#默认端口 5672

spring.rabbitmq.port=5672

#默认账户

spring.rabbitmq.password=guest

#默认密码

spring.rabbitmq.username=guest

##

##

### 消息总线相关

spring.cloud.bus.enabled=true

## 开启消息跟踪

spring.cloud.bus.trace.enabled=true

#

##//

#

###  http://localhost:6080/actuator/bus-refresh

#
(4) controller层 【记得添加注解 @RefreshScope】
package com.example.configclient6080.controller;

import org.springframework.beans.factory.annotation.Value;

import org.springframework.cloud.context.config.annotation.RefreshScope;

import org.springframework.web.bind.annotation.RequestMapping;

import org.springframework.web.bind.annotation.RequestMethod;

import org.springframework.web.bind.annotation.RestController;

import java.util.Date;

@RefreshScope

@RestController

public class GetController {

    @Value("${yourname}")

    private String namestr;

    @RequestMapping(value = "/getname", method = RequestMethod.GET)

    public String getConfig() {

        String str = "获取远程配置文件信息:" + namestr + "===" + new Date();

        System.out.println(str);

        return str;

    }

//    http://localhost:6080/getname

}
(5) 启动类
package com.example.configclient6080;

import org.springframework.boot.SpringApplication;

import org.springframework.boot.autoconfigure.SpringBootApplication;

import org.springframework.cloud.client.discovery.EnableDiscoveryClient;

@SpringBootApplication

//开启发现服务 ,也可以使用 EnableEurekaClient

@EnableDiscoveryClient

public class ConfigClient6080Application {

    public static void main(String[] args) {

        SpringApplication.run(ConfigClient6080Application.class, args);

    }

}
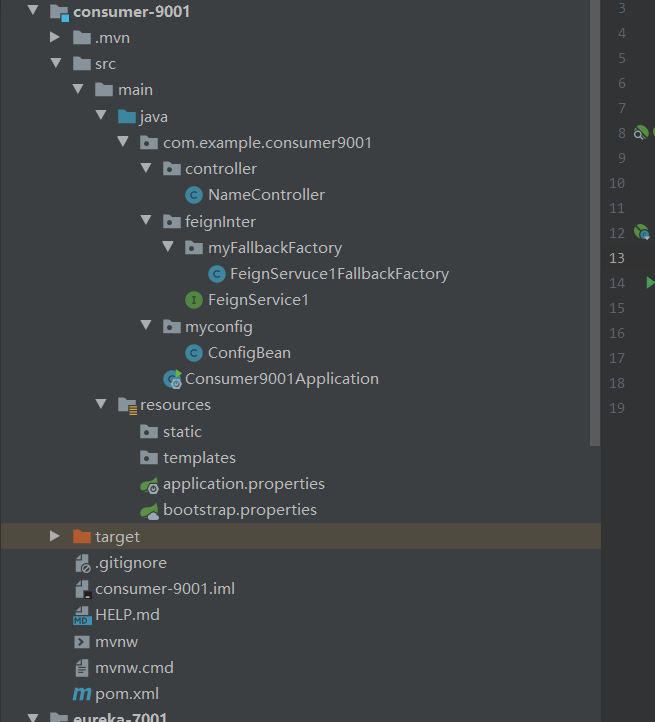
5.配置 一个服务消费者端 成为配置中心客户端 ,端口 9001
(1)目录结构
(2)pom.xml文件
<?xml version="1.0" encoding="UTF-8"?>

<project xmlns="http://maven.apache.org/POM/4.0.0" xmlns:xsi="http://www.w3.org/2001/XMLSchema-instance"

         xsi:schemaLocation="http://maven.apache.org/POM/4.0.0 https://maven.apache.org/xsd/maven-4.0.0.xsd">

    <modelVersion>4.0.0</modelVersion>

    <parent>

        <groupId>cen.cloud</groupId>

        <artifactId>cen-mycloud</artifactId>

        <version>0.0.1-SNAPSHOT</version>

        <relativePath/> <!-- lookup parent from repository -->

    </parent>

    <groupId>com.example</groupId>

    <artifactId>consumer-9001</artifactId>

    <version>0.0.1-SNAPSHOT</version>

    <name>consumer-9001</name>

    <description>Demo project for Spring Boot</description>

    <properties>

        <java.version>1.8</java.version>

    </properties>

    <dependencies>

        <!--        spring boot web 组件-->

        <dependency>

            <groupId>org.springframework.boot</groupId>

            <artifactId>spring-boot-starter-web</artifactId>

        </dependency>

        <!--        测试组件-->

        <dependency>

            <groupId>org.springframework.boot</groupId>

            <artifactId>spring-boot-starter-test</artifactId>

            <scope>test</scope>

            <exclusions>

                <exclusion>

                    <groupId>org.junit.vintage</groupId>

                    <artifactId>junit-vintage-engine</artifactId>

                </exclusion>

            </exclusions>

        </dependency>

        <!--eureka 注册中心依赖包 -->

        <dependency>

            <groupId>org.springframework.cloud</groupId>

            <artifactId>spring-cloud-starter-netflix-eureka-server</artifactId>

        </dependency>

        <!-- 修改后立即生效,热部署 -->

        <!-- 热修改后端-->

        <dependency>

            <groupId>org.springframework</groupId>

            <artifactId>springloaded</artifactId>

            <version>1.2.4.RELEASE</version>

        </dependency>

        <!-- 热修改前端-->

        <dependency>

            <groupId>org.springframework.boot</groupId>

            <artifactId>spring-boot-devtools</artifactId>

            <!--            <optional>true</optional>-->

        </dependency>

        <!--feign依赖包-->

        <dependency>

            <groupId>org.springframework.cloud</groupId>

            <artifactId>spring-cloud-starter-openfeign</artifactId>

        </dependency>

        <!--配置中心-客户端依赖包-->

        <dependency>

            <groupId>org.springframework.cloud</groupId>

            <artifactId>spring-cloud-starter-config</artifactId>

        </dependency>

        <!--健康检测管理中心 ,可刷新配置文件-->

        <dependency>

            <groupId>org.springframework.boot</groupId>

            <artifactId>spring-boot-starter-actuator</artifactId>

        </dependency>

        <!--spring cloud bus,消息总线-->

        <dependency>

            <groupId>org.springframework.cloud</groupId>

            <artifactId>spring-cloud-starter-bus-amqp</artifactId>

        </dependency>

    </dependencies>

    <build>

        <plugins>

            <plugin>

                <groupId>org.springframework.boot</groupId>

                <artifactId>spring-boot-maven-plugin</artifactId>

            </plugin>

        </plugins>

    </build>

</project>
(3)bootstrap.properties文件 【application.properties是文件空的】
spring.application.name=consumer-9001

server.port=9001

#

# 当前微服务注册到eureka中(消费端),可不写 ,默认为true

#eureka.client.register-with-eureka=true

eureka.client.service-url.defaultZone=http://localhost:7001/eureka/

#

#配置中心客户端配置

#获取指定配置文件名称 ,多个则以英文符号 , 隔开,不可有空格

spring.cloud.config.name=gittest

#获取配置的策略 , 读取文件:dev开发环境、test测试、pro生产

spring.cloud.config.profile=dev

#获取配置文件的分支,默认是master。如果是是本地获取的话,则无用,

spring.cloud.config.label=master

#开启配置信息发现

spring.cloud.config.discovery.enabled=true

#指定配置中心服务端的service-id,便于扩展为高可用配置集群,不区分大小写

spring.cloud.config.discovery.serviceId=config-server-6001

#

#健康检测管理中心配置

#springboot 1.5.X 以上默认开通了安全认证,这里可加可不加,不影响

#management.security.enabled=false

#springboot 2.x 默认只开启了info、health的访问接口,*代表开启所有访问接口

management.endpoints.web.exposure.include=*

#

#

## spring cloud bus 刷新配置

##rabbitmq 服务所在ip

#使用 localhost 会出错 ,使用 127.0.0.1 则没问题

spring.rabbitmq.host=127.0.0.1

#默认端口 5672

spring.rabbitmq.port=5672

#默认账户

spring.rabbitmq.password=guest

#默认密码

spring.rabbitmq.username=guest

##

##

## 开启消息跟踪

spring.cloud.bus.trace.enabled=true
(4) controller层 【记得添加注解 @RefreshScope】
package com.example.consumer9001.controller;

import com.example.consumer9001.feignInter.FeignService1;

import org.springframework.beans.factory.annotation.Autowired;

import org.springframework.beans.factory.annotation.Value;

import org.springframework.cloud.context.config.annotation.RefreshScope;

import org.springframework.web.bind.annotation.RequestMapping;

import org.springframework.web.bind.annotation.RequestMethod;

import org.springframework.web.bind.annotation.RestController;

import java.util.Date;

@RefreshScope

@RestController

public class NameController {

    @Autowired

    private FeignService1 feignService1;

    @RequestMapping(value = "/doname", method = RequestMethod.GET)

    public String doname(String name) {

        System.out.println("接收名字=" + name + "==" + new Date());

        return "我是消费者端口9001,微服务处理结果是:" + feignService1.getname(name);

    }

    @Value("${yourname}")

    private String namestr;

    @RequestMapping(value = "/getname", method = RequestMethod.GET)

    public String getConfig() {

        String str = "我是消费者端口9001,获取远程配置文件信息:" + namestr + "===" + new Date();

        System.out.println(str);

        return str;

    }

//    http://localhost:9001/getname

}
使用了feign ,因为与bus无关 ,所以这里就不介绍了
(5) 启动类
package com.example.consumer9001;

import com.example.consumer9001.myconfig.ConfigBean;

import org.springframework.boot.SpringApplication;

import org.springframework.boot.autoconfigure.SpringBootApplication;

import org.springframework.cloud.client.discovery.EnableDiscoveryClient;

import org.springframework.cloud.netflix.eureka.EnableEurekaClient;

import org.springframework.cloud.netflix.ribbon.RibbonClient;

import org.springframework.cloud.openfeign.EnableFeignClients;

@SpringBootApplication

//服务客户端【发现服务】

@EnableEurekaClient

//@EnableDiscoveryClient ,也可以使用这个

//指定feign接口扫描范围 ,也可以不写

@EnableFeignClients(basePackages = {"com.example.consumer9001.feignInter"})

//开启客户端负载均衡自定义策略,参数name是该服务器的应用名字 ,configuration设置 策略配置类

@RibbonClient(name = "consumer-9001" ,configuration = ConfigBean.class)

public class Consumer9001Application {

    public static void main(String[] args) {

        SpringApplication.run(Consumer9001Application.class, args);

    }

}
6.其他配置
提前准备好一个端口为 7001 的 服务注册中心
7.测试
(1)运行

(2)eureka 面板信息

(3)RabbitMQ 面板信息

(4)端口 6080 访问 http://localhost:6080/getname

端口 9001 访问 http://localhost:9001/getname

(5)去GitHub仓库修改信息

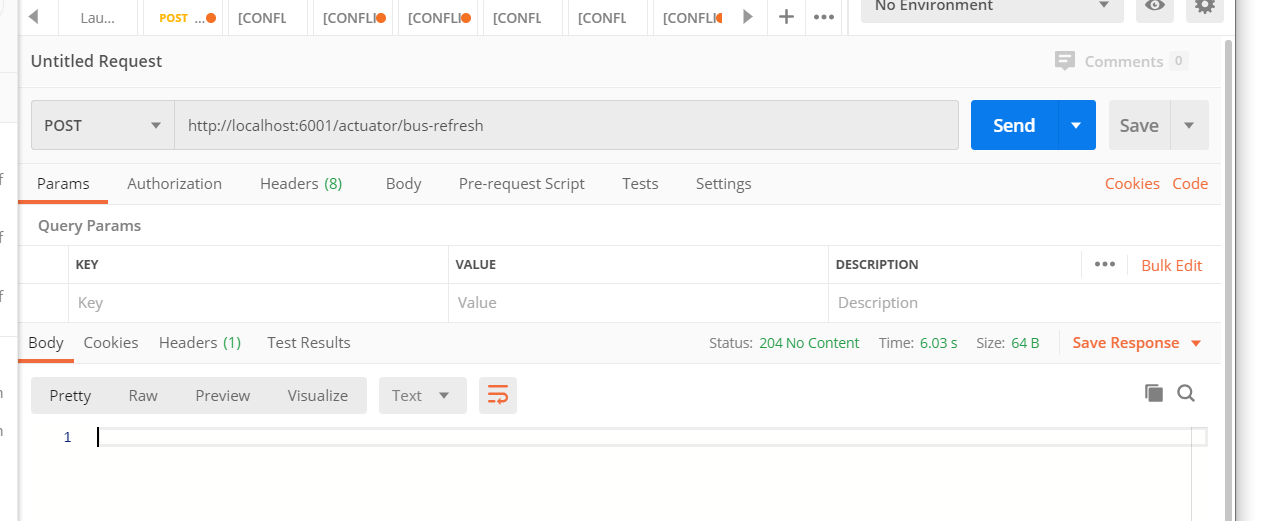
(6)现在再次访问 6080 或9001 ,发现信息没有变化 ,是因为需要手动以post方式 触发刷新接口,
【一共接入消息中间件的端口有3个 ,这三个端口只要有其中一个端口出发了 刷新请求 ,则会通过消息中间件通知其他端口刷新配置文件,因此,既可以触发配置客户端,也可以触发配置服务端,来让所有端口刷新配置文件,
为了配合微服务的专一性,因此不应该向配置客户端发送刷新请求 ,应该让配置中心专门负责关于配置的操作 ,因此应该向配置服务端发送刷新请求】
注意:在springboot2.x的版本中刷新路径为:/actuator/bus-refresh,在springboot1.5.x的版本中刷新路径为:/bus/refresh。
(7)端口 6080 访问 http://localhost:6080/getname
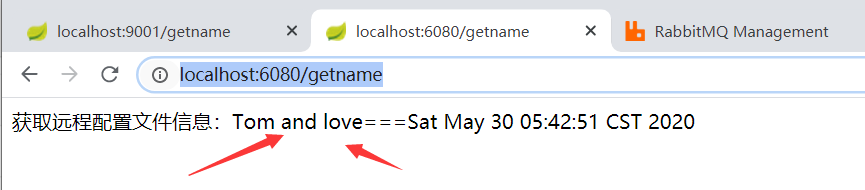
端口 9001 访问 http://localhost:9001/getname

成功 ,撒花
spring cloud bus 消息总线 动态刷新配置文件 【actuator 与 RabbitMQ配合完成】的更多相关文章
- 跟我学SpringCloud | 第八篇:Spring Cloud Bus 消息总线
SpringCloud系列教程 | 第八篇:Spring Cloud Bus 消息总线 Springboot: 2.1.6.RELEASE SpringCloud: Greenwich.SR1 如无特 ...
- Spring Cloud(十一)高可用的分布式配置中心 Spring Cloud Bus 消息总线集成(RabbitMQ)
详见:https://www.w3cschool.cn/spring_cloud/spring_cloud-jl8a2ixp.html 上一篇文章,留了一个悬念,Config Client 实现配置的 ...
- 干货|Spring Cloud Bus 消息总线介绍
继上一篇 干货|Spring Cloud Stream 体系及原理介绍 之后,本期我们来了解下 Spring Cloud 体系中的另外一个组件 Spring Cloud Bus (建议先熟悉 Spri ...
- Spring Cloud Bus 消息总线 RabbitMQ
Spring Cloud Bus将分布式系统中各节点通过轻量级消息代理连接起来. 从而实现例如广播状态改变(例如配置改变)或其他的管理指令. 目前唯一的实现是使用AMQP代理作为传输对象. Sprin ...
- Spring Cloud 2-Bus 消息总线(九)
Spring Cloud Bus 1.服务端配置 pom.xml application.yml 2.客户端配置 pom.xml application.yml Controller.java 3 ...
- Spring Cloud Stream消息总线
Springcloud 里面对于MQ的整合一个是前一篇的消息总线一个是本文介绍的消息驱动 大体要学习这么几个知识点: 课题:SpringCloud消息驱动Stream1.什么是SpringCloud消 ...
- SpringCloud之Config配置中心+BUS消息总线原理及其配置
一.配置中心作用 在常规的开发中,每个微服务都包含代码和配置.其配置包含服务配置.各类开关和业务配置.如果系统结构中的微服务节点较少,那么常规的代码+配置的开发方式足以解决问题.当系统逐步迭代,其微服 ...
- SpringCloud学习之Bus消息总线实现配置自动刷新(九)
前面两篇文章我们聊了Spring Cloud Config配置中心,当我们在更新github上面的配置以后,如果想要获取到最新的配置,需要手动刷新或者利用webhook的机制每次提交代码发送请求来刷新 ...
- 通过消息总线Spring Cloud Bus实现配置文件刷新(使用Kafka或RocketMQ)
如果需要客户端获取到最新的配置信息需要执行refresh,我们可以利用webhook的机制每次提交代码发送请求来刷新客户端,当客户端越来越多的时候,需要每个客户端都执行一遍,这种方案就不太适合了.使用 ...
随机推荐
- 【力扣】两个数组的交集 II
给定两个数组,编写一个函数来计算它们的交集. 示例 1: 输入:nums1 = [1,2,2,1], nums2 = [2,2]输出:[2,2]示例 2: 输入:nums1 = [4,9,5], nu ...
- 【Matlab】xticks/xticklabels的用法
先说一下我自己的理解,这东西就是把原来的有的标签位置换成自己的标签名称,一般都是要手动设置看物理意义. https://ww2.mathworks.cn/help/matlab/ref/xticks. ...
- 拉格朗日乘子法(Lagrange Multiplier) 和KKT条件
参考文献:https://www.cnblogs.com/sddai/p/5728195.html 在求解最优化问题中,拉格朗日乘子法(Lagrange Multiplier)和KKT(Karush ...
- 初识shellcode
以前只是知道shellcode就是一段恶意代码,直到今天学习了shellcode的知识,才发现这东西真是博大精深.同时也学习到了一些新的指令,在这里记录一下. 通常pwn题目就是为了拿到shell,目 ...
- 解决android studio no debuggable process
这个问题可能是由多种因素造成的. 一.可能是buildtypes配置或选择错误,在对应module的build.gradle中确认如下配置 debug { debuggable true//一定要配置 ...
- CF831B Keyboard Layouts 题解
Content 给你 \(26\) 个字母的映射(都是小写,大写的映射方式相同),再给你一个字符串 \(s\),求它的映射结果(如果有非字母的字符保持不变). 数据范围:\(1\leqslant |s ...
- python执行命令行调试工具pdb
调试 pdb pdb是基于命令行的调试工具,非常类似gnu的gdb(调试c/c++). 命令 简写命令 作用 break b 设置断点(用法,b <数字>:在第数字行设置断点....... ...
- Kafka Eagle分布式模式
1.概述 最近有同学留言,Kafka Eagle的分布式模式功能怎么使用,如何部署安装?今天笔者就为大家来详细介绍一下Kafka Eagle的分布式模式功能的安装和使用. 2.内容 首先,这里我们需要 ...
- 【九度OJ】题目1017:还是畅通工程 解题报告
[九度OJ]题目1017:还是畅通工程 解题报告 标签(空格分隔): 九度OJ 原题地址:http://ac.jobdu.com/problem.php?pid=1017 题目描述: 某省调查乡村交通 ...
- 【LeetCode】210. Course Schedule II 解题报告(Python)
作者: 负雪明烛 id: fuxuemingzhu 个人博客: http://fuxuemingzhu.cn/ 目录 题目描述 题目大意 解题方法 拓扑排序,BFS 拓扑排序,DFS 参考资料 日期 ...